10.8 Create a Security Lockdown Policy
Sensitive data should be accessible on a “need to know” basis, meaning that only a limited set of individuals, based on their roles, should have access to this sensitive data. Furthermore, Data Owners, those most familiar with the sensitivity of the data and who should have access to it, should be empowered to be the ultimate decision makers.
Once you have established the proper access permissions for a High-Value Target, you can establish the baseline of access permissions for the High-Value Target that will be strictly enforced through a Lockdown policy. When unauthorized access permission changes are made to the High-Value Target, the new permissions are removed and the permissions specified in the Lockdown policy are restored.
10.8.1 Creating a Security Lockdown Policy
-
In the Admin Client, click the tab.
-
Click .
-
Select > .

-
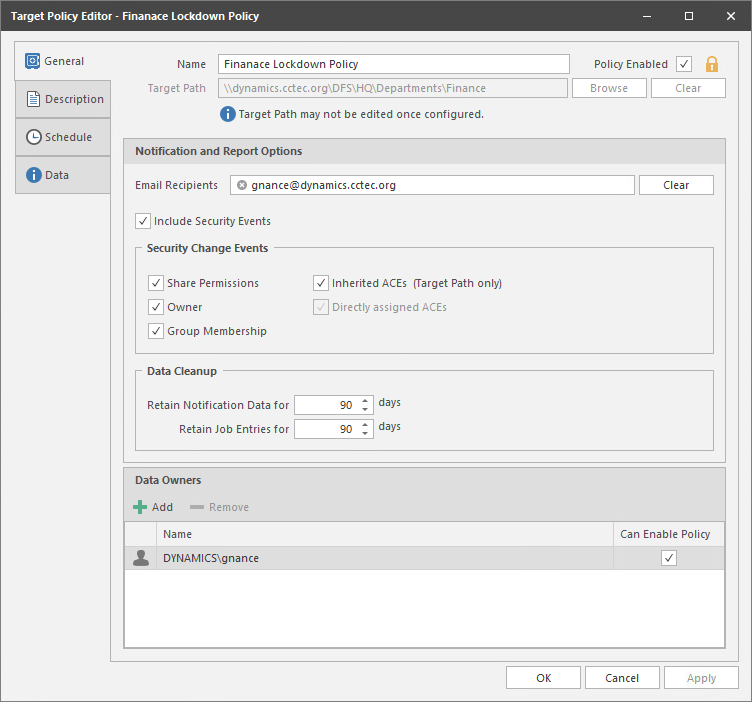
In the field, give the Security Lockdown policy a descriptive name.
For example, HQ Finance Lockdown Policy.
-
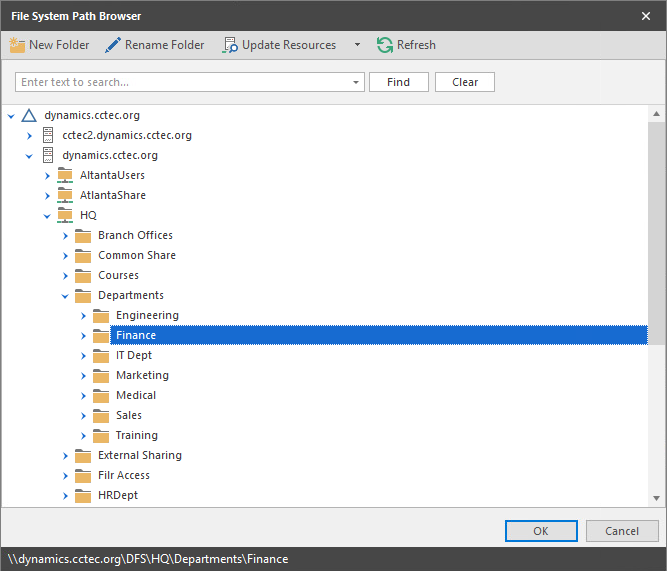
Click the button pertaining to the Target Path field and specify the share or folder for this policy.
-
(Conditional) If the currently established access permissions to the specified High-Value Target are the permissions you want enforced, select the check box.
Otherwise, come back and select the check box after you have updated the access permissions to the High-Value Target.
Once this option is selected, this becomes the baseline for comparison for all Security Scans.
-
In the field, specify the email addresses of each user you want notified when access permissions to the selected folder or share take place.
Email addresses can be separated by a comma, semicolon, or a space.
File Dynamics only reports on the changes in permissions between one scan and the next. Therefore, if there are no changes in access permissions between scans, no notifications will be emailed.
-
In the region, specify the event types for which this policy will email notifications.
-
In the region, specify how long you want scan job information to remain in the database.
For more information, see Security Lockdown Policy.
-
In the region, click to specify the users or groups that will serve as Data Owners for this policy.
Data Owners assigned for a Security Lockdown policy will be enabled to view changes in access permissions in the security reports via the Data Owner Client.
-
(Conditional) If you want the specified Data Owners to be able to enable the policy, select the check box.
When a Data Owner can enable a policy, he or she can enable or disable the policy. An example of when this might be helpful is when the access permissions for the High-Value Target need to be updated.
If a Data Owner disables and then enables a policy, the Data Owner is given the option to rebuild the baseline.
-
Click the tab and in the field, specify any information you want to include pertaining to this policy.
-
Click .
-
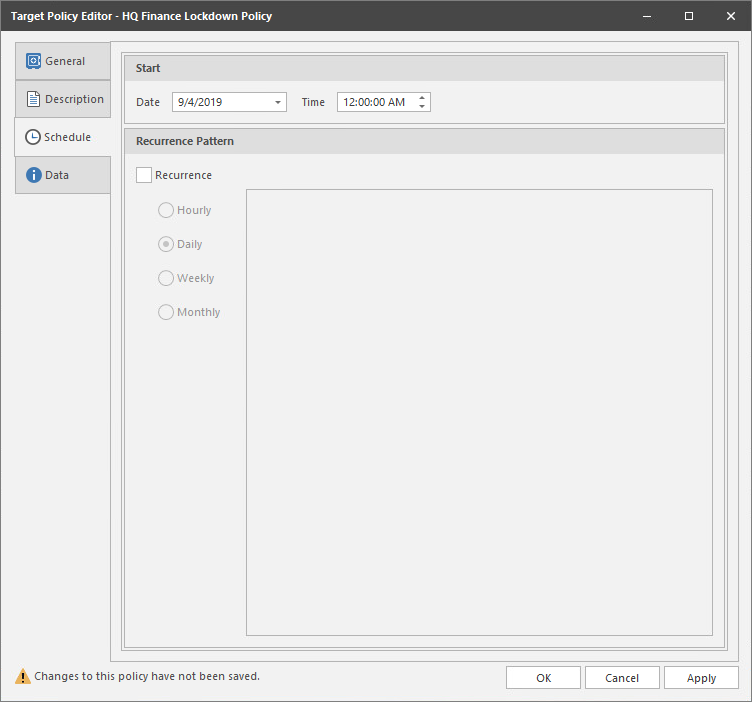
In the field, specify the date you want the policy to be initially invoked.
-
In the field, specify the time you want the policy to be initially invoked.
-
(Conditional) If you want the policy to run on a recurrent basis, select the check box and then select one of the options.
-
Click to save the schedule.
-
Click .
10.8.2 Editing a Security Lockdown Policy and Resetting the Baseline
There might be times when you need to adjust the permissions assignments for a High-Value Target that is locked down through a Security Lockdown policy.
-
In the Admin Client, click the tab.
-
Click .
-
From the list of policies, double-click the Security Lockdown policy you want to edit.
-
Deselect the check box.
-
Click .
In the policy list, note the new warning icon indicating that the policy you are editing is now disabled.
-
In the network file system, make any needed security changes.
-
From the list of policies, double-click the Security Lockdown policy you disabled previously.
-
Select the check box.
-
Click .
-
From the drop-down menu, select .
-
From the drop-down menu, select .
This creates the new baseline.