12.3 Target Driven Tab
The tab is the means of enabling and establishing Target-Driven policies.
12.3.1 Policies
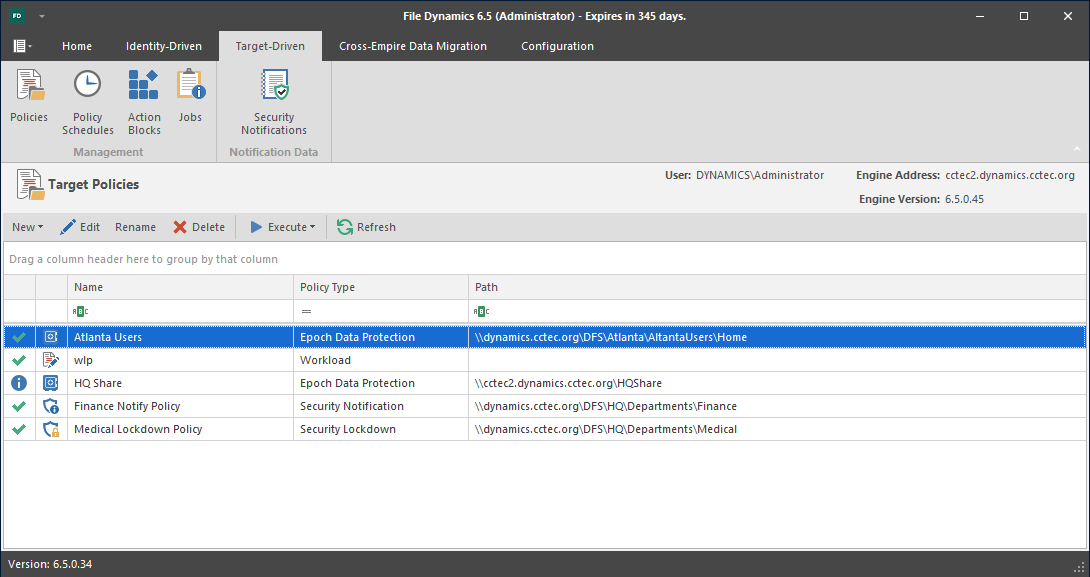
All Target-Driven policies in File Dynamics are managed through this page.
Figure 12-39 Target-Driven Policies Page
NOTE:For procedures on creating and managing Target-Driven policies, refer to Creating Target-Driven Policies.
Left Pane: This region displays all Target-Driven policies according to classification. If you click a classification such as , only Copy policies will be listed in the Right Pane. If you click a named Target-Driven policy such as , the policy settings appear in the Right Pane.
You can right-click listed policies and policy classifications in the Left Pane to create new policies, delete policies, and execute policies.
Right Pane: Depending on what is selected in the Left Pane, this region either lists specific Target-Driven policies, or displays the policy settings for a selected Target-Driven policy.
Manage: Use this menu to create, delete, or execute Target-Driven policies.
Refresh: Updates the list of Target-Driven policies.
Copy Policy
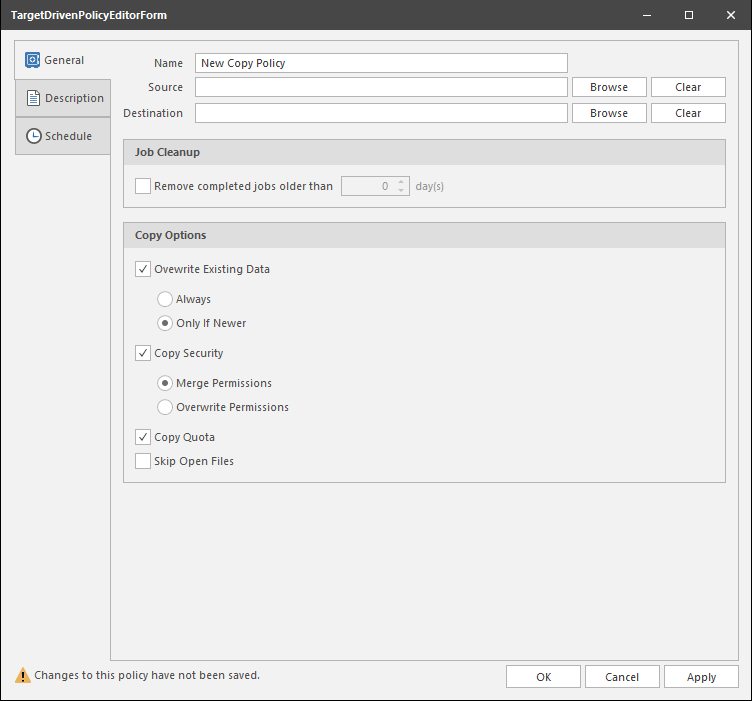
A discussion of fields and settings specific to a Copy policy follows.
Figure 12-40 Copy Policy Page
General Tab
Name: Use this field to specify a name for the Copy policy.
Source: Displays the location in the file system from where the files will be copied.
Destination: Displays the location in the file system where all copied files for this policy will be relocated.
Remove completed jobs older than: Lets you specify the number of days that a Copy task from this policy is listed on the Jobs list before it is purged.
Overwrite Existing Data: With the default setting, File Dynamics will overwrite an existing file on the target destination only if the same file from the source location is newer. You can adjust this setting to your preferences.
Copy Security: When selected, this maintains the file permissions from the source location to the destination location.
Copy Quota: If the destination supports quota management, it will maintain the disk quota settings from the source location to the destination location.
Skip Open Files: Skips all of the files that are opened from the source folder.
With Copy policies, File Dynamics does not attempt to copy skipped files later. You might want to therefore schedule the policy to run during a time when users are logged out. For procedures on scheduling a Copy policy to run, see Section 10.3, Create a Copy Policy.
Description Tab
The box indicates when the policy was created. It also lets you write notes pertaining to the policy. The box allows up to 255 characters.
Schedule Tab
Displays the schedule for the Copy policy.
NOTE:For procedures on scheduling a Copy policy, see Section 10.3, Create a Copy Policy.
Move Policy
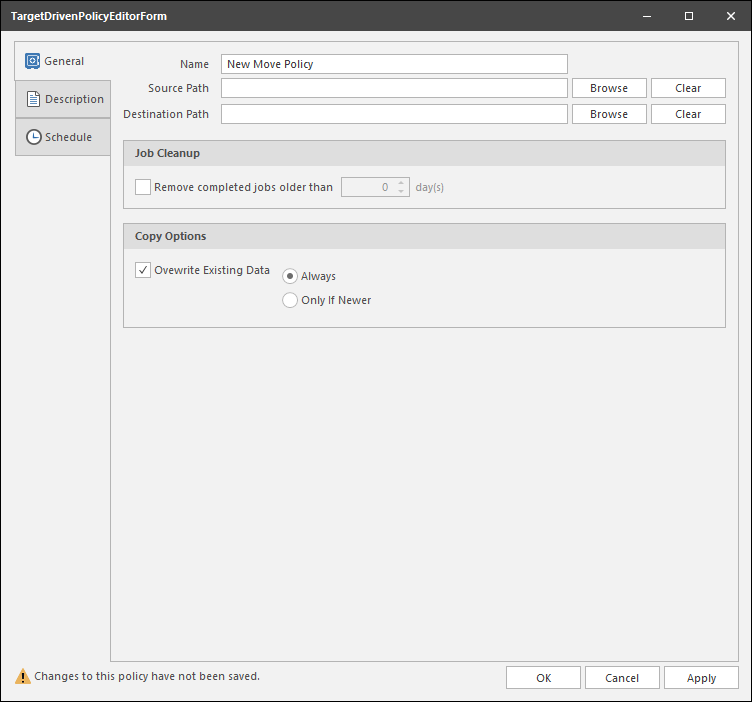
A discussion of fields and settings specific to a Move policy follows.
Figure 12-41 Move Policy Page
General Tab
Name: Use this field to specify a name for the Move policy.
Source Path: Displays the location in the file system from where the files will be moved.
Destination Path: Displays the location in the file system where all moved files for this policy will be relocated.
Remove completed jobs older than: Lets you specify the number of days that a Move task from this policy is listed on the Jobs list before it is purged.
Overwrite Existing Data: With the default setting, File Dynamics will overwrite an existing file on the target destination only if the same file from the source location is newer. You can adjust this setting to your preferences.
Description Tab
The box indicates when the policy was created. It also lets you write notes pertaining to the policy. The box allows up to 255 characters.
Schedule Tab
Displays the schedule for the Move policy.
NOTE:For procedures on scheduling a Move policy, see Section 10.4, Create a Move Policy.
Groom Policy
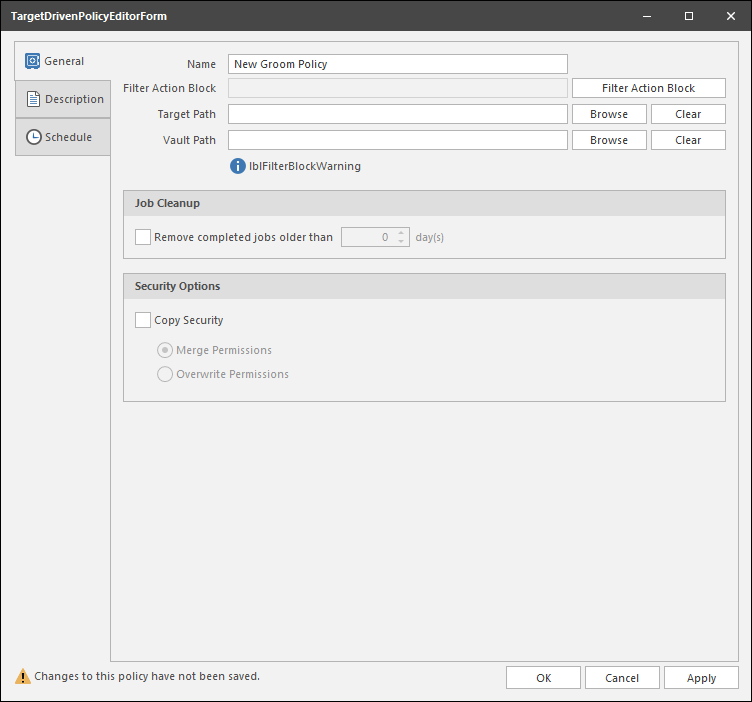
A discussion of fields and settings specific to a Groom policy follows.
Figure 12-42 Groom Policy Page
General Tab
Name: Use this field to specify a name for the Groom policy.
Filter Action Block (field): Specifies the name of the Filter Action Block with the groom rule specifications for this policy.
Filter Action Block (button): Clicking this button brings up the Action Block Selector dialog box where you can select from all available Groom Rule Action Blocks.
Target Path: Displays the location in the file system where files will be groomed.
Vault Path: Displays the location in the file system where all groomed files for this policy will be relocated.
Remove completed jobs older than: Lets you specify the number of days that a Groom task from this policy is listed on the Jobs list before it is purged.
Copy Security: Selecting this check box will allow users to access groomed files from the new vault location.
-
Merge Permissions: Merges permissions from the source to the target if the target contains permissions that are not present in the source. This applies to all folders and files in the source folder structure.
-
Overwrite Permissions: Overwrites permissions in the target with those found in the source. This applies to all folders and files in the target folder structure.
Description Tab
The box indicates when the policy was created. It also lets you write notes pertaining to the policy. The box allows up to 255 characters.
Schedule Tab
Displays the schedule for the Groom policy.
NOTE:For procedures on scheduling a Groom policy, see Section 10.2, Create a Groom Policy.
Epoch Policy
A discussion of fields and settings specific to an Epoch Data Protection policy follows.
Figure 12-43 Epoch Data Protection Policy Page
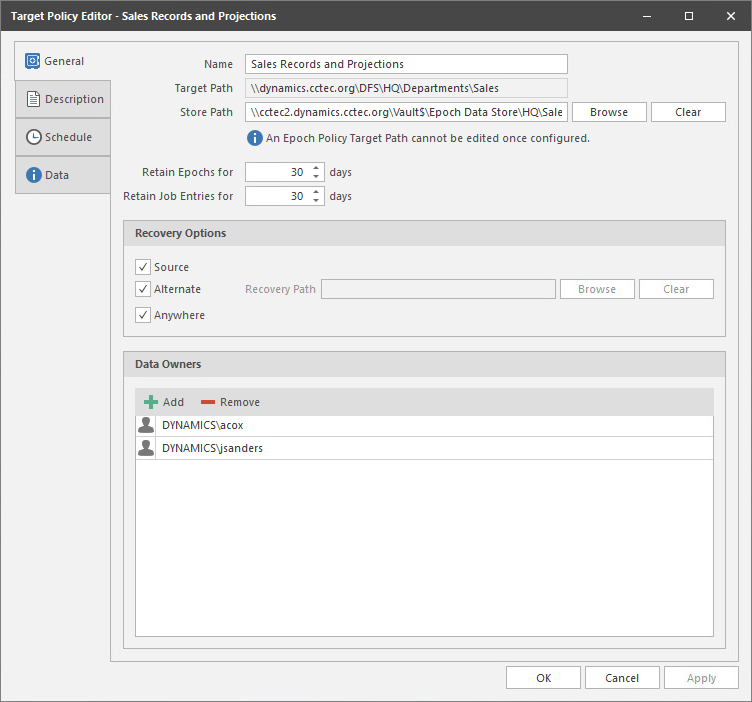
General Tab
Name: Use this field to specify a name for the Epoch Data Protection policy.
Target Path: Displays the High-Value Target in the file system from where you will be archiving files for this policy.
Store Path: Specifies the nearline storage location in the file system where archived files from High-Value Targets are to be stored for this policy.
Retain Epochs for: Specifies the number of days that an Epoch will be saved before it is purged.
Retain Job Entries for: Specifies the number of days that a job will be listed on the Target Policy Jobs page before it is removed.
Recovery Options: Specifications for where recovered files can be placed by the Data Owner on the network.
Source: Specifies that recovered files will be placed back in the location where the files are or were originally.
Alternate: Lets you specify an alternate location for placing recovered files. Once you check the check box, a text box and associated button appear so that you can enter or browse to the alternate path.
Anywhere: Lets you place recovered files anywhere that the user of the Data Owner Client can browse to.
Recovery Path: If the Anywhere check box is deselected, you can use the Browse button to specify a recovery path in this field.
Data Owners: Use this region to specify the Data Owner for this policy.
A Data Owner is a network user that has been designated and enabled to view Epochs, recover files from File Stores, and be notified of data access security issues.
Description Tab
The box indicates when the policy was created. It also lets you write notes pertaining to the policy. The box allows up to 255 characters.
Schedule Tab
Displays the schedule for the Epoch Data Protection policy.
NOTE:For procedures on scheduling an Epoch Data Protection policy, see Section 10.5, Create an Epoch Data Protection Policy.
Data Tab
This page displays the properties of the CouchDB database.
Security Notification Policy
A discussion of fields and settings specific to a Security Notification policy follows.
Figure 12-44 Security Notification Policy Page
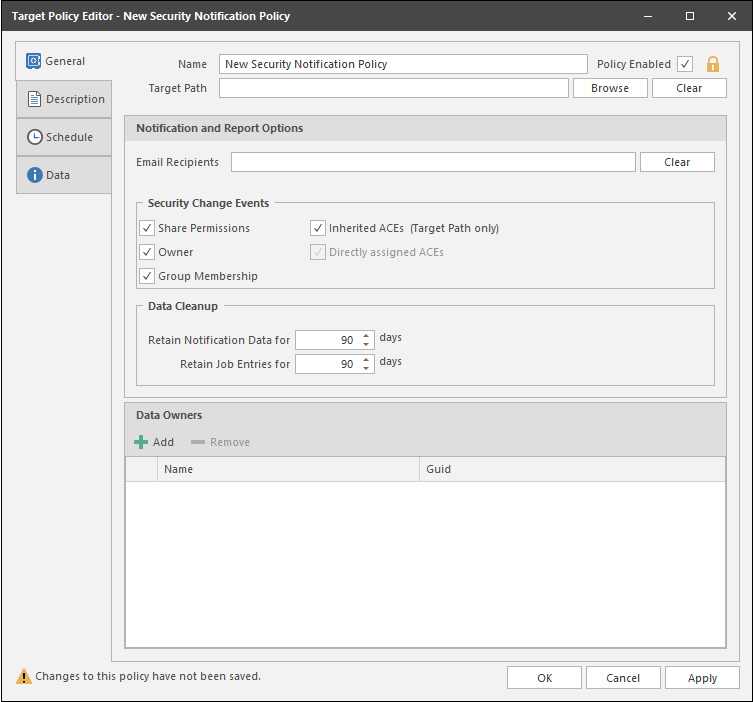
General Tab
Name: Use this field to specify a name for the Security Notification policy.
Target Path: Indicates the folder or share that will be analyzed for access permission changes.
Browse: Click to access the File System Browser where you can select the folder or share for the Security Notification policy.
Clear: Click to clear the path specified in the field.
Email Recipients: Specify the email addresses of each user you want notified when access permissions to the selected folder or share are changed. Email addresses can be separated by a comma, semicolon, or a space.
Clear: Click to clear the email addresses specified in the field.
Security Change Events: This region displays options for notifications. For example, if the check box were selected, data owners would be notified whenever there was a change to a group that has access to the High-Value Target specified in the field.
Data Cleanup: Options for specifying how long you want scan job information to remain in the database.
Retain Notification Data for: Lets you specify how long the Security Notification data will remain in the database.
Retain Job Entries for: Lets you specify how long you want scan job information to remain in the database. If you do not select the check box, the scan job stays in the database indefinitely.
Data Owners: This region lets you specify the data owners for the High-Value Target displayed in the field. The data owners will receive security notifications based on changes to the selected options in the region.
Description Tab
The box indicates when the policy was created. It also lets you write notes pertaining to the policy. The box allows up to 255 characters.
Schedule Tab
Displays the schedule for the Security Notification policy.
Data Tab
This page displays the properties of the CouchDB database.
Security Lockdown Policy
A discussion of fields and settings specific to a Security Lockdown policy follows.
Figure 12-45 Security Lockdown Policy Page

General Tab
Name: Use this field to specify a name for the Security Lockdown policy.
Policy Enabled: Once the access permissions to the specified High-Value Target are the permissions you want enforced, select this check box to enable the policy. Otherwise, come back and select the check box after you have updated the access permissions to the High-Value Target.
Target Path: Indicates the folder or share that will be analyzed for access permission changes.
Notification and Report Options: This region includes the settings specific to who is notified, what is reported, and how long the report information remains accessible.
Email Recipients: Specify the email addresses of each user you want notified when access permissions to the selected folder are changed (and subsequently reverted back through the Lockdown policy). Email addresses can be separated by a comma, semicolon, or a space.
Include Security Events: When this check box is selected, all specified recipients listed in the field will also receive security notifications according to the options selected in the region. Deselecting this option limits the notifications to only changes in access permissions to the High-Value Target (and subsequently reverted via the Lockdown policy).
Security Change Events: This region displays options for notifications. For example, if the check box were selected, data owners would be notified whenever there was a change to a group that has access to the High-Value Target specified in the field.
Data Cleanup: Options for specifying how long you want scan job information to remain in the database.
Retain Notification Data for: Lets you specify how long the Security Lockdown data will remain in the database.
Retain Job Entries for: Lets you specify how long you want scan job information to remain in the database. If you do not select the check box, the scan job stays in the database indefinitely.
Data Owners: This region lets you specify the data owners for the High-Value Target displayed in the field.
Can Enable Policy: Select this option if you want the selected data owner to be able to enable the Lockdown policy
Description Tab
The box indicates when the policy was created. It also lets you write notes pertaining to the policy. The box allows up to 255 characters.
Schedule Tab
Displays the schedule for the Security Lockdown policy.
Data Tab
This page displays the properties of the CouchDB database.
Security Fencing Policy
A discussion of fields and settings specific to a Security Fencing policy follows.
Figure 12-46 Security Fencing Policy Page
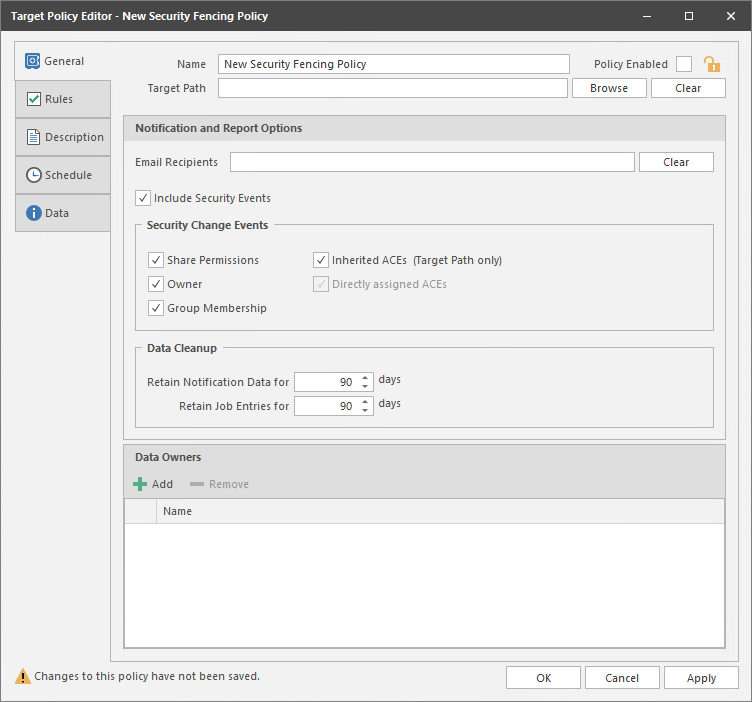
General Tab
Name: Use this field to specify a name for the Security Fencing policy.
Policy Enabled: Once the access permissions to the specified High-Value Target are the permissions you want enforced, select this check box to enable the policy. Otherwise, come back and select the check box after you have updated the access permissions to the High-Value Target.
Target Path: Indicates the folder or share that will be analyzed for access permission changes.
Notification and Report Options: This region includes the settings specific to who is notified, what is reported, and how long the report information remains accessible.
Email Recipients: Specify the email addresses of each user you want notified when access permissions to the selected folder are changed. Email addresses can be separated by a comma, semicolon, or a space.
Include Security Events: When this check box is selected, all specified recipients listed in the field will also receive security notifications according to the options selected in the region. Deselecting this option limits the notifications to only changes in access permissions to the High-Value Target.
Security Change Events: This region displays options for notifications. For example, if the check box were selected, data owners would be notified whenever there was a change to a group that has access to the High-Value Target specified in the field.
Data Cleanup: Options for specifying how long you want scan job information to remain in the database.
Retain Notification Data for: Lets you specify how long the Security Fencing data will remain in the database.
Retain Job Entries for: Lets you specify how long you want scan job information to remain in the database. If you do not select the check box, the scan job stays in the database indefinitely.
Data Owners: This region lets you specify the data owners for the High-Value Target displayed in the field.
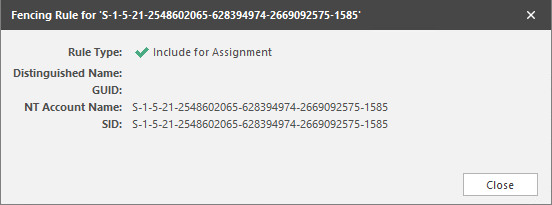
Rules Tab
On this page, you specify the policy’s “fence” for inclusion and exclusion. A Security Fencing policy can be very detailed in its inclusion and exclusions. For example, you can include an Active Directory container, but exclude a group within the container. Additionally, your list for inclusion or exclusion can specify unresolved or well-known SIDs. In many cases, you will need to include unresolved or well-known SIDs, or the policy will prevent access for those SIDs.
HINT:You can access a list of Windows well-known SIDs here..
Figure 12-47 Security Fencing Policy Rules Page
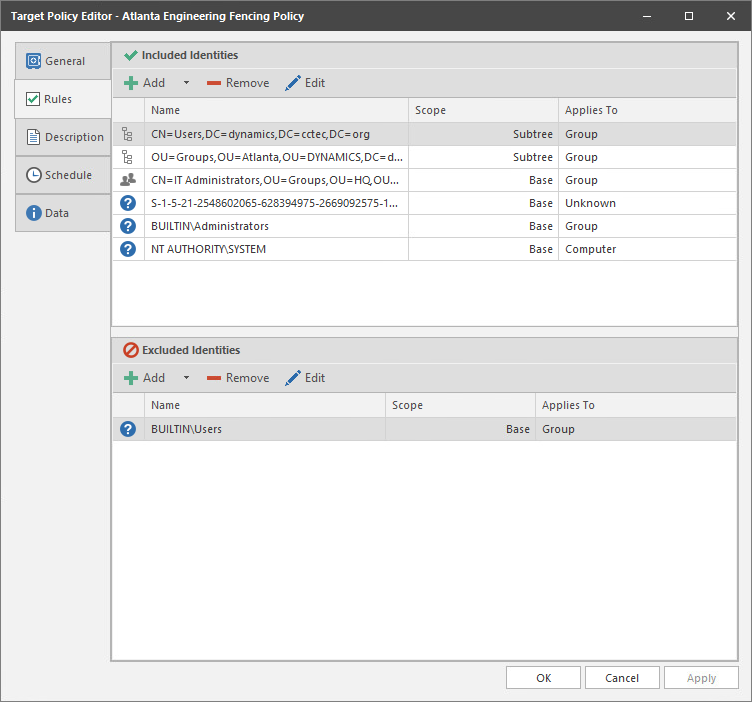
In Figure 12-47, the list displays containers, groups, well-known and unresolved SIDs.
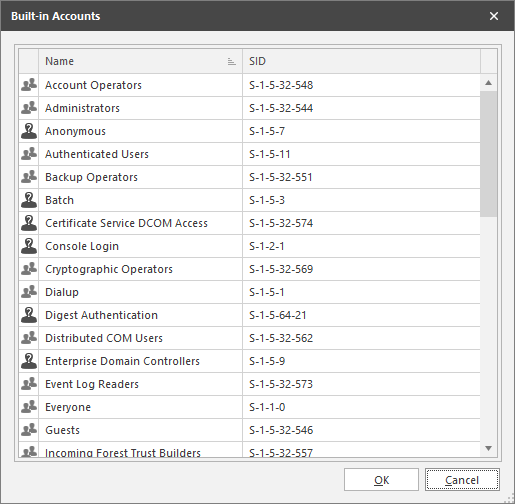
To Add or Exclude a Well-Known SID as a Built-in Account
-
In the or region, from the drop-down menu, select .
-
Hold down the Control key and select the Built-in SIDs.
-
Click .
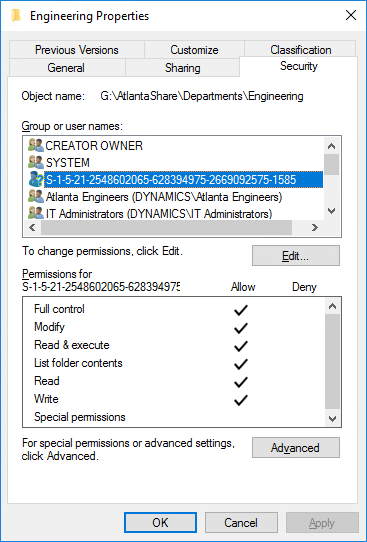
To Add or Exclude an Unknown SID
-
In the or region, from the drop-down menu, select .

-
Refer to the unresolved SID listed on the tab of the Properties dialog box.
-
In the field of the Security Identifier Selector dialog box, enter the SID in SDDL format and click .
-
Click .
Included Identities: Use to display, add, and remove objects for inclusion in the Security Fencing policy.
Excluded Identities: Use to display, add, and remove for exclusion in the Security Fencing policy.
Description Tab
The box indicates when the policy was created. It also lets you write notes pertaining to the policy. The box allows up to 255 characters.
Schedule Tab
Displays the schedule for the Security Fencing policy.
Data Tab
This page displays the properties of the CouchDB database.
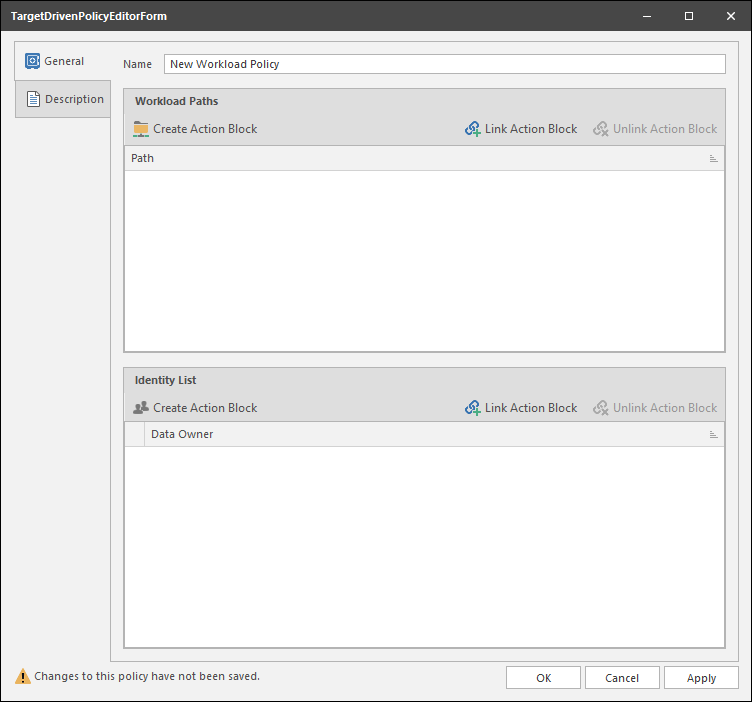
Workload Policy
A discussion of fields and settings specific to a Workload policy follows.
Figure 12-48 Workload Policy Page
General Tab
Name: Use this field to specify a name for the Workload policy.
Workload Paths: This region displays the Workload path for this policy, as well as provides the means of linking, unlinking, and viewing Action Blocks pertaining to the path.
Paths: Displays the selected Action Block for this Workload policy.
Link Action Block: Lets you specify an Action Block for this policy.
Unlink Action Block: Removes a selected Action Block from the list.
Action Block Editor Link: Located in the upper right-hand corner of the region, clicking this opens the Action Block Editor dialog box and lets you add new Workload paths.
Identity List: This region displays the Data Owners for the policy, as well as provides the means of linking, unlinking, and viewing Data Owners pertaining to the Workload policy.
Data Owner: Displays the Data Owners for this policy.
Link Action Block: Lets you specify an Action Block for this policy. This will display the Data Owners specified in the Action Block.
Unlink Action Block: Removes the listed Data Owners.
Data Owners Link: Located in the upper right-hand corner of the Identity List region, clicking this opens the Action Block Editor dialog box where you can edit the list of Data Owners for this policy.
Description Tab
The box indicates when the policy was created. It also lets you write notes pertaining to the policy. The box allows up to 255 characters.
12.3.2 Policy Schedules
Use this page to view and schedule all Target-Driven policy schedules.
Figure 12-49 Schedule Page

Left Pane: This region displays all Target-Driven policies according to classification. If you click a classification such as , only scheduled Groom policies will be displayed on the calendar in the Middle Pane. If you click a named Target-Driven policy such as , the schedule for that policy appears in the calendar of the Middle Pane.
You can right-click a listed policy in the Left Pane to create new schedules, edit, schedules, and delete schedules.
A search field at the top of the Left Pane lets you search for policies by name.
Middle Pane: This calendar displays scheduled Target-Driven policy actions. You can display the calendar as a single day, 5-day week, 7-day week, or as a month using the calendar number icons above the Middle Pane.
The icons above the Middle Pane also allow you to edit the schedule, move through the calendar, zoom in or out, group scheduled tasks, and change the time scales and captions.
Right Pane: This region displays a monthly calendar for the current and next month, which you can change using the arrows. Clicking a date adjusts the calendar in the Middle Pane to the selected date.
NOTE:For procedures on scheduling a Target-Driven policy, see Section 10.0, Creating Target-Driven Policies.
12.3.4 Jobs
This page provides details on all Target-Driven jobs that have taken place or are pending.
Figure 12-50 Jobs Page
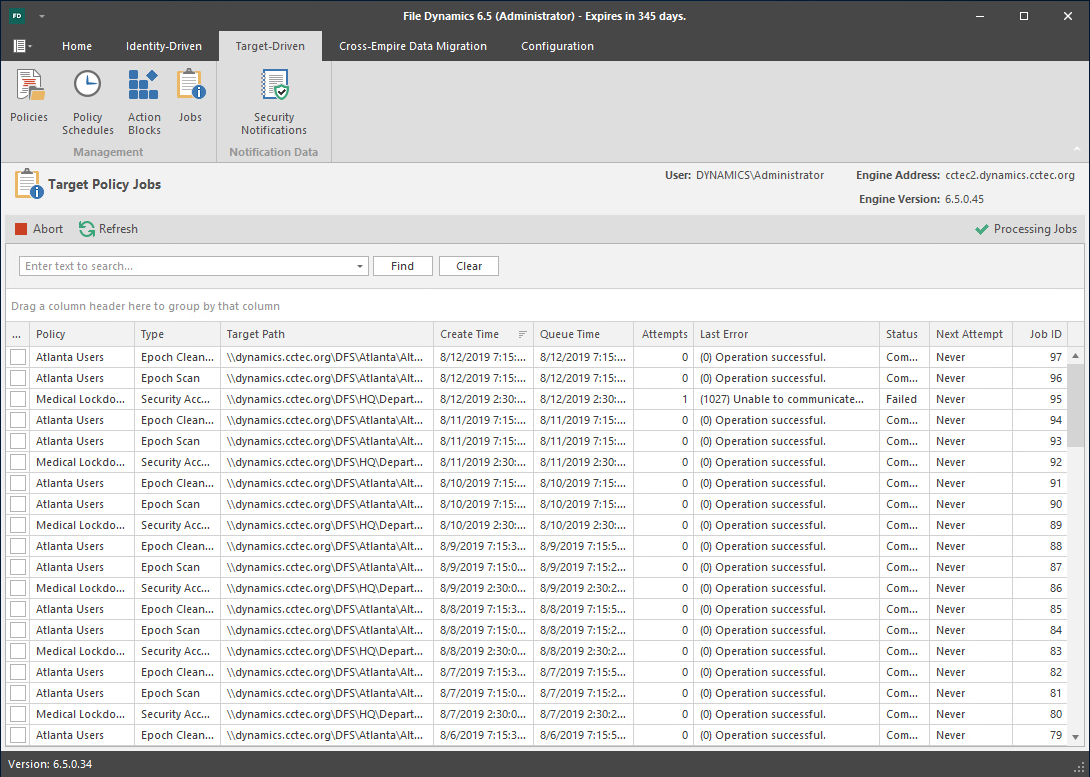
The page lists completed and pending jobs. You can maximize the list by clicking the icon in the upper right corner of the region.
12.3.5 Security Notifications
This page provides a graphical summary of changes in security access permissions and group memberships for High-Value Targets managed through security policies. Using the information you ascertain from the graphs, you can in-turn run a Detail Report to view the details of the changes.
Figure 12-51 Security Notifications Page
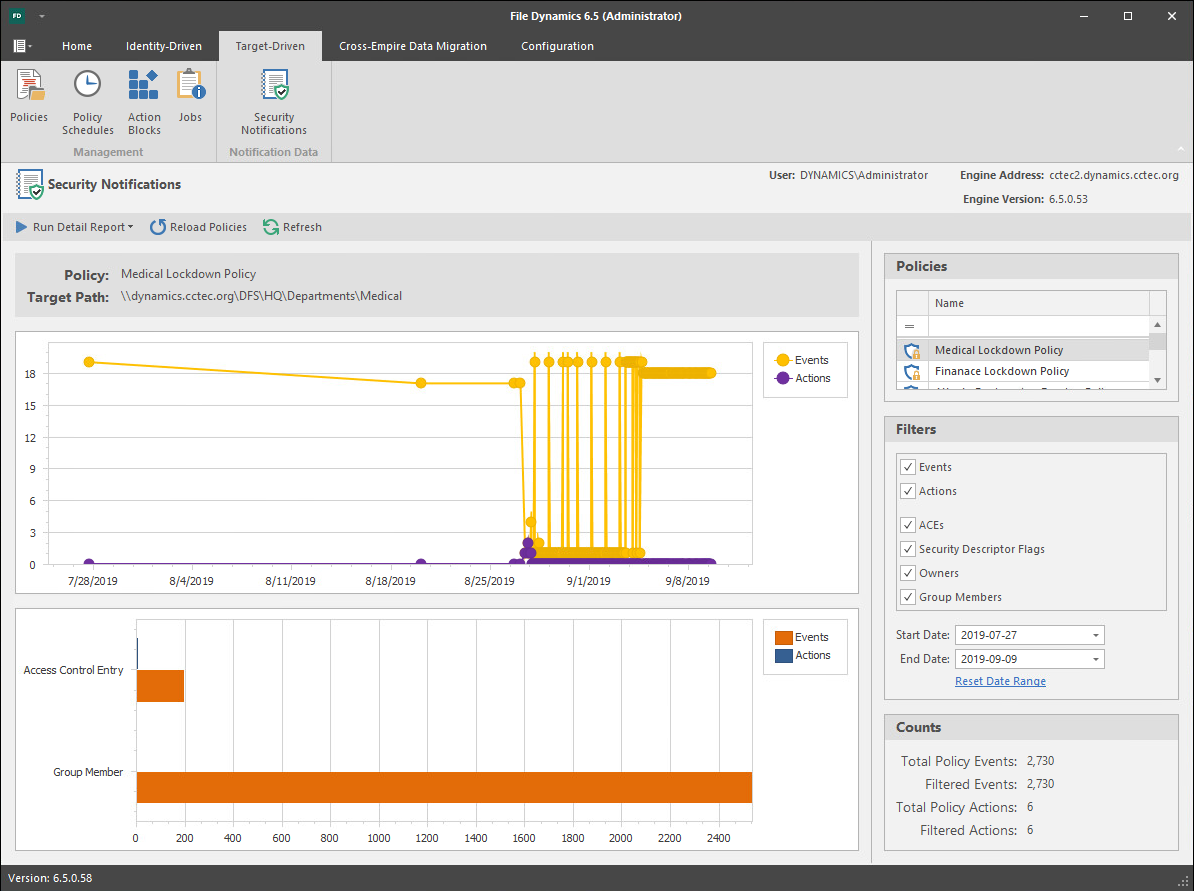
Run Detail Report: This drop-down menu is the means of generating detail reports for either file system events or group membership events. Reports are generated according to the selected policy, filter settings, and date range settings located on the right-hand portion of the page.
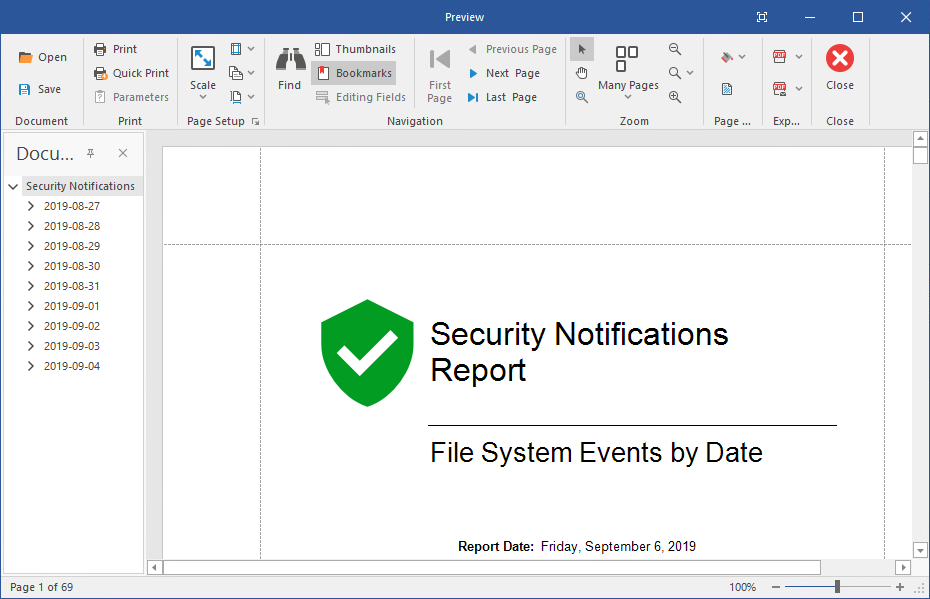
Reports are first generated in preview mode, where they can then be saved in a number of different format types.
Figure 12-52 Sample File Systems Event Report
Reload Policies: Adds to the list of policies, any new security policies that have been created since the Security Notification page was opened.
Refresh: Refreshes the Security Notifications page.
Upper Graph: According to the specifications on the right-hand side of the page, displays a graph of the number of events and actions in a timeline from the first security scan, to the most recent. Placing the pointer on lines of the graph provides additional numerical information.
Lower Graph: According to the specifications on the right-hand side of the page, displays a graph of the totals for the specified data range.
Policies: Select from this list to display the policy-specific data in the graphs and in the Detail Report.
Filters: Lets you specify what criteria and date range to include in the graphs and in the Detail report.
Counts: Based on the selected policy, criteria, and date range, displays the total count of policy events, filtered events, policy actions, and filtered actions.