12.1 Enabling Users to Share
12.1.2 General Order for Setting Up Sharing
When you set up sharing for your Filr site, complete the necessary steps in the following order:
-
Set up sharing for the entire Filr site (as described in Enabling Sharing in Filr).
-
Configure sharing for individual users (as described in Restricting Personal Storage Sharing).
After you have enabled sharing for the entire Filr system, you can fine-tune share rights throughout the site on the user level.
For example, if you want only a few groups of users to be allowed to share with external users, you first need to enable sharing to external users at the site level. After you have enabled it at the site level, you can then remove this ability from the users who you do not want to have this ability.
-
Set up sharing for specific Net Folders (as described in Enabling Sharing for Specific Net Folders).
Users who are given share rights on a specific Net Folder are able to share files within that Net Folder that they have rights to at least view on the file system.
Enabling Sharing in Filr
After you set up sharing for the entire Filr site, all users by default are granted rights to share files in the My Files area (this includes files in the Home folder and files in personal storage), with the site-wide access rights that you specify. If you want only certain users to be allowed to share files from their My Files area, you must enable sharing for the entire site as described in this section. Then you must restrict sharing privileges at the user level, as described in Restricting Personal Storage Sharing.
-
Log in to the Filr site as the Filr administrator.
-
Launch a web browser.
-
Specify one of the following URLs, depending on whether you are using a secure SSL connection:
http://Filr_hostname:8080
https://Filr_hostname:8443
Replace Filr_hostname with the hostname or fully qualified domain name of the Filr server that you have set up in DNS.
Depending on how you have configured your Filr system, you might not be required to enter the port number in the URL. If you are using NetIQ Access Manager, the Filr login screen is not used.
-
-
Click the link in the upper-right corner of the page, then click the icon
 .
.
-
Under , click .
The Share Settings page is displayed.
-
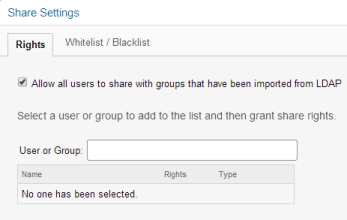
Select to enable users to share with LDAP groups.
If you select this option, groups that were imported from the LDAP directory are displayed in the field when users are sharing an item (as described in
Sharing Files and Folders
in the Filr 3.4: User Access Guide). All users in the LDAP group then have access to the item that was shared.
Enabling Users and Groups for Net Folder Sharing
-
To enable sharing for all internal users on the Filr site, go to the field, begin typing All Internal Users, then select it when it appears in the drop-down list.
or
To enable sharing on a per-user or per-group basis, go to the field, begin typing the name of the user or group for whom you want to grant share rights, then select the name when it appears in the drop-down list.
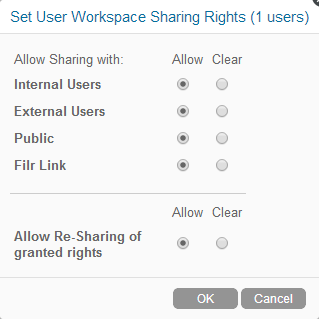
The Edit Share Rights dialog box is displayed. Select from the following options:
Re-share items: When users share a file or folder, they can give the users they are sharing with the ability to re-share the file or folder. The user receiving the share can share the file only if that user has been given administrative rights to share the file or folder.
IMPORTANT:When selecting this option, be aware that if one user's access rights to an item are removed, it does not remove the access rights of the user with whom the item was re-shared.
For example, suppose User A shares an item with User B and grants re-share rights. User B then shares the item with User C. If User A revokes User B's access rights to the item, User C continues to have access to the shared item.
Share with Internal users: Allows users to share items with internal users.
Share with “All Internal Users” group: Allows users to perform a mass share to all internal users by sharing with the All Internal Users group.
Share with External users: Allows users to share items with users external to the organization.
Users external to the organization receive an email notification with a link to the shared item, and they can then log in to the Filr site. For more information, see
Sharing with People Outside Your Organization
in the Filr 3.4: User Access Guide.Share with Public: Allows users to make items publicly available. This means that anyone with the correct URL to the shared item can access the shared item without logging in to the Filr site.
In addition to selecting this option, you also need to enable Guest access to the Filr site if you want to allow users to share items with the public. For information about how to enable Guest access to the Filr site, see
Share using File Link: Allows users to share a link to a file in Filr. Any user with the link can then access the file. However, the file is not displayed in the Public area, so users must have direct access to the link in order to access the file.
NOTE:If you select this option, users can share a link of the Filr file even with email addresses that are listed in the field.
For more information about File Links, see
Distributing a Link to a File
in the Filr 3.4: User Access Guide. -
(Optional) Click the tab to configure which email addresses and domains users can share with when sharing externally.
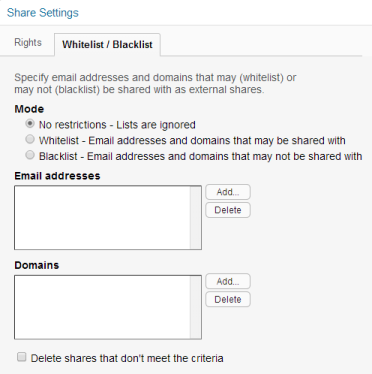
The following options are available when configuring a whitelist or blacklist for sharing:
No restrictions: Select this option to disregard any email addresses or domains that might already exist in the and fields. Selecting this option means that users can share with any email address.
Whitelist: Select this option to allow sharing only with email addresses and domains that have been specified in the and fields.
Email addresses: Click , specify the email address that you want to add to the whitelist or blacklist, then click .
Blacklist: Select this option to disallow sharing with any email addresses and domains that have been specified in the and fields.
Repeat this process to add multiple email address.
NOTE:If a user has rights, the user can share links of Filr files even with the blacklisted email addresses.
Domains: Click Add, specify the domain that you want to add to the whitelist or blacklist (for example, yahoo.com), then click .
Repeat this process to add multiple domains.
Delete shares that don’t meet the criteria: Select this option to delete all existing shares in the Filr system that do not match the criteria you set.
For example, if you selected and then specified in the field, selecting this option would delete all Filr shares made to Yahoo email addresses.
-
Click .
Restricting Personal Storage Sharing
After you have enabled sharing of files for the entire Filr system (as described in Enabling Sharing in Filr), you can restrict shared-access right granting on an individual-user basis.
You cannot grant individual users more rights than are currently defined for the site-wide setting.
To restrict share rights for specific users:
-
Log in to the Filr site as the Filr administrator.
-
Launch a web browser.
-
Specify one of the following URLs, depending on whether you are using a secure SSL connection:
http://Filr_hostname:8080
https://Filr_hostname:8443
Replace Filr_hostname with the hostname or fully qualified domain name of the Filr server that you have set up in DNS.
Depending on how you have configured your Filr system, you might not be required to enter the port number in the URL. If you are using NetIQ Access Manager, the Filr login screen is not used.
-
-
Click the link in the upper-right corner of the page, then click the icon
.
-
Under , click .
-
Select the users whose sharing rights you want to manage, then click > .
-
Select the radio button in the column next to the sharing right that you want to remove from the user or group, then click .
or
If you have already removed a share right and you want to add it again, select the radio button in the column next to the sharing right that you want to add to the user or group, then click .