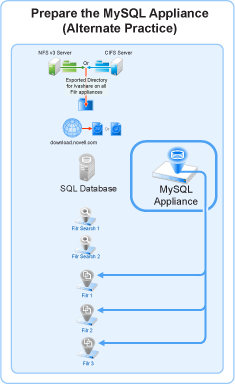
Figure 8-3 illustrates that the MySQL appliance is configured to recognize the Filr appliances and allow them to connect before they are set up and deployed.
Table C-1 Configuring a MySQL Appliance
|
IMPORTANT:The following steps assume that you installed and prepared a MySQL appliance as documented in the previous chapters, in addition to your Filr and Filrsearch appliances.
|
|
-
Using a browser on your management workstation, access the Port 9443 Administration Utility on the MySQL appliance by entering the following URL:
https://mysql_IP_Address:9443
Where IP_Address is the IP address of the MySQL appliance.
|
|
MySQL Appliance Sign In |
|
|
MySQL Tools |
-
Click the button to launch the phpMyAdmin utility.
-
Log in as root with password root.
|
|
phpMyAdmin |
-
Under , click .
-
Type and retype (confirm) a new password for the phpMyAdmin root user, then click .
IMPORTANT:If you click the button, the generated password takes precedence over your typed passwords.
Be sure to note the generated password and use it when configuring Filr.
-
Click the tab.
|
|
Users Overview |
|
|
Login Information |
-
Type filr in the field.
HINT:You can specify any name for the user and associated database. If you specify a different name, then when you set up the Filr appliances, you will need to use that name instead of filr.
-
For the field, select .
-
In the field, type the IP addresses for each of the Filr appliances that you will configure.
-
In the and fields, type and re-type (confirm) a password for the new filr user, then scroll down.
IMPORTANT:You will need this password when you configure the Filr appliances.
|
|
Database for user |
-
Select .
-
In the bottom right corner of the dialog, click .
A filr user entry is added and the corresponding database is created.
|
|
Users Overview |
|