10.2 Specifying Net Folder Servers
The first step in creating Net Folder is to set up Net Folder Servers.
Figure 10-3 Net Folder Server Creation
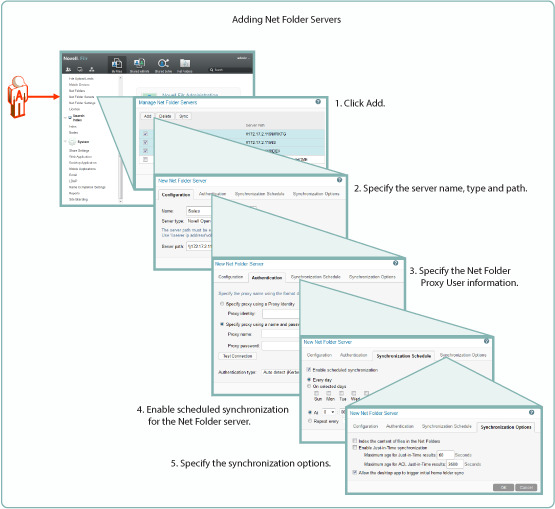
As illustrated in Figure 10-3, adding a Net Folder Server includes the following:
-
Specifying the Name, Type, and Path
-
Name: Net Folder users don’t see this name, so use a name that makes sense from an administrative perspective. For example, you might include the IP address or DNS name of the server, or you could use a location name, such as Third_Floor_Server.
-
Type: Select the server type being targeted: Microsoft Windows, Micro Focus OES, Micro Focus OES (NSS for AD), SharePoint 2013, or NetWare
-
Server Path: This is the full UNC path to the NSS volume or directory on OES, or to the Windows share on NTFS where your Net Folder is located.
-
-
Specifying the Net Folder Proxy User Information
-
Proxy Identity: If you have defined a Proxy Identity that applies to this Net Folder, select , begin typing the identity’s name, then select it. For more information, see
Proxy User Identities
in the Filr 3.43.4: Administrative UI Reference. -
Proxy Name: This is the name of the Net Folder proxy user that provides access to this volume. For more information, see Net Folder Proxy Users.
IMPORTANT:Be sure to follow these guidelines when specifying the proxy user
-
OES, NetWare, and NSS AD: Always use a fully qualified name, such as cn=admin,o=myorganization.
If you specify only a simple name, such as admin, then Filr accesses the Net Folders for the server using CIFS rather than NCP.
When you test the connection, the test succeeds and data synchronizes using CIFS.
Unfortunately, when Filr attempts to determine a user’s effective rights, the request fails because that function requires NCP and the simple name doesn’t provide enough information to the NCP process.
-
Windows: Use domain\username as the syntax.
DFS for Windows requires this, and the syntax will always work with Active Directory and Windows.
-
-
Proxy Password: This is the password of the Net Folder proxy user. If the password changes in the identity store, it must be updated here.
-
Test Connection: This lets you test the path and the credentials of the proxy user that you have specified.
-
-
Enabling Synchronization for the Net Folder Server
-
Enable Scheduled Synchronization: This creates a synchronization schedule for this Net Folder Server. You can then specify when you want the synchronization to occur. Any Net Folders for this server that don’t have their own synchronization schedules will be synchronized according to this schedule.
-
-
Specifying the Synchronization Options This lets you specify whether you want Net Folder contents indexed for searching, whether to enable Just-in-Time synchronization, and whether to allow desktop users to request Net Folder synchronizations.
For more information about Net Folder Server creation, see Creating and Modifying Net Folders
in the Filr 3.43.4: Administrative UI Reference.