1.3 Setting Up Collector Model Domain Profiles
Review these sections for information about the Collector model for domain profiles.
1.3.3 Configure Profiles
See below, for information about configuring the domain profiles.
Domain Profile: Collector/Paired Server Model
Create a Paired Server to receive the data sent by the Collector:
On the GroupWise Disaster Recovery Server, create the Paired Server:
-
Create a directory for the backup data. For example:
mkdir /reload
-
Start the GroupWise Disaster Recovery Administration Console by typing on the command line:
reload
-
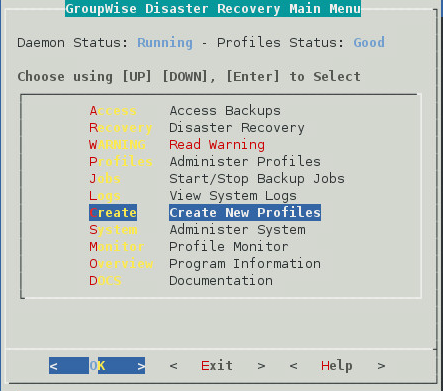
Select .
-
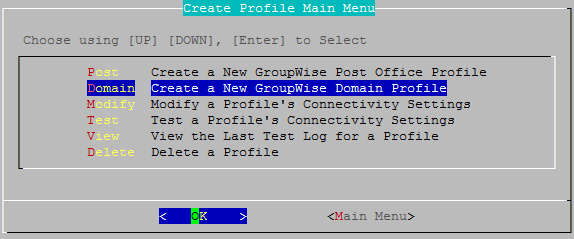
Select .
-
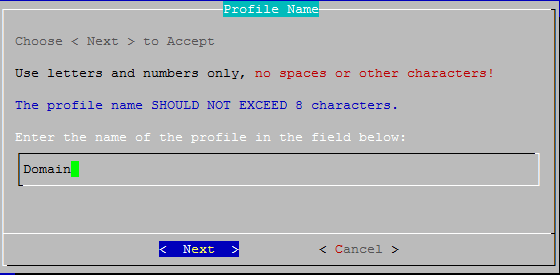
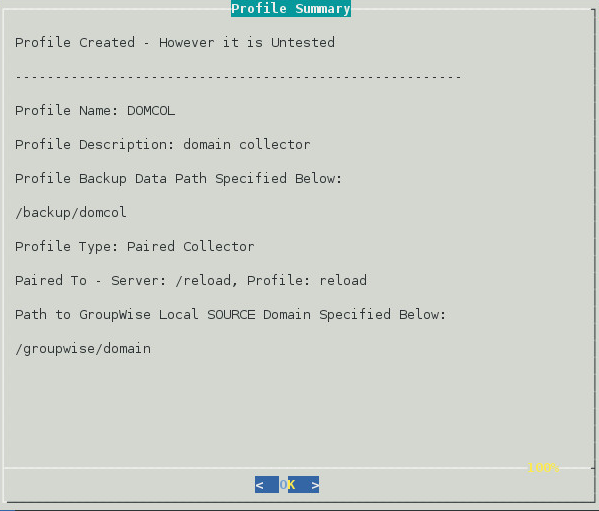
Give the Profile a Name. The profile name should not exceed eight characters. Use letters and numbers only, no spaces or other characters. For example: Domain Be aware, that a profile cannot be renamed, once it has been created. Choose the name wisely. Perhaps you will want to name the profile so that the name is the same as the GroupWise post office or domain that the profile represents. Once named, click .
-
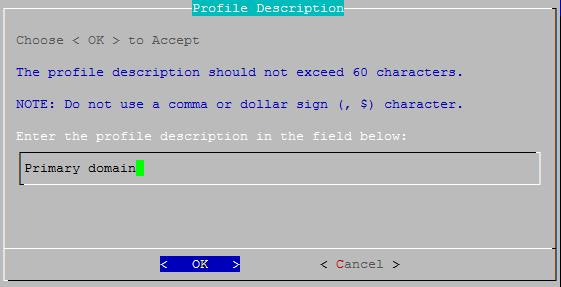
Give the Profile a Description. The profile description should not exceed 60 characters and should not have comma(,), nor dollar sign($) characters. For example: Primary Domain. The description of the profile will be added to the Agent Log when backup jobs are run for the profile. When complete, click .
-
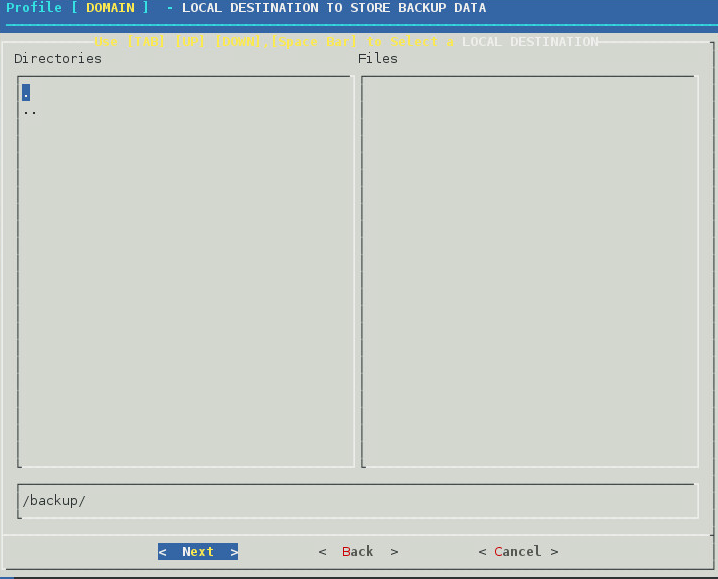
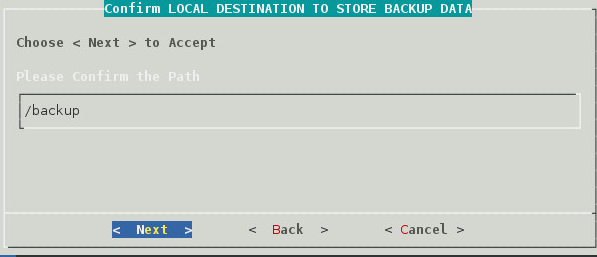
Backup Path: Enter the path or browse to the local destination directory to store the backup data. For example: /reload. This path can be a location on the Linux server, or an NFS mount to another Linux/Unix server, or to a SAN. Do not use a NAS as it does not allow the right kind of access. The path should always be available; GroupWise Disaster Recovery is not configured to mount paths in order to access stored data. Also, the path should be to a location that has a lot of disk space available. When complete, click .
-
Confirm the path to the local destination directory.

-
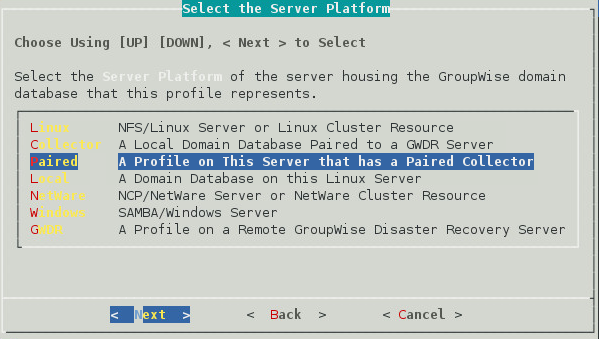
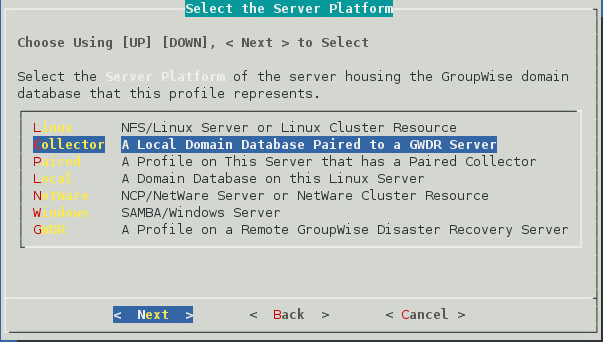
Choose the server type, . Select the Next button.
-
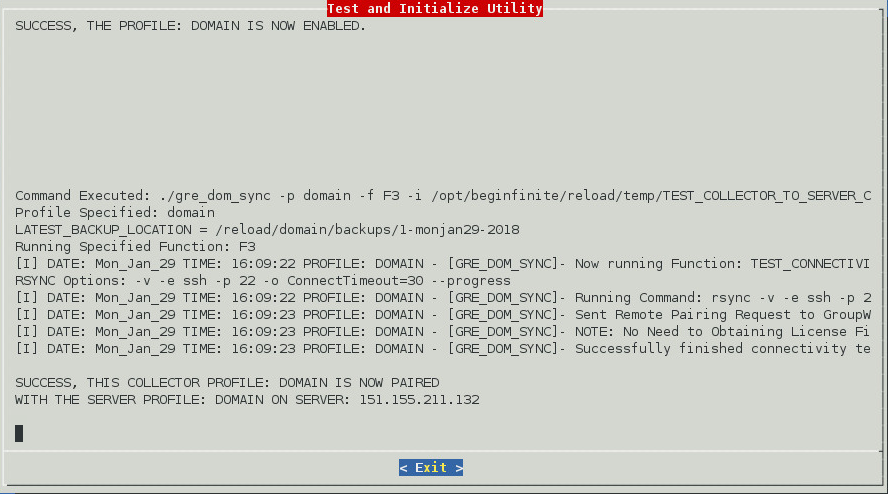
The profile creation wizard tests and initializes the newly created profile and prepares it to accept a pairing request from a Paired Collector, and initializes the newly created profile and prepares it to accept a pairing request from a Paired Collector.
Testing and initializing a profile does not backup the post office or domain in any way.

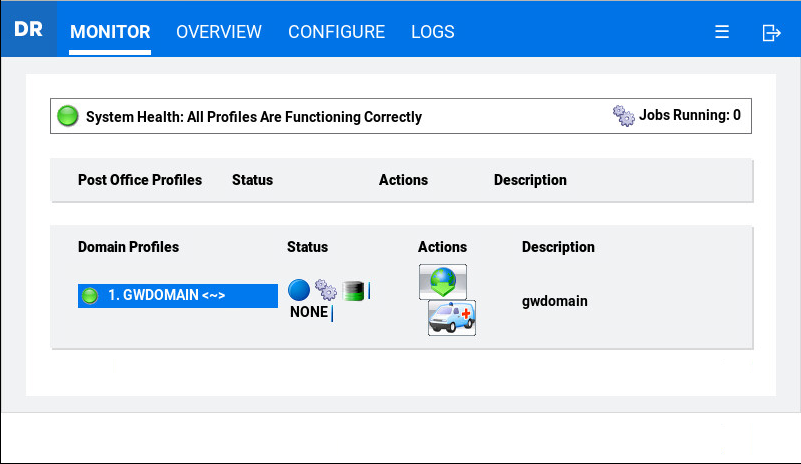
Once a profile is tested and initialized successfully, the profile is available to be configured further. The default configuration of a profile is sufficient for making quickly accessible backups with GroupWise Disaster Recovery. Further configuration of the profile should be done in GroupWise Disaster Recovery Web Administration.
To be able to backup the data, a collector needs to be created on the GroupWise server.
On the GroupWise Server, create the Collector:
On the GroupWise server, the collector will need to be downloaded, installed and configured to connect to the GroupWise Disaster Recovery server. The procedure for doing this will depend on if this is an existing installation or a new installation.
If this is an existing GroupWise Disaster Recovery installation with an existing Server model connection for the profile:
On the GroupWise Disaster Recovery server, browse to the GroupWise Disaster Recovery Web Administration Console: http://<GroupWise Disaster Recovery_Server_IP_or_Hostname>:5555
-
Select the profile.
-
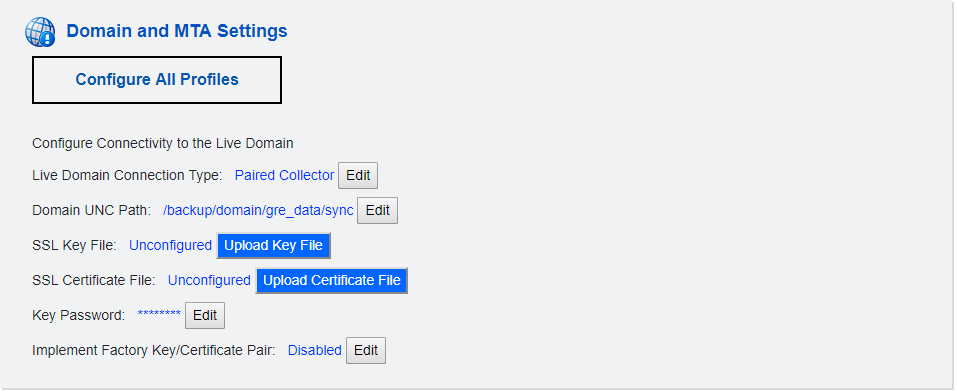
Click the Configure tab.
-
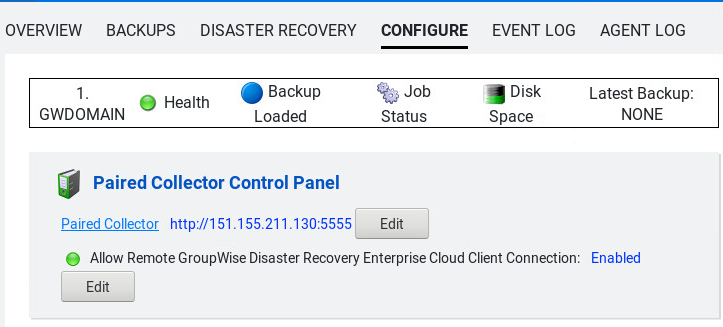
Open the .
-
Make sure is enabled.
-
Click next to Paired Collector and specify the GroupWise Disaster Recovery server and port (5555).
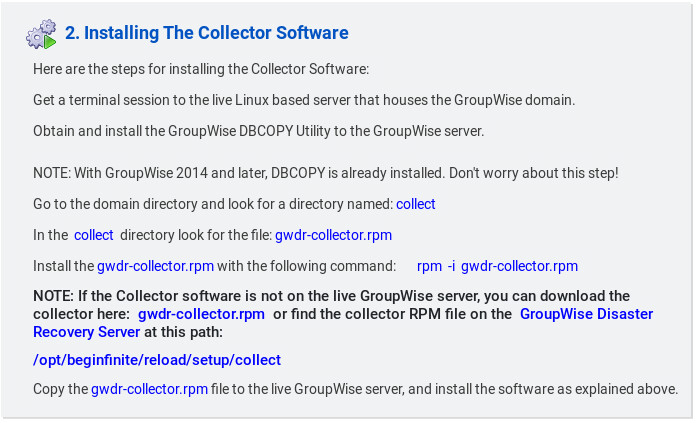
On the GroupWise server, in the Domain directory a new directory (/collect) will be created and the gwrd_collector.rpm file will be created.
Open a terminal window, go to where the file is and run:
rpm -i gwdr_collector.rpm
If this is a new installation with no preexisting connection:
On the GroupWise server, browse to the GroupWise Disaster Recovery Web Administration Console. http://<GroupWise Disaster Recovery_Server_IP_or_Hostname>:5555
-
In the GroupWise Disaster Recovery Admin console, select the menu button at the top right and select .
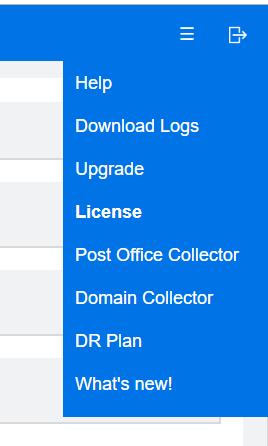
-
Click to open the section.
-
Click the gwdr-collector.rpm to download the rpm. Install the rpm using the following command:
rpm -i gwdr-collector.rpm
Configure the Collector Agent
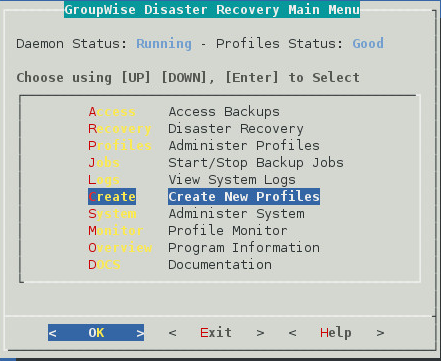
Once the collector is installed, on the GroupWise server, start the GroupWise Disaster Recovery Administration Console by typing reload on the command line.
To configure the Collector Agent:
-
Select .
-
Select Domain: .
-
Give the Profile a Name. The profile name should not exceed eight characters. Use letters and numbers only, no spaces or other characters. For example: domain. Be aware, that a profile cannot be renamed, once it has been created. Choose the name wisely. Perhaps you will want to name the profile so that the name is the same as the GroupWise post office or domain that the profile represents. Once named, click .
-
Give the Profile a Description. The profile description should not exceed 60 characters and should not have comma(,), nor dollar sign($) characters. For example: Domain Collector. The description of the profile will be added to the Agent Log when backup jobs are run for the profile. Once complete, click .
-
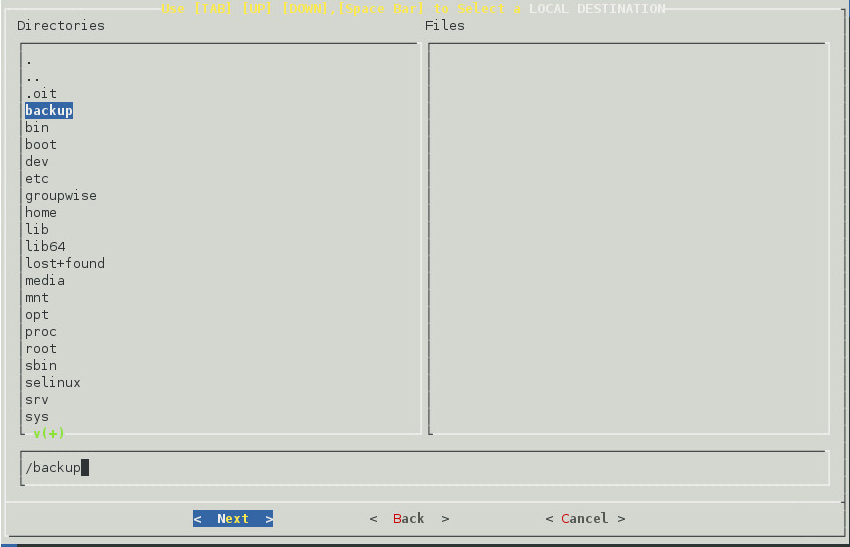
Backup Path: Enter the path or browse to the local destination directory to store the backup data. For example: /reload. The profile directory will be added to this path. This path can be a location on the Linux server, or an NFS mount to another Linux/Unix server, or to a SAN. The path should always be available; GroupWise Disaster Recovery is not configured to mount paths in order to access stored data. Also, the path should be to a location that has a lot of disk space available. Once complete, click .
-
Confirm the path to the local destination directory.
-
Choose the server type, , and click .
-
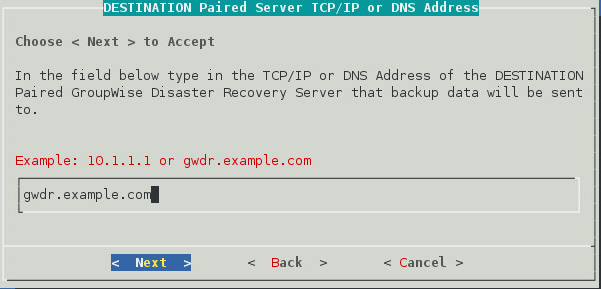
Enter the TCP/IP Address or DNS host name for the GroupWise Disaster Recovery server this collector will be paired with (Do not use the number pad), and click .
-
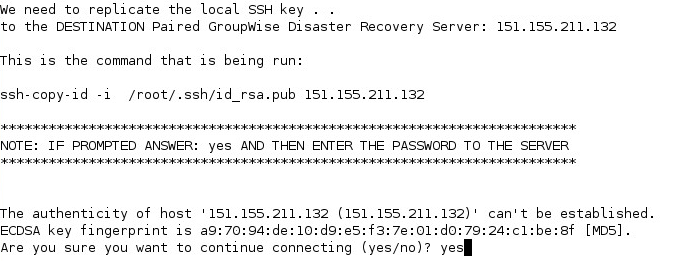
A terminal session will appear to prompt you to accept an SSH key and enter the password for the GroupWise Disaster Recovery server. If another profile was created to the same server it will only update.
-
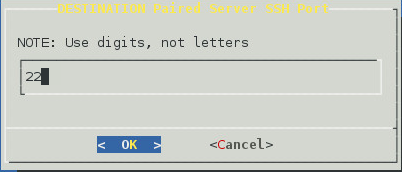
Enter the SSH port used by the GroupWise Disaster Recovery server (default port: 22)
-
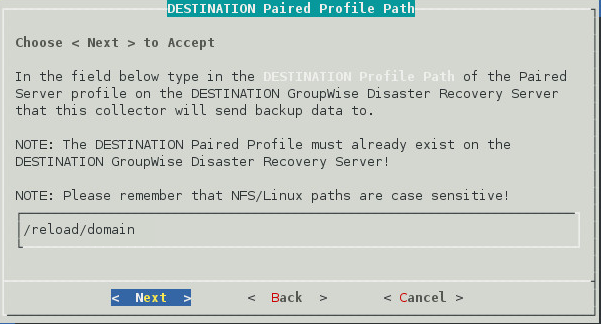
Backup Path: Enter the destination path the data will be stored in on the GroupWise Disaster Recovery server. This is the destination directory you entered when creating the Paired Server on the GroupWise Disaster Recovery server.
-
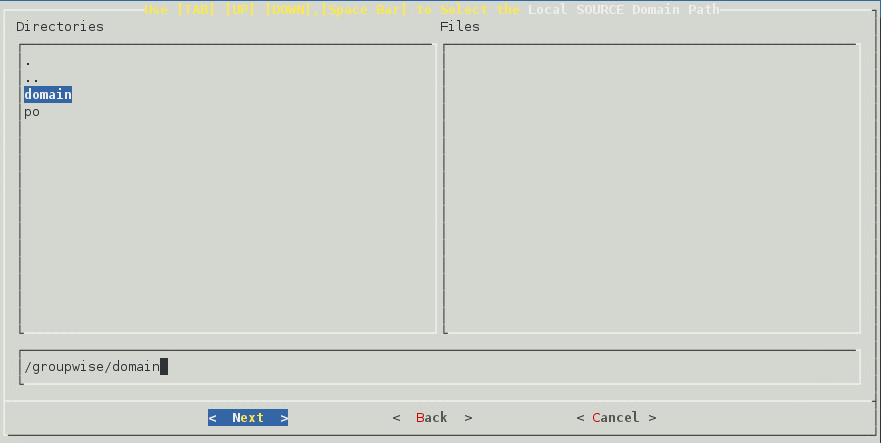
Source Path of the GroupWise files: Enter the source path to the local destination directory entered earlier on the GroupWise server. For example: /groupwise/domain
-
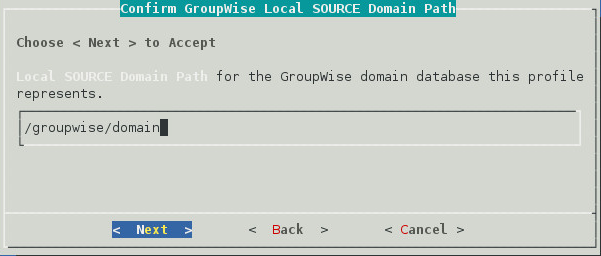
Confirm the path to the local source directory.
-
A summary of the profile settings will appear. Click .
-
Test and Initialization:

-
If the profile is correct, click .
-
If the profile is not correct, click .
-
-
The profile creation wizard tests and initializes the newly created profile and prepares it to accept a pairing request from a Paired Collector and initializes the newly created profile and prepares it to accept a pairing request from a Paired Collector.
-
The Collector should find the license from the Server. If it fails, then backups will not occur. The license file can be loaded to the Collector in the Web Console as during the install procedure.
1.3.4 Switching from Server model to Collector Model
If you have been running GroupWise Disaster Recovery using the server model and the GroupWise Domain and/or Post Office is on Linux, then you can easily switch to the collector model.
On the GroupWise server, create a directory for the GroupWise Disaster Recovery Agent to copy the databases to before sending to the GroupWise Disaster Recovery server. For example,
mkdir /reload
If switching the Domain profile:
-
Browse to the GroupWise Disaster Recovery Web Administration console http://<GroupWise Disaster Recovery_Server_Address>:5555
-
Select the Domain Profile.
-
Select the Configure tab and open .
-
Enable and save the changes.
-
Click . This will create the directory /collect in the domain directory on the GroupWise server and copy the gwdr_collector.rpm file to it, or download from the Post Office Collector option from the GWDR web console.
-
Connect to the GroupWise server and run
rpm -ivh gwdr_collector.rpm
-
Setup up the collector by running
reload
-
See Domain Profile: Collector/Paired Server Model to complete the setup process.
-
Start a backup job on the collector and the profile on the GroupWise Disaster Recovery will change to a Collector/Server with a <~> after the name.