26.2 Scheduling Appointments
Use appointments to schedule blocks of time on a specific date or range of dates.
You can use Busy Search to check for a time when all the users and resources you want for an appointment are available.
When you perform a Busy Search for users who are in a different time zone than you, GroupWise takes into consideration the difference in time zones. For example, if you are trying to schedule a meeting with a co-worker whose time zone is seven hours later than your own, that co-worker’s workday is blocked out in the Busy Search sometime after 10:00 a.m. your time.
When you schedule an appointment and include yourself as a participant, GroupWise automatically accepts the appointment for you unless there is a conflicting appointment, in which case you will receive a notification stating you have a conflicting appointment. This occurs when you try to send the appointment.
26.2.1 Scheduling an Appointment for Yourself
If you are not available for meetings, you can schedule a personal appointment for those times. When another user includes you in an appointment and does a busy search, the user can see that you are not available at those times, but can still schedule over your appointment.
Personal appointments are placed in your Calendar on the date you specify. They are not placed in your Mailbox or in any other user’s Mailbox. Similarly, all personal appointments are saved to your main GroupWise calendar. To move them to a personal calendar, drag and drop them to the personal calendar after they are created.
-
On the toolbar, click the arrow on the button, and then click .
or
In your Calendar, open a view with an Appointments List, click a date, and then double-click a time in that day.
-
(Optional) Type a subject and a place.
-
Specify the start date.
or
Click
 to specify a date or auto-date for your appointment. To create a recurring appointment, see Scheduling Recurring Items.
or
Select for an all day event.
For more information about all day events, see Understanding All Day Events.
-
Specify a start time and duration. Duration can be in minutes, hours, or days.
-
Specify how you want the appointment to appear with the drop-down menu. Appointments can appear as , , , or .
-
(Optional) If you have to travel to your appointment, you can schedule travel time as well. To schedule travel time, click the Travel Time icon
 . For information, see Scheduling Travel Time.
 -
(Optional) Type a message.
You can specify many options, such as making this appointment a high priority and more, by clicking the tab.
-
(Optional) Specify a Show Appointment As type by clicking > , and then clicking a type.
-
Click on the toolbar.
26.2.2 Scheduling an Appointment for Multiple People
When you schedule an appointment for two or more people, there are several options to consider as you create the appointment. For example:
-
Expected attendees as opposed to optional attendees
-
How the item will show on your calendar (free, busy, etc.)
-
Do you want to schedule travel time?
-
Are you scheduling a resource or adding a resource pool to automate selecting the resource?
To schedule an appointment for two or more people:
-
Click on the toolbar.
-
In the field, type a user name, and then press Enter. Repeat for additional users. Include any resource or resource pool IDs (such as conference rooms) in the field. If necessary, click or to add the desired field, and type user names in the and fields.
or
To select user names or resources from a list, click on the toolbar, double-click each user, and then click .
Your name is automatically added to the field of the appointment. When you send the appointment, it is automatically added to your calendar. If you do not want to be included in the message, delete your name from the field.
If more than one place is added to an appointment as a resource, only the first one will be displayed in the field.
-
(Conditional) If a place has not been added as a resource in the field, type the place description in the field.
-
Specify the start date.
or
Click
to specify a date or auto-date for your appointment. To create a recurring appointment, see Scheduling Recurring Items.or
Select for an all day event.
For more information about all day events, see Understanding All Day Events.
-
Specify a start time and duration. Duration can be in minutes, hours, or days.
-
Specify how you want the appointment to appear as. Appointments can appear as , , , or .
Recipients in the and fields receive the appointment as Free.
-
(Optional) If you have to travel to your appointment, you can schedule travel time as well. To schedule travel time, click the Travel Time icon
. For information, see Scheduling Travel Time. -
Type a subject and message.
-
If you want to ensure that the people and resources for the appointment are available, do a busy search by clicking on the toolbar. For more information, see Using Busy Search to Check Availability.
You can specify many options, such as making this appointment a high priority, requesting a reply from recipients, and more, by clicking the tab.
-
Click on the toolbar.
If the appointment conflicts with an appointment that is already on your calendar, you are given the option to continue scheduling the appointment or to change the appointment.
26.2.3 Using Busy Search to Check Availability
Use Busy Search to find a time when all the people and resources you want to schedule for a meeting are available.
Performing a Busy Search
To perform a busy search:
-
In an appointment you are creating, specify user names and resource IDs in the field.
-
Specify the first possible day for the meeting in the field.
-
Specify the meeting’s duration.
-
Click on the toolbar.
The legend at the bottom of the Busy Search dialog box shows the meaning of the various Show Appointment As patterns on the grid.
If
 appears to the left of the user name or resource, you can click a scheduled time across from the user name or resource on the tab to display more information about the appointment in the box below. However, the user or resource owner must give you appointment Read rights in their Access List before the icon appears. See Granting Proxy Rights as a Mailbox Owner.
To exclude a user name or resource from the search without deleting it, click the tab, and then click the check box next to the user or resource to deselect it. Excluding a person or resource from the search is useful if a user (like a CC recipient) should be invited to a meeting but does not necessarily need to attend. To include a user or resource name that has been excluded, click the check box next to the user or resource to select it.
-
Click to select the first available meeting time, and then click to transfer the users, resources, and selected time and duration to the appointment you were scheduling.
or
Click until the time you want is displayed, and then click to transfer the users, resources, and selected time and duration to the appointment you were scheduling.
or
Click the tab to see possible meeting times, click a time to select it, and then click to transfer the users, resources, and selected time and duration back to the appointment you were scheduling.
-
To remove a user or resource from the list after the search, click the tab, click the user name or resource to remove, press , and then click .
This is useful if you want to include several conference rooms in the search to find one that is available, and then eliminate those you do not want.
-
Complete and send the appointment.
If you want to do a busy search before creating an appointment, click > . Specify information in the Busy Search dialog box, and then click to perform a busy search. When you find a time you want for a meeting, click to transfer the information to a new appointment view, and then complete the appointment.
You can change the search range for one appointment by scheduling the appointment with > and changing the number in the .
This method is useful when you are scheduling recurring appointments or planning appointments with users and you want to see the users’ schedules further into the future than the default seven days.
Changing Busy Search Options
You can change the search range, time, and days default for all appointments on the tab in Date Time Options.
-
Click > , double-click , and then click the tab.
-
Change the options you want.
Options include the range of dates or specific days to search.
-
Click .
Busy Search and Resource Pools
Beginning in GroupWise 18.5, if you select a resource pool to schedule a resource when creating an appointment, the Busy Search function is automated to choose the first available resource in the resource pool list. The selected resource will show in parentheses next to the resource pool in the Appointment window before you even send the appointment.
If you would rather choose another resource in the resource pool, you can click in the Appointment window and manually change the resource to a different one by expanding ![]() the resource pool in the tab and selecting a different available resource in the list.
the resource pool in the tab and selecting a different available resource in the list.
26.2.4 Scheduling Travel Time
If you have to travel to attend an appointment or meeting that is scheduled on your calendar, whether personal or for multiple people, you can enable the Travel Time feature when you create or edit the appointment. This feature includes both before and after meeting travel time that displays on either side of the appointment on your calendar.
While this feature will only display on your personal calendar, the time you designate on your calendar will show up as Busy by default for others who are also included in the meeting. However, you can change the Travel Time to show as Free or Tentative, if desired.
To include travel time for a meeting or appointment that you are scheduling, or for a meeting that is already on your calendar (whether scheduled by you or someone else), do the following:
-
Start a new appointment or double-click an existing appointment on your calendar.
-
Click the Travel Time icon
in the appointment window. -
Configure the travel time duration in the Set Travel Time dialog box.
The configuration creates the duration entered for both before and after travel by default. If the duration needs to be different for the two, disable the setting for them being the same, and you will be presented with settings for both Before and After.
-
Click .
Canceling Travel Time
You can cancel travel time in the same manner as canceling regular appointments. If you cancel the appointment the Travel Time was scheduled for, it also removes both Travel Time items associated with it.
To easily cancel both Before and After Travel Time items in the same instance and leave the parent appointment intact, click the Travel icon on the parent appointment and set the duration for both Before and After times to zero. You can use this same method to only remove one or the other, Before or After.
Understanding Travel Time
This feature is intended to block out time on your calendar when you might be unavailable, which can include meeting preparation, or other reasons. Specific behavior for this feature not described above is provided below:
-
GroupWise Web: Prep/Travel Time created in the GroupWise Client will display as any other appointment on the GroupWise Web calendar without the identifying icon
that is used in the GroupWise Client. -
Alarms: Tabs for Before and After Travel time are now included in the Alarm dialog box for the parent appointment. For information see, Setting an Alarm on a Calendar Item.
-
Scheduling Conflict: Since Travel Time items show as Busy by default, they will generate a scheduling conflict if you already have an appointment on your calendar that overlaps that time. You can resolve conflicts in the same manner as an other appointment.
26.2.6 Time Input
When you schedule appointments and other items you might be required to specify a time. In most cases you have the option to specify the time by typing it directly into the time field or entering it through the time input field. Click  to open the time input window.
Use the green arrow to select a start time and the red arrow to select an end time. The currently selected times display on the right side of the screen. You can use intervals as small as 15 minutes.
If a correct duration has already been entered, you can move it by dragging the selected area up or down.
A time zone option is available to specify a specific time zone for the event. For more information on time zones, see Specifying a Time Zone for an Appointment.
26.2.7 Specifying a Time Zone for an Appointment
NOTE:This section contains information that is version specific.
Functionality Changes in 18.3.1 and Later
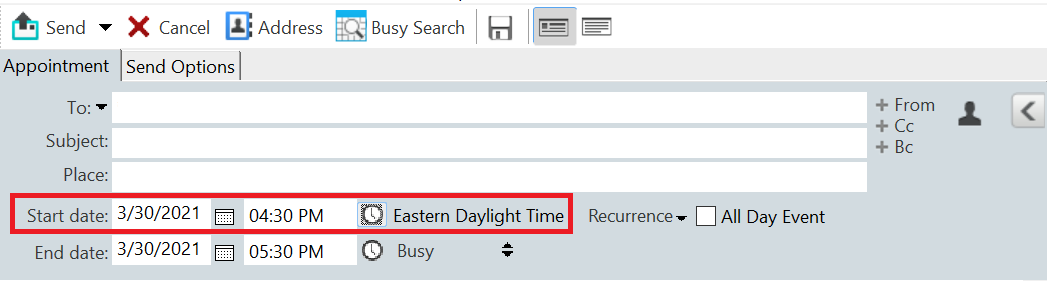
When you select a time zone while creating an appointment, the appointment is adjusted to be scheduled at the time you set in the selected time zone. For example, if you schedule an appointment at 4:30 PM Eastern Daylight time in the United States and you are in the Pacific Daylight time zone, it shows up on your calendar at 1:30 PM PDT.
Also, the time zone is now displayed in the appointment header next to the start time as shown below:
Functionality Prior to 18.3.1
The Time Zone feature lets you schedule a meeting for recipients in different time zones who will meet in a single location.
Normally, GroupWise automatically adjusts meeting times based on the recipients’ time zones. For example, a meeting scheduled by a user in Utah for 10:00 would be displayed as 9:00 for a recipient in California and as 12:00 for a user in New York because these users are in different time zones. Because GroupWise adjusts the time, all the users scheduled for a conference call can call in at the same moment, even though their local time might differ.
Use the Time Zone feature if you don’t want GroupWise to adjust to the recipients’ local time zone. For example, if you are in the Saskatchewan time zone and include users from the Mountain Time (US & Canada) time zone in your appointment, you would use the Time Zone feature if these users are flying to Saskatchewan for the appointment. Time Zone ensures that the appointment in their Calendars and Mailboxes shows the correct Saskatchewan time.
-
Open and create a new appointment.
-
Click > , click the drop-down list and select the time zone for the appointment location, and then click .
-
Click on the toolbar.
When the users you have scheduled with the Time Zone feature receive the appointment, they see a time annotation after the subject when they see the appointment in their Mailboxes. For example, if the subject of the meeting is “Marketing Conference” and the time zone is Saskatchewan, users would see a subject and time annotation similar to the following: Marketing Conference (Saskatchewan). In the users’ Calendars, the place is annotated with the time zone, rather than the subject.