6.5 Working with Address Books
Address books are the databases that store contact information, including names, address, email addresses, phone numbers, and much more. Contacts folders give you a more flexible view of address book information.
-
Section 6.5.3, Editing a Personal or Frequent Contacts Address Book
-
Section 6.5.8, Using Predefined Filters for the Frequent Contacts Address Book
-
Section 6.5.13, Viewing Contacts, Groups, Organizations, or Resources in an Address Book
-
Section 6.5.14, Editing a Distribution List in the GroupWise Address Book
-
Section 6.5.18, Importing and Exporting Addresses and Address Books
6.5.1 Opening an Address Book
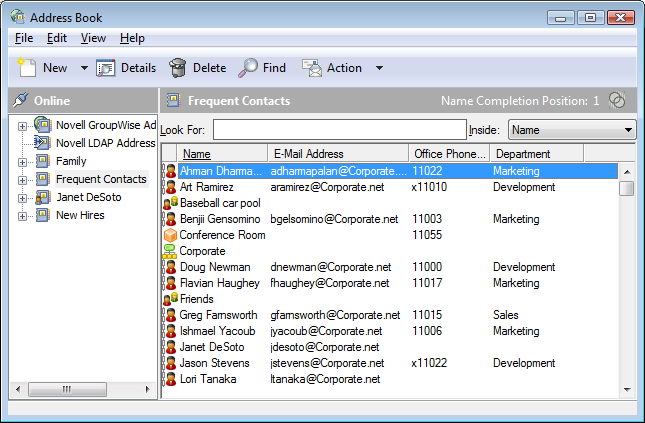
To open an address book, click  on the Main Window toolbar. The left pane lists the GroupWise Address Book, LDAP Address Book, Frequent Contacts address book, and any personal address books you have created.
Figure 6-6 The Address Book Window
You can use > and > to display and hide the address books in this pane. The right pane lists all the entries in the selected address book.
In an address book, you can open contacts to view details, select names to send an item to, create and modify groups, and create and delete contacts.
You also have advanced options, such as creating and modifying personal address books, changing your Name Completion search order, changing the properties of an address book, defining copy options, changing your MAPI configuration, importing and exporting address books, sharing address books, adding directory services, printing labels, and more.
6.5.2 Creating a Personal Address Book
-
In the Main Window, click
on the toolbar.
-
Click > .
-
Type a name for the new book, then click .
6.5.3 Editing a Personal or Frequent Contacts Address Book
In a personal address book, including the Frequent Contacts address book, you can add or delete entries, edit existing information, copy names from one book to another, or rename a book. You can also create your own custom address book fields.
Quickly Adding Contacts to Your Personal Address Book
You can quickly add any recipient in an item to any personal address book.
-
Open an item addressed to one or more recipients.
-
Right-click the recipient you want to add to a personal address book.
-
Click , then click the address book to add the contact to.
Editing Entries in a Personal Address Book
-
In the Main Window, click
 on the toolbar.
-
Click an address book, then double-click the name you want to edit.
-
Edit the information on the different tabs, then click .
Copying Entries between Personal Address Books
You cannot copy entries to a closed address book; you must open the book first. You cannot copy names to the GroupWise Address Book.
-
In the Main Window, click
on the toolbar.
-
Click an address book, then click or Ctrl+click the names you want to copy.
-
Click > .
-
Select the address book you want to copy the names to, then click .
When you copy an entry from one address book to another, the entries are linked, so that if you edit one entry, the other entry is also updated.
Defining Custom Fields in a Personal Address Book
-
In the Main Window, click
on the toolbar.
-
Click the personal address book where you want to define custom fields.
-
Double-click an entry, then click the tab.
-
Click , then type a title for the field in the field.
-
In the field, type the information you want to display in the field for that entry.
-
Click .
After you have added a custom field to an address book, the field cannot be deleted. However, because custom fields are displayed as columns, you can remove the column from your display. Because each address book can have different columns displayed, the column must be removed from each address book individually.
Deleting Entries from a Personal Address Book
-
In the Main Window, click
on the toolbar.
-
Click an address book, then click or Ctrl+click the names you want to delete.
-
Press the Delete key, then click .
6.5.4 Renaming a Personal Address Book
-
In the Main Window, click
on the toolbar.
-
Click the personal address book you want to rename.
You cannot rename the Frequent Contacts address book.
-
Click > .
-
Type the new name, then click .
6.5.5 Copying a Personal Address Book
-
In the Main Window, click
on the toolbar.
-
Click the personal address book you want to copy.
-
Click > .
-
Type a new name for the address book, then click .
6.5.6 Deleting a Personal Address Book
-
In the Main Window, click
on the toolbar.
-
Click the personal address book you want to delete.
-
Click > , then click .
After it is deleted, a personal address book cannot be recovered.
NOTE:You cannot delete the Frequent Contacts address book.
6.5.7 Setting Address Book Properties
You can choose and view various properties and options for your address books.
Setting Personal Address Book Properties
Use the Address Book Properties dialog box to view the properties of each of your address books (including the GroupWise Address Book). There are three property tabs in the address books; not all of them are visible from every address book.
The tab is visible from all address books. Use the tab to view the name of the address book, the MAPI service provider (if known), a summary of what the address book contains, and so forth. You can also use it to add a description of the address book.
The tab is visible only from the Frequent Contacts address book. Use the tab to specify what is saved in Frequent Contacts and how this address book should be cleaned up. See Setting Frequent Contacts Properties.
The tab is visible for personal address books for which you are the owner, including your Frequent Contacts address book. Use the tab to choose whether or not to share an address book, who to share it with, and which access rights each person should have.
You can also share your personal groups by placing them in an address book you share with others.
Viewing an Address Book’s Properties
-
In the Main Window, click
on the toolbar.
-
Click the address book you want to view the properties for.
If the book is not visible, the book is not open.
-
Click > .

-
To view the number of individuals, resources, companies, and so forth, click .
If the address book is large, this might take some time. The status bar measures the progress of this operation.
-
To add or modify a description for the address book, click the field, then type or edit the description.
-
Click to save your changes and close the Properties dialog box.
or
Click to apply your changes and keep the Properties dialog box open.
Setting Frequent Contacts Properties
-
In the Main Window, click
on the toolbar.
-
Click the Frequent Contacts address book.
-
Click > , then click the tab.

-
Select the options you want.
If you cannot change these options, your GroupWise administrator has locked them.
To stop names from being placed into the Frequent Contacts address book, click .
-
To delete names from this book, select the check box, type a number in the field, click a time period from the drop-down list (from hours to years), then click to remove old addresses.
-
Click to save your changes and close the Properties dialog box.
or
Click to save your changes and keep the Properties dialog box open.
6.5.8 Using Predefined Filters for the Frequent Contacts Address Book
-
In the Main Window, click
on the toolbar.
-
Click the Frequent Contacts address book.
If the Frequent Contacts address book is not visible, you must open it by clicking > .
-
Click > .
or
Click > (a reference is the number of times you have sent or received items from an entry), type the minimum number of references an entry must have in order to be included in the search criteria, then click .
6.5.9 Sharing an Address Book with Another User
Shared address books are marked with a  icon. This icon might be slightly different, depending on whether or not you created the address book.
You can share personal address books with other users. You can give users read-only rights, or you can give them rights to read, add, edit, and delete information in the address book. When you share an address book, the users receive a notification that they can accept or decline.
-
In the Main Window, click
on the toolbar.
-
Right-click the address book you want to share, then click .
If the address book is not visible, you can open it by clicking > .
-
Click .
-
Type the name of the person with whom you want to share the address book, then click to add the user to the list.
If you do not know the name of the person, click
 , then search for and select the user.
You cannot share address books across external domains.
-
Click each user’s name in the list, then assign him or her access rights in the group box.

-
Click to save your changes and close the dialog box.
or
Click to apply your changes and keep the dialog box open.
When you click or , the person with whom you want to share the address book receives a notification. The column displays as until the user accepts or declines the shared address book request, then the column is updated to reflect the user’s selection.
In the Address Book list, shared address books are marked with the
icon.
You and the users you share an address book with can arrange your address book columns differently.
6.5.11 Synchronizing Address Book Entries
You can use Synchronize to make sure that your personal address book entries match the corresponding entries in the GroupWise Address Book. You can synchronize an entire personal address book or just the entries you have selected.
For example, you might have a personal address book containing the names of your contacts in the Marketing department. When the Marketing department changes buildings and phone numbers, Synchronize saves you from needing to create a new personal address book.
-
In the Main Window, click
on the toolbar.
-
Click the personal address book you want to synchronize.
-
To synchronize an address book, click > > .
or
To synchronize selected entries, Ctrl+click or Shift+click the entries, then click > > .
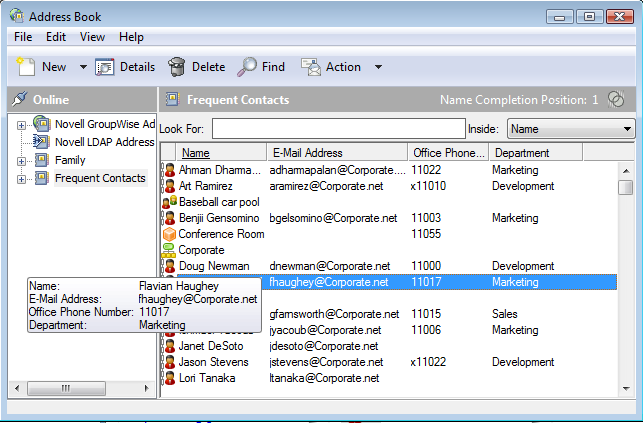
6.5.12 Displaying Quick Info
Summary information about users is displayed in an address book and in the Address Selector when you mouse over that name. The same information displays in the , , , or fields of a message if you first click the name. This display is called Quick Info.
Figure 6-7 shows Quick Info in a mail message:
Figure 6-7 Mail View With Information about a User

Figure 6-8 shows Quick Info in the Address Book window:
Figure 6-8 Address Book With Information about a User
If multiple users are listed in the , , , or fields of a message, click the box to open the list of users, select one of them, then mouse over the selected user.
Quick Info is enabled by default. To disable Quick Info:
-
In the Main Window, click
on the toolbar.
-
Click > .
6.5.13 Viewing Contacts, Groups, Organizations, or Resources in an Address Book
Use the predefined filters in the to display only groups, users, organizations, or resources in an address book.
By default, address books display all entries. Although all groups, organizations, and resources are marked by icons, finding specific entries in large address books can prove difficult. A predefined filter displays only the type of entry you are looking for.
There is one predefined filter that applies only to the Frequent Contacts address book: . You can use it to filter all entries with at least the number of references you specify.
To view groups, organizations, or resources in an address book,
-
In the Main Window, click
on the toolbar.
-
Click an address book.
-
Click , then click the filter you want to sort by.

-
To return to the non-filtered address book view, click > .
In the Address Selector, click a predefined filter from the  drop-down list to filter for contacts, groups, and resources.
The following icons identify contacts, resources, groups, and organizations in address books:
 Contacts
 Resources
 Groups
 Organizations
6.5.14 Editing a Distribution List in the GroupWise Address Book
If your GroupWise administrator has granted you rights to modify a public distribution list in the GroupWise Address Book:
-
In the Main Window, click
on the toolbar.
or
Click
 on the toolbar in an item you are composing.
-
Select the GroupWise Address Book.
-
Double-click the public distribution list that you have rights to edit.
-
Make changes as necessary.
-
Click , then click to save your changes.
6.5.15 Searching for Address Book Entries
You can quickly find entries in an address book by using the Search List. You can also specify search criteria by defining one or more filters. For example, you can define a filter that displays only entries with last names that begin with “D.”
Searching for Users, Resources, Organizations, and Groups
-
In the Main Window, click
on the toolbar.
or
Click
on the toolbar in an item you are composing.
-
Select the address book you want to search.
-
In the field, begin typing what you are searching for.
Name Completion completes the name.
Using Filters to Narrow an Address Search
-
In the Main Window, click
on the toolbar.
-
Click > .

-
Click the first drop-down list, then specify the column you want to filter.
-
Click
 , then specify an operator.
An operator is a symbol used with a condition to specify a particular value. For example, to create a filter that lists only users whose last name is Davis, click the column, click , then type “Davis.” In this example, = Equal To is the operator and Davis is the condition.
For more information, see Using Advanced Find.
-
Type the condition you want to filter by, then click .
The filtered search sorts the address book according to the results it found.
After a filter has been defined for an address book, you can enable the filter whenever you want by displaying the address book in which you want to enable the filter and clicking > . Clicking enables it; it remains in effect until you turn it off or delete it.
6.5.16 Customizing an Address Book Display
You can control which address books are displayed in the Address Book list by opening and closing address books. For example, you might have a personal address book for an account that you deal with only six months out of the year. You can close it when you don’t need it and open it again six months later.
You can also control the information that is displayed in a single address book. In order for you to change displayed information in an address book, that address book must be open.
Opening and Closing Address Books
-
In the Main Window, click
on the toolbar.
-
Click > .
If all of your address books are open, is dimmed.
-
Click or Ctrl-click one or more address books, then click .
-
To close an address book, select the address book, then click > .
Closing an address book does not delete it; you can open it again at any time.
Specifying the Columns to Display in an Address Book
-
In the Main Window, click
on the toolbar.
or
Click
in an item you are composing.
-
Click the address book where you want to change the displayed columns.
-
Right-click a column heading, then click a column name.
If the column name is not displayed, click . To add a column, click the column in the A list box, click , then click .

-
To remove a column, drag the column heading off the address book.
-
To arrange columns, drag a column heading to another position.
Viewing Links to the GroupWise Address Book
-
In the Main Window, click
on the toolbar.
-
Click the personal address book where you want to view links.
A linked contact in an address book is shown with the
 icon.
icon.
-
Click > to select it.
Links show that an entry in a personal address book is linked to an entry in another book. When one is updated, the other is also updated. Links are created when you copy an entry from one address book to another. Links are also created when entries from the GroupWise Address Book are added to your Frequent Contacts address book because correspondence has occurred.
Choosing the Display Format of Names
-
In the Main Window, click
on the toolbar.
-
Click > .
-
Click a radio button to display address books by first name first or last name first.
-
Ctrl-click the personal address books you want the format to apply to.
-
Click to apply these changes without exiting the dialog box.
or
Click to apply these changes and exit the dialog box.
6.5.17 Sorting an Address Book
-
In the Main Window, click
on the toolbar.
-
Click the address book you want to sort.
-
Right-click the column you want to sort by, then click (for example, sort by the column rather than by the column).
or
Right-click any column heading, click (for example, A to Z or 1, 2, 3) or (for example, Z to A or 3, 2, 1) to sort the column entries.
6.5.18 Importing and Exporting Addresses and Address Books
Use the Import and Export features to transfer your existing Novell and third-party address books into and out of a GroupWise personal address book. If your former address book was a MAPI service provider, your conversion should be smooth. If not, your address books can still be imported with some reformatting. Novell address books are best exported in .nab format should be used to avoid information loss, and importing address books is also more accurate if the .nab format is used. You can also import and export your personal groups.
Address books from supported POP3 and IMAP4 email clients can be imported by using the GroupWise E-Mail Client Import utility.
You can also share personal address books. See Sharing an Address Book with Another User.
Importing a Novell Personal Address Book into a Personal Address Book
-
If you have received a Novell personal address book (.nab file) as an attachment, right-click the attachment, click , select the folder or diskette where you want to save it, then click .
Novell address book files are text files with specific formatting. GroupWise 2012 .nab files use UTF-8 character encoding and cannot be imported into earlier versions of GroupWise. However, GroupWise 2012 can export .nab files in ANSI character format, which is compatible with earlier versions of GroupWise. The .nab files created by earlier versions of GroupWise can be imported into GroupWise 2012.
-
In the Main Window, click
on the toolbar.
-
Click > .
-
Select the address book .nab file, then click .
-
Click the address book you want to import addresses into.
or
Create a new personal address book to import the addresses into.
For information, see Creating a Personal Address Book.
-
Click .
To stop the import, press Esc, then click .
You cannot import addresses into the GroupWise Address Book.
Importing Contacts from a vCard
A vCard can contain either a single contact or multiple contacts. GroupWise supports either format.
To import information into an address book from a vCard you have received:
-
Right-click the vCard, then click .
-
Click the address book where you want the information to be added, then click .
Importing Third-Party Address Books
Importing Contacts with a CSV File
To import a CSV (comma-separated values) file:
-
In the Main Window, click
on the toolbar.
-
Click > .
-
Select the .csv file, then click .
-
Select the address book you want to import addresses into, then click .
or
Click to create a new personal address book to import the addresses into, type a name for the new address book, then click .
For information, see Creating a Personal Address Book.
The Choose GroupWise Fields for CSV Data window is displayed.

The column lists the data fields as provided in the file. The column lists the data provided in the .csv file. The column lets you choose the associations between CSV fields and GroupWise fields.
By default, the import process can recognize characters such as comma (,), semicolon (;), and colon (:) as field delimiters. It can also recognize characters such as quotation marks (") as text delimiters. However, if unusual characters are used as delimiters, the import process won’t recognize them.
-
If the .csv file does not display in proper columns:
-
Click .
-
Change the field delimiter character as required by the .csv file.
-
Change the text delimiter character as required by the .csv file.
The .csv file should redisplay in proper columns.
-
-
Click
 and
and  to page through the .csv file data.
The import process attempts to assign the CSV fields to GroupWise fields.
-
To change an automatic field assignment, click the GroupWise field link that you want to change.
or
To select a field assignment, click the link.
-
Select a displayed field.
or
Click a field category, then select the GroupWise field that you want to correspond to the .csv file field.
-
To not import the data from a CSV field, click the link in the column, then click .
-
When you are finished assigning field mappings, click to import the CSV data into the selected address book.
HINT:You can also initiate an import by dragging and dropping a .csv file into a Contacts folder.
Importing Address Books from POP3/IMAP4 Email Accounts
-
Click > > .
The list box displays the email accounts installed on your machine.
-
Select the email account you want to import into GroupWise, then click .
-
Select the check box, then click .
-
Type a name for the new GroupWise personal address book that will contain the imported addresses.
The name you type displays on a new tab in the address book list.
-
Click .
-
Review the summary information to ensure that it is correct, then click .
or
Click to change your import options.
-
Check to see if the email account was successfully imported, then click .
Exporting Addresses from the Address Book
To export addresses from an address book in NAB (Novell Address Book) format:
-
In the Main Window, click
on the toolbar.
-
Click the address book from which you want to export names.
-
Select the addresses you want to export.
If you want to export an entire address book, you don’t need to select any names.
-
Click > .
-
Click if you want to export the entire address book.
or
Click if you want to export the addresses you have selected.
-
Click .
-
Type a file name for the exported file, then click a folder where you want the file to be saved.
-
In the drop-down list, select the file type to save the addresses as.
You can save the file as a Novell Address Book (.nab), a vCard (.vcf), or a comma-separated file (.csv).
Novell address book files are text files with specific formatting. GroupWise 2012 .nab files use UTF-8 character encoding and cannot be imported into earlier versions of GroupWise. However, GroupWise 2012 can export .nab files in ANSI character format, which is compatible with earlier versions of GroupWise.
The .nab and .vcf file types are preferred because they handle complex data without loss. For example, if you export a distribution list as a .nab or .vcf file, members of the distribution list are included in the exported file. However, if you export a distribution list as a .csv file, only the name of the distribution list is exported.
-
Click .
To stop the export, press Esc, then click .
6.5.19 Using the LDAP Address Book
Adding a Directory Service to an Address Book
-
Make sure you know the server name and port number of the LDAP directory service. You can get this information from your Internet service provider or GroupWise administrator.
-
In the Main Window, click
on the toolbar.
-
In the left pane, click .
-
In the right pane, click , then click .
-
Follow the prompts. When you specify the server address, you can specify an IP address or Internet domain name.
-
Click .
-
If you are adding a directory service to search for security certificates, the directory service must be set as the default. Click the directory service account you just added, then click .
-
Click .
Searching for a Person through a Directory Service
-
In the Main Window, click
on the toolbar.
-
Click the LDAP Address Book.

-
Select a directory service from the drop-down list.
-
Type the name you want to search for.
or
Type an email address you want to search for.
If other search fields are available, specify the information you want to search for.
-
Click .
-
When the search is complete, double-click the name you want.
-
Click .
If you want to save the names you find in the search, click the names, click > , select a personal address book, then click .
Establishing a Secure Connection to a Directory Service
-
In the Main Window, click
on the toolbar.
-
Click the LDAP Address Book.
-
Click , then click a directory service.
-
Click .
-
Click .
-
Specify the path to your digital certificate file.
This file enables GroupWise to use SSL to authenticate to the LDAP server (that is, the directory service) you have chosen. Contact your GroupWise administrator to learn the location of this certificate file, or obtain a certificate file from your Internet service provider. You can click the button to find the exact location of the file.
NOTE:GroupWise expects a DER encoded certificate file to be used when establishing a secure connection to the LDAP server.
Modifying the Properties of a Directory Service
-
In the Main Window, click
on the toolbar.
-
Click the LDAP Address Book.
-
Click , then click a directory service.
-
Click .
-
Click the , , and tabs to find the properties you want to modify.
-
Modify the properties, then click .
Specifying the Search Criteria a Directory Service Uses
-
In the Main Window, click
on the toolbar.
-
Click the LDAP Address Book.
-
Click , then click a directory service.
-
Click .
-
Click the tab, then click .
-
Select up to four fields.
If you want to add search fields that you do not see listed, click the tab, then click . Click a MAPI search field name, then click the right-arrow button to add it to the List. Click , click the tab, click , then select the fields you want to search. The available search fields depend on the selected directory service.
Many directory services allow you to search using only the and fields.
-
Click twice, then click twice.
Changing the Length of Time for Directory Service Searches
-
In the Main Window, click
on the toolbar.
-
Click the LDAP Address Book.
-
Click , then click a directory service.
-
Click , then click the tab.
-
Drag the bar under until it shows the amount of time you want.
-
Click , click , then click again.
6.5.20 Advanced Address Book Options
Defining Copy Options
Use Copy Options to select the copying format to use when you copy address book data to the clipboard. When the address book data is copied to the clipboard, it is formatted as a virtual business card (vCard) or address book text. A vCard includes all of identifying information for an individual that is included in an address book.
There are two copy formats you can select: Display Data (ASCII text format) or vCard Data (.vcf stream format). When you select a format, the vCard data copied with the standard Windows text-copy procedure (select text, then press Ctrl+C), can be pasted in that format into other applications (such as personal information managers and Web applications) to fill your particular needs.
For example, you could paste the display text into an HTML editor or a word processor for import into a database or for formatting as a mail merge document. Or, if you chose to copy in vCard format, you could paste the data into a vCard editor or viewer to include sound clips, graphics, or additional text. You could also save the data as a .vcf file for import into any other application that supports the vCard standard. GroupWise supports up to version 2.1 of the vCard standard.
To select the text format to use for copying:
-
In the Main Window, click
on the toolbar.
-
Click > .
-
Select the copy option you want.
The option copies text as “display” text. The option renders text as a vCard data stream.
-
To make your current selection the default, select the check box.
-
Click .
Changing Your MAPI Configuration
-
In the Address Book window, click > .
-
Make your changes, then click .
If the address book’s name is visible, it is a MAPI service provider.