Monitoring the WebAccess Agent
The following sections explain the various methods you can use to monitor the GroupWise® WebAccess Agent to ensure that it is operating properly.
- Monitoring the NetWare WebAccess Agent
- Monitoring the Windows WebAccess Agent
- Monitoring the Linux WebAccess Agent
- Monitoring the WebAccess Agent through the Web Console
- Monitoring the WebAccess Agent through NetWare 6.5 Remote Manager
Monitoring the NetWare WebAccess Agent
The NetWare® WebAccess Agent console, shown below, lets you monitor the operation of the agent, view the agent's log information, and change the log settings while at the server.
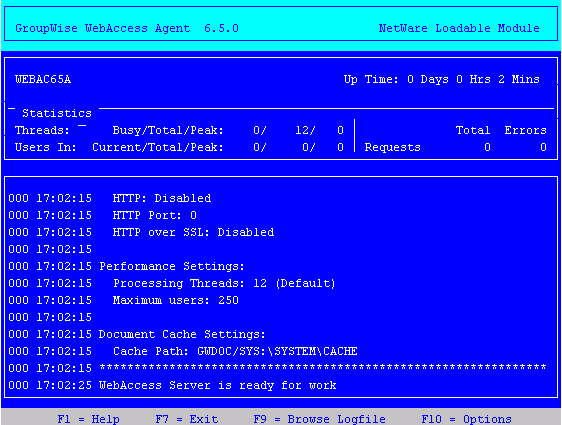
The console and its options are described below.
Threads
The default of 12 threads enables the WebAccess Agent to service 12 user requests at one time. The Busy field displays the number of threads that are currently servicing user requests. The Total field displays the total number of threads available to service requests (by default, 12). The Peak field displays the most threads used at one time to service requests. If all threads are busy much of the time, you can increase the number of threads available for use. See Modifying WebAccess Settings.
Users In
The Users In field displays the number of users who currently are logged in. During startup, if you have enabled WebPublisher, the WebAccess Agent logs in one time for each available thread; these logins are reflected in the Users In fields. The Total field displays the total number of users who have logged in during the current up time. The Peak field displays the most users who have been logged in at one time.
By default, a maximum of 250 users can be logged in at one time. You can use the /maxusers startup switch to change the default. See Using WebAccess Agent Startup Switches.
Requests
The Total field displays the total number of requests the WebAccess Agent has processed during its current up time. The Errors field lists the number of requests that could not be processed because of errors.
Logging Box
The Logging box displays the logged information. The current log level determines the amount of information that is displayed (see F10 = Options). For each line, the first item is the number of the thread that processed the user's request, the second item is the time of the request, and the third item is the information associated with the request.
F9 = Browse Logfile
Press F9 to view the log file. If disk logging is turned on, the current log file is displayed. If disk logging is turned off, a list of old log files is displayed (if any exist). You can then choose which log file you want to view.
F10 = Options
Press F10, then select View Log Files or Logging Options. Using the logging options, you can specify the logging level, turn disk logging on or off, specify the number of days to keep old log files, and specify the maximum amount of disk space to use for log files.
Any changes you make to the logging options apply only to the current session. When you restart the WebAccess Agent, the logging level is reset to the level specified in ConsoleOne® or in the startup file (strtweb.ncf).
Log Level: Off turns logging off; Normal displays initial statistics, user logins, warnings, and errors; Verbose displays Normal logging plus user requests; and Diagnostic displays Verbose logging plus thread information. The default is Normal logging. Use Diagnostic only if you are troubleshooting a problem with WebAccess.
File Logging: Turns disk logging on or off. When disk logging is turned on, the WebAccess Agent creates a new log file each day and each time it is restarted. The log file is named mmddweb.nnn, where mm is the month, dd is the day, and nnn is a sequenced number (001 for the first log file of the day, 002 for the second, and so forth). The default location for the log files is the domain\wpgate\webac65a\xxx.prc directory.
The verbose and diagnostic logging levels do not degrade WebAccess Agent performance, but log files saved to disk consume more disk space when verbose or diagnostic logging is in use.
Max Log File Age: Specifies the number of days you want the WebAccess Agent to retain old log files. The WebAccess Agent will retain the log file for the specified number of days unless the maximum disk space for the log files is exceeded. The default age is 7 days.
Max Log Disk Space: Specifies the maximum amount of disk space you want to use for log files. If the disk space limit is exceeded, the WebAccess Agent will delete log files, beginning with the oldest file, until the limit is no longer exceeded. The default disk space is 65536 KB.
Monitoring the Windows WebAccess Agent
The Windows WebAccess Agent console lets you monitor the operation of the agent. The console, shown below, is displayed in a DOS window.
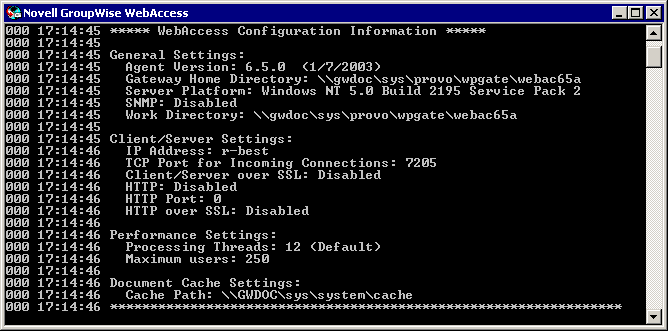
The console and its options are described below.
Logging Window
The current logging level determines the amount of information that is displayed. You can specify the logging level through ConsoleOne, through startup switches, or by using the F2 function key. See Modifying Log Settings in ConsoleOne, Modifying Log Settings through Startup Switches, and F2.
The verbose and diagnostic logging levels do not degrade WebAccess Agent performance, but log files saved to disk consume more disk space when verbose or diagnostic logging is in use.
For each line, the first item is the number of the thread that processed the user's request, the second item is the time of the request, and the third item is the information associated with the request.
F2
Cycles the logging level between Normal, Verbose, and Diagnostic. Normal displays initial statistics, user logins, warnings, and errors; Verbose displays Normal logging plus user requests; and Diagnostic displays Verbose logging plus thread information. The default is Normal logging. Use Verbose only if you are troubleshooting a problem with WebAccess.
The verbose and diagnostic logging levels do not degrade WebAccess Agent performance, but log files saved to disk consume more disk space when verbose or diagnostic logging is in use.
Any changes you make to the logging level using F2 apply only to the current session. When you restart the WebAccess Agent, the logging level is reset to the level specified in ConsoleOne or in the startup file (strtweb.bat).
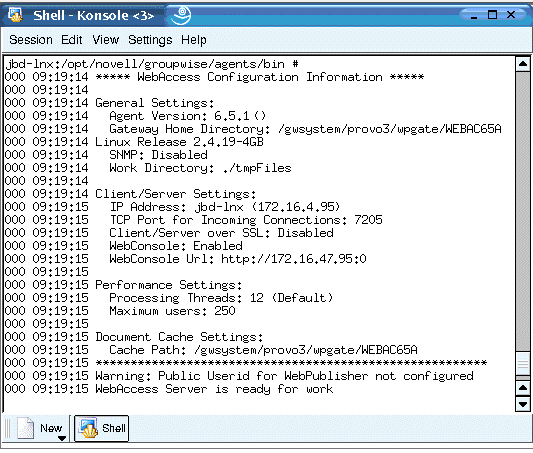
Monitoring the Linux WebAccess Agent
By default, the Linux Agent runs as a daemon with no user interface. To display information on the server where the WebAccess Agent runs, you must start the WebAccess Agent with the --show startup switch. The console is displayed in a terminal window.
Monitoring the WebAccess Agent through the Web Console
You can use a Web browser interface, referred to as the Web console, to monitor the WebAccess Agent.
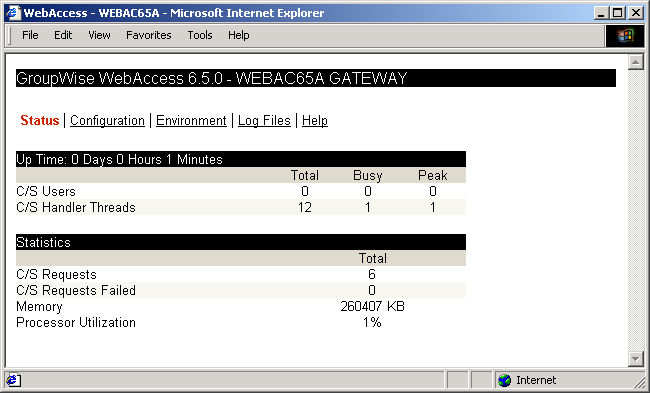
Through the Web console you can view the following information:
Status: Displays how long the WebAccess Agent has been up; the number of client/server users who have logged in, the number of threads dedicated to handling requests, and the number of successful and failed requests; and the amount of memory on the server and the percent of processor utilization.
Configuration: Displays the gateway home directory being used by the WebAccess Agent, the current log settings, the performance settings (processing threads and maximum users), and the client/server settings (IP address, TCP port, and so forth).
Environment: Displays server information such as name, operating system date, memory, processor utilization, and loaded modules.
Log Files: Lets you view the contents of the WebAccess Agent's log files and the current log settings.
For detailed information about each field on the Status, Configuration, Environment, or Log Files page, select the page, then click Help.
You cannot use the Web console to change any of the WebAccess Agent's settings. Changes must be made through ConsoleOne, the WebAccess Agent console, or the startup file.
Refer to the following sections for information about enabling and using the Web console:
Enabling the WebAccess Agent Web Console
If, during, installation, you enabled the Web console, skip to Using the WebAccess Agent Web Console. On Linux, the Web Console is enabled by default. Skip to Using the WebAccess Agent Web Console.
If you want to enable the Web console, you need to complete the following steps.
-
In ConsoleOne, right-click the WebAccess Agent object, then click Properties.
-
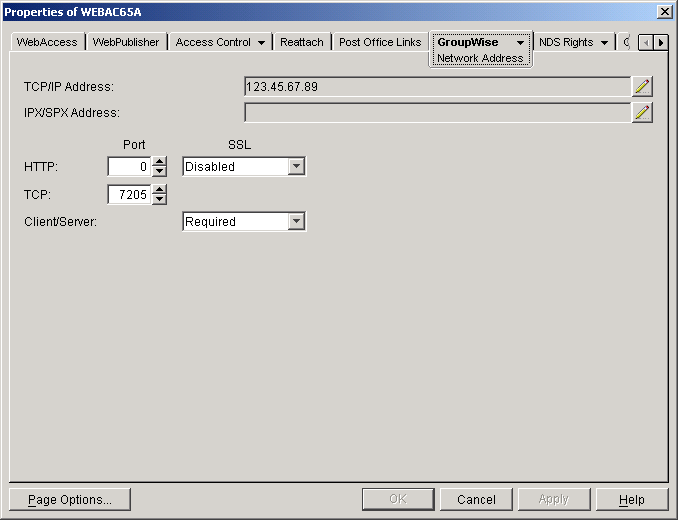
Click GroupWise > Network Address to display the Network Address page.
-
In the HTTP Port field, enter a port number. We recommend that you use port 7211 if it is not already in use on the WebAccess Agent's server.
Assigning a port number enables the Web console; assigning 0 as the port number disables the Web console.
Any user who knows the WebAccess Agent's IP address (or hostname) and the HTTP port number will be able to use the Web console. If you want to restrict Web console access, you can assign a username and password. To do so:
-
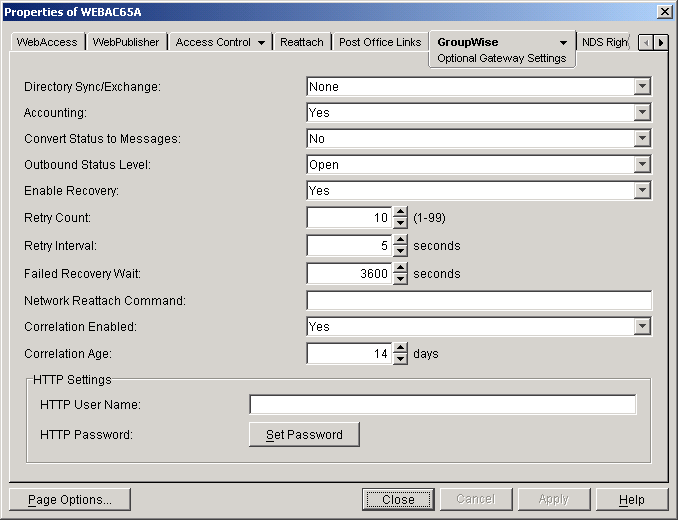
Click the GroupWise tab, then click Optional Gateway Settings to display the Optional Gateway Settings page.
-
In the HTTP User Name field, enter an arbitrary username (for example, webcon).
-
Click Set Password to assign a password (for example, monitor).
-
Click OK to save your changes.
The Web console can only be enabled or disabled through the Network Address page (see Step 2 above). However, you can use the /httpuser and /httppassword startup switches to override the assigned username and password. For more information, see Using WebAccess Agent Startup Switches.
Using the WebAccess Agent Web Console
-
In a Web browser, enter the following:
http://IP_address:agent_port
or
https://IP_address:agent_port
where IP_address is the IP address of the server where the WebAccess Agent is running, and agent_port is the port number assigned to the agent. If you used the default port during installation, the port number is 7211.
-
If prompted, enter the Web console username and password.
-
Select Status, Configuration, Environment, or Log Files to view the desired information.
For detailed information about each field on the Status, Configuration, Environment, or Log Files page, select the page, then click Help.
Monitoring the WebAccess Agent through NetWare 6.5 Remote Manager
If the WebAccess Agent is running on a NetWare 6.5 server, you can use the IP Address Management feature in NetWare Remote Manager (NetWare Remote Manager > Manage Server > IP Address Management) to view the IP address and port configuration for the WebAccess Agent. This is also true for other GroupWise agents (MTA, POA, and Internet Agent) running on NetWare 6.5 servers.
IMPORTANT: If the WebAccess Agent is running in protected mode, it will not display in NetWare Remote Manager.
You access NetWare Remote Manager by entering the following URL in a Web browser:
http://server_address:8008
For example:
http://137.65.123.11:8008
For more information about using NetWare Remote Manager, see the NetWare 6.5 documentation.