3.5 Managing Received Items
GroupWise stores all the mail messages, appointments, and other items you receive in your Mailbox.
Figure 3-1 Mailbox View
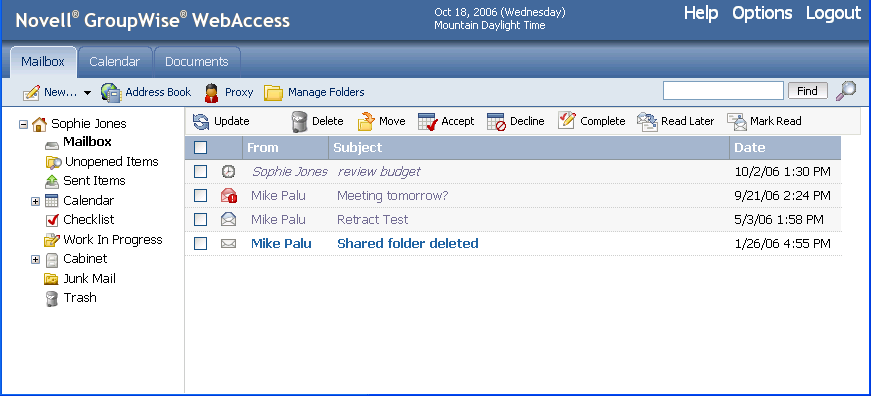
From your Mailbox, you can read items, reply to items, and forward items you've received. You can organize items by assigning them to categories or by creating a checklist. You can delegate tasks and appointments to other users. You can handle unwanted Internet e-mail with Junk Mail Handling.
This section contains the following topics:
3.5.1 Reading Items You Receive
You can read items you receive in your Mailbox or Calendar. Your Mailbox displays a list of all of the items you have received from other users. Posted appointments, tasks, and reminder notes appear in your Calendar, not in your Mailbox.
Phone and mail messages stay in your Mailbox until you delete them. Appointments, reminder notes, and tasks stay in your Mailbox until you accept, decline, or delete them. When you accept an appointment, reminder note, or task, it is moved to your Calendar.
All Mailbox items are marked with an icon.The icons change depending on whether or not the item has been opened. For more information, see Section 1.3.4, Item List.
In addition, all unopened items in your Mailbox are bolded to help you easily identify which items and documents you have not yet read. For more information, see Section 2.2.6, Marking an Item Unread (Read Later) and Section 2.2.7, Marking an Item Read.
Reading Items in Your Mailbox
-
Click the item you want to read.
3.5.2 Replying to Items You Receive
Use Reply to respond to an item. You can reply to everyone who received the original item or to the sender only, without needing to create and address a new message. You can also include a copy of the original message in your reply. Your reply will include Re: preceding the original subject text. You can modify the subject text if you want.
Replying to an Item
-
Open the item you want to reply to.
-
Click on the toolbar.
Click the arrow next to to choose from the following options:
-
Reply to Sender (Include Message): Sends a message and a copy of the original message to only the sender.
-
Reply to Sender: Sends a message to only the sender (without including the original message).
-
Reply to All (Include Message): Sends a message and a copy of the original message to all recipients.
-
Reply to All: Sends a message (without including the original message) to all recipients.
-
-
Type your message, then click on the toolbar.
If the original item included BC or CC recipients and you selected to reply to all, your reply is sent to the CC recipients but not to the BC recipients.
3.5.3 Forwarding Items to Other Users
Use Forward to send items you receive and document references to other users. When you forward an item, it is sent as an attachment to a mail message. The mail message includes your name and any additional comments you have made.
Forwarding an Item
-
Right-click the item you want to forward.
-
Click .
-
Add the names of the users to whom you want to forward the item.
-
Type a message (optional).
-
Click on the toolbar.
3.5.4 Printing Items
When you print an item, the From, To, Date, Subject, CC, and attachment names are displayed at the top of the page.
-
In an open item click .
-
In the field, select the printer to use.
-
Select the pages to print, then click .
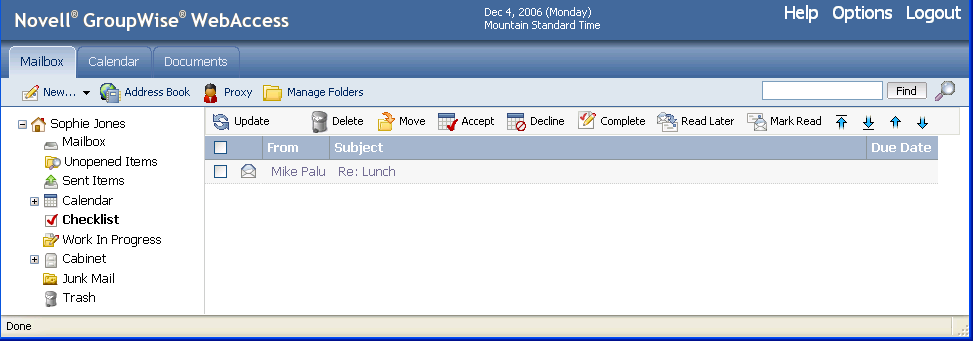
3.5.5 Creating a Checklist
Use the Checklist folder to create a task list. You can move any items (mail messages, phone messages, reminder notes, tasks, or appointments) to this folder and arrange them in the order you want. Each item is marked with a check box so that you can check off items as you complete them.
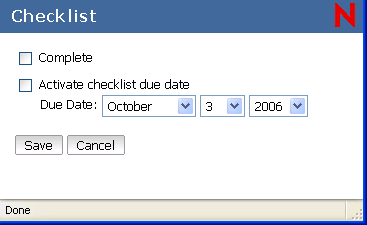
After you have moved an item to the Checklist folder, you can open it, click the tab, and assign it a due date. You can also mark it Completed and set its position in the list from the Checklist tab.
The Checklist folder is a system folder. It replaces the Task List folder.
IMPORTANT:If you or your system administrator has set up auto-archiving of items in your Mailbox, checklist items are archived based on the original date you received the item, not based on the due date you assign it.
This section contains the following topics:
Creating a Master Checklist in the Checklist Folder
-
Drag items to the Checklist folder.
In the Checklist folder, the items display with a check box to the left of them. When you complete an item in the checklist, you can mark it complete by selecting the check box.
You can move items to the Checklist folder from a shared folder only if you are the owner of the shared folder.
-
To assign a due date and a numerical position (order) in the Checklist to an item, open the item and add this information on the tab.
You can also create a checklist area in another folder and drag items to the area. After items are in a checklist area of any folder, they will also display in the master Checklist folder, even though they are still located in the original folder.
Creating a New Item in the Checklist Folder
-
Click the folder.
-
If no items exist in the Checklist folder, click the down-arrow on the
 icon, then click
.
icon, then click
.
Type a subject and message, click on the toolbar, then skip to Step 6.
or
If items already exist in the Checklist folder, follow Steps 3-5 below.
-
Click the position in the checklist where you want to add a new item. For example, if you want the item to be first in the checklist, click the first item.
-
Begin typing the subject text.
-
When you are finished typing the subject text, press Enter.
The item you have created displays as a posted mail item in the position you selected, and the item that was originally in that position is moved down one position in the checklist.
-
To add additional information to this item, open it and type additional text on the tab.
-
To assign a due date to the item, open it, click the tab, click , then click a date.
Assigning a Due Date to an Item in the Checklist Folder
-
Open an item in the Checklist folder.
-
Click the tab.
-
Select , then click a date.
Marking or Unmarking a Checklist Item Completed
-
Click the box next to the checklist item.
3.5.6 Viewing the Source of External Messages
When you receive or send messages to and from external systems, you can view the source for a message. The source includes all the data that is contained in a message.
-
Open an item that you received from an external source.
-
Click the Mime.822 attachment to open it.