63.2 Creating and Managing Agent Groups
You might find it convenient to group related agents together for monitoring purposes. Initially, all agents are in a single group with the same name as your GroupWise system.
Figure 63-3 Monitor Agent Console on Initial Startup

Agent groups are displayed on the left side of the Monitor Agent server console. When you select an agent group, the monitored agents in the group and their status information are listed on the right side of the Monitor Agent server console.
Figure 63-4 Monitor Agent Console with Agent Groups Defined
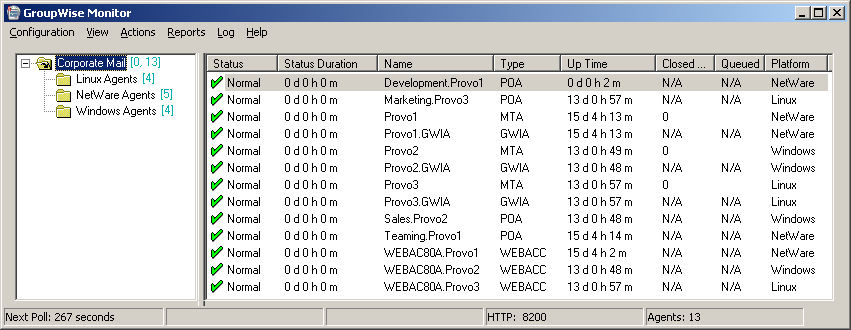
You can create additional groups and subgroups as needed to make monitoring similar agents easier. You might want to create agent groups based on geographical areas, on administrative responsibilities, or on agent configuration similarities. The number of agents in the group is displayed to the right of the group name in the agent groups window.
In addition, by creating agent groups, you can provide configuration settings for monitoring just once for all agents in each group, rather than having to provide them individually for each agent in your GroupWise system.
NOTE:On Linux, you perform these tasks at the Monitor Agent Web console or Monitor Web console, using steps similar to those provided in this section
63.2.1 Creating an Agent Group
At the Windows Monitor Agent server console:
-
Right-click the folder where you want to create the agent group, then click .
-
Type a name for the group, then click to create a new folder for the agent group.
The group name must be unique within its parent group.
-
Click a folder containing agents that you want to add to the new group.
-
Drag and drop agents into the new group as needed.
-
Click the new group to view its contents.
You can nest groups within groups as needed.
63.2.2 Managing Agent Groups
Managing agent groups is easy at the Monitor Agent server console:
-
To rename an agent group, right-click the agent group, click , type the new name, then press Enter.
-
To move an agent group, drag and drop it to its new location.
-
To delete an agent group, right-click the agent group, then click . A group must be empty before you can delete it.
63.2.3 Viewing Your Agent Group Hierarchy
When you create nested groups, you can choose how much of the hierarchy you want displayed at the Monitor Agent server console:
-
You can open and close groups manually by clicking the plus and minus icons beside each folder.
-
To expand your entire group hierarchy, click
-
To collapse your entire group hierarchy, click .
You can also decide whether you want to view just the agents in the currently selected group or the agents in subgroups as well. By default, only the agents in the selected folder are listed in the agent window. Right-click an agent group, then click to display the contents of nested groups along with the selected group.
Figure 63-5 Monitor Agent Server Console with Subgroup Agents Displayed
Numbers in brackets beside each group indicate the number of agents in the selected group and the total number displayed.
63.2.4 Configuring an Agent Group
Configuration settings for monitoring can be set individually for each monitored agent, for each agent group, or for all monitored agents collectively. You can establish default configuration settings for all agents by setting them on the root agent group that is named the same as your GroupWise system. Those default settings can be inherited by each subgroup that you create thereafter if you select Those default settings can be overridden by establishing different settings for an agent group or for an individual agent if you deselect .