3.2 Managing Sent E-Mail
3.2.1 Working with Sent Items
You can track status information about an item in the Sent Items folder. Usually, this option is turned on by default to track delivered and opened information. If you choose not to add items to the Sent Items list, GroupWise cannot track any information for them.
Listing Sent Items
You might want to display items you previously sent. For example, you can read a sent item, resend it with or without corrections, and in some cases, retract it (if it has not already been opened by the recipient).
-
Click the folder
 in the Nav Bar.
The icons next to an item can also give you helpful status information. See Section 1.9, Identifying Icons Appearing Next to Items.
All sent items reside in this folder unless they are moved to a folder other than the Mailbox or Calendar. If a sent item is moved to another folder, it no longer displays in the Sent Items folder. To display sent items that have been moved to other folders, open those folders.
If you are sending messages to non-GroupWise systems, remember that those systems must have status tracking capability in order to return the status of your outgoing message to your GroupWise system.
Displaying Sent Item Properties
Properties lets you check the status of any item you send. For example, you can see when an item was delivered and when the recipient opened or deleted the item. If a recipient accepted or declined an appointment and included a comment, you see the comment in the Properties window. You also see if a recipient marked a task Completed.
The Properties window also shows information about items you receive. You can see who else received the item (except for blind copy recipients), the size and creation date of attached files, and more.
Understanding Sent Item Properties
There are two views for the properties:
Basic Properties: Displays the Properties header and a list of recipients. The list of recipients displays the recipient’s name and user ID, what actions the recipient has taken with the item, the date and time of the last action, and any comments.
Advanced Properties: Displays the Properties header, recipients, Post Offices, files, and options for the item. The Advanced Properties page is helpful to system administrators when they need to track the item for troubleshooting purposes.
For information about a document, use the Activity Log in Document Properties. See Section 15.7, Viewing the History of a Document.
Viewing Sent Item Properties
In your Sent Items folder:
-
Right-click an item.
-
Click .
-
Scroll to the status information near the bottom of the Properties page.
The icons next to an item can also give you helpful status information. See Section 1.9, Identifying Icons Appearing Next to Items.
If you are sending messages to non-GroupWise systems, remember that those systems must have status tracking capability in order to return the status of your outgoing message to your GroupWise system.
Saving the Status Information of an Item
-
Right-click an item, then click .
-
Click > .
GroupWise gives the item a temporary filename. You can change the filename and default folder.
-
Click .
Printing the Status Information of an Item
-
Right-click an item, then click .
-
Right-click in the Properties window, then click .
Setting the Sent Items Default View Action
When you double-click an item in the Sent Items folder, you can choose whether the message or the item properties are displayed.
-
Click >
-
Click .
-
Select if you want the sent item to or .
-
Click .
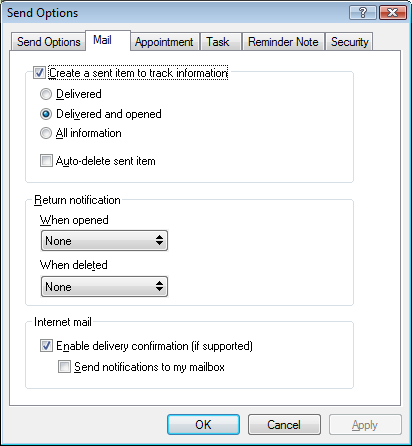
Configuring Sent Item Information to Track
-
To change the sent information to track for an item, open a new item, click .
or
To change the sent information to track for all items you send, click > , then click the tab for the item type.
IMPORTANT:The option is selected by default. It is highly recommended that you do not deselect it. If this option is not selected, no sent item is created when you send an item; therefore, you do not have a copy of the items you send unless you save them yourself.
-
Select the information to track:
Delivered: Tracks when an item you have sent was delivered to a user’s mailbox.
Delivered and opened: Tracks when an item you have sent was delivered and when it was opened by the recipient.
All information: Tracks when an item you have sent was delivered, opened, deleted and emptied.
-
(Optional) Decide if you want to enabled. This removes sent items from your mailbox after all the recipients have deleted the items and emptied them from their Trash.
-
Return to the item you are composing.
or
Select the information to track for each item type, click , then click to save the setting for all items.
3.2.2 Retracting Sent E-Mail
Use to retract a sent item from the recipient’s Mailbox. You can retract a mail or phone message from those recipients who haven’t yet opened the item. You can retract an appointment, reminder note, or task at any time. Items that have been sent through the Internet to other e-mail systems cannot be retracted.
-
Click the folder in the Nav Bar.
-
Right-click the item you want to retract, then click .
If you click , items are deleted and purged, and they cannot be recovered.
-
Select the appropriate option.
My Caching and Online Mailbox: Deletes the item from your caching and online mailbox.
My Caching Mailbox: Deletes the item from your caching mailbox.
Recipient’s Mailbox: Deletes the item from the mailbox of all recipients, but not from your mailbox.
All Mailboxes: Deletes the item from your mailbox and the mailbox of all recipients.
-
If you have selected to retract this item from other recipients’ mailboxes, you can type a comment to the recipients, explaining why the item was retracted.
-
Click .
To see which recipients have opened your message, right-click the item, then click . E-mail cannot be retracted if it has already been opened.
3.2.3 Resending E-Mail
Use to send an item a second time, perhaps with corrections.
-
Click the folder in the Nav Bar.
-
Right-click the item you want to resend, then click .
-
If the item was an auto-date item, click or .
-
Make any changes to the item, if necessary, then click on the toolbar.
-
Click to retract the original item.
or
Click to leave the original item.
You can check the Properties of the original item to see if GroupWise was able to retract it. Right-click the item in the folder, then click . Mail and phone messages cannot be retracted if they have already been opened.
3.2.4 Replying to Sent E-Mail
Use to make additions to any sent mail.
-
Click the folder in the Nav Bar.
-
Right-click the item you want to reply to, then click .
-
Select to send the reply just to yourself.
or
Select to send the reply to yourself and all others on the original message.
-
Click .
-
Make all necessary additions to the message, then click on the toolbar.
3.2.5 Confirming Delivery of E-Mail You Send
GroupWise provides several ways to confirm that your item was delivered.
If you are sending messages to non-GroupWise systems, remember that those systems must have status tracking capability in order to return the status of your outgoing message to your GroupWise system.
Receiving Notification About Items You Send
You can receive notification when the recipient opens or deletes a message, declines an appointment, or completes a task.
-
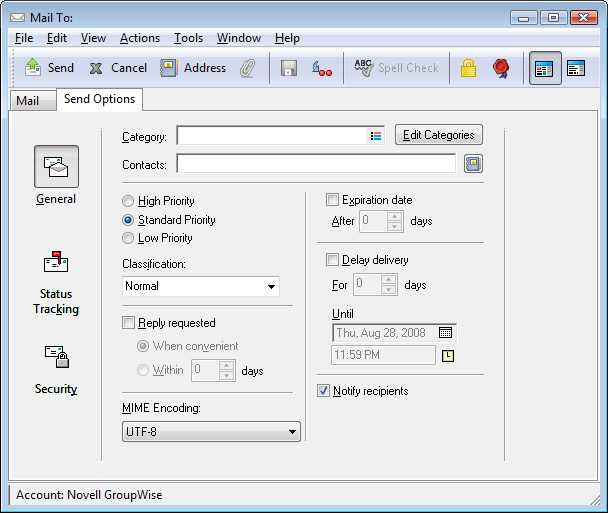
To get a return receipt for one item, open an item view, click the tab, then click .
or
To always get a return receipt for items you send, click > , double-click , then click the tab for the item type.
-
In the group box, specify the type of return receipt you want.
None: No action is taken. Information is tracked in the properties for sent items.
Mail Receipt: You receive an e-mail.
Notify: You receive an alarm in Notify.
Notify and Mail: You receive an e-mail and an alarm in Notify.
This feature is not supported when sending to a non-GroupWise system.
If you have deselected to receive alarms and notifications, you cannot receive notifications with Notify. For more information, see Section 8.2, Starting Notify.
If you are sending an item to an Internet address, you can click . If the receiver’s Internet e-mail system enables status tracking, you can receive status about the item you send.
Requesting a Reply for Items You Send
You can inform the recipient of an item that you need a reply. GroupWise adds a sentence to the item stating that a reply is requested and changes the icon in the recipient’s Mailbox to a double arrow.
-
To request a reply for one item, open an item view, click the tab, then click .
or
To request a reply for all items you send, click > , then double-click .
-
Click , then specify when you want to receive the reply.
The recipient sees
 next to the message. If you select , “Reply Requested: When convenient” appears at the top of the message. If you select , “Reply Requested: By xx/xx/xx” appears at the top of the message.
-
Return to the item you are composing.
or
Click , then click to save settings for all items.
Notifying Recipients About Items You Send
-
To notify the recipients of one item, open an item view, then click .
or
To notify the recipients of all items you send, click > .
-
Select .
Users are automatically subscribed to Notify in Options. If they have deselected to receive alarms and notifications, they cannot be notified of messages you send. For more information, see Section 8.5, Being Notified of Someone Else’s Messages.
-
Return to the item you are composing.
or
Click , then click to save the setting for all items.