6.4 Writing Entitlements in XML through iManager
To help you better understand what needs to go into an entitlement, you can look at the entitlements and policies in one of the preconfigured drivers, Active Directory (AD), that has entitlements enabled. This includes examining Novell’s Entitlement DTD (Document Type Definition), then looking at XML examples of writing entitlements based on the DTD.
In this section:
6.4.1 What the Active Directory Driver Adds When Entitlements Are Enabled
The AD driver with entitlements enabled contains the following changes to its structure:
-
Adds the DirXML-EntitlementRef attribute to the driver filter. The DirXML-EntitlementRef attribute allows the driver filter to listen for entitlement activities.
-
Creates a User Account Entitlement. The User Account entitlement grants or revokes an account in Active Directory for the user. When the account is granted, the user is given an enabled logon account. When the account is revoked, the logon account is either disabled or deleted, depending on how the driver is configured.
-
Creates a Group Membership Entitlement. The Group Entitlement grants or revokes membership in a group in Active Directory. The group must be associated with a group in the Identity Vault. When membership is revoked, the user is removed from the group. The group membership entitlement is not enforced on the Publisher channel; if a user is added to a controlled group in Active Directory by some external tool, the user is not removed by the driver. Further, if the entitlement is removed from the user object instead of being simply revoked, the AD driver takes no action.
-
Creates an Exchange Mailbox Entitlement. The Group Entitlement grants or revokes an Exchange mailbox for the user in Microsoft Exchange.
-
Adds entitlement information to many policies.
The following policies contain additional rules that allow entitlements to work properly:
-
InputTransform (driver level). The Check Target Of Add Association For Group Membership Entitlements rule in this policy checks the target of “add-association” for group membership entitlements. Group membership entitlements assigned to users being created in Active Directory cannot be processed until the user is successfully created. Add-association signals that an object has been created by the driver in Active Directory. If the object is also tagged for group entitlement processing, it performs the work now.
-
Event Transform (Publisher channel). The Disallow User Account Delete rule in this policy disallows a user account delete in the Identity Vault. When using the User Account Entitlement, managed user accounts are controlled by the entitlement in the Identity Vault. A delete in Active Directory does not delete the controlling object in the Identity Vault. A future change to the object in the Identity Vault or a merge operation might re-create the account in Active Directory.
-
Command (Subscriber channel). The Command policy contains the following rules pertaining to entitlements:
-
The User Account Entitlement Change (Delete Option) rule. The User Account Entitlement grants the user an enabled account in Active Directory. Revoking the entitlement disables or deletes the Active Directory account depending on the value you select for the global variable. This rule executes when the entitlement is changing and you have selected the Delete option.
-
The User Account Entitlement Change (Disable Option) rule. The User Account Entitlement grants the user an enabled account in Active Directory. Revoking the entitlement disables or deletes the Active Directory account depending on the value you select for the global variable. This rule executes when the entitlement is changing and you have selected the Disable option.
-
The Check User Modify for Group Membership Being Granted or Revoked rule.
-
The Check User Modify for Exchange Mailbox Being Granted or Revoked rule.
-
-
Matching (Subscriber channel). This is the Account Entitlement: Do Not Match Existing Accounts rule for this policy. When using the User Account entitlement with the Identity Manager user application or Role-Based Entitlements, accounts are created and deleted (or disabled) by granting or revoking the entitlement. The default policy does not match an existing account in Active Directory if the user is not entitled to an account in Active Directory. Modify or remove this rule if you want the entitlement policy to apply to matching accounts in Active Directory. This might result in the Active Directory account being deleted or disabled.
-
Creation (Subscriber channel). The Creation policy contains the following rules pertaining to entitlements:
-
Account Entitlement: Block Account Creation When Entitlement Not Granted. When using the User Account entitlement with the Identity Manager user application or Role Based Entitlements, accounts are created only for users that are specifically granted the account entitlement. This rule vetoes user account creation when the entitlement is not granted.
-
Identity Vault Accounts Are Enabled if Login Disabled Does Not Exist.
-
Prepare To Check Group Entitlements After Add. Group entitlements are processed after the add completes, because the added object needs to exist in order to be added to a group. The add is flagged with an operational property that is checked in the input transform when the add processing completes.
-
Signal the Need To Check Exchange Entitlements After the Add.
-
Map User Name to Windows Logon Name. When userPrincipalName is configured to follow the eDirectory user name, set userPrincipalName to the eDirectory object name plus the name of the Active Directory domain.
-
You can see the actual XML code for each policy by performing the following steps in iManager:
-
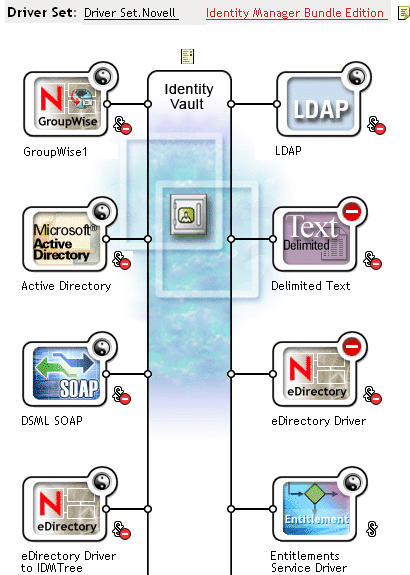
Select the > .
-
Browse to the driver set where the driver resides and click .
-
From the Identity Manager Overview page, select the Driver object from the presented Driver Set.
-
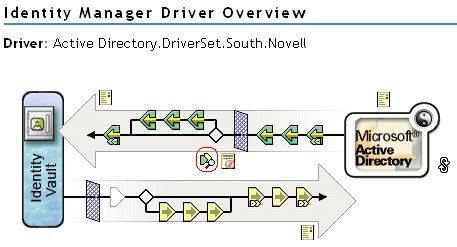
Double-click the driver from the Driver Set to bring up the driver page. Click the icon in the center of the driver (circled in red).
-
Once you select a policy from the Show All Policies screen, you can view the conditions and actions that make up the policy.

-
To view the actual XML code behind the policies, Select from the drop-down menu (this menu defaults to Identity Manager Policy). For information on creating and editing policies, see the Policy Builder and Driver Customization Guide and the selected Identity Manager driver guide for building policies specific to that driver.
-
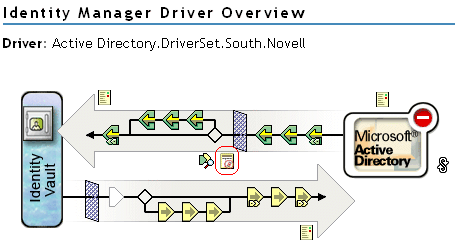
To view the entitlements that come with preconfigured drivers (our example is Active Directory) with entitlements enabled, follow Step 1 through Step 4. However, select the icon in the center of the driver (circled in red).
-
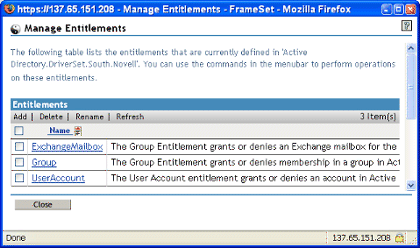
On the Manage Entitlements page, click the entitlement name to bring up the entitlement in the XML viewer. To edit the entitlement’s code, click .
The Active Directory driver with entitlements enabled comes with three entitlements: User Account, Group, and Exchange Mail.
Figure 6-1 Entitlements That Come with the AD Driver
You can see the XML code for these entitlements as part of the writing samples in Section 6.4.6, Example Entitlements To Help You Create Your Own Entitlements.
6.4.2 Using Novell’s Entitlement Document Type Definition (DTD)
Some entitlements come predefined on drivers that have entitlements enabled. You can use these entitlements or you can create your own entitlements in iManager or Designer. To help you create your own entitlements, use the following Novell Entitlement DTD as an example to create entitlements.
This explanation of the DTD is followed by four examples of how to write entitlements in this XML format through iManager. If you don’t want to worry about XML formatting, use Designer’s Entitlement Wizard for an easier way to create entitlements.
Novell’s Entitlement DTD
<!-*****************************************************************->
<!-- DirXML Entitlements DTD
<!-- Novell Inc.
<!-- 1800 South Novell Place
<!-- Provo, UT 84606-6194
<!-- Version=1.0.0
<!-- Copyright 2005 Novell, Inc. All rights reserved -->
<!--************************************************************* -->
<!--
	Entitlement definition stored in the XmlData attribute of a
      DirXML-Entitlement object.
-->
<!ELEMENT entitlement (values?)>
<!ATTLIST entitlement
	conflict-resolution (priority | union) "priority"
	display-name CDATA #REQUIRED
	description CDATA #REQUIRED
>
<!ELEMENT values (query-app | value+)?>
<!ATTLIST values
	multi-valued (true | false) "true"
>
<!ELEMENT value (#PCDATA)>
<!ELEMENT query-app (query-xml, result-set)>
<!ELEMENT query-xml ANY>
<!ELEMENT result-set (display-name, description, ent-value)>
<!ELEMENT display-name(token-attr | token-src-dn | token-association)>
<!ELEMENT ent-value (token-association | token-src-dn | token-attr)>
<!ELEMENT description (token-association | token-src-dn | token-attr)>
<!ELEMENT token-association EMPTY>
<!ELEMENT token-attr EMPTY>
<!ATTLIST token-attr
	attr-name CDATA #REQUIRED
>
<!ELEMENT token-src-dn EMPTY>
<!--
	Entitlement reference stored in the DirXML-EntitlementRef attribute 	of a DirXML-EntitlementRecipient or a DirXML-SharedProfile object.
-->
<!ELEMENT ref (src?, id?, param?)>
<!ELEMENT param (#PCDATA)>
<!ELEMENT id (#PCDATA)>
<!ELEMENT src (#PCDATA)>
<!--
    Entitlement result stored in the DirXML-EntitlementResult attribute of a DirXML-EntitlementRecipient object.
-->
<!ELEMENT result(dn, src, id?, param?, state, status, msg?,timestamp)>
<!ELEMENT dn (#PCDATA)>
<!ELEMENT state (#PCDATA)>
<!ELEMENT status (#PCDATA)>
<!ELEMENT msg ANY>
<!ELEMENT timestamp (#PCDATA)>
<!--
   Cached query results stored in the DirXML-SPCachedQuery attribute of a DirXML-Entitlement object.
-->
<!ELEMENT items (item*)>
<!ELEMENT item (item-display-name?, item-description?, item-value)>
<!ELEMENT item-display-name (#PCDATA)>
<!ELEMENT item-description (#PCDATA)>
<!ELEMENT item-value (#PCDATA)>
<!--
   Representation of a DirXML-EntitlementRef within the DirXML Script and within the operation-data of an operation in an XDS document.
-->
<!ELEMENT entitlement-impl (#PCDATA)>
<!ATTLIST entitlement-impl
	name CDATA #REQUIRED
	src CDATA #REQUIRED
	id CDATA #IMPLIED
	state (0 | 1) #REQUIRED
	src-dn CDATA #REQUIRED
	src-entry-id CDATA #IMPLIED
>
6.4.3 Explaining the Entitlement DTD
The Entitlement DTD is broken into five parts: definition, reference, result, cached query, and internal reference information. The heading is just a comment and is optional. In the DTD, the heading for the Entitlement Definition is:
<!-- Entitlement definition stored in the XmlData attribute of a DirXML-Entitlement object. -->
Headings are followed by Elements (ELEMENT) and Attribute lists (ATTLIST). Below is a detailed explanation of the elements and attributes under the Entitlement Definition heading, which is the main heading you need to focus on when creating entitlements.
<!ELEMENT entitlement (values?)>
The root level element is <entitlement>, which can contain a single, optional, child <values> element. This is followed by the Attribute list, which includes conflict-resolution, display-name, and description. Conflict resolution uses Priority or Union attribute values.
conflict-resolution (priority | union) "priority"
Role-Based Entitlements use conflict resolution to determine what should happen when a valued entitlement is applied multiple times to the same object. For example, suppose that user U is a member of Entitlement Policy A and Entitlement Policy B, each of which reference the same valued entitlement E, but with a different set of values. Entitlement E of Entitlement Policy A has values (a, b, c). Entitlement E of Entitlement Policy B has a set of values (c, d, e).
The conflict resolution attribute decides which set of values should apply to user U. If set to union, user U is assigned both sets of values (a, b, c, d, e). If set to priority, user U would get only one set of values, depending upon which Entitlement Policy has a higher priority.
If an entitlement is single-valued, conflicts must be resolved by priority, because a union of values would result in more than one value being applied. Role-Based Entitlements presently uses this attribute; in the future, Workflow Entitlements might also use it.
display-name CDATA #REQUIRED description CDATA #REQUIRED
The literal entitlement name is not necessarily what an entitlement should display. The Display-name and Description attributes are intended for end-user display. (In Designer, you have an option to choose a display name for the entitlement instead of using the actual entitlement name.)
<!ELEMENT values (query-app | value+)?> <!ATTLIST values multi-valued (true | false) "true"
The <values> element is optional and indicates that an entitlement is valued. If you do not use this element, it means an entitlement is value-less. An example of a valued entitlement is an entitlement that grants a distribution list. An example of a value-less entitlement is an entitlement that grants an account in an application, such as the User Account entitlement that comes with the Active Directory driver.
Valued entitlements receive their values from three sources. One source is the external application (designated by the <query-app> element). Another is from a predefined list of enumerated values (one or more <value> elements). The third source is from the entitlement client (a <values> element with no <value> children). The examples are helpful in explaining the way values work.
Valued entitlements may be single- or multi-valued, and the default is multi-valued. It is the responsibility of the entitlement client to enforce this restriction.
<!ELEMENT value (#PCDATA)>
Entitlement values are untyped strings.
<!ELEMENT query-app (query-xml, result-set)>
If values come from an external application (such as an e-mail distribution list), you must specify an application query through the < query-xml> element. You extract the results from the query through the <result-set> element. We show two examples of this in Example 2: Application Query Entitlement: External Query.
<!ELEMENT query-xml ANY>
XML queries are XDS formatted. The <query-xml> command is used to find and read objects from the connected application. The functionality for DirXML rules, object migration, etc. depends on the driver’s implementation of the query command. For more information on XML queries, see Novell’s developer documentation on queries.
<!ELEMENT result-set (display-name, description, ent-value)> <!ELEMENT display-name(token-attr | token-src-dn | token-association)> <!ELEMENT ent-value (token-association | token-src-dn | token-attr)> <!ELEMENT description (token-association | token-src-dn | token-attr)> <!ELEMENT token-association EMPTY> <!ELEMENT token-attr EMPTY> <!ATTLIST token-attr attr-name CDATA #REQUIRED
Use the result set element to help you interpret the result of an external application query. There are three pieces of data that are of interest: the display name of the value (the display-name child element), the value’s description (the description child element), and the literal entitlement value (the ent-value child element), which is not displayed.
The token elements <token-src-dn>, <token-association>, <token-attr> are actually placeholders for XPATH expressions that extract the src-dn attribute value, association value, or any attribute values respectively from an XDS-formatted XML document. The DTD assumes the query result is XDS.
Other Headings in the DTD
The remaining entitlement headings in the Entitlement DTD serve different functions, but they are not items that you need to focus on when creating an entitlement.
<!-- Entitlement reference stored in the DirXML-EntitlementRef attribute of a DirXML-EntitlementRecipient or a DirXML-SharedProfile object. -->
The information stored in the Entitlement Reference portion of the DTD points to an entitlement object. This information is placed there by the managing agent (such as the Role-Based Entitlement driver, Entitlement.xml, or the Approval Flow driver, UserApplication.xml). This is the triggering event for an action to take place in a connected system. You don’t need to do anything with the DTD under this heading, but you can use this information to ensure that the entitlement object is being referenced.
<!-- Entitlement result stored in the DirXML-EntitlementResult attribute of a DirXML-EntitlementRecipient object. -->
The Entitlement Result portion reports the results about whether an entitlement is granted or revoked. The information includes the state or status of the event and when the event is granted or revoked (through a time stamp). You don’t need to do anything with the elements and attributes under this heading.
<!-- Cached query results stored in the DirXML-SPCachedQuery attribute of a DirXML-Entitlement object. -->
The Entitlement Query portion contains the entitlement values that are gathered from an external application. This information can then be used again if the entitlement client needs to display this information. These values are stored in the DirXML-SPCachedQuery attribute of the Entitlement object. You don’t need to do anything with the elements and attributes under this heading.
<!-- Representation of a DirXML-EntitlementRef within the DirXML Script and within the operation-data of an operation in an XDS document. -->
Because the DTD defines values for more than one document, this EntitlementRef portion is actually not part of the Entitlement definition. You don’t need to do anything with the elements and attributes under this heading.
6.4.4 Creating Entitlements Through Designer
Although the examples in Section 6.4.5, Creating and Editing Entitlements in iManager show the actual XML code for writing entitlements, a much easier method of writing entitlements is to use the Designer utility that ships with Identity Manager. After you add an Identity Manager driver to an Identity Vault in the Designer modeler, you can right-click on the driver from the Outline View and select Add Entitlement. You are prompted through the Entitlement Wizard to designate the type of entitlement you want, and the wizard then steps you through the creation process.
For more information on using the Entitlement Wizard, see the Designer for Identity Manager: Administration Guide.
6.4.5 Creating and Editing Entitlements in iManager
Although it is recommended that you use Designer’s Entitlement Wizard for creating entitlements, you can create entitlements through iManager.
-
Select the Create Entitlements option under the Identity Manager Utilities heading.
-
On the Create Entitlements page, type the name you want the entitlement to be, then use the Object Browser to find the Identity Manager Driver object to which the entitlement belongs.
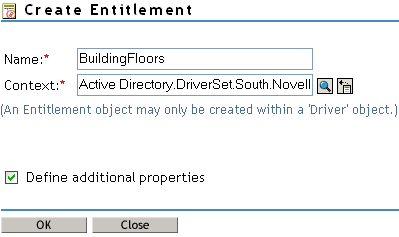
-
If Define Additional Properties is selected, you see the XML Editor page where you define the elements you want for this entitlement.
-
Check Enable XML Editing to add your elements to the entitlement.
NOTE:It is not a good idea to change an entitlement’s name. If you change the entitlement name later on, you also need to change all of the references in the policies that are implementing the entitlement. The entitlement name is stored on the Ref and Result attributes within the policy.
6.4.6 Example Entitlements To Help You Create Your Own Entitlements
There are two types of entitlements that you can create: value-less and valued. Valued entitlements can get their values from an external query, from an administrator-defined list, or free form. Below are examples of the four types of entitlements you can create.
NOTE:If you see a line that is without the Lesser Than sign (<), it means the line has wrapped and the information is usually displayed on one line, not two (or three). Also remember that, other than the Account Entitlement, these are simply examples of what you can create for each type of valued entitlement.
Example 1: Account Entitlement: Value-less
<?xml version="1.0" encoding="UTF-8"?>
<entitlement conflict-resolution="priority"
    description="This is an Account Entitlement"
    display-name="Account Entitlement"/>
In this example, the value-less entitlement’s name is Account. This is followed by the conflict-resolution line with the default setting of Priority, which in most cases means that if the entitlement is used by Role-Based Entitlements, the RBE with priority sets the value. (However, because this is an example of a value-less entitlement, valued settings don’t apply.) The Entitlement description is This is an Account Entitlement, and the display name is Account Entitlement. This information is all you need to create an Account Entitlement, which you can then use to grant an account in an application.
The Active Directory driver with entitlements enabled has a UserAccount entitlement that Active Directory uses to grant or revoke a user account.
<?xml version="1.0" encoding="UTF-8"?>
<entitlement conflict-resolution="union"
	description="The User Account entitlement grants or denies an
	account in Active	Directory for the user. When granted, the user
	is given an enabled logon account.	When revoked, the logon
	account is either disabled or deleted depending on how the drive
	is configured."	display-name="User Account Entitlement" name="UserAccount">
</entitlement>
In this example, the conflict resolution is Union, which allows the entitlement to merge the values that are assigned. (Again, valued settings don’t apply to value-less entitlements.) The Description field explains what this entitlement is used for and why it was created. This is useful information for those who perform future modifications to the entitlement. The actual name of the entitlement is UserAccount, while the <display-name> displays in a managing agent as User Account Entitlement.
Example 2: Application Query Entitlement: External Query
The Group and Exchange Mailbox entitlements that come with an entitlement-enabled Active Directory driver offer examples of application queries. Use this entitlement type when you need external information from a connected system to perform an event.
<?xml version="1.0" encoding="UTF-8"?>
<entitlement conflict-resolution="union"
   description="The Group Entitlement grants or denies membership in
   a group in Active Directory. The group must be associated with a
   group in the Identity Vault. When revoked, the user is removed from
   the group. The group membership entitlement is not enforced on the
   publisher channel: If a user is added to a controlled group in
   Active Directory by some external tool, the user is not removed by
   the driver. Further, if the entitlement is removed from the user
   object instead of being simply revoked, the driver takes no action."   display-name="Group Membership Entitlement" name="Group">
   <values>
	<query-app>
	   <query-xml>
		<nds dtd-version="2.0">
		   <input>
			<query class-name="Group"
			   scope="subtree">
			   <search-class class-name="Group"/>
			   <read-attr attr-name="Description"/>
			</query>
		   </input>
		</nds>
	   </query-xml>
	   <result-set>
		<display-name>
		    <token-src-dn/>
		</display-name>
		<description>
		   <token-attr attr-name="Description"/>
		</description>
		<ent-value>
		   <token-association/>
		</ent-value>
	   </result-set>
	</query-app>
   </values>
</entitlement>
In this example, the Group entitlement uses Union to settle conflicts if the entitlement is applied more than once to the same object. The Union attribute merges the entitlements of all involved Role-Based Entitlement policies, so if one policy revokes an entitlement but another policy grants an entitlement, the entitlement is eventually granted.
The Group description is useful because of its detail, which explains what was set up through rules in the driver’s policies. This description is a good example of the detail you need go into when defining entitlements in the first place.
The <display-name> is Group Membership Entitlement, which appears in the managing agents, such as iManager for Role-Based Entitlements. The name is the Relative Distinguished Name (RDN) of the entitlement. If you don’t define a display name, the entitlement’s name is its RDN.
The initial query values look for the class name of Group at the top of the tree and continues through its subtrees. These values come from the connected Active Directory server and the application query starts at the <nds> tag. Under the <query-xml> tag, this query receives information similar to the following:
<instance class-name="Group" src-dn="o=Blanston,cn=group1">
   <association>o=Blanston,cn=group1</association>
   <attr attr-name="Description"> the description for group1</attr>
</instance>
<instance class-name="Group" src-dn="o=Blanston,cn=group2">
   <association>o=Blanston,cn=group2</association>
   <attr attr-name="Description"> the description for group2</attr>
</instance>
<instance class-name="Group" src-dn="o=Blanston,cn=group3">
   <association>o=Blanston, cn=group3</association>
   <attr attr-name="Description"> the description for group3</attr>
</instance>
<!-- ... ->
Then, under the <result-set> tag, the information received from the query fills in the various fields. For instance, the <display-name> field would receive o=Blanston,cn=group1. The <description> field would receive the description for group1, and the <ent-value> field would receive o=Blanston,cn=group1. Because more than one group existed and met the query criteria, this information was also collected and shown as other instances.
NOTE:The association format value is unique for every external system, so the format and syntax are different for each external system queried.
Another example is the Exchange Mailbox entitlement.
<?xml version="1.0" encoding="UTF-8"?>
<entitlement conflict-resolution="union"
  description="The Exchange Mailbox Entitlement grants or denies an
  Exchange mailbox for the user in Microsoft Exchange."
  display-name="Exchange Mailbox Entitlement" name="ExchangeMailbox">
  <values>
	<query-app>
	   <query-xml>
		<nds dtd-version="2.0">
		   <input>
			<query class-name="msExchPrivateMDB"
			   dest-dn="CN=Configuration," scope="subtree">
			   <search-class class-name="msExchPrivateMDB"/>
			   <read-attr attr-name="Description"/>
			   <read-attr attr-name="CN"/>
			</query>
		   </input>
		</nds>
	    </query-xml>
	    <result-set>
		<display-name>
		   <token-attr attr-name="CN"/>
		</display-name>
		<description>
		   <token-attr attr-name="Description"/>
		</description>
		<ent-value>
		  <token-src-dn/>
		</ent-value>
	    </result-set>
	</query-app>
   </values>
</entitlement>
In this example, the Exchange Mailbox entitlement uses Union to settle conflicts if the entitlement is applied more than once to the same object. The Union attribute merges the entitlements of all involved Role-Based Entitlement policies, so if one policy revokes an entitlement but another policy grants an entitlement, the entitlement is eventually granted.
The description states that the entitlement grants or revokes an Exchange mailbox for the user in Microsoft Exchange, which is enough detail for what the entitlement does. The display-name is Exchange Mailbox Entitlement, which appears in the managing agents, such as iManager for Role-Based Entitlements. The name is the Relative Distinguished Name (RDN) of the entitlement. If you don’t define a display name, the entitlement’s name is its RDN.
The initial query values look for the class name of msExchPrivateMDB, which is a Microsoft Exchange function call that begins looking in container Configuration and continues through its subtrees. These values come from the connected Active Directory database and the application query starts at the <nds> tag. The class msExchPrivateMDB has no equivalent in eDirectory, so you would need to be conversant in Microsoft Exchange function calls to make such a query. But the query is completed because of the rules and policies that are found in the Active Directory driver.
Entitlement consumers use the information that is retrieved by the query. For example, the entitlement value (ent-value) is passed to Identity Manager policies through the DirXML-EntitlementRef attribute. The display name and description information are displayed by iManager or the User Application and are stored in the DirXML-SPCachedQuery attribute.
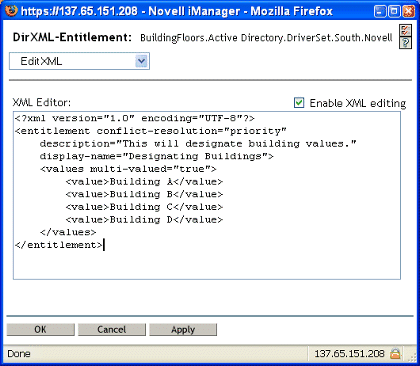
Example 3: Administrator-Defined Entitlement: With Lists
The third example is an admin-defined entitlement that creates a grant or revoke event after you select a list entry.
<?xml version="1.0" encoding="UTF-8"?>
<entitlement conflict-resolution="union"
    description="This will show Administrator-defined Values">
	   <display-name="Admin-defined Entitlement"/>
	   <values multi-valued="true">
		<value>Building A</value>
		<value>Building B</value>
		<value>Building C</value>
		<value>Building D</value>
		<value>Building E</value>
		<value>Building F</value>
	</values>
</entitlement>
In this example, the entitlement name is Admin-defined, with a defined display name of Admin-defined Entitlement. (You only need to put in a display name if you want the display name to be different from the entitlement’s RDN.) The conflict-resolution line shows the setting of Union, which allows the entitlement to merge the values that are assigned.
The Entitlement description is . The multi-value attribute is set to true, which allows the entitlement to assign a value more than once. In this example, the values are corporate building letters: Building A through Building F. Then, through an entitlement client such as an iManager RBE task or through the User App, users or defined-task managers can specify the building information, which is then included in an external application, such as Novell eDirectory.
Example 4: Administrator-Defined Entitlements: Without Lists
The fourth example is an admin-defined entitlement that forces the administrator to type a value before the entitlement can grant or revoke an event. You can use this kind of entitlement if you do not have all of the information at the initial setup so you cannot create a task list.
<?xml version="1.0" encoding="UTF-8"?>
<entitlement conflict-resolution="priority"
    description="There will be no pre-defined list">
    <values multi-valued="false"/>
</entitlement>
In this example, the entitlement name is Admin-defined (no list), and it uses the entitlement name as the displayed name because there is no display name entry. The conflict resolution is again set to the default of Priority, which means that if the entitlement is used by Role-Based Entitlements, the RBE with priority sets the value. Through an entitlement client, such as an iManager RBE task or through the User App, you specify the building information, which is then included in an external application, such as eDirectory.
6.4.7 Completing the Creating Entitlements Steps
The entitlement creation examples have shown how to work through the first two steps for creating and using entitlements, as described in Section 6.2, Creating Entitlements: Overview. This includes Step 1, making a checklist of what you want to accomplish with entitlements, and Step 2, writing entitlements to address items in the checklist. Step 3, creating policies for the Identity Manager driver, is beyond the scope of this chapter. For information on creating and editing policies, see the Policy Builder and Driver Customization Guide and the appropriate Identity Manager driver guide.
After you create entitlements (or use entitlements that come preconfigured with certain Identity Manager drivers), you now need to manage them, which is Step 4. Entitlements are managed by two packages or agents: through iManager as Role-Based Entitlement Policies or through the User Application in workflow-based provisioning. For entitlements used in workflow-based provisioning, see
Introduction to Workflow-Based Provisioning.
The rest of this chapter focuses on Role-Based Entitlements.