7.2 Creating and maintaining container pages
The process of creating and maintaining container pages involves the following steps:
-
Create a new container page or select an existing container page, as described in Section 7.2.1, Creating container pages.
-
Add content (in the form of portlets) to the page, as described in Section 7.2.2, Adding content to a container page.
You may also want to delete content from the page, as described in Section 7.2.3, Deleting content from a container page.
-
Choose a portal layout, as described in Section 7.2.4, Modifying the layout of a container page.
-
Arrange the order and position of content on the selected layout, as described in Section 7.2.5, Arranging content on the container page.
-
Display the new page right away by entering the container page URL in your browser, as described in Section 7.2.6, Displaying a container page.
Container pages and layouts Container pages are not tightly bound to portal layouts. That means you can switch layouts for container pages without losing any page contents. When you apply a new layout to a container page, any portlets that have been added to the page are automatically displayed using the new layout. You may need to fine-tune the content placement in the new layout.
7.2.1 Creating container pages
You can create container pages from scratch or by copying existing pages. This section describes both procedures.
To create a container page from scratch:
-
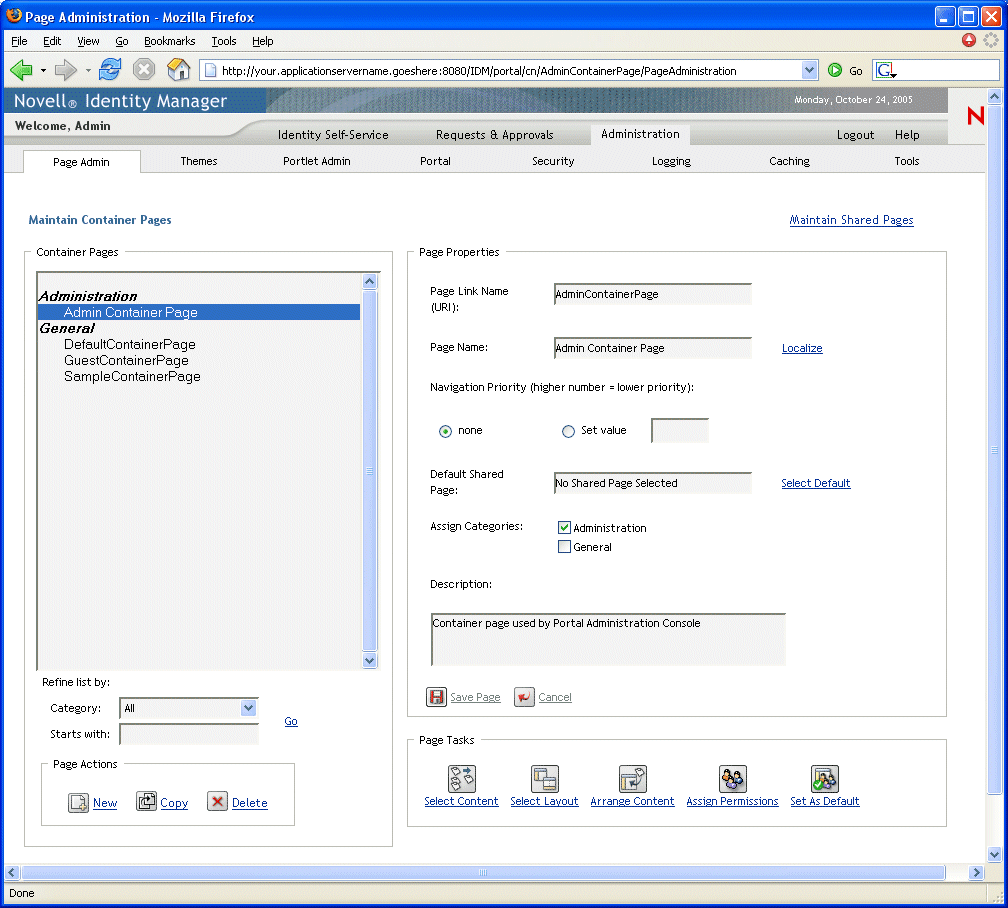
On the Page Admin page, select Maintain Container Pages.
The Maintain Container Pages panel displays:
-
Select the New page action (in the bottom-left section of the panel).
An untitled, uncategorized container page is created.
-
Specify the page properties of the container page:
Property
What to do
Page Link Name (URI)
Specify the URI name for the page (as it is to appear within the user interface URL). For example, if you specify the URI:
MyContainerPage
it appears within the URL like this:
http://myappserver:8080/IDM/portal/cn/MyContainerPagePage Name
Specify the display name for the page. For example:
My Container Page
You can click Localize to specify localized versions of this name for other languages.
Navigation Priority
Specify one of the following:
-
None — if you don’t need to assign a priority to this container page.
-
Set value — to assign a priority to this container page, relative to other container pages. The priority must be an integer between -1 and 9999, where -1 is the highest priority and 9999 is the lowest.
Setting priority values is useful if you want to ensure a particular order when pages are listed by priority, or if you want to ensure a particular selection when multiple default pages exist (in the case of a user who belongs to multiple groups).
Default Shared Page
See Section 7.6, Selecting a default shared page for a container page.
Assign Categories
Select zero or more of the following categories in which you want the page to belong:
-
Administration
-
General
Assigning categories is useful if you want to ensure proper organization when pages are listed by category, or if you want to ensure an appropriate subset when pages are filtered by category.
Description
Type text that describes the page.
-
-
Click Save Page (at the bottom of the page properties section).
To create a container page by copying an existing page:
-
On the Page Admin page, select Maintain Container Pages.
The Maintain Container Pages panel displays (as shown in the previous procedure).
-
In the list of container pages, select the page you want to copy.
HINT:If the list is long, you can refine it (by category or starting text) to more easily find the desired page.
-
Select the Copy page action (in the bottom-left section of the panel).
A new container page is created with the name Copy of OriginalPageName.
-
Specify the page properties of the container page (as described in the previous procedure).
-
Click Save Page (at the bottom of the page properties section).
7.2.2 Adding content to a container page
After you create a container page, the next step is to add content by selecting portlets to place on the page. You can use prebuilt portlets supplied with the Identity Manager user application or other portlets you have registered.
To add content to a container page:
-
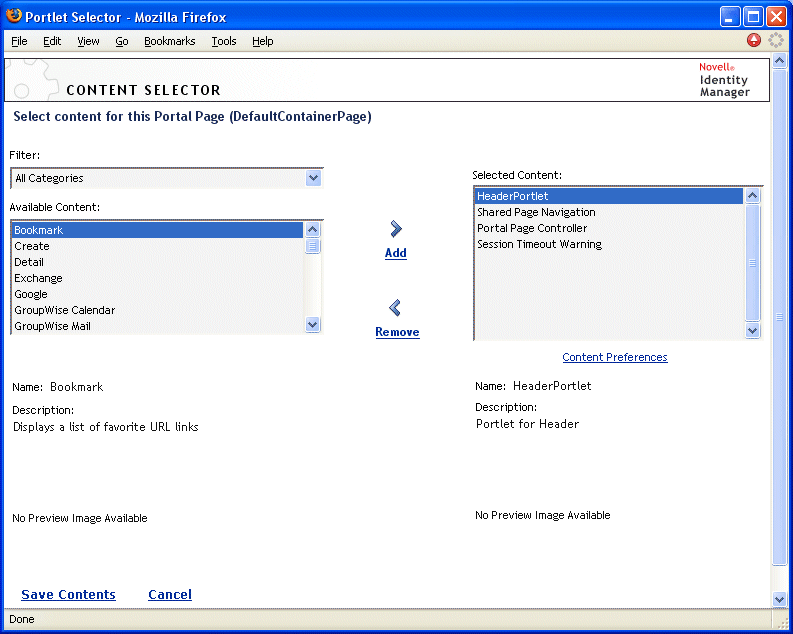
Open a new or existing page on the Maintain Container Pages panel, then click the Select Content page task (at the bottom of the panel).
The Content Selector displays in a new browser window:
-
If you want to display a specific category of available content, select a category from the Filter dropdown menu.
-
Select one or more portlets from the list of Available Content.
HINT:Hold down the Control key to select multiple non-contiguous portlets from the list; use the Shift key to make multiple contiguous selections.
-
Click Add to move your choices to the list of Selected Content.
-
You can click Content Preferences to edit the preferences of any portlet you have selected for your container page. The preference values you specify take effect for the instance of the portlet that appears on your page.
-
Click Save Contents.
Now that you have chosen the content for your container page, you can select a new layout as described in Section 7.2.4, Modifying the layout of a container page, or arrange the content on the current layout as described in Section 7.2.5, Arranging content on the container page.
7.2.3 Deleting content from a container page
In the process of creating container pages, you may want to delete content by removing portlets from a page. You can use the Content Selector or Layout Selector, as described in the following procedures.
To delete content from a container page using the Content Selector:
-
Open a page on the Maintain Container Pages panel, then click the Select Content page task (at the bottom of the panel).
The Content Selector displays in a new browser window (as shown in the previous procedure).
-
Select a portlet you want to delete from the Selected Content list and click Remove.
The portlet is removed from the page.
-
Click Save Contents.
To delete content from a container page using the Layout Selector:
-
Open a page on the Maintain Container Pages panel, then click the Arrange Content page task (at the bottom of the panel).
The Layout Selector displays in a new browser window, showing the portlets on that page:
-
Click the X button for a portlet you want to remove.
-
When you’re prompted for confirmation, click OK.
The portlet is removed from the page.
-
Click Save Layout.
7.2.4 Modifying the layout of a container page
When you modify the layout of a container page, existing content is shifted to accommodate the new layout. In some cases, you may need to fine-tune the end result.
To modify the layout of a container page:
-
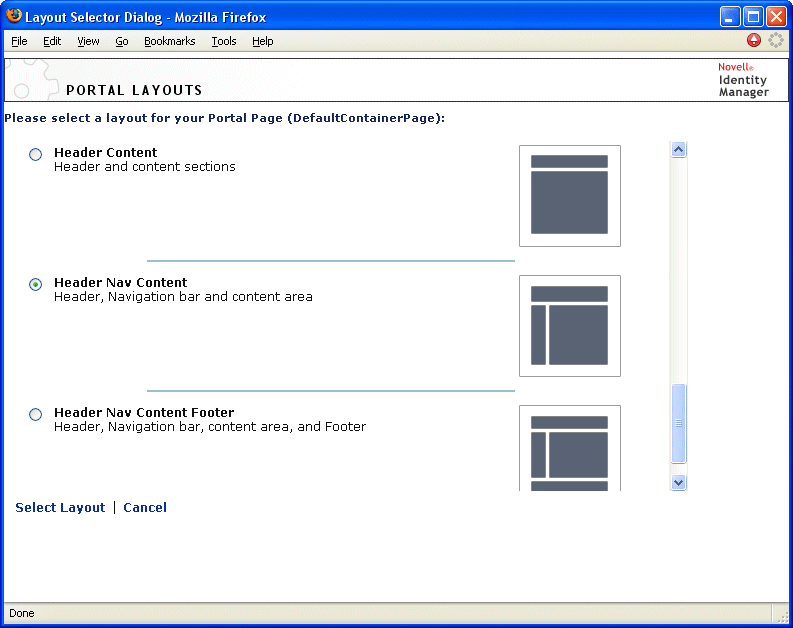
Open a page on the Maintain Container Pages panel, then click the Select Layout page task (at the bottom of the panel).
The Portal Layouts list displays in a new browser window:
-
Scroll through the choices and select the layout you want.
-
Click Select Layout.
7.2.5 Arranging content on the container page
After you have designated the content and layout for your container page, you can position the content in the selected layout, add other portlets in specific locations, or delete portlets.
To arrange content on a container page:
-
Open a page on the Maintain Container Pages panel, then click the Arrange Content page task (at the bottom of the panel).
The Layout Selector displays in a new browser window, showing the portlets on that page:
-
If you want to add a portlet to the page, follow these steps:
-
Click Add Content in the desired layout frame.
The Portlet Selector displays in a new browser window.
-
If you want to display a specific category of available content, select a category from the Filter dropdown menu.
-
Select a portlet you want from the list of Available Content.
-
Click Select Content.
The Portlet Selector closes and the portlet you selected appears in the target layout frame of the Layout Selector.
-
-
If you want to move a portlet to a different location in the layout, follow these browser-specific steps:
-
If you want to remove a portlet from the layout, follow these steps:
-
Click the X button for the portlet you want to remove.
-
When you’re prompted for confirmation, click OK.
The portlet is removed from the layout.
-
-
If you want to edit the preferences of a portlet, follow these steps:
-
Click the pencil button for the portlet you want to edit.
The portlet’s Content Preferences display in your browser.
-
Change preference values, as appropriate.
The preference values you specify take effect for the instance of the portlet that appears on your page.
-
Click Save Preferences.
-
-
Click Save Layout to record your changes and close the Layout Selector.
7.2.6 Displaying a container page
You can display your page by going to the container page URL in your browser.
To display a container page:
-
In your Web browser, go to the following URL:
http://server:port/IDM-war-context/portal/cn/container-page-name
For example, to display the container page named MyContainerPage:
http://myappserver:8080/IDM/portal/cn/MyContainerPage