2.5 Setting Up the Driver
If you are upgrading an existing driver, setup is not required.
If this is the first time the Delimited Text driver has been used, complete the post-installation tasks in the following sections:
2.5.1 Configuring the Driver
Importing the Sample Configuration File: iManager
-
Create a local directory for output files.
For example, on Windows create c:\csvsample\output.
This directory can be any directory on your local file system. Files on this driver’s Subscriber channel are created and placed here.
-
Create a local directory where input files can be created.
For example, on Windows create c:\csvsample\input.
This directory can be any directory on your local file system. Files for this driver’s Publisher channel are placed here. The driver looks in this directory for files to process.
-
In iManager, select > .
-
Select a driver set.
If you place this driver in a new driver set, you must specify a driver set name, context, and associated server.
-
Mark , then select the DelimitedTextCSVSample.xml file.
The driver configuration file is installed on the Web server when you set up iManager.
-
Click .
You are prompted for the following information:
-
Click .
NOTE:You can configure and modify the driver's other parameters. For more information, refer to Configuring Driver Parameters.
Importing the Sample Configuration File: Designer
You can import the basic driver configuration file for JDBC by using Designer for Identity Manager. This basic file creates and configures the objects and policies needed to make the driver work properly.
The following procedure explains one of several ways to import the sample configuration file:
-
Open a project in Designer.
-
In the modeler, right-click the Driver Set object, then select .
-
From the drop-down list, select , then click .
-
Click , in the Perform Prompt Validation window.
-
Configure the driver by filling in the fields.
Specify information specific to your environment. For information on the settings, see the table of information in Step 6.
-
After specifying parameters, click to import the driver.
-
Customize and test the driver.
-
Deploy the driver into the Identity Vault.
See
Deploying a Driver to an Identity Vault
in the Designer for Identity Manager 3: Administration Guide.
2.5.2 Preparing Data Locations
If you use all of the defaults provided by the sample configuration, prepare locations for Identity Manager data.
-
Add the containers Users\Active at the root level of your Identity Vault.
-
On Windows, point to or create an input directory and an output directory on your local file system.
For example, point to the two directories created in Step 1 and Step 2. You can use any two directories on your local file system.
On Solaris, Linux*, or NetWare, create input and output directories wherever you’d like. Then update the driver configuration with the correct platform-specific paths. For more information, refer to Input File Path.
2.5.3 Starting the Driver
If you changed default data locations during configuration, ensure that the new locations exist before you start the driver.
-
In iManager, select > .
-
Locate the driver in its driver set.
-
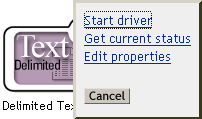
Click the driver status indicator in the upper right corner of the driver icon, then click .
Synchronization takes place on an object-by-object basis as changes are made to individual objects. If you want to have an immediate synchronization, initiate that process as explained in Migrating and Resynchronizing Data.
2.5.4 Migrating and Resynchronizing Data
Identity Manager synchronizes data as the data changes. If you want to synchronize all data immediately, you can do one of the following:
- Migrate new data into or from an Identity Vault.
- Resynchronize existing data by using the driver set Properties page.
The and options usually behave independently of any driver. However, some issues exist with these options and the Identity Manager Driver for Delimited Text.
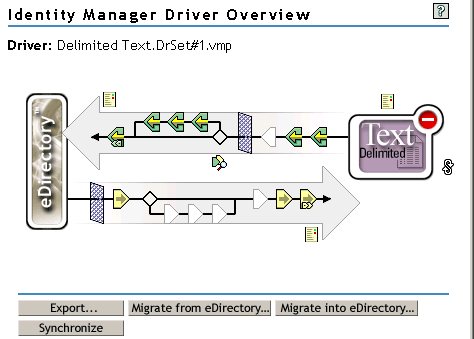
The following figure illustrates the buttons that select the and options:
Migrating Data from eDirectory
To find eDirectory entries that do not have an Identity Manager association for the driver, click . Non-associated entries that are not vetoed by rules processing are written to the output file and receive an association.
NOTE:Entries that already have up-to-date associations aren't written to the output file. To output all associated entries, click .
Migrating Data into eDirectory
With most Identity Manager drivers, migrating into eDirectory causes the Metadirectory engine to query the application through its driver. The query finds entries that can be synchronized from the application into eDirectory. These synchronized entries are created in eDirectory. The driver assigns an association value to each new entry.
The option has no function when used with the Identity Manager Driver for Delimited Text. This driver gets all of its input as files are placed in the input directory. Because the driver is always up-to-date concerning the files it processes, you don't need to do any additional processing or querying. If you do click Migrate into eDirectory, nothing happens because queries are disabled with this driver.
Synchronizing Data
When entries in eDirectory have an association with the selected driver, the option causes those entries to synchronize again with the associated entries in the application. If the driver has a Subscriber channel, eDirectory is considered to be the authoritative source for the attributes in the Subscriber filter.
The Identity Manager Driver for Delimited Text can't query the application directly to determine what is out of sync. Therefore, the Metadirectory engine sends a Modify event to the driver for each associated entry. This event causes each of these entries to be written to an output file whenever you click . If no Subscriber is configured, has no effect with the driver.
To use , , or :
-
In iManager, select > .
-
Locate the driver set containing the Delimited Text driver, then double-click the driver icon.
-
Click the appropriate migration button.
2.5.5 Activating the Driver
Activate the driver within 90 days of installation. Otherwise, the driver will stop working.
For information on activation, refer to Activating
Novell Identity Manager Products
in the Identity
Manager 3.0.1 Installation Guide.