6.7 Recovery Agent Certificates

The Recovery agent is a trustworthy organization that issues and signs public key certificates. This organization should be an entity independent of entities owning the iFolder server's infrastructure, or, independent of the IT department if deployed in a corporate environment.

Recovery agent certificates are the public key certificates used for encrypting the data encryption key. The user selects one of these certificates to perform the data key encryption for later key recovery. The supported certificate formats are *.cer and *.der(X.509).

You can also use self-signed certificates if iFolder is deployed in a trusted environment.The certificates are generated by using the YaST CA Management plug-in or OpenSSL tools.

6.7.1 Understanding Digital Certification

To protect user data from access by unauthorized people, the user data is encrypted by using keys that always occur in private and public key pairs. The keys are applied to the user data in a mathematical process, producing an altered data record in which the original content can no longer be identified.

Private Key: The private key must be kept safely by the key owner. Accidental publication of the private key compromises the key pair and can also be a security threat. The private key is either held by the Recovery agent or the user.

Public Key: The key owner circulates the public key for use by third parties.

Certified Authority (CA): The public key process is popular and there are many public keys in circulation. Certified Authorities are the trustworthy organizations that issue and sign public key certificates. The CA ensures that a public key actually belongs to the assumed owner. The certificates that a CA holds contain the name of the key owner, the corresponding public key, and the electronic signature of the person or entity issuing the certificate. The iFolder Recovery Agents are examples of one kind of CA.

Public Key Infrastructure (PKI): Certificate authorities are usually part of a certification infrastructure that is also responsible for the other aspects of certificate management, such as publication, withdrawal, and renewal of certificates. An infrastructure of this kind is generally referred to as a Public Key Infrastructure or PKI. One familiar PKI is the X.509 Public Key Infrastructure (PKIX). The security of such a PKI depends on the trustworthiness of the CA certificates. To make certification practices clear to PKI customers, the PKI operator defines a certification practice statement (CPS) that defines the procedures for certificate management. This should ensure that the PKI issues only trustworthy certificates.

X.509 Public Key Infrastructure: The X.509 Public Key Infrastructure is defined by the IETF (Internet Engineering Task Force) that serves as a model for almost all publicly-used PKIs today. In this model, authentication is made by certificate authorities (CA) in a hierarchical tree structure. The root of the tree is the root CA, which certifies all sub-CAs. The lowest level of sub-CAs issue user certificates. The user certificates are trustworthy by certification that can be traced to the root CA.

X.509 Certificate: An X.509 certificate is a data structure with several fixed fields and, optionally, additional extensions. The fixed fields mainly contain the name of the key owner, the public key, and the data such as name and signature relating to the issuing CA. For security reasons, a certificate should only have a limited period of validity, so a field is also provided for this date. The CA guarantees the validity of the certificate in the specified period. The CPS usually requires the issuing CA to create and distribute a new certificate before expiration. The extensions can contain any additional information. An application is only required to be able to evaluate an extension if it is identified as critical. If an application does not recognize a critical extension, it must reject the certificate. Some extensions are only useful for a specific application, such as signature or encryption.

Table 6-1 X.509v3 Certificate

Field

Content

Version

The version of the certificate, for example, v3

Serial Number

Unique certificate ID (an integer)

Signature

The ID of the algorithm used to sign the certificate

Issuer

Unique name (DN) of the issuing authority (CA)

Validity

Period of validity

Subject r

Unique name (DN) of the owner

Subject Public Key Info

Info Public key of the owner and the ID of the algorithm

Issuer Unique ID

Unique ID of the issuing CA (optional)

Subject Unique ID

Unique ID of the owner (optional)

Extensions

Optional additional information, such as KeyUsage or BasicConstraints

YaST-Based PKI: YaST contains modules for the basic management of X.509 certificates. This mainly involves the creation of CAs and their certificate. YaST provides tools for creating and distributing CAs and certificates, but cannot currently offer the background infrastructure that allow continuous update of certificates and CRLs. To set up a small PKI, you can use the available YaST modules. However, you should use commercial products to set up an official or commercial PKI.

6.7.2 Creating a YaST-based CA

  1. Start YaST and go to Security and Users > CA Management.

  2. Click Create Root CA.

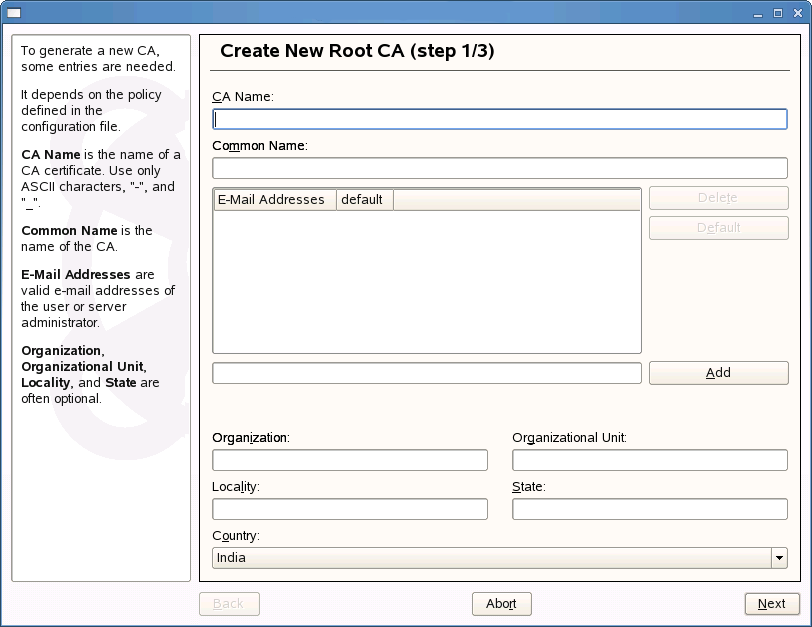
  3. Enter the information for creating the CA in the dialog boxes. The following table summarizes the decisions you make.

    CA Settings

    Description

    CA Name

    Enter the technical name of the CA. Because the Directory names, among other things, are derived from this name, you must use only the characters listed in the help. The technical name is also displayed in the overview when the module is started.

    Common Name

    Enter the name of the CA.

    E-Mail Address

    You can enter several e-mail addresses that a CA user can see. This is helpful for inquiries.

    Country

    Select the country where the CA is operated.

    Organization, Organizational Unit, Locality, State

    Optional Values.

  4. Click Next.

  5. Enter a password in the second dialog. This password is always required when using the CA for generating certificates. The following table summarizes the decisions you make.

    CA Settings

    Descriptions

    Password

    Specify a password with a minimum length of five characters. To confirm, re-enter it in the next field.

    Key Length (bit)

    Select the key length. You can choose a value between a minimum of 512 and a maximum of 2048.

    Valid Period (days)

    The Valid Period in the case of a CA defaults to 3650 days (roughly ten years). This long period makes sense because the replacement of a deleted CA involves an enormous administrative effort.

    Advanced Options

    Advanced Options are very special options.

    WARNING: If you change these options, iFolder cannot guarantee that the generated certificate works correctly. Clicking Advanced Options opens a dialog for setting different attributes from the X.509 extensions. These values have rational default settings and should only be changed if you are really sure of what you are doing.

    YaST displays the current settings for confirmation.

  6. Click Create.

    The root CA is created then appears in the overview.

6.7.3 Creating Self-Signed Certificates Using YaST

iFolder key recovery mechanism uses the X509 certificates to manage the keys. You can either get a certificate from an external Certified Authority, for instance Verisign or generate a self-signed certificate if deployed in a trusted environment, where a trusted user-admin relationship exists.

NOTE:In certificates intended for e-mail signature, the e-mail address of the sender (the private key owner) should be contained in the certificate to enable the e-mail program to assign the correct certificate. For certificate assignment during encryption, it is necessary for the e-mail address of the recipient (the public key owner) to be included in the certificate. In the case of server and client certificates, the hostname of the server must be entered in the Common Name field. The default validity period for certificates is 365 days.

This section discusses creating self-signed certificates for encryption and self-signed key certificate for key recovery using YaST.

  1. Start YaST and go to Security and Users > CA Management.

  2. Select the required CA and click Enter CA.

  3. Enter the password for the CA if asked for.

    YaST displays the CA key information in the Description tab.

  4. Click Certificates tab.
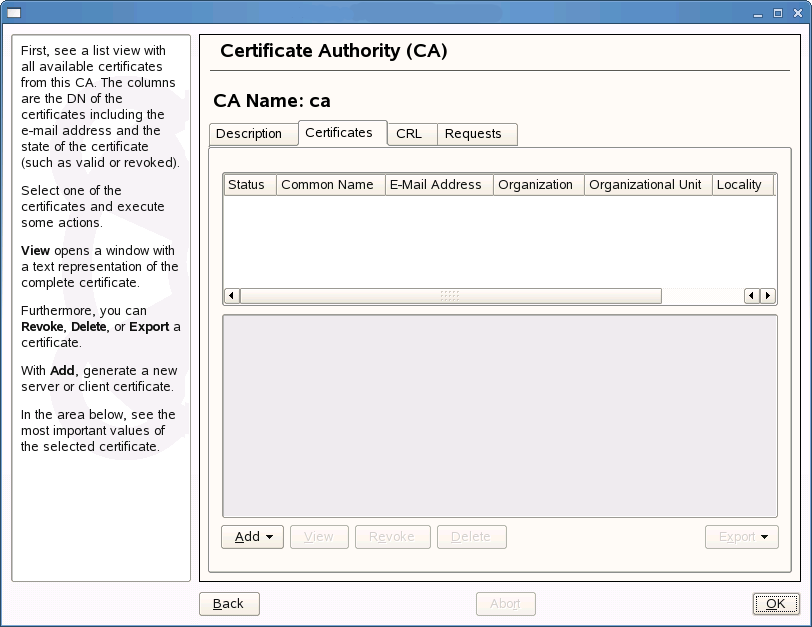
  5. Click Add > Add Server Certificate.

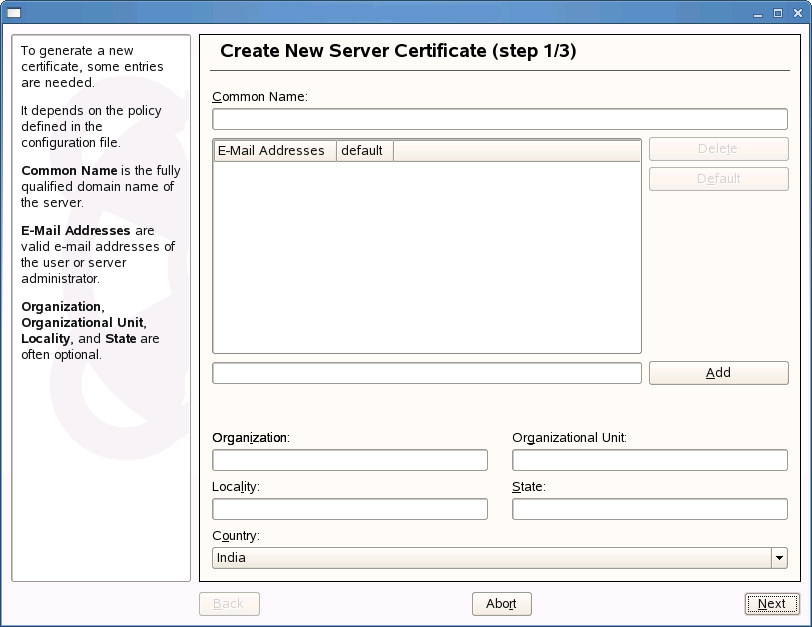
  6. Enter the information for creating the certificates in the dialog boxes. The following table summarizes the decisions you make.

    CA Settings

    Description

    Common Name

    Enter the name of the CA.

    E-Mail Address

    You can enter several e-mail addresses that a CA user can see. This is helpful for inquiries.

    Country

    Select the country where the CA is operated.

    Organization, Organizational Unit, Locality, State

    Optional Values.

  7. Enter a password in the second dialog.The following table summarizes the decisions you make.

    CA Settings

    Descriptions

    Password

    Specify a password with a minimum length of five characters. To confirm, re-enter it in the next field.

    Key Length (bit)

    Select the key length of minimum value of 512 and a maximum value of 2048. iFolder supports only 512, 1024 and 2048 as the key length.

    Valid Period (days)

    The Valid Period in the case of a CA defaults to 3650 days (roughly ten years). This long period makes sense because the replacement of a deleted CA involves an enormous administrative effort.

    Advanced Options

    Advanced Options are very special options.

    WARNING:If you change these options, iFolder cannot guarantee that the generated certificate works correctly. Clicking Advanced Options opens a dialog for setting different attributes from the X.509 extensions. These values have rational default settings and should only be changed if you are really sure of what you are doing.

    YaST displays the current settings for confirmation.

For information on encryption, see Encryption in the Novell iFolder 3.9.2 Cross-Platform User Guide and Using the Recovery Agent in the Novell iFolder 3.9.2 Security Administration Guide.

6.7.4 Exporting Self-Signed Certificates
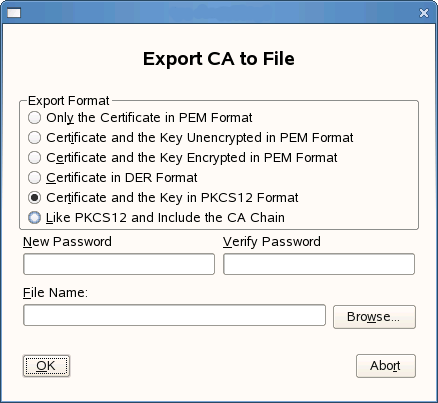
  1. Click Export drop-down and select Export to File.

  2. Select Only the Certificate in PEM format.

  3. Specify a password of minimum length of five characters.

  4. Click Browse to find a location to save the file, then specify a filename for the certificate you have created.

  5. Click OK to save the certificate.

  6. Convert the certificate in PEM format to DER format using OpenSSL command as given below:

    openssl x509 -in <certificate>.pem -inform PEM -out <certificate>.der -outform DER

  7. Copy the certificate in DER format to the location you have configured for loading Recovery Agent Certificate during iFolder configuration.

    If the certificate is expired, you need to load the new certificates again to this location.

  8. Restart the iFolder server to load the Recovery agent certificates.

6.7.5 Exporting Self-Signed Private Key Certificates For Key Recovery

  1. Click Export drop-down and select Export to File.

  2. Select Certificate and the Key in PKCS12 Format.

  3. Specify a new password and re-enter that for confirmation.

    This password is used with the certificate and the keys exported to a file in XML format.

    IMPORTANT:You must use a password different from the one you have used for certificate creation.

  4. Specify a filename for the certificate you have created and click Browse to find a location to save the file.

  5. Click OK to save the certificate.

6.7.6 Exporting eDirectory CA Certificate Using iManager

  1. Login to iManager using iManager administrator credentials.

  2. Click Novell Certificate Server > Configure Certificate Authority.

  3. Click the Certificates tab.

  4. Select the Root CA and click Export.

  5. Select the organizational CA from the Certificates list and click Next to export the file in pfx format.

6.7.7 Using KeyRecovery to Recover the Data

Each iFolder has a unique data encryption key which is auto-generated during iFolder creation. The key is encrypted by using a passphrase provided by the user and also by using the public key with the Recovery agent. If the users forget the passphrase, they cannot access the iFolder data and they must reset the passphrase to gain access to the iFolder data.

Users can reset the passphrase by launching the Passphrase Recovery Wizard using the Security > Forgot Passphrase option in the client. If the user does not have the secret file or the new data file, then they can use the wizard to export the old data file and then e-mail the file to the administrator. The administrator can then use the KeyRecovery tool to generate the new data file and send it back to the user. The KeyRecovery tool can be downloaded from the iFolder 3 Welcome page.

NOTE:The keys are exported to a file in XML format. It is recommended to save the file as <filename>.xml

This section help you understand the process followed by a Recovery agent to retrieve the key.

  1. Download the Passphrase Recovery Tool from the iFolder 3 Welcome page. For Linux and Macintosh, run KeyRecovery and for Windows run KeyRecovery.exe and follow the on-screen instructions.

    The following table summarizes the decisions you make.

    Parameters

    Description

    Encrypted Key file path

    Specify the path (including the file name of the encrypted key) for reading the encrypted keys.

    Private Key

    Specify the path to the private key file (PKCS12 file format, *.p12).

    Decrypted Key file path

    Specify the path to store the decrypted key file. Ensure that the filename also included in the path you specify.

    Private Key password

    Specify the password to decrypt the private key.

    Encrypt Result key

    Specify whether you want to encrypt the decrypted key with one time passphrase. Default value: Yes

    One time passphrase

    Specify a one time passphrase to encrypt the decrypted keys.

  2. Send the decrypted key usually by replying to the mail attached with the encrypted keys and the one-time passphrase (if the key is encrypted using the one-time passphrase) to the user.

  3. Send the one-time passphrase (if the key is encrypted using the one-time passphrase) to the user through any other communication channel other than the one you used to exchange the key files.

6.7.8 Managing Certificate Change

The self-signed certificates for iFolder services change when they are expired, revoked, or replaced with a new certificate by a new CA.

Client: When a new certificate is created, the user has to approve of from the client side. The client prompts for the new certificate for the user to accept it.

Web Admin Server: The change in the certificate is not automatically communicated to the Web Admin server. You must reconfigure the Web Admin server for the new certificate to be accepted. By default, the new certificate is accepted in the server side. In the front-end, the browser is updated automatically when the server is updated with the new certificate.

Web Access Server: The change in the certificate is not automatically communicated to the Web Admin server. You must reconfigure the Web Access server for the new certificate to be accepted. By default, the new certificate is accepted in the server side. In the front-end, the browser is updated automatically when the server is updated with the new certificate.