Connect for Baan User's Guide
CHAPTER 2
This chapter describes how to set up and configure the Integration ManagerTM Connect for Baan.
The following requirements must be completed before you can use the Integration Manager Connect for Baan:
Determine the release number of your Baan system. The Novell Integration Manager Connect for Baan supports Baan IVc and above.
Locate or acquire the JDBC driver for the database used with your Baan system. See JDBC Drivers.
Update the classpath in xconfig.xml, in both the design environment and on the server, to reflect the addition of the JDBC driver. See Adding the JDBC Driver to the Design-Time Environment and Adding the JDBC Driver to the Novell Application Server Environment.
Update the license for your Integration Manager Connect for Baan installation. See Updating the Design-time Software License and Updating the Runtime License.
The steps necessary to accomplish these requirements are discussed in detail in the following sections.

Before attempting to use the Integration Manager Connect for Baan (which is installed automatically as part of the default Integration Manager installation process), you must complete the installation by obtaining and installing the JDBC drivers for the database used with your Baan system. These files are proprietary to their developers and are not shipped by Novell nor installed as part of Integration Manager.
You need the following JDBC driver files, depending on the database used:
These JDBC drivers should be included in your Baan environment. If they are not, you can download the JDBC drivers from the following Web sites:
Oracle:http://www.oracle.com/technology/software/tech/java/sqlj_jdbc/index.html
Informix:http://www-306.ibm.com/software/data/informix/tools/jdbc/
Microsoft SQL Server:http://www.microsoft.com/sql/downloads/default.asp
When you have located the JDBC driver, you must add the driver JAR files to the classpath in both your design-time and runtime environments, as described in the following sections.
 To add the JDBC driver to your design-time configuration
If Integration Manager is running, shut it down before proceeding.
Obtain the JDBC driver files (see JDBC Drivers), if they are not included in your Baan installation.
Copy the JDBC driver files to the /Common/lib folder of the Integration Manager installation directory on your design-time computer.
To add the JDBC driver to the design-time classpath
Locate your xconfig.xml file under /Composer/Designer/bin and open the file in a text editor.
Scroll to the bottom. Within the <RUNTIME> element, you should see many <JAR> entries.
Add additional <JAR> elements that specify the path to the JDBC driver files. For example:
<JAR>..\..\..\Common\lib\ojdbc14.jar</JAR>
The JAR entries tell the class loader where it can find the JDBC driver files.
If the application server is running, shut it down before proceeding.
Obtain the JDBC driver files (see JDBC Drivers), if they are not included in your Baan installation.
Copy the JDBC driver files to a suitable location on your application server. The exact location doesn't matter, as long as you create a classpath entry pointing to the JDBC driver file location, as described in the following steps.
Update the application server classpath. For the Novell exteNd application server, locate the AgJars.conf file in the AppServer/bin directory and open the file in a text editor.
Create a new entry for each JDBC driver file in the "MODULE COMMON" section. For example:
$SS_LIB ../../Common/lib/ojdbc14.jar
This example assumes that you have placed the JDBC driver files in the application server /Common/lib directory. Edit this path as required to reflect the actual target directory.
NOTE: For application servers other than Novell exteNd, follow the application server vendor's instructions for updating the classpath.
Obtain a valid license string from your Novell representative.
NOTE: You use the same license string to activate the design-time and runtime versions of Integration Manager Connect for Baan.
Select About Integration Manager from the Help menu. The About Integration Manager dialog box is displayed.
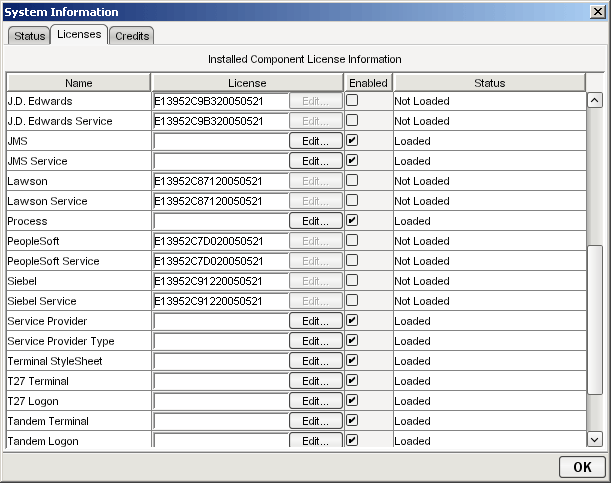
Select System. The System Information dialog box is displayed.
Click on the Licenses tab, located in the upper left corner of the System Information dialog box. The license information for your Integration Manager installation is displayed.
Scroll down until you see the row for Baan.
NOTE: The Connect ships with an Evaluation license string which may be used for 90 days.
To use the evaluation license string, select the check box in the Enabled column and skip to Step 10. To enter a different license string, select the check box in the Enabled column. The Edit button in the Siebel row is enabled.
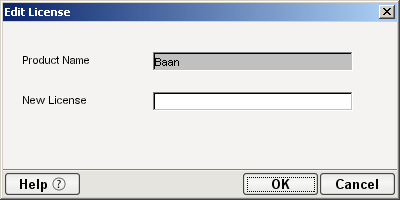
Select Edit in the Baan row. The Edit License dialog box is displayed.
Type the license string for the Integration Manager Connect for Baan in the New License field.
NOTE: If you are using the Tomcat application server, copy the jca10apis.jar from the \NIM6\Server Resources\Tomcat directory (Windows) or nim/Server Resources/Tomcat directory (Linux) to the Tomcat Composer\lib and shared\lib directories before attempting to update the runtime license.
Make sure that the Novell Integration Manager Enterprise Server is installed.
Start the application server. The Novell Integration Manager Enterprise Server starts automatically when you start the application server.
Open a browser window and navigate to the Novell Integration Manager main administrative console. Typically, this is at:
http://localhost/exteNdComposer
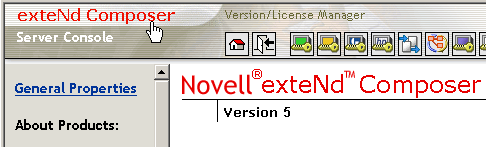
In the upper left corner of the console window, click the Integration Manager logo immediately above the words "Server Console," as shown in the following illustration.
In the content area of the main frame, near the bottom, click Licenses. The Manage Licenses window is displayed. This window shows the license status of every Integration Manager Connect. See the following illustration.
Scroll down to the entry labeled "baan".
NOTE: The Connect ships with Evaluation license strings which may be used for 90 days.
Type a license string in the text field in the "baan" row; then select Enabled in the "baan" row. To use the evaluation license string, just select Enabled.
Type a license string in the text field in the "baanservice" row; then select Enabled in the "baanservice" row. To use the evaluation license string, just select Enabled.
Copyright © 2004-2005 Novell, Inc. All rights reserved. Copyright © 1997, 1998, 1999, 2000, 2001, 2002, 2003 SilverStream Software, LLC. All rights reserved. more ...