Integration Manager User's Guide
CHAPTER 4
A project is a collection of Integration Manager objects designed to perform XML based B2B integration services. A project holds all the objects for the application you're building, and is the unit that is deployed to the application server. You may deploy as many projects to an application server as you wish.
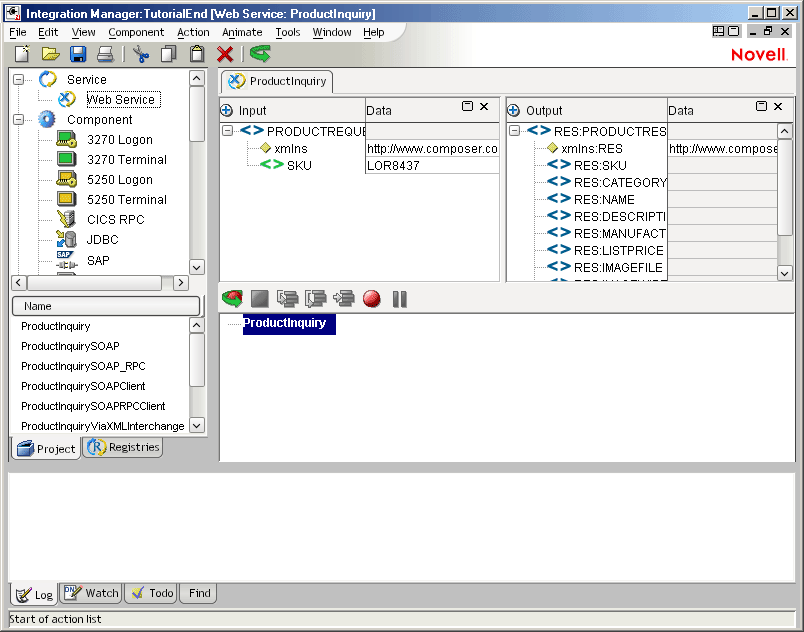
The illustration shows the parts of a project.
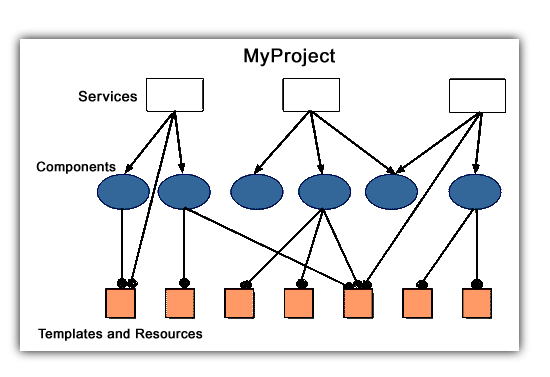

A service is used to combine the various components you build to create a logical unit of deployment for the application server. Services are the objects that are actually executed within the application server. A Web Service is started by a Service Trigger object and accepts XML document(s) as input(s), returning XML documents as output. A JMS Service accepts messages as input and is triggered by the arrival of a message on a queue. For more information, see Creating a New Service.
A component is an xObject that accepts one or more XML documents as inputs, uses a collection of actions to operate on the inputs, and returns an XML document as output.
A component is usually called within a service and can contain calls to actions or other components. (Services are basically collections of components.)
For more information about how components work, how they are created, and underlying design principles, see Creating an XML Map Component.
Resources are xObjects that perform specialized operations. They are used by services and components to help preform their tasks. Resource types include Code Tables, Code Table Maps, Connections, and Custom Scripts.
An XML template contains the sample documents, schemas, and stylesheets that assist you in designing and testing a component. You'll create XML categories to contain similar XML templates. Next you'll create XML templates, then use the templates as the inputs and outputs for the components you build. For more information, see About XML Templates.
When you first start Integration Manager, a sample project, called Tutorial, is loaded. When you begin your own application, you should start by creating a new, empty project.
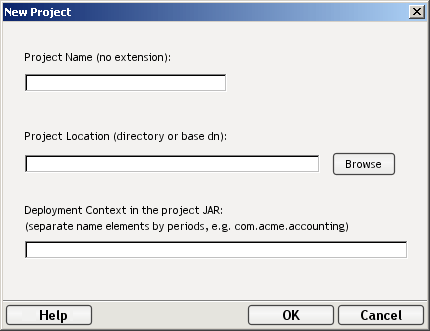
Select File, then New, then Project. The New Project dialog box appears.
Type in a Project Name. This is a required field. Integration Manager adds the project name extension, which is.spf.
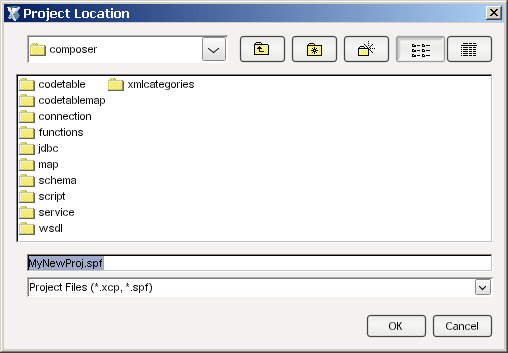
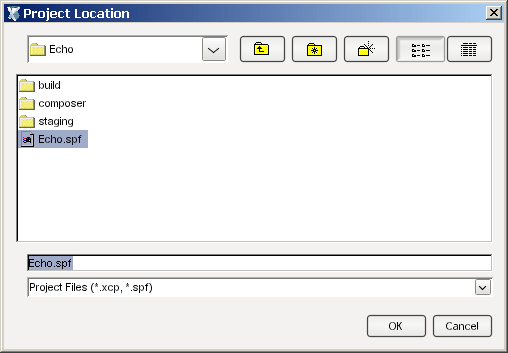
Select Browse to locate the folder where you want your project to reside. The Project Location dialog appears.
NOTE: If you have a project open, the Project Location dialog defaults to the folder where the open project resides.
Navigate to the folder where you want your project to reside.
To create a
new folder in which to save your new project, click the New Folder icon.  A folder called "New Folder" will appear in the list of folders in the current directory. Click this new entry a single time to highlight it, then click again to rename it to an appropriate Folder Name.
Click OK. The File Location dialog appears with the newly-created folder in the Look In: field.
NOTE: The File Name in the Project Location dialog defaults to the project name you designated in step 2.
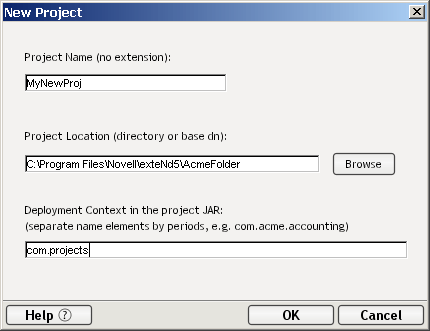
Click OK. The New Project dialog appears with your newly-created Project Name and Project Location displayed.
Enter a deployment context string in the bottommost text field of the dialog. The string should contain labels (no spaces) separated by periods, as in "com.server.apps."
NOTE: The context string should not contain Java-language keywords, such as try, catch, finally, int, for, etc. For a complete list of Java keywords, see the "Reserved Words" appendix.
Click OK. The Integration Manager window appears with the name of the project you just created in the title bar.
You can open a project in the following ways.
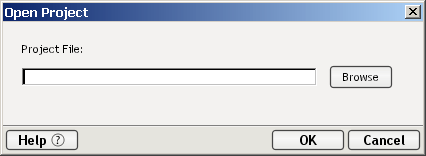
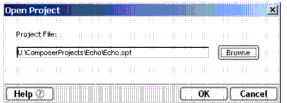
Select File then Open Project. The Open Project dialog appears.
Click the Browse button. Optionally, you can type in the path of the project you wish to open. The Project Location dialog appears.
Navigate to the directory where the project you'd like to open resides.
Click OK. The Open Project dialog appears with the path of the project you just chose in the Project File field.
Click OK. The Integration Manager window appears with the name of project you just opened in the title bar.
NOTE: You can also open a project by selecting a project from the Recent Projects list on the File menu.
As a startup option, you can launch Integration Manager by running XC.exe in command-line mode, and you can specify a project name parameter, such as:
C:\NIM6\Composer\Bin\xc myproject
In this example, XC.exe is run with a project file named myproject.spf.
When you launch Integration Manager, the last project you worked on is automatically loaded. If you moved the project files, or if you are trying to access another user's project that is inaccessible, Integration Manager may not be able to find your project.
At startup, Integration Manager uses the first command line parameter for the name of the project file to open. If the command line parameter is omitted (or is invalid), Integration Manager uses DEFAULTPROJECTFILENAME from xconfig.xml as the project name to open. If both the command line option is omitted or invalid and the DEFAULTPROJECTFILENAME is omitted or invalid, then Integration Manager displays the Project Create/Open dialog.
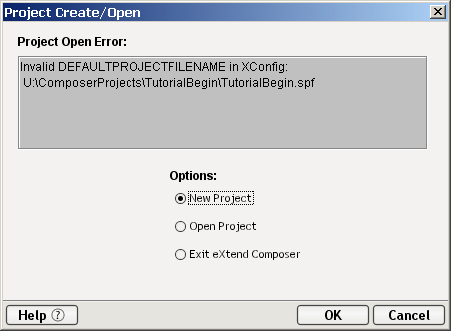
The Project Create/Open dialog allows you to create a new project, open an existing project, or exit Integration Manager altogether, as well as providing relevant error information regarding the failure to open an initial project.
 To locate a project at startup:
On the Project Create/Open dialog, do one of the following:
Select the New Project radio button to display the New Project dialog.
Select the Open Project radio button to locate your project.
Select the Exit Integration Manager radio button to search for the project. For more information about where project files are stored see Understanding Where Project Files are Stored.
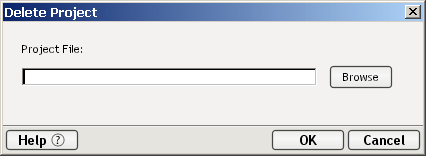
You can use Integration Manager to delete an entire project and all its objects from your disk drive, or since projects are stored in normal directory structures, you can use standard windows delete functions. In either case, if you do so, the project will be permanently destroyed and unrecoverable.
xObjects are the building blocks of all XML integration services. In order to build project components, you can either:
You can create xObjects from the menubar and use them in components.
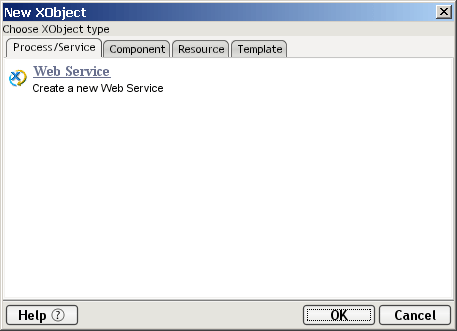
From the File menu, select New, then select xObject. Alternatively, you can click with your right mouse button on the type of xObject you wish to create in the navigator pane and select New.
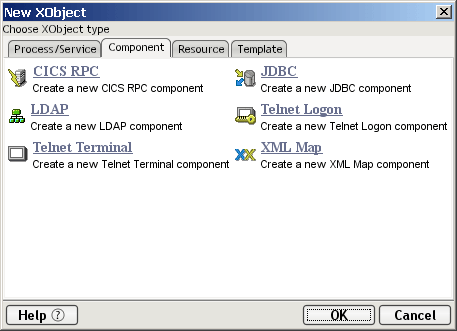
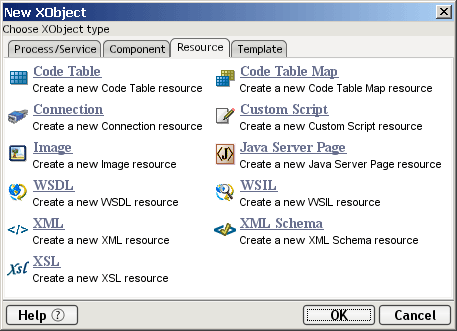
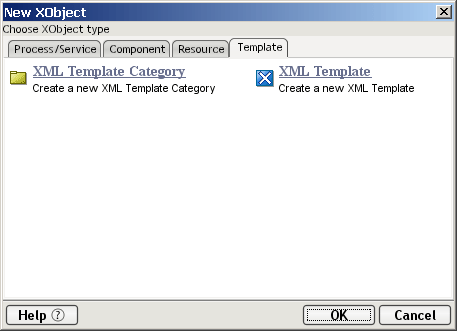
Tab to select the type of xObject to create. The choices are Process/Service, Component, Resource, or Template.
If you select Process/Service, you can create a new Web Service. You may have additional choices depending on what services you have installed.
If you select Component, select a component type. The visible choices depend upon which Connect products you have installed.
If you select Resource, select a resource type. There are several choices available by default and again, the visible choices will depend on what Connect products you have installed.
If you select Template, you have the choice to create a new Template Category, or a new Template.
In any of the four cases, once your selection is complete, type a name for the xObject.
Complete the rest of the xObject definition screens. Click Finish to complete and save the xObject.
The xObject is placed under the category in Integration Manager appropriate for its type.
NOTE: The xObjects you create are themselves stored as XML files on your hard disk in a directory of the same name as the category they're in.
If there are existing xObjects in the current project, you can open them from the main Integration Manager window to edit or view the contents.
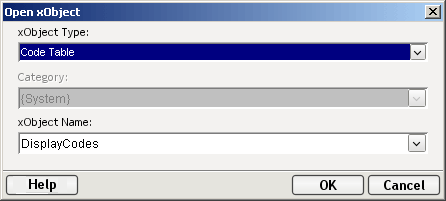
To open an existing xObject, from the File menu, select Open. Alternatively, highlight any existing xObject in the Instance Pane and press Ctrl+O. Either of these methods will display the Open xObject dialog box.
The xObject is opened in its own window.
NOTE: To open an xObject directly, doubleclick on it in the Instance Pane, or highlight it in the Instance Pane, click with your right mouse button and select Open.
Besides opening xObjects, you can import them from another project or location.
NOTE: The xObjects you create are themselves stored as XML files on your hard disk in a directory of the same name as the category they're in. To import an xObject, select the xObject's XML file as detailed below.
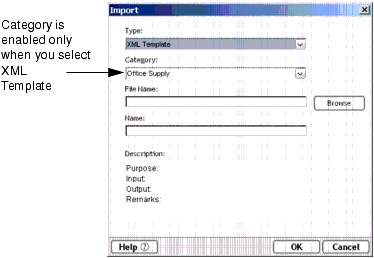
From the File menu, select Import xObject. The Import xObject dialog box appears.
Type the path and filename of the xObject, or click Browse and search for the xObject. You may also read in a file from a URL by explicitly preceding your filename with "http://," "https://" or "ftp."
Optionally, type any descriptive text, or keep the original text.
The xObject is placed under the category in Integration Manager appropriate for its type.
All xObjects have properties associated with them. Properties include their name, descriptions (header information), and other information specific to the xObject type.
To display the properties of an xObject:
NOTE: You can also click the right mouse button and select Properties from the context menu.
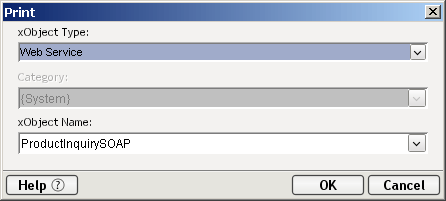
In addition to viewing the properties of an xObject, you can also print the properties. When you print an xObject, the time and date of the print, along with the name of the xObject and all Header and other information specific to the xObject type is included.
If you print the properties of a component, all data concerning the component's DOM structures (See What is a DOM?) as well as its Action Model (See About the Action Model Pane) are printed.
To print the properties of an xObject:
From the File menu, select Print. Alternatively, highlight any existing xObject in the Instance Pane and press Ctrl+P. Either of these methods will display the Print dialog box.
You can also select an xObject first and print it.
To rename an xObject, right-click the xObject and select Rename. Type a new name into the text field.
NOTE: Changing the name of an xObject on its Properties page causes a Save As operation, preserving the original and creating a duplicate with a new name. To change just the name of an xObject, use the Rename option on the context menu.
To delete an xObject, right-mouse click it, and select Delete. Confirm that you want to delete the xObject.
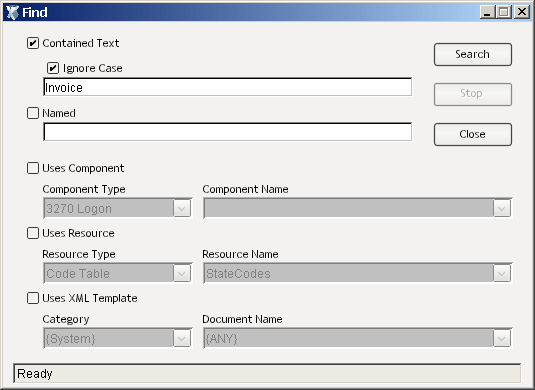
The bigger your project gets, the more services, components, resources, and XML Templates it will contain. You may find it difficult, at times, to locate information with such an overwhelming number of objects at your fingertips. The Find tool is designed to help you locate xObjects, text within objects, or objects that reference a given XML Template or Component.
To find an
xObject in your project:
There are several different ways to select and specify the methods you wish to search by.
Contained Text allows you to type a string to search for. This type of search will inspect all xObjects registered with your project. The entire text of the object will be searched, not just its name. Ignore Case can be toggled on or off.
Named allows you to inspect all the xObjects registered with a project by name. An asterisk ( * ) can be used as a multi-position wildcard.
Uses Component allows you to search by component type and, if desired, by name within component type. If you search within a Web Service component, the search will inspect other components that have actions containing calls to the Web Service you have selected. Similarly, if you have the Process Manager installed, searching a Process component will also inspect all sub-process activities that use the target process.
Uses Resource allows you to search among resource type objects, including Code Tables and Code Table Maps, Connections, JSPs, XML Schemas, Custom Scripts, Service Providers, Service Provider Types, WSDL and WSIL
Uses XML Template allows you to search among your XML templates.
When located, the target xObject(s) are shown in list form in the Find tab of the Integration Manager main window. Any component or object in the search-results list can be opened by doubleclicking it. As in the Category pane of the navigation frame, the icon next to the xObject indicates its type (component, service, resource, or XML Template).
Selecting Tools>Next Occurrence or pressing F4 will find the next result for the specified search. Selecting Tools>Previous Occurrence or pressing Shift-F4 will find the previous result for the search.
During the execution of a component, certain messages (e.g., internal system messages from Integration Manager, or text specified by Log actions) are written to a log file, xcsyslog.txt. You can specify the location of this file by altering the contents of the xconfig.xml file (which is in the \bin directory of your Integration Manager design-time installation). Look for the <LOGFILE> element in xconfig.xml and change its contents to the desired pathname.
NOTE: The easy way to change the log file path is to enter a new path in the General tab of the User Preferences dialog. Use the Preferences command under the Tools menu to bring up this dialog. See "Configuring Integration Manager's Environment" on page 47.
At animation time or when executing a component in Integration Manager, system messages (and Log Action output) will appear in real time in the Message pane at the bottom of the main Integration Manager window. Select the Log tab at the bottom of the window. (If the Message pane is not visible, choose View > Output Tabs from the main menu.)
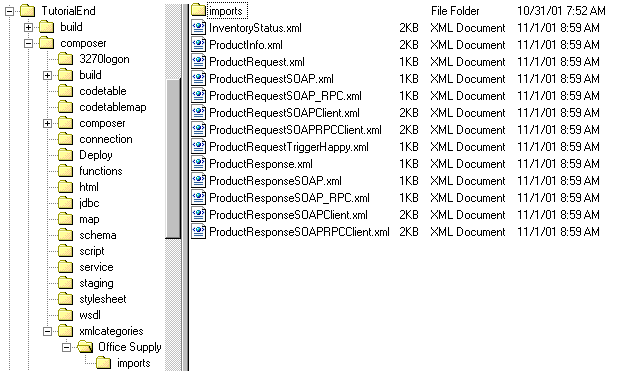
All Integration Manager objects (projects, XML categories, XML templates, components, resources, services, etc.) that you create in Integration Manager are stored in folders with names that match the object type.
When you create a project, the project file (e.g., myproject.spf) is stored in a folder named after the project (assuming you manually created a new folder for the project). As you build your application by creating XML templates, resources, and components, the created objects are stores as XML files within sub folders of your project folder. So creating a service named "AcceptInvoice" creates an XML file named "AcceptInvoice.xml" that contains all the actions performed by that service. All XML template categories are stored under "XMLCategories" by name of category. All XML Templates are stored under category by name of template. All XML samples for a category (i.e., there could be more than one template) are stored under "Imports" by name of sample document.
The illustration below shows an example of where files are stored.
All XML documents and support files are part of a project. After you deploy your project, the project files are stored in a Java Archive file (a JAR file).
The following table shows what files constitute a project:
|
Project File Name |
Description |
|---|---|
|
[projectname].spf |
Integration Manager project file. Stores startup information for your project. This file is created when you create a new project. |
|
PROJECT.xml |
This is an optional file that Integration Manager creates. It contains project variables that you define. See Creating Project Variables for more information. |
|
[projectname].jar |
A Java Archive that is created during deployment. |
|
*.xml, *.xsl |
All XML samples, definitions, and stylesheets you use in designing your application are stored in folders under the project folder. |
A project variable allows you to designate a value for an element and use the specified element globally in all components and functions you create. Unlike ECMAScript "globals," which are scoped to the component in which they are used, project variables are scoped to a service's session, which means they can be used by any number of components running inside an Integration Manager service.
Project variables are implemented as values stored in an in-memory DOM called $PROJECT. This DOM is in turn derived from a file that Integration Manager creates for every project called PROJECT.xml (which later gets deployed to the server).
NOTE: Changes to project variables that occur at runtime are not persisted across service invocations. In a production environment, PROJECT.xml is read-only. (To create persistent globals, you would need to read and write your own scratch file using XML Interchange actions.)
Because they are global in scope, project variables can perform important functions during both design-time development of your project and runtime maintenance of your project after deployment.
At design time, project variables provide a convenient means of centralizing project-wide values that might need to be used in multiple places in a project. At deployment time, the project variable file (PROJECT.xml) provides a convenient way of updating a project's static variables. After deployment, you can conveniently change the behavior of multiple deployed components and services by updating just the deployed PROJECT.xml file on the application server.
Examples of items that might best be stored as project variables include:
You create the names of project variables that map to specific values. By making the reference of certain information indirect through a project variable, you can change the data in one place and be assured that all places where it is used will get the same new values.
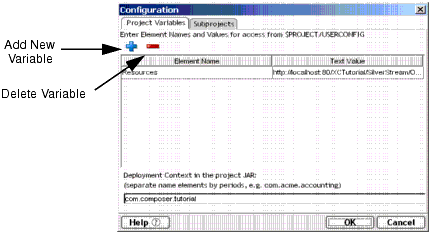
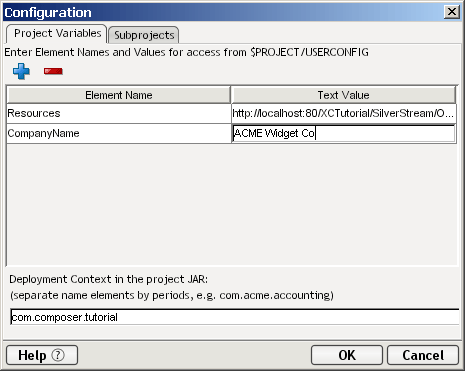
Select Tools then Project Settings from the Integration Manager window. The Project Settings dialog appears.
Click the Add New Variable button. A blank field appears in the Project Variable window.
Click in the blank Element Name field and type an element name. For example, type the element "CompanyName." Do not use spaces.
Click in the blank Text Value field and type a text value. For example, "ACME Widget Co."
The Element Name and Text Value that you just created are now stored in a project XML file called PROJECT.xml. This file can be manually edited after you deploy your project, if you need to change the variable value.
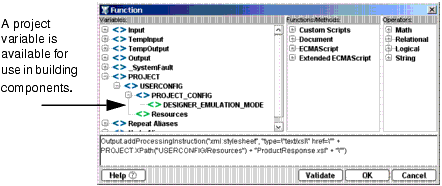
The Element Name and Value are automatically added to Integration Manager dialog boxes for your use in building components. For example, the variable is available for use in functions.
In addition to creating permanent (static) project variables, you can also create project variables dynamically within a component or a service.
The $PROJECT DOM is always present in the DOM lists (dropdown menus) that display in the Map action dialog. It's a very simple matter to create a project variable and assign it a value, because you can map to the $PROJECT DOM the same way you would map elements and element values to any other DOM (including via drag-and-drop).
NOTE: You can view the contents of the $PROJECT DOM in tree, text, or stylized form at any time by choosing Window Layout from Integration Manager's View menu and making the $PROJECT DOM visible. See the discussion under "Using Window Layout and Show/Hide in the Component Editor" on page 108 of this guide.
If you look at the structure of the PROJECT.xml file, you'll see that the root element is called USERCONFIG. User-defined variables are attached to this node as child elements. The string values of the child elements are the values of the project variables corresponding to the element names.
In addition to user-defined project variable names, you will also see Integration Manager-defined elements under USERCONFIG, because Integration Manager uses the PROJECT.xml file to persist certain project preference values.
Dynamically created project variables are, of course, volatile. You can use dynamic project variables for the lifetime of the executing service (which may in turn call many components that use it). When the service finishes executing, the dynamic variables are destroyed, since they were created in memory.
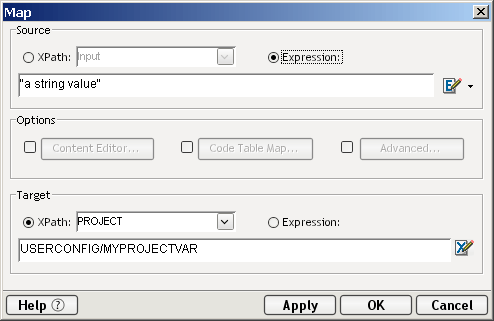
You can reassign values to a project variable as many times as needed, by mapping to its node in the $PROJECT DOM. An example of this follows.
To create a dynamic project variable and map a value to it:
Doubleclick a service in the instance pane. The Service editor window appears.
In the main menubar, select Action, then Map. The Map dialog appears.
Click the Expression radio button in the Source section of the Map dialog.
Type in a value for your project variable in the Source field. If the value is a string, don't forget to enclose it in double quotes.
There are two ways to enter the target expression:
PROJECT.createXPath("USERCONFIG/MYPROJECTVAR")
in the Target field, where MYPROJECTVAR is the name of the project variable you wish to create—or:
Click the XPath radio button under Target, select PROJECT from the dropdown menu, and in the field underneath type:
USERCONFIG/MYPROJECTVAR
in the target field, where MYPROJECTVAR is the name of the project variable you wish to create. (See above illustration for the completed dialog's appearance.)
Click OK. The dynamic variable you just created now appears in the Action pane of the Service editor window.
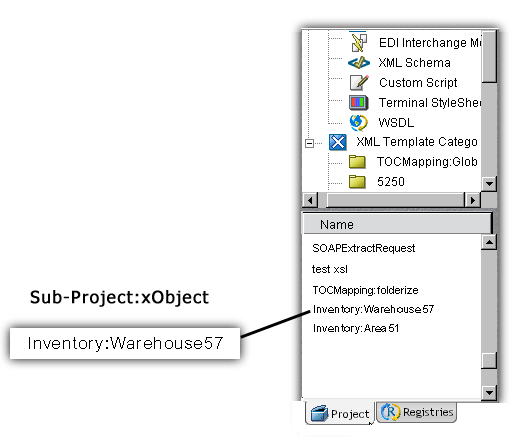
You can include other Integration Manager projects within your current project—a feature designed to foster rapid application development via reuse of existing xObjects. When external projects are reused in this fashion, they are called subprojects. A subproject's xObjects are exposed in the current project's Category and Instance panes, in the usual way, except that a project prefix appears before the name of each object, to identify the object as coming from a named subproject. An example is shown below.
To include a Subproject in an Integration Manager Project:
Under the Tools menu on Integration Manager's main menubar, choose Project Settings.
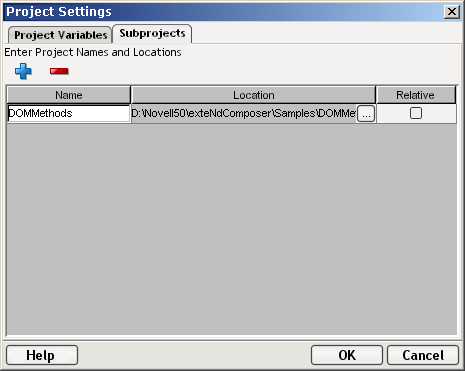
Select the Subprojects tab of the Project Settings dialog, as shown below.
Click the plus-sign icon in the upper left part of the dialog to add a subproject. A dialog will appear, allowing you to browse your file system. Choose any .spf file that was created by Integration Manager; it will appear in the list of subprojects.
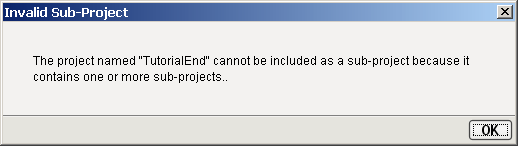
NOTE: If the .spf you choose already contains a subproject of its own, you will get an error dialog advising you that you cannot add subprojects containing subprojects.
Click the Relative checkbox if you want to change the location of the subproject to a relative path (to the main project.spf). If the project is on a separate drive than the main project, then the Relative checkbox is disabled.
To remove a subproject, select it and then click the minus-sign icon.
Dismiss the dialog by clicking OK. Your subproject's xObjects will appear in the detail pane of Integration Manager's nav frame. They can be distinguished by the appearance of a namespace/colon prefix on each xObject name.
To achieve object reuse, you can import xObjects directly, one-by-one, into a given project, rather than take advantage of subprojects. (See "Importing an xObject" elsewhere in this chapter.) But the disadvantage of importing an xObject is that it results in the original object's underlying XML files being copied into the current project. This can pose code maintenance problems, in that alterations or updates of the original xObject will need to be made, also, in any copies of that object that might exist in projects that imported the object. This is not true for subprojects. When you include an external project within your current project, no additional copies of the subproject's source files are made. All "source code" stays in one place, simplifying maintenance.
Nesting of subproject beyond one level s is not supported. A given project can have any number of subprojects, but they must all be at the same level (one level deep). This also means that a project containing one or more subprojects cannot serve as a subproject for another project. For example, consider the case where Project A contains a subproject named Project B. A third project called Project C could not use Project A as a subproject, although it could use Project B.
If you attempt to add a subproject to your current project, and that subproject contains its own subprojects, you will get a warning as follows:
The sharing of xObjects and variables among projects and subprojects is limited by certain scoping rules that you should be aware of.
xObjects: A project can access a subproject's components (and other xObjects), but the subproject cannot access the parent project's objects. For example, if Project A contains Project B as a subproject, the components in Project B (the "child" project) cannot address components or resources in Project A (the parent).
Project variables: Variables derived from the $PROJECT DOM (see "Adding a Project Variable to a Project" earlier in this chapter) belong to the project in which they were created. Components and services in Project A cannot "see" project variables belonging to Project B, nor vice versa.
ECMAScript variables and functions: The lifetime of script variables is always scoped to the component. When a component goes out of scope, any ECMAScript variables it may have used also go out of scope. Custom Script resources in a subproject, on the other hand, are accessible to the main project, via a built-in Integration Manager ECMAScript extension called the Projects object. For example, suppose that the current project, Project A, contains a subproject, MyOtherProject; and suppose MyOtherProject contains a Custom Script resource in which there is a function called salesTax(). A component in Project A can use the salesTax() function by calling:
Projects.MyOtherProject.salesTax()
Copyright © 2004 Novell, Inc. All rights reserved. Copyright © 1997, 1998, 1999, 2000, 2001, 2002, 2003 SilverStream Software, LLC. All rights reserved. more ...