Connect for PeopleSoft User's Guide
CHAPTER 3
To create a Component that utilizes the Integration Manager Connect for PeopleSoft, you will generally need to do three things:
Create a Connection Resource (to allow your component to connect to a PeopleSoft system)
Create the Component itself (containing your business logic)
Each of these processes is discussed in detail in this chapter.
Before creating a component that interacts with a PeopleSoft system, you need to create a Connection Resource, which is a lightweight Integration Manager object (xObject) that encapsulates basic connection information (parameter values) associated with a connection to a back-end system.
In addition to a connection resource, a PeopleSoft Component requires that you have already created XML templates so that you have sample input and output documents for use in designing your component. For more information, see "Creating an XML Template" in the Novell Integration Manager User's Guide.
If your component design calls for any other resources, such as custom scripts, XSL, XSD, etc., it is best to create these before creating the PeopleSoft Component. For more information, see "Creating Custom Scripts" in the Novell Integration Manager User's Guide.

You create different types of connection resource depending on the type of interaction with the PeopleSoft system that is desired. If your application needs to initiate PeopleSoft business events, you need to create a PeopleSoft Connection resource. If your application needs to process data when a business event occurs within PeopleSoft, you need to create an inbound connection resource. Inbound connection resources include file, HTTP, and TCP connection types.
You can specify Connection parameter values in one of two ways: as Constants or as Expressions. A constant-driven parameter uses the value you type in the Connection dialog every time the Connection is used. An expression-driven parameter allows you to set the value using a programmatic expression, which can result in a different value each time the connection is used at runtime. This allows the Connection's behavior to be flexible and vary based on runtime conditions each time it is used.
For instance, one very simple use of an expression-driven parameter in a Connection would be to define the User ID and Password as PROJECT Variables (e.g. PROJECT.XPATH("USERCONFIG/MyDeployUser"). This way when you deploy the project, you can update the PROJECT Variables in the Deployment Wizard to values appropriate for the final deployment environment. At the other extreme, you could have a custom script that queries a Java business object in the Application Server to determine what User ID and Password to use.
 To switch a parameter from Constant-driven to Expression driven:
Click the right mouse button in the parameter field you are interested in changing.
Select Expression from the context menu and the editor button will appear or become enabled.
Click on the button and then create an expression that evaluates to a valid parameter value at runtime. (Strings should be wrapped in double-quotes.)
To create a PeopleSoft connection resource:
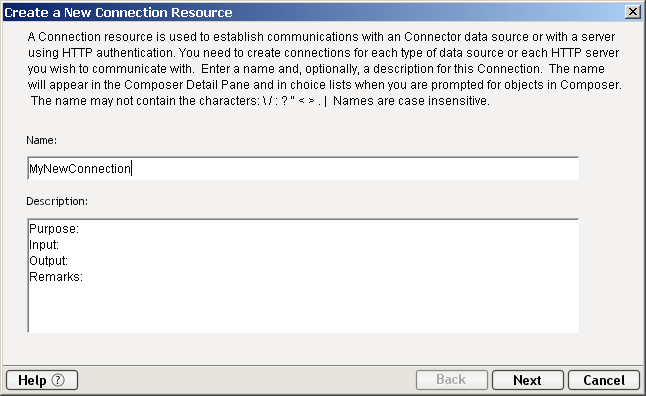
Select File > New > xObject and select the Resource tab. Click on Connection. The "Create a New Connection Resource" Wizard appears.
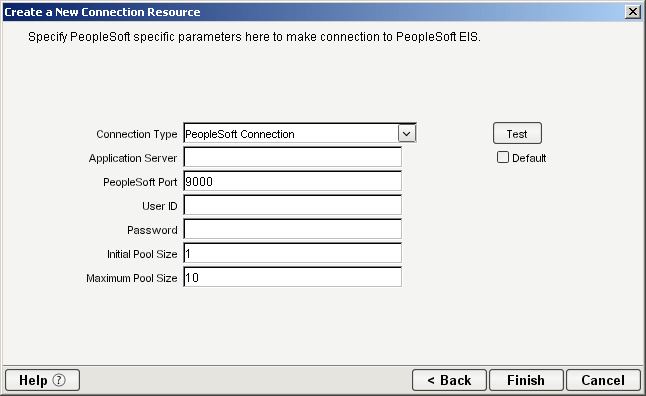
Select PeopleSoft Connection from the Connection Type pull down menu.
In the Application Server field, enter the host name or IP address for the PeopleSoft server that you'll be using.
NOTE: This parameter, and all subsequent parameters in this dialog, can be dynamically set using Expressions. See the discussion "About Constant-Driven and Expression-Driven Connection Parameters" later in this chapter.
In the PeopleSoft Port field, enter the appropriate port number.
Enter a valid User ID to sign on to the selected PeopleSoft server.
In the Initial Pool Size field, enter the desired J2EETM Connector Architecture pool size. (Not applicable for non-managed environments.)
Enter a Maximum Pool Size as desired. Again, this is a J2EETM Connector Architecture setting. (Not applicable for non-managed environments.)
If desired, select Test to see if your connection parameters and current network environment will allow you to create a live connection. (The connection is discarded immediately after the test.) A "success" or "failure" message dialog will appear. You can continue working with the resource, even if your connection fails.
NOTE: This does not test the connection pool (if defined).
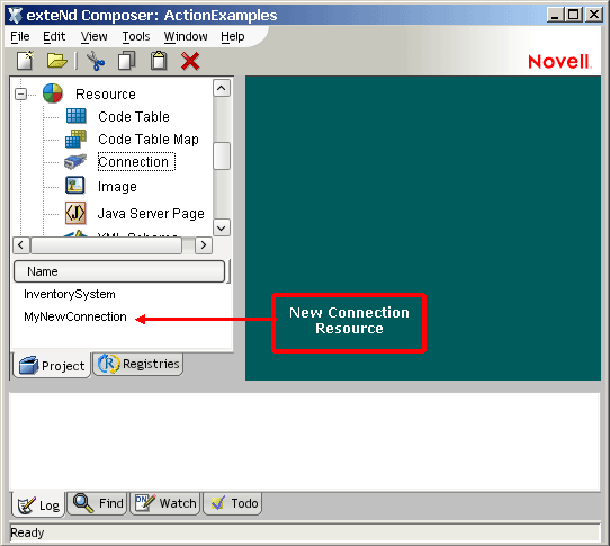
Click Finish. The newly-created resource connection object appears in the Integration Manager Connection Resource detail pane.
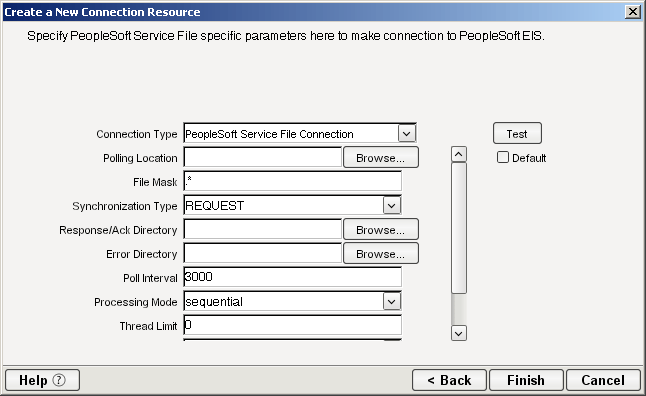
To Create a PeopleSoft File Service Connection Resource:
Select File > New > xObject. The New xObject dialog box is displayed.
Double-click on Connection. The "Create a New Connection Resource" wizard is displayed.
Optionally, type a description of the connection object in the Description field.
Select PeopleSoft File Service Connection from the Connection Type list.
Use the Browse button next to the Polling Location field to select the target file system location for the PeopleSoft XML file.
In the File Mask field type the file name to be used for the output file generated as a result of this operation. The default is ".*".
Select REQUEST, REQUEST_RESPONSE, or REQUEST_ACK from the Synchronization Type list. Select the option that is correct for the Workflow with which you are integrating (e.g., if your Workflow is set up to process a response, select REQUEST_RESPONSE). The Synchronization Type selected also determines the tabs that are displayed in the Service Request Native Environment pane (e.g., if REQUEST_RESPONSE is selected, both Request and Response tabs are displayed).
Use the Browse button next to the Response/Ack Directory field to select the directory to which responses or acknowledgements from your application will be written.
Use the Browse button next to the Error Directory field to select the directory to which error information will be written.
In the Poll Interval field, type the interval (in milliseconds) in which the Polling Location is checked for input. The default is 3000 (3 seconds).
Select Threaded or Sequential from the Processing Mode list. Threaded indicates processing of multiple requests simultaneously. Sequential indicates serial processing of requests.
If Threaded processing mode is selected in the Processing Mode list, use the Thread Limit field to specify the maximum number of requests that can be processed simultaneously.
From the Metadata Connection list, select a PeopleSoft connection resource from the list of defined connection resources. This connection is used for acquiring metadata from the PeopleSoft system.
Type the desired maximum pool size in the Maximum Pool Size field. This is a JCA setting that specifies the maximum number of connections to be allowed in the connection pool (not applicable for non-managed environments).
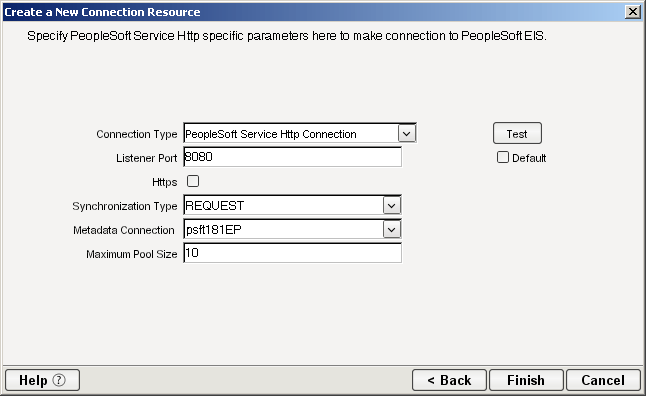
To Create a PeopleSoft HTTP Service Connection Resource:
Select File > New > xObject. The New xObject dialog box is displayed.
Double-click on Connection. The "Create a New Connection Resource" wizard is displayed.
Optionally, type a description of the connection object in the Description field.
Select PeopleSoft HTTP Service Connection from the Connection Type list.
In the Listener Port field, type the number of the port on which the application will listen for PeopleSoft event data. The default port is 8080.
Select REQUEST, REQUEST_RESPONSE, or REQUEST_ACK from the Synchronization Type list. Select the option that is correct for the Workflow with which you are integrating (e.g., if your Workflow is set up to process a response, select REQUEST_RESPONSE). The Synchronization Type selected also determines the tabs that are displayed in the Service Request Native Environment pane (e.g., if REQUEST_RESPONSE is selected, both Request and Response tabs are displayed).
From the Metadata Connection list, select an outbound PeopleSoft connection resource from the list of defined connection resources. This connection is used for acquiring metadata from the PeopleSoft system.
Type the desired maximum pool size in the Maximum Pool Size field. This is a JCA setting that specifies the maximum number of connections to be allowed in the connection pool (not applicable for non-managed environments).
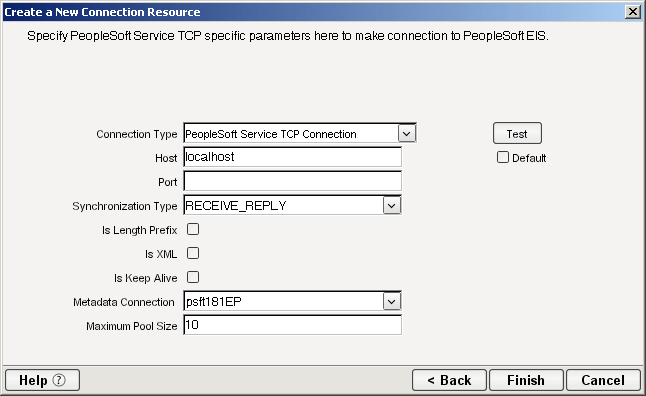
To Create a PeopleSoft TCP Service Connection Resource:
Select File > New > xObject. The New xObject dialog box is displayed.
Double-click on Connection. The "Create a New Connection Resource" wizard is displayed.
Optionally, type a description of the connection object in the Description field.
Select PeopleSoft Service TCP Connection from the Connection Type list.
In the Host field, specify the host name or URL of the system on which the PeopleSoft system is installed.
In the Port field, type the name of the port on which the host is listening.
Select RECEIVE_REPLY, RECEIVE_ACK, or RECEIVE from the Synchronization Type list:.
Select Is Length Prefix if the PeopleSoft application sends data that is not in XML format. The TCP/IP event application must prefix the data with a 4-byte binary length field when writing the data to the TCP/IP port. When this option is selected, deselect the Is XML option.
Select Is XML if the PeopleSoft application sends data in XML format. When this option is selected, deselect the Is Length Prefix checkbox.
Select Is Keep Alive to maintain continuous communication between the PeopleSoft application and your application.
From the Metadata Connection list, select an PeopleSoft Connection resource from the list of defined connection resources. This connection is used for acquiring metadata from the PeopleSoft system.
Type the desired maximum pool size in the Maximum Pool Size field. This is a JCA setting that specifies the maximum number of connections to be allowed in the connection pool (not applicable for non-managed environments).
Before creating a PeopleSoft Component, you should create any XML templates that might be needed. This basically means telling Integration Manager what XML samples to use. (For more information, see Creating a New XML Template in the separate Integration Manager User's Guide.) Once you've specified the XML templates, you can create a component, using the template's sample documents to represent the inputs and outputs processed by your component.
Also, as part of the process of creating a PeopleSoft Component, you can select a preexisting PeopleSoft connection resource, or you can create a new one. If you create the connection beforehand (as outlined in the previous chapter), then it is available to for use by any PeopleSoft Components in the current project. If you have not already created at least one PeopleSoft connection resource in the current project, you will be prompted to do so when you try to create a PeopleSoft Component.
NOTE: You can still create a Component without first creating a Connection Resource, but you won't be able to use any debug features that depend on a live connection.
To create a new PeopleSoft Component:
Select File>New>xObject. In the dialog that appears, select the Component tab and then the PeopleSoft component type.
NOTE: Alternatively, under Component in the Integration Manager Navigator pane (explorer view), you can highlight PeopleSoft, click the right mouse button, then select New.
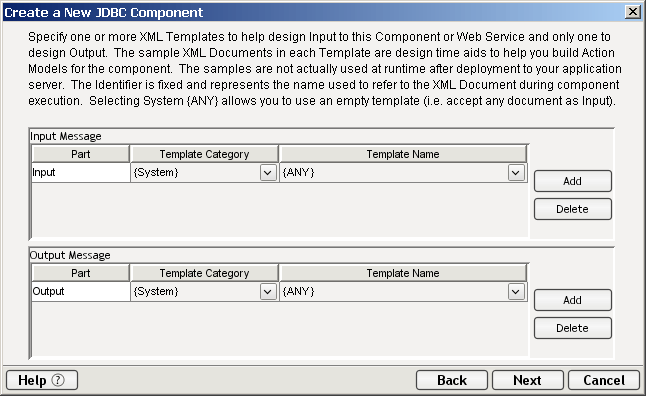
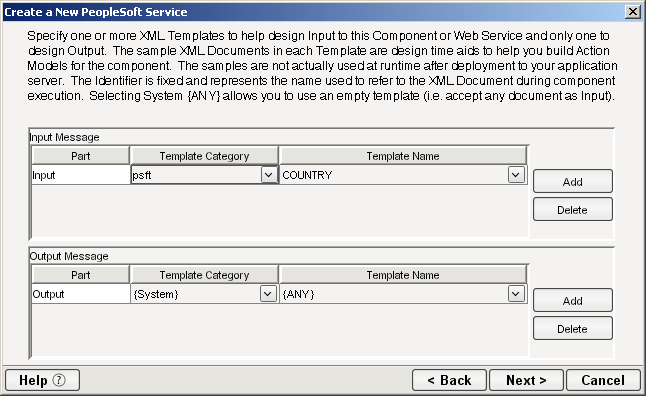
Click Next. The XML Input/Output Property Info panel of the New PeopleSoft Component Wizard appears.
Specify the Input and Output templates as follows.
Type in a name for the template under Part if you wish the name to appear in the DOM as something other than "Input".
Select a Template Category if it is different than the default category.
Select a Template Name from the list of XML templates in the selected Template Category.
To add additional input XML templates, click Add and choose a Template Category and Template Name for each.
To remove an input XML template, select an entry and click Delete.
Select an XML template for use as an Output DOM using the same steps outlined above.
NOTE: You can specify an input or output XML template that contains no structure by selecting {System}{ANY} as the Input or Output template. For more information, see Creating an Output Document without Using a Template in the Integration Manager User's Guide.
If desired, specify a template to be used as a scratchpad under the "Temp Message" pane of the dialog window. This can be useful if you need a place to hold scratchpad values that will be used temporarily during the execution of your component. Select a Template Category if it is different than the default category. Then select a Template Name from the list of XML templates in the selected Template Category.
Under the "Fault Message" pane, select an XML template to be used to pass back to clients when an error condition occurs.
As above, to add additional input XML templates, click Add and choose a Template Category and Template Name for each. Repeat as many times as desired. To remove an input XML template, select an entry and click Delete.
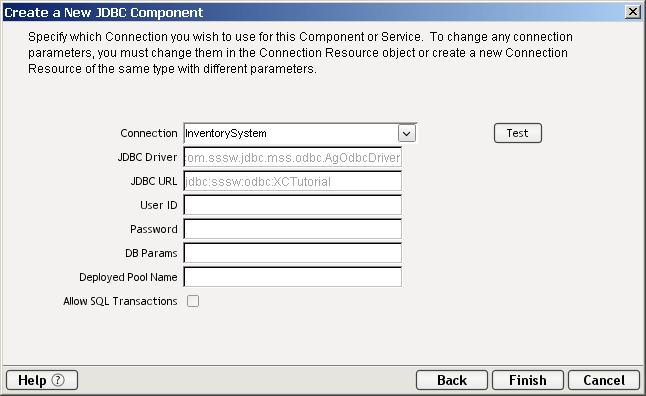
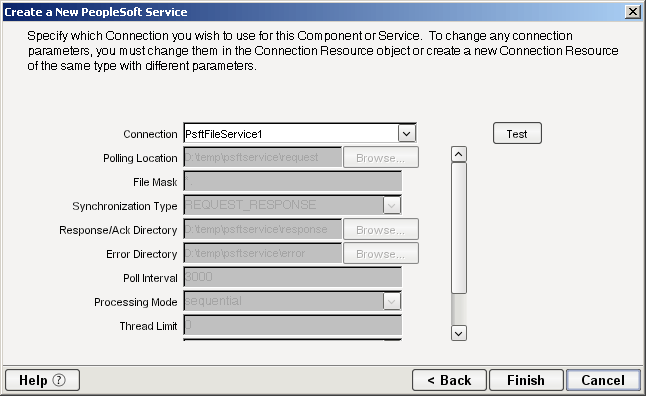
Click Next. The Connection Info panel of the "Create a New PeopleSoft Component" Wizard appears.
Click Finish. The component is created and the PeopleSoft Component Editor appears.
The PeopleSoft Component Editor includes all the functionality of the XML Map Component Editor. It contains mapping panes for Input and Output XML documents as well as an Action Model.
The PeopleSoft Component Editor also includes a Native Environment Pane, which appears as a grey pane until you create a PeopleSoft Request action, at which time it will show a tabbed Request/Response pane with corresponding XML trees.
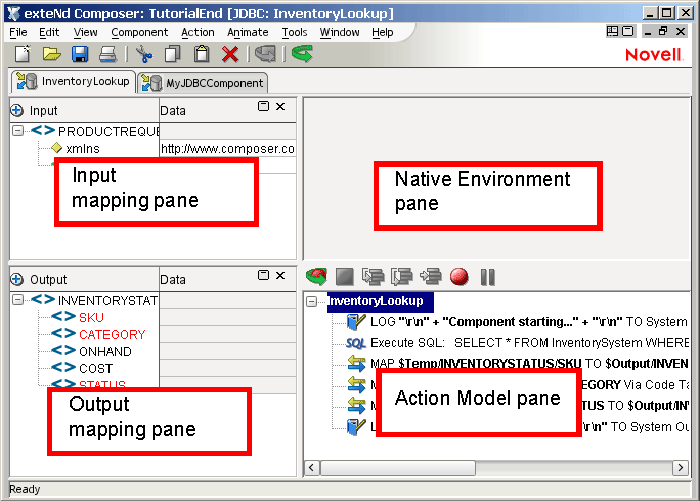
(The Native Environment Pane shown here is blank, because no PeopleSoft Request action has yet been created.)
You can create all the normal Integration Manager actions in the Action Model of your PeopleSoft component (e.g., XML Map, Function, Log, Send Mail, and so on). In addition, you can create a PeopleSoft Request action.
The PeopleSoft Request action communicates requests (XML request documents) to your PeopleSoft system and fetches responses back from the same system.
The Integration Manager GUI for creating a PeopleSoft Request action allows you to
specify the type of PeopleSoft function (or "service") you want to invoke
automatically generate XML schemas (request and response) for the particular Component Interface API you wish to use
use the generated schemas to fine-tune the exact structure of the actual request document you want to use (a request document that conforms to the schema but reflects your own "setup" choices and initialization parameters, etc.)
automatically generate the corresponding XML request and response documents that conform to the schemas and choices you've made
You will see how this works in the procedure given below.
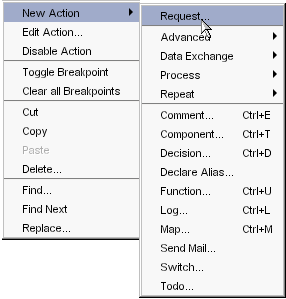
To create a PeopleSoft Request action
Right-click in the Action Model at the location where you wish to create a new PeopleSoft Request action, then (in the context menu that appears) choose New Action > Request.
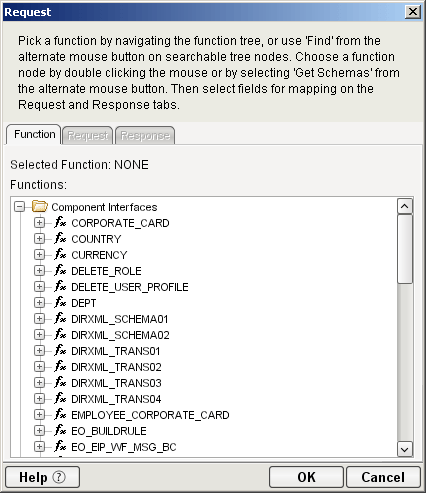
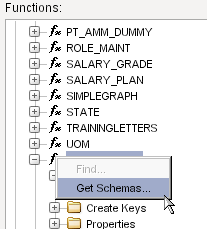
In the dialog that appears (see below), give focus to the Functions tab and expand the topmost node (Component Interfaces) in the tree-view shown.
You will see a list of functions corresponding to those for which Component Interface classes were built (see Deploying the PeopleSoft Component Interface Files and How to Create a New Component Interface).
Right-click on the function of interest. Select Get Schemas from the context menu that appears. (If the command is not available, it means no Component Interface API classes are available for this Function type.)
After a few seconds, the Request and Response tabs of the dialog should become enabled. When this has occurred, select the Request tab to bring it forward.
Enter a request-message (document) mapping name, or accept the default as shown.
Select the elements that you want to occur in the Request document, by checking or unchecking checkboxes in the node tree. Some nodes are greyed out (disabled) while others are not. This is because the document's schema determines which nodes you can edit.
Integration Manager will not let you specify an invalid request document, because the things you should not edit are greyed out (disabled), and the editable items for which customization is allowed have RMB context-menus that non-customizable nodes do not have, etc. For example:
Mandatory elements and attributes are marked selected and disabled.
All child nodes are left unselected and disabled if the parent node is not selected.
A parent element, once selected, will autoselect mandatory elements and attributes underneath it.
When a parent node is selected, you will need to select optional element manually.
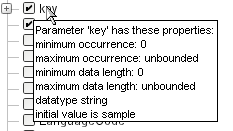
Tool tips are an important aid in using the Request and Response panes, because they display document-structure rules that come straight from the corresponding Component Interface request/response document schema. You should take time to familiarize yourself with the tooltip feature by letting the mouse hover over various nodes. An example is shown below.
NOTE: The tooltips that appear in this tree are also made available in the Native Environment pane.
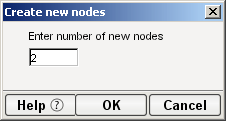
If a node has "maximum occurrence" of more than one, then a RMB menu command called "Create new..." is available. Choosing that command brings up the following dialog:
Enter the number of additional instances of this node-type that you want to insert in the document. Then click OK. New nodes are added to the document structure.
CAUTION: There is currently no Undo for this.
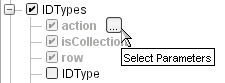
If an Enumeration Button appears to the right of a given node, you can click it to choose from the list of appropriate (schema-allowed) values for that enumeration.
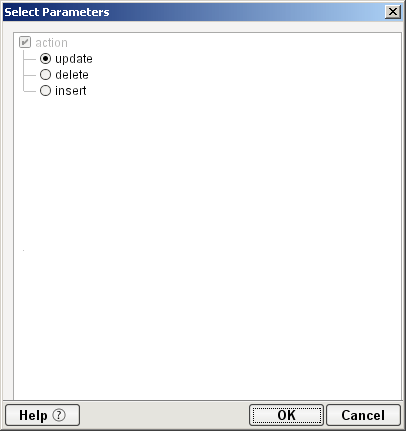
A common situation is that an enumeration offers choices of Update, Insert, or Delete. An example of this is shown in the following illustration, which shows the dialog that appears when you click an Enumeration Button.
Visit all of the nodes in the request tree that are of interest to you, and use the various Integration Manager UI features to customize the request document's structure.
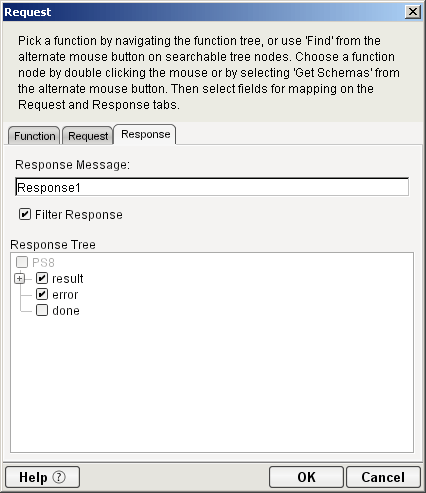
When you are satisfied with the structure, click the Response tab at the top of the dialog to bring the Response document pane forward. This pane shows a tree view of the response document, similar to the one shown for the Request document.
Check or uncheck Filter Response as desired. It is checked by default. If this box is unchecked, the tree will be disabled and greyed (no longer editable), meaning that a default schema configuration will be used. When the box is checked, you can customize the structure of the request document by specifying various types of node filtering.
Visit all of the nodes in the Response document tree and customize the settings as desired. (See previous steps, applicable to the Request document, for an explanation of the UI semantics.)
Click OK. (Otherwise, use Cancel.) The dialog goes away and a new action appears in the Action Model of your component. At the same time, the Native Environment Pane changes to show the Request and Response tabs along with corresponding tree views of the fully customized document(s).
In the normal component editor view, drag and drop data from the Input document pane to the Request document of the Native Environment Pane, as desired. This will create mappings from your Input document to the Request doc that will be submitted to the PeopleSoft server. The mappings will appear (automatically) as new XML Map Actions in the Action Model.
Repeat the drag-and-drop mapping process for the Response document, dragging nodes from the Native Environment Pane to the component's Output document tree view. Again, this will automatically cause new Map Actions to appear in your Action Model. (You can cut/copy/delete the actions once they appear in the Action Model pane.)
Add or remove actions from the Action Model as needed to create the business logic you need.
Once you have created a PeopleSoft Request Action in your action model (using the above procedure), you can go back and revisit the Request and Response schema trees (and change your customizations) simply by doubleclicking the Request Action in your action model. Doubleclicking will cause the PeopleSoft Request Action dialog to reappear. You can use the Request and Response tabs to navigate the request- and response-doc schemas and change your customizations as desired. When you exit out of the dialog, your changes will be reflected in the Native Environment Pane.
NOTE: If you make hand-edits to the Request or Response documents in your Native Environment Pane, you will not be able to reopen the PeopleSoft Request Action dialog. (See discussion further below.) Therefore, try to avoid manually editing request/response documents. Instead, make modifications through careful use of the XML Map Action or by using Request.createXPath( ) and/or DOM methods in a Function Action.
After you have created the PeopleSoft Request Action using the foregoing procedure, the Native Environment Pane portion of the Integration Manager editor view will show Request and Response documents in tree-view form.

As mentioned earlier, you can drag and drop data from your component's Input document to the Request document to create XML Map actions. (First, put focus on the target Request-document node by clicking in it. Then go to the Input document and click-drag any data you want to map over to the target node in the Request document.) You can use drag-and-drop mapping to map from Response to Output, as well. In the illustration shown above, some nodes are shown in red. The red entries represent nodes to which data have been mapped.
If you right-click anywhere inside the Request or Response tree views in the Native Environment Pane, you will get a context menu.

The Edit Document command in this menu will open the document in a text-editor view as shown below.
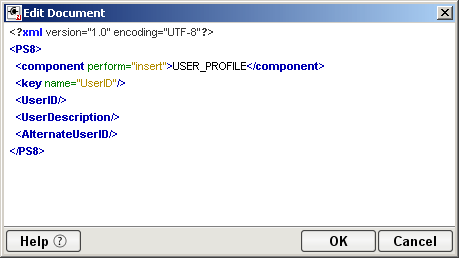
In this window, you can hand-edit the Request or Response document as desired.
CAUTION: If you make hand-edits to the document, it may no longer conform to the original schema. As a result, you will no longer be able to reopen it in the PeopleSoft Request Action dialog.
Note that if you've made hand-edits to a Request or Response document, doubleclicking on the corresponding PeopleSoft Request Action in the action model will cause the following dialog to appear:
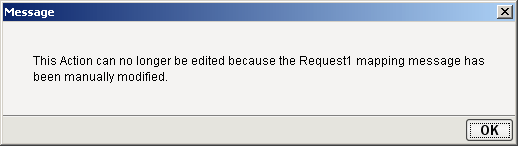
If this dialog appears, you will need to recreate the action in order to see the original Request or Response document. (Any hand edits will be lost, however.)
To prevent this situation from occurring, avoid making manual edits to Request or Response documents. Instead use XML Map Actions (and/or Function actions) to modify documents or node contents. Be aware that doing so may violate schema constraints. This will not necessarily cause runtime problems for your component when executing in the Integration Manager Enterprise Server environment, because Integration Manager does not validate the request document against the schema at runtime, on the server. However, your PeopleSoft system may validate incoming requests, in which case a hand-edited Request document could be the source of hard-to-troubleshoot errors.
You will notice that whenever a PeopleSoft Request action is created in your Action Model, two additional lines are added to the action list: Before Execute Actions and After Execute Actions. These are header labels (grouping labels) for blocks of actions that you want to occur before the request is sent to the PeopleSoft system or after a response document has come back, respectively. Typically you will want to map data fields from Input to Request and have those actions be grouped under the "Before Execute Actions" header. Likewise, any map actions or other action logic you need to perform on the Response document after the PeopleSoft system executes you request should be grouped under the "After Execute Actions" heading.

This section describes how to use the Integration ManagerTM Connect for PeopleSoft to create a PeopleSoft Service component to connect to PeopleSoft and listen for events. As part of the process of creating a PeopleSoft Service, you can select an existing PeopleSoft connection resource, or you can create a new one. If you create the connection beforehand, it is available for use by any PeopleSoft Services in the current project. If you have not already created at least one PeopleSoft connection resource in the current project, you will be prompted to do so when you try to create a PeopleSoft Service.
NOTE: You can still create a PeopleSoft Service without first creating a connection resource, but you won't be able to use any debug features that depend on a live connection.
To Create a New PeopleSoft Service:
Select File > New > xObject. The New xObject dialog box is displayed.
NOTE: Alternatively, under Service in the Integration Manager Navigator pane (Explorer view), you can highlight PeopleSoft Service, click the right mouse button, then select New.
Double-click on "PeopleSoft Service."
If you have not previously defined a connection resource, you are prompted to do so now (see Creating Connection Resources).
If you have already defined a connection resource, the "Create a New PeopleSoft Service" Wizard is displayed.
Select Next. The XML Input/Output Message Property Info panel of the New PeopleSoft Service Wizard is displayed.
Specify the Input and Output templates as follows:
Type a name for the template under Part if you wish the name to appear in the DOM as something other than "Input"
Select a Template Category if it is different than the default category.
Select a Template Name from the list of XML templates in the selected Template Category.
To add additional input XML templates, click Add, then choose a Template Category and Template Name for each.
To remove an input XML template, select an entry and click Delete.
Select an XML template for use as an Output DOM using the procedure described in the previous step.
NOTE: You can specify an input or output XML template that contains no structure by selecting {System}{ANY} as the Input or Output template. For more information, see "Creating an Output Document without Using a Template" in the Novell Integration Manager User's Guide.
Select Next. The Temp and Fault XML Template panel is displayed.
If desired, specify a template to be used as a scratch pad under the "Temp Message" pane of the dialog box. This can be useful if you need a place to hold values that will be used temporarily during the execution of your component. Select a Template Category if it is different than the default category. Then select a Template Name from the list of XML templates in the selected Template Category.
Under the "Fault Message" pane, select an XML template to be used to pass back to clients when an error condition occurs.
To add additional input XML templates, click Add and choose a Template Category and Template Name for each. Repeat as many times as desired. To remove an input XML template, select an entry and click Delete.
Select Next. The Connection Info panel of the Create a New PeopleSoft Service wizard is displayed.
Select a PeopleSoft File, HTTP, or TCP Service connection from the Connection list. The Connection list displays the names of the PeopleSoft connection resources that have been defined in this project.
Select Finish. The component is created and the PeopleSoft Service Editor is displayed. The features of this window are identical to the features described in About the PeopleSoft Component Editor Window. The following sections describe the steps required to create a PeopleSoft Service Action.
You can create all the normal Integration Manager actions in the Action Model of your PeopleSoft Service (e.g., XML Map, Function, Log, Send Mail). In addition, you can create a PeopleSoft Service Request action.
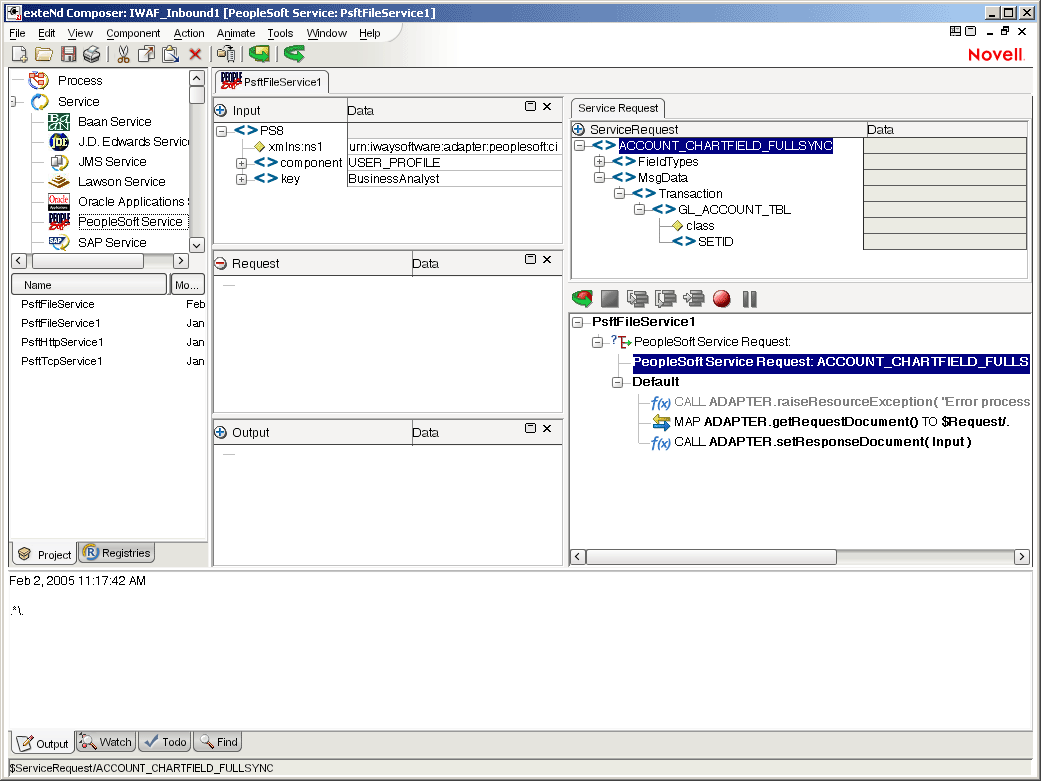
The PeopleSoft Service Request action is similar to a Switch action (see "The Switch Action" in the in the Novell Integration Manager User's Guide). A Switch action allows program control to branch to a block of actions based on a match between an input value and a Case value. In a PeopleSoft Service Request, Integration Manager receives a DOM, and compares a series of cases against the DOM. If an exact match occurs between the DOM and a case, execution branches to the actions listed underneath the case in the Action model. Cases are tested in the order listed; and once a match is found, execution of the match logic precludes execution of any other logic in the PeopleSoft Service Request.
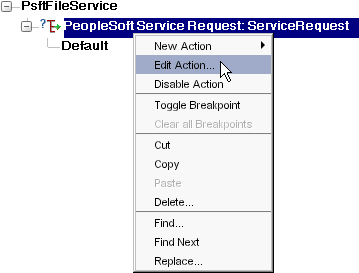
To Create a PeopleSoft Service Request Action
In the Action Model, right-click on PeopleSoft Service Request:
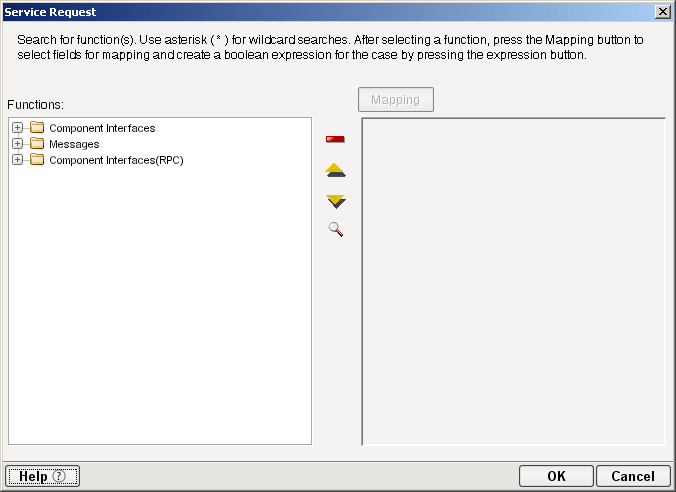
Select Edit Action. The Service Request dialog box is displayed.
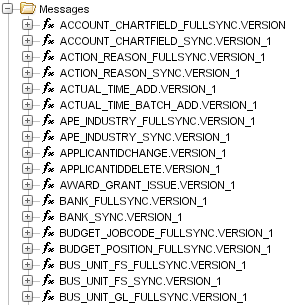
In the Function tree, click on the plus (+) sign to the left of the Messages node to expand the tree view for that node.
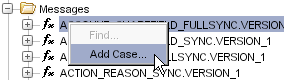
Right-click on the message name that you want to use for input and select Add Case, or double-click on the message name.
The Adapter Service Request dialog box is displayed. This dialog box is similar to the PeopleSoft Request dialog box (see Creating Actions in the Component Editor).
Select or deselect Filter Request, as desired. Filter Request is selected by default. If deselected, the tree will be disabled and greyed (no longer editable), indicating that a default schema configuration will be used. If selected, you can customize the structure of the request document by selecting the nodes to be included in the request document.
Expand the nodes of the Service Request Tree by clicking on the plus signs to the left of the nodes.
Select the elements that you want to include in the Service Request document by selecting or deselecting the check boxes in the node tree. Some nodes are greyed out (disabled). This is because the document schema determines the nodes that you can edit.
If the Service Response tab is enabled (this depends on the Synchronization Type setting in the Connection resource), click the Service Response tab at the top of the dialog box to bring the Service Response document pane forward. This pane shows a tree view of the Response document, similar to the one shown for the Request document. The same user interface features that applied to the Request document pane apply to the Response document pane.
Visit all of the nodes in the Response document tree and customize the settings as desired.
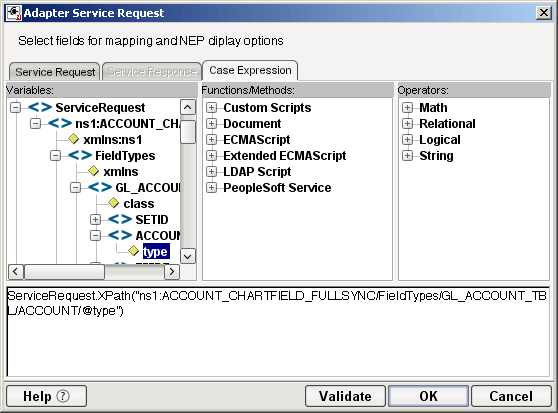
Click the Case Expression tab at the top of the dialog box to bring the Case Expression pane forward. This pane provides an Expression Builder that you use to build a case expression.
Type the static string values or the ECMAScript expressions that will be checked against the input DOM.
Select the OK button. The Service Request dialog box is displayed.
To add another case, repeat Step 3 through Step 12. The cases are listed from top to bottom in the order in which they are evaluated. Each Case value will be checked in turn, in the order you list them.
For optimal performance, list the most likely matches first.
You can change the order in which the cases are listed by clicking on the name of a case, then clicking the up or down triangle icons.
To edit a case, select the name of the case, then press the Mapping button. You can also select the name of the case, then select the Expression Builder button.
When you have finished adding cases, select OK. The Service Request dialog box closes and a new action appears in the Action Model of your component. The Native Environment Pane changes to show the Request and Response (if the Synchronization Type is set to REQUEST_RESPONSE in the Connection resource) tabs along with tree views of the request and response documents.
In the Action Model, add actions to be performed to each case to create the desired business logic.
To map a node of the Input document to a node in the Request document, drag a node from the Input pane and drop it on a node in the Request tab of the Native Environment pane. This automatically creates a new XML Map Action in the Action Model.
To map a node of the Response document to a node in the Output document, drag a node from the Response tab of the Native Environment pane and drop it on a node in the Output pane. This automatically creates a new XML Map Action in the Action Model. You can cut, copy, or delete the actions once they appear in the Action Model pane.
When all of the Actions for a case have been evaluated, Integration Manager sets the Service Response DOM.
The final case in the Action model is always labeled Default. This case is generated automatically and cannot be removed. Actions placed under Default are executed if and only if the none of the other cases are matched. While you are not required to place actions under Default, it is good programming practice to have at least some kind of fallback logic for the Default case, even if it's only a Log action or a Raise Error action.
The Request and Response document displays for Service Requests work similarly to the displays for Requests (see Request and Response Documents).
Once a project containing PeopleSoft Services has been deployed (see "Deploying Your Project" in the Novell Integration Manager User's Guide), the Listener objects actively listen for messages each time you start your server. To manually start and stop these services you need to use the Integration Manager PeopleSoft Services Console. This browser-based console allows you to see the list of PeopleSoft Services, the status of each service (running or not running), the running tally (Count) of messages received, other administrative information, and a Start/Stop button.
To display the Integration Manager PeopleSoft Services Console:
Make sure that you have installed the Integration Manager Enterprise Server to your application server (see the Novell Integration Manager Installation Guide) and that your application server is running.
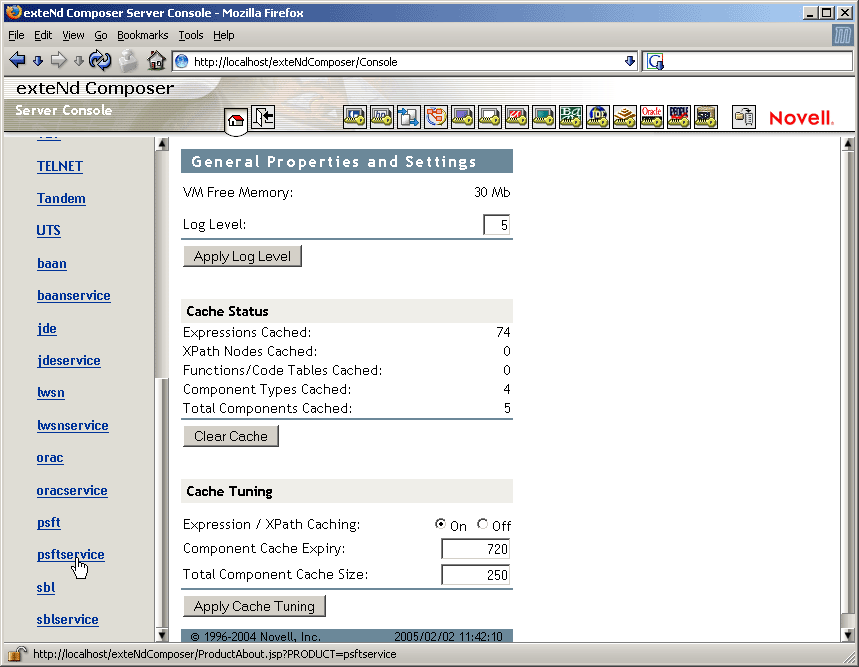
Start the Integration Manager Enterprise Server (for example, if you are using the JBoss application server, you would use a Web browser to access http://localhost:8080/exteNdComposer). A dialog box for entering the application server administrator ID and password is displayed.
Type your administrator ID and password, then select OK. The Integration Manager Server Console page is displayed.
Scroll down the About Products list on the left side of the page until you see the link titled "psftservice".
Select the "psftservice" link. A page is displayed that provides information (e.g., version, license number, copyright) about the Connect. It also displays a Console button.
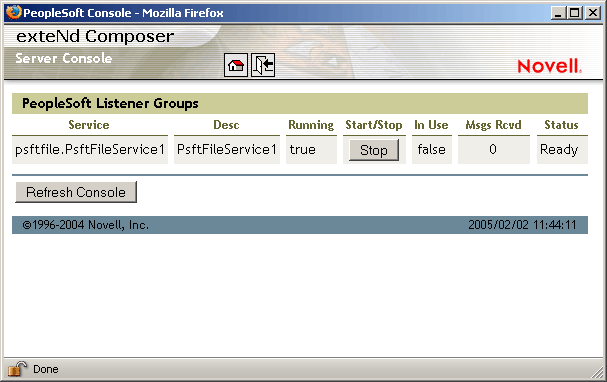
Select the Console button. The PeopleSoft Service console page is displayed. This page lists any PeopleSoft Services that have been deployed.
To stop a PeopleSoft Service, select the appropriate Stop button (the button will then change to Start).
NOTE: If messages are being handled by a service at the time of the Stop command, there may be some delay before the service actually exits. Select the Refresh button periodically until the "Running" column of the console says No for the service.
To undeploy a PeopleSoft Service:
Make sure that you have installed the Integration Manager Enterprise Server to your application server (see the Novell Integration Manager Installation Guide) and that your application server is running.
Start the Integration Manager Enterprise Server (for example, if you are using the JBoss application server, you would use a Web browser to access http://localhost:8080/exteNdComposer). A dialog box for entering the application server administrator ID and password is displayed.
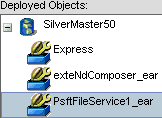
Expand the database containing the deployed objects that you want to manage:
See Appendix A to this guide for a list of ECMAScript extension methods that can be used with the PeopleSoft Connect.
Copyright © 2004-2005 Novell, Inc. All rights reserved. Copyright © 1997, 1998, 1999, 2000, 2001, 2002, 2003 SilverStream Software, LLC. All rights reserved. more ...
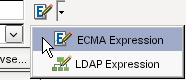


 )from the toolbar.