9.4 Digital Certificates

The Micro Focus iPrint Appliance ships with a self-signed digital certificate. All the inbound and outbound communications to the iPrint Appliance are via self-signed certificate. The validity of the certificate is two years. To verify the details of self-signed certificate, see Viewing Details of the Certificates.

To renew the self-signed certificate on expiry, see Self-Signed Certificate Expiry.

If you want to use a third party certificate instead of the self-signed certificate, see Third Party Certificates.

The certificate works for both the Micro Focus iPrint Appliance and the iPrint remote renderer (ports 9443 and 8443). You do not need to update your certificate when you update the iPrint Appliance software.

Terminology

Server Certificate: This is a certificate that is used for all secure communications with iPrint Appliance. You can either use the self-signed certificate or third party certificate.

  • Self-signed Certificate: This is the default certificate (self-signed_cert) that is shipped with iPrint Appliance.

  • Third Party Certificate: Instead of using the self-signed certificate, you could use other trusted server certificate that is signed by a trusted certificate authority (CA) such as VeriSign or Equifax.

Private Key: This key was generated when creating Certificate Signing Request (CSR).

Chain Certificate: This is the file from the vendor (CA). Ensure all the chain certificates are available.

9.4.1 Viewing Details of the Certificates

  1. On a Web browser, use either the host name or the IP address to access the Management Console. For example, https://10.0.0.1:9443 or https://iprint.example.com:9443.

  2. Click Digital Certificates.

  3. In the Key Store drop-down list, select JVM Certificates or Web Application Certificates.

    List of certificates are displayed that are configured on the appliance.

  4. Select a certificate, then click View Info. Details of certificate such as name of the CA, validity of the certificates will be displayed.

    For example, to view details of self-signed certificate, select Web Application Certificates > self-signed_cert, then click View Info.

9.4.2 Third Party Certificates

If you plan to use a third party certificate instead of the self-signed certificate, you need to meet the following prerequisites:

  • Server certificate signed by CA

  • Private key

  • Chain certificates

  • All the above certificates must be packaged in a PKCS12 format

When you use an existing certificate and key pair, use a PKCS12 key pair format. If your trusted certificates are not in PKCS12 format, see Converting Certificates to pfx or p12 Formats.

  1. Go to the Digital Certificates page by clicking Digital Certificates from the Micro Focus Appliance Configuration.

  2. On the Digital Certificates page, in the Key Store drop-down menu, select Web Application Certificates.

  3. Click File > Import > Trusted Certificate. Browse and select your existing certificate, then click OK.

    1. Alias Specify a name that you want to use to identify and manage this certificate.

  4. Click File > Import > Trusted Certificate. Browse and select your existing certificate chain for the certificate that you selected in the preceding step, then click OK.

  5. Click File > Import > Key Pair, then browse to and select your .p12 or .pfx key pair file, specify your password if needed, then click OK.

  6. Continue with Activating the Certificate.

9.4.3 Self-Signed Certificate Expiry

The self-signed certificate is valid for two years. To regenerate the self-signed certificate after expiry, do the following:

  1. On a Web browser, use either the host name or the IP address to access the Management Console. For example, https://10.0.0.1:9443 or https://iprint.example.com:9443.

  2. Click Digital Certificates.

  3. In the Key Store drop-down list, ensure that Web Application Certificates is selected.

  4. Click File > New Certificate (Key Pair), then specify the following information:

    Alias: Specify a name that you want to use to identify and manage this certificate.

    Validity (days): Specify how long you want the certificate to remain valid.

    Key Algorithm: Select either RSA or DSA.

    Key Size: Select the desired key size.

    Signature Algorithm: Select the desired signature algorithm.

    Common Name (CN): This must match the server name in the URL in order for browsers to accept the certificate for SSL communication.

    Organizational Unit (OU): (Optional) Small organization name, such as a department or division. For example, Purchasing.

    Organization (O): (Optional) Large organization name. For example, Micro Focus, Inc.

    City or Locality (L): (Optional) City name. For example, Provo.

    State or Province (ST): (Optional) State or province name. For example, Utah.

    Two-letter Country Code (C): (Optional) Two-letter country code. For example, US

  5. Click OK to create the certificate.

    After the certificate is created, it is self-signed.

  6. You must now activate the certificate, see Activating the Certificate.

9.4.4 Creating a New Certificate and Getting it Signed

  1. On a Web browser, use either the host name or the IP address to access the Management Console. For example, https://10.0.0.1:9443 or https://iprint.example.com:9443.

  2. Click Digital Certificates.

  3. In the Key Store drop-down list, ensure that Web Application Certificates is selected.

  4. Click File > New Certificate (Key Pair), then specify the following information:

    Alias: Specify a name that you want to use to identify and manage this certificate.

    Validity (days): Specify how long you want the certificate to remain valid.

    Key Algorithm: Select either RSA or DSA.

    Key Size: Select the desired key size.

    Signature Algorithm: Select the desired signature algorithm.

    Common Name (CN): This must match the server name in the URL in order for browsers to accept the certificate for SSL communication.

    Organizational Unit (OU): (Optional) Small organization name, such as a department or division. For example, Purchasing.

    Organization (O): (Optional) Large organization name. For example, Micro Focus, Inc.

    City or Locality (L): (Optional) City name. For example, Provo.

    State or Province (ST): (Optional) State or province name. For example, Utah.

    Two-letter Country Code (C): (Optional) Two-letter country code. For example, US

  5. Click OK to create the certificate.

    After the certificate is created, it is self-signed.

  6. Select the certificate that you created in the preceding step, then click File > Certificate Requests > Generate CSR.

  7. Mail the digital certificate to a certificate authority (CA), such as VeriSign or Equifax.

    The CA takes the Certificate Signing Request (CSR) and generates an official certificate based on the information in the CSR. The CA then mails the new certificate and chain certificates back to you.

  8. After you have received the official certificate and certificate chain from the CA:

    1. Click Digital Certificates.

    2. Click File > Import > Trusted Certificate. Browse to the trusted certificate chain that you received from the CA, then click OK.

    3. Select the self-signed certificate, then click File > Certification Request > Import CA Reply.

    4. Browse to and upload the official certificate to be used.

      On the Digital Certificates page, the name in the Issuer column for your certificate changes to the name of the CA that stamped your certificate.

  9. Activate the certificate, as described in Activating the Certificate.

9.4.5 Activating the Certificate

  1. On the Digital Certificates page, in the Key Store drop-down menu, select Web Application Certificates.

  2. Select the certificate that you want to make active, click Set as Active, then click Yes.

  3. Verify that the certificate and the certificate chain were created correctly by selecting the certificate, then clicking View Info.

    When you activate a certificate, the Set as Active button might still be enabled for that certificate. You can ignore it, as it does not affect the certificate activation.

9.4.6 Managing Certificates

All certificates that are included with the IBM Java package that is bundled with the version of SLES that iPrint Appliance ships with, are installed when you install iPrint Appliance.

You can use the Digital Certificates tool on the iPrint Appliance to remove certificates that are not used by your organization, if you are concerned about keeping them.

Also, you can use the Digital Certificates tool on the iPrint Appliance to maintain the certificate store by removing certificates that have expired and then installing new certificates as needed, according to your organization’s security policies.

To access the Digital Certificates tool:

  1. Click Digital Certificates in the Micro Focus Appliance Configuration page.

To delete a certificate:

  1. On the Digital Certificates page, in the Key Store drop-down menu, select Web Application Certificates or JVM Certificates.

    In Web Application Certificates, do not delete the self-signed certificate if you are using it.

    In JVM Certificates, do not delete the edir_root_ca certificate. This certificate is used when importing the users to the appliance using the Import Users feature of the appliance.

  2. Select a certificate, then click Edit > Delete.

9.4.7 Converting Certificates to pfx or p12 Formats

The iPrint Appliance server only accepts certificates that are in .pfx or .p12 format. Use this script to convert the third-party certificate to .pfx or .p12 format. The location of the certman.sh is /opt/novell/iprintmobile/bin.

On successful conversion, you can upload the certificates to the iPrint Appliance server.

Syntax: Execute the following script on the appliance server:

sh certman.sh -t convert <options>

Table 9-1 Certificate Conversion Options

Parameter

Description

-h

Displays help

-i <format>

Specify the input certificate format. Valid formats: crt, pem, or cer.

-o <format>

Specify the format to convert the certificate. Valid formats: pfx or p12

-w <absolute path>

Specify the path to create the output (pfx or p12) file.

-c <absolute path>

Specify the path to the input certificate file. Valid formats: crt, .cer, or .pem

-k <absolute path>

Specify the path to the key file.

-n <absolute path>

Specify the path to the chain certificate file.

-p <key passphrase>

(Optional) Specify the passphrase for the key file. The default value is 'changeit' when no value is specified.

Examples: The server certificate is vaserver.crt, the key file vaserver.key, and the chain certificate is chain_certificate.pem. On successful conversion the certificates are converted to pfx format.

sh certman.sh -t convert -i crt -o pfx -c /vastorage/conf/certs/vaserver.crt -k /vastorage/conf/certs/vaserver.key -n /vastorage/conf/certs/chain_certificate.pem -w /tmp/cert.pfx

9.4.8 Configuring Certificates for Apache

Use this script to configure the certificates for the Apache server.

Syntax: Execute the following script on the appliance server:

sh certman.sh -t apache <options>

Table 9-2 Apache Configuration Options

Parameter

Description

-h

Displays help.

-a

Configures Apache automatically with the default path of the certificate file and key file. Only the passphrase option (-p) can be used with this option.

-r <path>

Specify the absolute path of the certificate file.

-k <path>

Specify the absolute path of the key file.

-n <path>

Specify the absolute path of the certificate chain file.

-c <path>

Specify the absolute path of the CA certificate file.

-p <key passphrase>

(Optional) Specify the passphrase for the key file. The default value is 'changeit' when no value is specified.

Example 1: If you are facing issues when using a self-signed certificate, use the -a option to configure Apache automatically.

sh certman.sh -t apache

Example 2: To configure the third-party certificates for the Apache server, execute the following:

sh certman.sh -t apache -r /vastorage/conf/certs/vaserver.crt -k /vastorage/conf/certs/vaserver.key -n /vastorage/conf/certs/chain_certificate.pem -c /vastorage/conf/certs/CA_certificate.pem

9.4.9 Generating Certificates for Server and Remote Renderer

Use this script to regenerate the certificates of the iPrint Appliance server and the Remote renderer client.

Syntax: Execute the following script on the appliance server:

sh certman.sh -t cert <options>

Table 9-3 Certificate Generation Options

Parameter

Description

-h

Displays help.

-s

Generates the certificate for the server.

-g

Generates the certificate for the remote renderer client.

-d <directory>

(Optional) Specify the directory to store the newly created certificates.

-i

Imports certificates to the default path (/vastorage/conf/certs/keystore) of the Java keystore.

-c <path to .p12>

(Optional) Specify the path of the .p12 file to be imported to the Java keystore. If no path of the file is provided the vaserver.p12 file available in the /vastorage/conf/certs/ folder is imported to the Java keystore.

Example 1: If the self-signed certificate is expired, execute the following script:

sh certman.sh -t cert -s

This regenerates the certificates and configures the server.

Example 2: If the remote renderer certificate is expired, execute the following script:

sh certman.sh -t cert -g

This regenerates the certificates and will be placed in a bundle with the remote renderer. You can now download these newly generated certificates from the Renderers page in the Management Console.

Example 3: If the iPrint management console is not reflecting the imported third party certificate, then you can use the following script to import the certificate to the java keystore:

sh certman.sh -t cert -i -c <path to .p12 certificate file>

sh certman.sh -t cert -i -c /tmp/appliance-cert.p12

The appliance-cert.p12 file is imported to the java keystore. You must restart jetty to use the newly added certificate file.

9.4.10 Renewing eDirectory Certificates

Use this script to renew the eDirectory certificates.

Syntax: Execute the following script on the appliance server:

sh certman.sh -t edir <options>

Table 9-4 eDirectory Regeneration Options

Parameter

Description

-h

Displays help

-r

Regenerates the certificates for eDirectory.

9.4.11 Reconfiguring Certificates

If you are facing any issues with the certificates, use this script to reconfigure the certificates for the appliance.

Syntax: Execute the following script on the appliance server:

sh certman.sh -t repair <options>

Table 9-5 Certificate Repair Options

Parameter

Description

-h

Displays help.

-a

Performs repair of the certificates automatically. This also creates a backup of the previous certificate configuration.

-r

Reverts to the state of the certificate before the execution of the -a option.

Example: If you are facing issues with the self-signed or third party certificates, execute the following:

sh certman.sh -t repair -a

This will repair the certificates and reconfigure the appliance.

9.4.12 Troubleshooting Certificate Issues

Authentication Failure When Logging to the Mobile Apps

Logging to the Mobile App fails with an authentication error.

One of the reason for this failure could be the missing trusted CA certificate. To verify if it is a certificate issue, view the details of certificate. To resolve the issue, perform the following:

  1. Convert the third party certificates to a p12 format. For more information, see Converting Certificates to pfx or p12 Formats

  2. Import the p12 format certificates to the iPrint Appliance.

    1. Go to the Digital Certificates page by clicking Digital Certificates from the Micro Focus Appliance Configuration.

    2. On the Digital Certificates page, in the Key Store drop-down menu, select Web Application Certificates.

    3. Click File > Import > Trusted Certificate. Browse and select your existing certificate, then click OK.

    4. Click File > Import > Trusted Certificate. Browse and select your existing certificate chain for the certificate that you selected in the preceding step, then click OK.

    5. Click File > Import > Key Pair, then browse to and select your .P12 key pair file, specify your password if needed, then click OK.

    6. Select the certificate that you want to make active, click Set as Active, then click Yes.

    7. Verify that the certificate and the certificate chain were created correctly by selecting the certificate, then clicking View Info.

  3. Restart the services: apache, jetty, and mobile server.

Logging to the Management Console Displays an Untrusted Certificate Message

Logging to the Management Console or Mobile Apps displays an untrusted certificate message. This is caused when chain certificates are missing from the p12 file. Due to missing chain certificates, iPrint Appliance is not able to validate the certificates from the CA.

To resolve this issue, when using third party certificates, ensure to include chain certificates to the root CA.

OES Signed Certificate

If you have used OES as a certificate authority (CA) to sign the iPrint Appliance certificate, then all the logins to Apps and browsers will display an untrusted certificate error. To resolve this issue, perform the following:

  1. Download the OES CA certificate in DER format from the OES server.

  2. Convert the DER format certificate to PEM format using the following script:

    openssl x509 -inform der -in <OES_CA_certificate>.der -out <OES_CA_certificate>.pem

  3. Copy the OES_CA_certificate.pem file to /vastorage/conf/certs folder

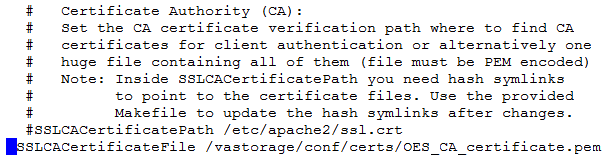
  4. In the /etc/apache2/vhosts.d/vhost-ssl.conf file, edit the path of the parameter SSLCACertificateFile with the newly created OES CA certificate.

  5. Using the following script, combine the certificate files vaserver.key, vaserver.crt, and the OES CA certificate (OES_CA_certificate.pem) to a pfx format.

    sh certman.sh -t convert -c <absolute_path_server_certificate> -k <absolute_path_key> -n <absolute_path_chain_certificate> -w <options>

    sh certman.sh -t convert -i crt -o pfx -c /vastorage/conf/certs/vaserver.crt -k /vastorage/conf/certs/vaserver.key -n /vastorage/conf/certs/OES_CA_certificate.pem -w /temp/cert.pfx

  6. Go to the Digital Certificates page by clicking Digital Certificates from the Micro Focus Appliance Configuration.

  7. On the Digital Certificates page, in the Key Store drop-down menu, select Web Application Certificates.

  8. Click File > Import > Key Pair, then browse to and select your .p12 or .pfx key pair file, specify your password if needed, then click OK.

  9. Activate the certificate.