Loading the Inventory Database as a Separate Oracle Instance
The following sections explain the steps for configuring and running multiple Oracle 8i database instances:
- Configuring and Running Multiple Oracle Database Instances on a NetWare 5.x Server
- Configuring and Running Multiple Oracle Database Instances on a Windows NT/2000 Server
Prerequisites for configuring the database include the following:
Follow these instructions: Unload Oracle, at the database server prompt, enter oraunld. Invoke the Net8 configuration utility. At the database server prompt, run easycfg.ncf. This loads the Net8 Easy configuration window. Define a unique Oracle instance. Click Config > Listener > Database. Click Add. Assign values for Database Instance and Database Name in the Adding Instances Address window. For example, assign Database Instance=zfd3 and Database Name=mgmtdb. In this configuration, the database instance is zfd3. You can specify any database instance name. The Database Domain field should be left blank. Click Accept > Save. Configure the Listener for IPC. To run an Oracle system, the IPC and TCP addresses should be already be configured. Click Config. Click Listener >Address. Ensure that IPC and TCP addresses are configured for the server. The settings should be as follows: IPC: servername_LSNR TCP: IPaddress or hostname If these settings exist, click Cancel. Otherwise, assign the values for these settings > click Save. Create an IPC alias. Click Add to add an alias name for the new instance. Enter the following details: Database Alias: servername-databaseinstance-IPC For example, the database alias is austr, where austr is the servername, zfd3 is the database instance created earlier. Protocol: IPC Service/Host Name or Key Name: server_name_LSNR Database Instance: zfd3 Click Accept > Save. To verify the configured alias name in the list window: Exit the EasyCfg tool. Click Config > Exit. Create a password file for logging as Internal user for this instance, enter load orapwd81 file=oracle_volume:oracle_home\DATABASE\PWDdatabase_instance.ORA password=password entries=2 where oracle_volume is the NetWare volume name of your Oracle installation, PWDdatabase_instance.ORA is the password file name, and password is any password that you specify. For example, this command is as follows: load orapwd81 FILE=oracle:\orahome1\database\pwdzfd3.ora password=mgmtdb entries=2 This password file will be created in the oracle_volume:\DATABASE directory. Ensure that the file exists in the directory. Load the Oracle NLMs. At the database server prompt, enter oraload. Set the newly created ZfD instance. Load the Oracle Server Manager. At the database server prompt, enter svrmgr31. Enter the following commands: set instance servername-databaseinstance-IPC. For example, set instance austr-zfd3-ipc This displays that the newly created ZfD3 instance is started. connect internal/password where, password is the password created in Step 7. Mount the Inventory database. After extraction, you will see the following list of system files and Database Space files in this directory.
CIM1.ORA, CIM2.ORA, CIM3.ORA, CIM4.ORA, CIM5.ORA, CIM6.ORA, CIM7.ORA, CIM8.ORA, and CIM9.ORA Table spaces that contain the inventory information for ZfD CTL1.ORA Oracle control file INIT.ORA Database startup file LOG1.ORA, LOG2.ORA Online Redo log file RBS1.ORA Rollback segment file containing table space for rollback SYS1.ORA SYS schema file containing the data dictionary TMP1.ORA Temporary table space _DBINT.SQL Contains the Inventory database site name _START.SQL Contains the location of the database startup file ALTERCTRL.SQL Contains the location of table spaces MGMTDBO.NCF ZENworks Inventory database startup file for Oracle on NetWare \TRACE\oracle_log_files Contains the Oracle log files
Copy the _DBINIT.SQL file from volume\ZFD3\ORACLE to the SYS:\SYSTEM directory on the database server, where volume is the volume on which the .ZIP file was extracted.
siteid:=site_ID; siteName:='site_name'; where, site_ID uniquely identifies the database and 'site_name' provides a description for the database site. If you do not specify the site ID, the default values specified in the file apply. Save the changes you make.
Edit the ALTERCTRL.SQL file located in volume\ZFD3\ORACLE to specify the path to which you have extracted the .ZIP file, where volume is the volume on which the .ZIP file was extracted. For example, modify the existing DATA:\ZFD3\ORACLE\DATABASE path to ORACLE:\ZFD3\ORACLE\DATABASE in ALTERCTRL.SQL. In this .SQL file, modify the path for these parameters, if required. startup nomount pfile=oracle:\zfd3\oracle\database\INIT.ORA logfile group 1 'oracle:\zfd3\oracle\database\log1.ora' size 256K, logfile group 2 'oracle:\zfd3\oracle\database\log2.ora' size 256K datafile 'oracle:\zfd3\oracle\database\sys1.ora', 'oracle:\zfd3\oracle\database\rbs1.ora', 'oracle:\zfd3\oracle\database\cim1.ora', 'oracle:\zfd3\oracle\database\cim2.ora', 'oracle:\zfd3\oracle\database\cim3.ora', 'oracle:\zfd3\oracle\database\cim4.ora', 'oracle:\zfd3\oracle\database\cim5.ora', 'oracle:\zfd3\oracle\database\cim6.ora', 'oracle:\zfd3\oracle\database\cim7.ora', 'oracle:\zfd3\oracle\database\cim8.ora', 'oracle:\zfd3\oracle\database\cim9.ora', 'oracle:\zfd3\oracle\database\tmp1.ora'
Save the changes. where volume is the volume on which the .ZIP file was extracted. Modify the path for the following parameters: control_files=location_of_CTLl.ORA\CTL1.ORA background_dump_dest=location_of_TRACE_dir\TRACE user_dump_dest=location_of_TRACE_dir\TRACE Save the changes. At the Server Manager prompt, enter @complete_path_of_alterctrl.sql\ALTERCTRL.
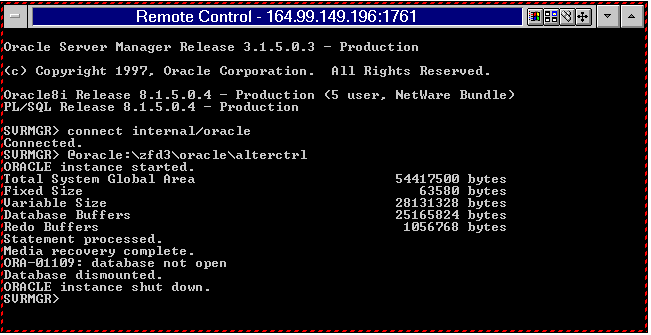
You should see the following window, which indicates that the database is mounted and loaded.
Exit the Server Manager, enter exit. Modify the _START.SQL file located in SYS:\SYSTEM. Modify the properties of the Database object. Create the Database object. In ConsoleOne, right-click a location in the tree for the Database object > click New > click Object > click ZENworks Database > click OK. Type a name for the Database object > click OK. Configure the Database Server options of the Database object. In ConsoleOne, right-click the Database object > click Properties > click ZENworks Database. Browse for the DN of the server or type the IP address of the server. Type the values for the following options: Database(Read-Write) User Name: MW_DBA and Database(Read-Write) Password: novell. Click OK. Ensure that the JDBC Driver properties are correct as per your database configuration. In ConsoleOne, right-click the Database object > click Properties > click Jdbc Driver Information. Click Populate Fields with Default Values for an Oracle Database > click Populate Now. The settings for the Oracle database should be as follows: Driver: oracle.jdbc.driver.OracleDriver Protocol: jdbc: SubProtocol: oracle: SubName: thin:@ Port:1521 SID Service Name (Service ID of the Oracle database): zfd3 The value for the SID is the same as assigned for the Database Instance, see Step 5. Click OK. At the database server prompt, enter mgmtdbo. Enter the password created in Step 7. Start other Oracle database instances. Run the Oracle Server Manager, set the applications instance, and mount the database. HINT: If you are loading multiple databases in separate Oracle instances, then each database reserves a separate Oracle SGA memory, where Oracle keeps all the database resources. In such environments, you should increase the amount of memory on the server. Refer to the documentation provided by Oracle.
Prerequisites for configuring the database include the following:
Follow these instructions: At the database server, run the Oracle Database Configuration Assistant. From the desktop Start menu, click Programs > Oracle > Database Administration > Oracle Database Configuration Assistant. Click Create a Database > Next. Click Typical > Next. Click Copy existing database files from the CD > click Next. Enter the following details: Global Database Alias: mgmtdb.your_windows_nt/2000_name. SID: The value is automatically filled as mgmtdb. Click Finish. This allows for Oracle database creation. This process takes a significant amount of time. Ensure that the OracleServiceMGMTDB service is created and started. Load the Inventory database. Run the Oracle Server Manager. From the desktop menu, click Start > Run > SVRMGRL. Enter the following commands: set instance mgmtdb connect internal/password_for_administrator Mount the Inventory database. After extraction, you will see the following list of system files and Database Space files in this directory:
CIM1.ORA, CIM2.ORA, CIM3.ORA, CIM4.ORA, CIM5.ORA, CIM6.ORA, CIM7.ORA, CIM8.ORA, and CIM9.ORA Table spaces that contain the inventory information for ZfD CTL1.ORA Oracle control file INIT.ORA Database startup file LOG1.ORA, LOG2.ORA Online Redo log file RBS1.ORA Rollback segment file containing table space for rollback SYS1.ORA SYS schema file containing the data dictionary TMP1.ORA Temporary table space _DBINT.SQL Contains the Inventory database site name _START.SQL Contains the location of the database startup file ALTERCTRL.SQL Contains the location of table spaces MGMTDBO.BAT ZENworks Inventory database startup file for Oracle on Windows NT/2000 \TRACE\oracle_log_files Contains the Oracle log files
siteid:=site_ID; siteName:='site_name'; where, site_ID uniquely identifies the database, and 'site_name' provides a description for the database site. If you do not specify a site ID, the default values specified in the file apply.
For example, modify the existing D:\ZFD3\ORACLE\DATABASE path to C:\ZFD3\ORACLE\DATABASE in ALTERCTRL.SQL.
startup nomount pfile=c:\zfd3\oracle\database\INIT.ORA logfile group 1 'c:\zfd3\oracle\database\log1.ora' size 256K, logfile group 2 'c:\zfd3\oracle\database\log2.ora' size 256K datafile 'c:\zfd3\oracle\database\sys1.ora', 'c:\zfd3\oracle\database\rbs1.ora', 'c:\zfd3\oracle\database\cim1.ora', 'c:\zfd3\oracle\database\cim2.ora', 'c:\zfd3\oracle\database\cim3.ora', 'c:\zfd3\oracle\database\cim4.ora', 'c:\zfd3\oracle\database\cim5.ora', 'c:\zfd3\oracle\database\cim6.ora', 'c:\zfd3\oracle\database\cim7.ora', 'c:\zfd3\oracle\database\cim8.ora', 'c:\zfd3\oracle\database\cim9.ora', 'c:\zfd3\oracle\database\tmp1.ora',
Modify the path for the following parameters:
control_files=location_of_CTLl.ORA\CTL1.ORA background_dump_dest=location_of_TRACE_dir\TRACE user_dump_dest=location_of_TRACE_dir\TRACE
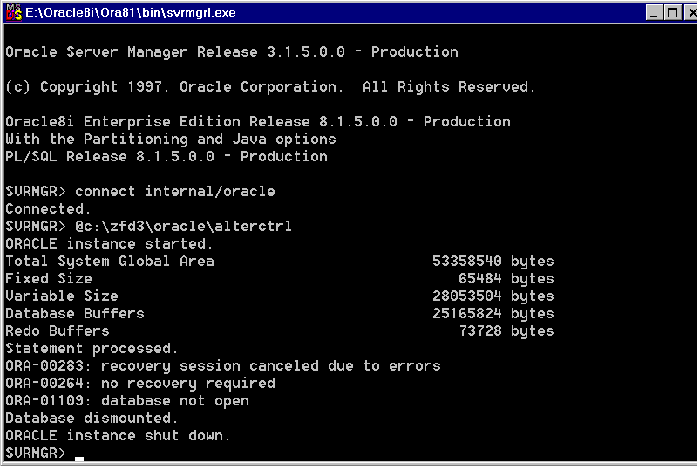
Connect as an administrator. For example, if the administrator's internal name is internal, at the Server Manager prompt, enter connect internal/password_for_administrator. Enter shutdown normal. At the Server Manager prompt, enter @complete_path_of_alterctrl.sql\ALTERCTRL. You should see the following window, which indicates that the database is mounted and loaded.
Exit the Server Manager, enter exit.
Copy drive\ZFD3\ORACLE\_START.SQL to the \ZFD3\ORACLE on the database server, where drive is the drive on which the .ZIP file was extracted. Modify the properties of the database object. Create the Database object. In ConsoleOne, right-click a location in the tree for the Database object > click New > click Object > click ZENworks Database > click OK. Type a name for the Database object > click OK. Configure the Database Server options of the Database object. In ConsoleOne, right-click the Database object > click Properties > click ZENworks Database. Browse for the DN of the server or type the IP address of the server. Type the values for the following options: Database(Read-Write) User Name: MW_DBA and Database(Read-Write) Password: novell. Click OK. Ensure that the JDBC Driver properties are correct as per your database configuration. In ConsoleOne, right-click the Database object > click Properties > click Jdbc Driver Information. Click Populate Fields with Default Values for an Oracle Database > click Populate Now. The settings for the Oracle database should be as follows: Driver: oracle.jdbc.driver.OracleDriver Protocol: jdbc: SubProtocol: oracle: SubName: thin:@ Port:1521 SID Service Name (Service ID of the Oracle database): mgmtdb The value for the SID is the same as assigned for the Database Instance, see Step 5. Click OK. At the database server console, from the path where the MGMTDBO.BAT(\ZFD3\ORACLE) is located, enter mgmtdbo. Enter the password for the Database Administrator (DBA). Start other Oracle database instances. Run the Oracle Server Manager, set the applications instance, and mount the database. HINT: If you are loading multiple databases in separate Oracle instances, then each database reserves a separate Oracle SGA memory, where Oracle keeps all the database resources. In such environments, you should increase the amount of memory on the server. Refer to the documentation provided by Oracle.
If you have an Inventory database on Oracle, you can improve the performance of the database when you generate the inventory reports or query the database. You use the database buffer cache to store the most recently used data blocks. The database cache is determined as DB_BLOCK_BUFFERS * DB_BLOCK_SIZE. These parameters are specified in the INIT.ORA file in the ZENWORKS\DATABASE directory on the database server. DB_BLOCK_BUFFERS specifies the number of database buffers. DB_BLOCK_SIZE specifies the size of each database buffer in bytes. The size of each buffer in the buffer cache is equal to the size of the data block. Oracle recommends that the database buffer cache for any Online Transaction Processing Application (OLTP) should have a hit ratio of about 90%, which is optimal. The ZfD Inventory database on Oracle has an approximate 88% hit ratio with a database cache size of 24 MB for 128 MB RAM, which is about 20% of total memory. If there is additional memory, you configure the database cache size by increasing the DB_BLOCK_BUFFERS parameter in the INIT.ORA file. If there are more volumes on the multiple physical disks of the database server, placing the Sybase database space files on separate volumes improves the performance while accessing the database. When you install the Sybase database component of ZfD3, the System Database file and the Database Spaces are installed in the volume on the database server you specify. On loading the Inventory database server, the System Database file (MGMTDB.DB) is loaded. This MGMTDB.DB file references the inventory information in the Database Spaces files. The Database Spaces files (MGMTDB1.DB, MGMTDB2.DB, MGMTDB3.DB, MGMTDB4.DB, MGMTDB5.DB, MGMTDB6.DB, MGMTDB7.DB, MGMTDB8.DB and MGMTDB9.DB) contain the inventory information. The ALTERDB.PROPS file is installed on the database server in the PUBLIC\ZENWORKS\WMINV\PROPERTIES. You modify the sections in the file to specify the location of the Database Spaces on the volumes. The contents of the ALTERDB.PROPS is as follows: ..... To organize the database spaces: Ensure that the database is not loaded. Ensure that the Inventory Service Manager is not running on the server. Manually move the Database Space files on the server volume. Move the Database Space files in the following way for better performance:
Modify the location of the nine Database Space files in the ALTERDB.PROPS file. For example, enter mgmtdb3=SYS:\\ZENWORKS\\DATABASE Load the database. Enter mgmtdbs on NetWare servers. On Windows NT/2000 servers, run the database service. Ignore the error messages displayed on the console. These messages are displayed because the database space files are not loaded. Ensure that the Database Location policy has been configured. On the server console, run the AlterDBSpace service. Enter AlterDBSpace. On the inventory server, the AlterDBSpace tool runs as a service. You will see a message that the database is adjusted. Exit the database and then load the database. Ensure that while loading the database there are no errors. Errors indicate that the specified volume location of the database space files are incorrect or do not exist. Ensure that the path of the Database Spaces are correct in the ALTERDB.PROPS file and repeat the procedure to organize the database spaces. IMPORTANT: If you place the Database Spaces in different volumes, the log file should be placed in the same volume as the System database file (MGMTDB.DB). Improving the database cache size improves database performance. You can improve the performance of the Inventory database maintained in Sybase on NetWare or Windows NT/2000 servers. The default database cache size is 16 MB; however, this database cache size may not be adequate for large databases with more than 10,000 workstations. You should change the database cache size to an optimum size. We recommend a database cache size that is one-fourth of the database size. You must also consider server memory size while assigning a cache size. For example, if you have 128 MB RAM, then a cache size of 32 MB is recommended. To change the database cache size on a NetWare server: Close all connections to the Inventory database. Quit the Sybase server. Open the MGMTDB.NCF file in the SYS:\SYSTEM directory. Modify the -c parameter. For example, -c 64M sets the cache size to 64 MB. Save the file. On the server console, load the Inventory database. Enter MGMTDBS. To change the database cache size on a Windows NT/2000 server: The Inventory Database service configuration tool lets you modify the startup parameters to optimize the Sybase database on Windows NT/2000 servers. To run this tool: The parameters are as follows: -c: Sets the initial memory reserves for caching database pages and other server information. For example, -c 32M reserves 32 MB cache size. -gc: Sets the maximum length of time in minutes that the database server runs without doing a checkpoint on each database. The default value is 60 minutes. For example, -gc sets the checkpoint time as 120 minutes. -m: Deletes the transaction log when a checkpoint is done, either at shutdown or as a result of a checkpoint scheduled by the server. -n: Specifies the name of the database server. For example, -n WARTHOG names the server WARTHOG. -ti: Disconnects the connections that have not submitted a request for a certain number of minutes. The default is 240 (4 hours). A client machine in the middle of the database transaction locks until the transaction ends or the connection terminates. The -ti option is provided to disconnect inactive connections and to free their locks. For example, specify -ti 400. -x: Specifies a communication link. For example, -x tcpip indicates a TCP/IP link.
If you delete the Workstation object in ConsoleOne, the inventory information for that Workstation object is deleted from the Inventory database server it is attached to. Also, the inventory information is deleted from all the next-level servers for that particular Inventory database server. ZfD provides a database sync tool to synchronize the Workstation objects stored in the Inventory database with the Workstation objects in NDS. This tool removes the workstations that do not exist in NDS from the Inventory database. The excess workstations in the Inventory database exist because these workstations may have been deleted from NDS; however, the corresponding workstations were not removed from the database. Use this tool regularly to maintain the database in a consistent state with NDS. You must run this tool for each Inventory database. HINT: You must ensure that the Service Manager is loaded when you run the Inventory database sync tool.
To run this tool: Generate a lookup file in the NDS Lookup Phase. ZfD compares the list of workstations in the database with those in NDS and generates a lookup file. This file contains the list of workstations to remove from the database. The server property file contains the [NDSLookupForDB Service] section with the lookup filename in the ARGUMENTS parameter. The default lookup filename (WSDELETE.LOK) file is located in the PUBLIC\ZENWORKS\WMINV\LOG directory. The lookup filename in this section and the [DBDelete Service] section of the server property file should be the same. Delete workstations in the lookup file from the Inventory database in the Database Delete Phase. In the [DBDelete Service] section of the properties file, specify the lookup filename. At the inventory server console, enter: StartSer DBDelete The WSDELETE.LOG log file located in the \PUBLIC\ZENWORKS\WMINV\LOGS directory contains the status of deletion. This file contains information as to whether the database was synchronized successfully with NDS. ZfD provides an option to back up the Inventory database from the server. We recommend that you back up the database on a weekly basis. However, if you are tracking the inventory of workstations frequently, increase the frequency of backup. The following sections contain additional information to help you back up the Inventory database.
You can back up the database files and the transaction log to the location relative to the SCANDIR path. To use this tool:
To run the backup tool on NetWare or Windows NT/2000 servers, At the inventory server console, enter StartSer DBBACKUP. View the status of the backup in the backup log file. The database will be copied to SYS:\ZENWORKS\DATABASE\directory_you_specify. To restore the database: If the Inventory database server is up, stop the Storer service. At the database server console, enter StopSer Storer. Exit the Sybase database. On NetWare servers, at the database server prompt, enter q to stop the Sybase database. On Windows NT/2000, stop the Sybase service (Adaptive Service Anywhere - ZENworks for Desktops 3). Copy the backup files, overwriting the working database files. Restart the database server. The backup tool creates a log file, BACSTATUS.TXT, located in the ZENWORKS\DATABASE directory on NetWare and Windows NT/2000 servers. The log records the status of the backup operation. Open this text file to view the status of the backup. This file increases in size for every backup operation. Remove the existing contents of the file if you do not require the details. ZfD provides an option to back up the Inventory database from the server. However, if you have a database backup and restore method such as using Recovery Manager, we recommend that you continue to use your existing backup method. To back up the database: If the Inventory database server is up, stop the Storer service. At the database server console, enter StopSer Storer. Load the Oracle Server Manager. On NetWare server with Oracle 8i, enter svrmgr31. On NetWare server with Oracle 8.0.4, enter svrmgr30. On Windows NT/2000 server with Oracle 8i Enterprise Edition, from the taskbar, click Start > Run > enter svrmgrl. Enter the following commands: set instance databaservername-databaseinstance-IPC, where databaseinstance refers to the database instance that you have set up earlier. See Configuring and Running Multiple Oracle Database Instances on a NetWare 5.x Server. For example, set instance austr-zfd3-ipc. Connect as an administrator. For example, if the administrator's internal name is internal, at the Server Manager prompt, enter connect internal/password. where password is the password created earlier. See Configuring and Running Multiple Oracle Database Instances on a NetWare 5.x Server. Ensure that no other databases are mounted. At the prompt, enter shutdown normal. Disconnect and exit from the Server Manager. At the Server Manager prompt, enter disconnect; Enter exit; Copy the complete ZFD3\ORACLE directory to a backup volume or disk. After the backup is done, ensure that the backup copy of the database matches the original copy. Perform database verification to verify the integrity of the backup. To verify the database verification on a NetWare server with Oracle 8i, enter load DBV81.NLM FILE=path_to_the_database_file BLOCKSIZE=4096 To verify the database verification on a NetWare server with Oracle 8.0.4, enter load DBV80.NLM FILE=path_to_the_database_file BLOCKSIZE=4096. To verify the database verification on a Windows NT/2000 server with Oracle 8i, enter DBV.EXE FILE=path_to_the_database_file BLOCKSIZE=4096 Example: enter DBV.EXE FILE=d:\zfd3\oracle\database\cim1.ora BLOCKSIZE=4096 Also, run this command for the following files: CIM1.ORA, CIM2.ORA, CIM3.ORA, CIM4.ORA, CIM5.ORA, CIM6.ORA, CIM7.ORA, CIM8.ORA, CIM9.ORA, SYS1.ORA, and CTL1.ORA. If the database backup is successful, ensure that there are no error messages on the verified pages. Ensure that the following displayed parameters display a zero value: TOTAL PAGES FAILING (DATA)=0, TOTAL PAGES FAILING (INDEX)=0, and TOTAL PAGES MARKED CORRUPT=0. To restore the database: If the Inventory database server is up, stop the Storer service. At the database server console, enter StopSer Storer. Load the Oracle Server Manager. On a NetWare server with Oracle 8i, enter svrmgr31. On a NetWare server with Oracle 8.0.4, enter svrmgr30. On a Windows NT/2000 server with Oracle 8i Enterprise Edition, from the taskbar, click Start > Run > enter svrmgrl. Connect as an administrator. For example, if the administrator's internal name is internal, at the Server Manager prompt, enter connect internal/password_for_administrator. Ensure that no other databases are mounted. Enter shutdown normal. Disconnect and exit from the Server Manager. At the Server Manager prompt, enter disconnect; enter exit; Copy the database from the backup location. If you copy the database to a different location than the earlier location, modify the location in the following files to specify the new path:
For example, modify the existing DATA:\ZFD3\ORACLE\DATABASE path to ORACLE:\ZFD3\ORACLE\DATABASE in ALTERCTRL.SQL. In this .SQL file, modify the path for the following parameters, if required. Save the changes.Configuring and Running Multiple Oracle Database Instances on a NetWare 5.x Server
Filenames
Contents Description
Configuring and Running Multiple Oracle Database Instances on a Windows NT/2000 Server
Filenames/Directory
Contents Description
Optimizing the Performance of the Oracle Database
Organizing the Database Spaces for a Sybase Database on NetWare or Windows NT/2000 Servers (AlterDBSpace Tool)
#Database Space Propertiescount=9mgmtdb1=volume_location_of_mgmtdb1mgmtdb2=volume_location_of_mgmtdb2mgmtdb3=volume_location_of_mgmtdb3mgmtdb4=volume_location_of_mgmtdb4mgmtdb5=volume_location_of_mgmtdb5mgmtdb6=volume_location_of_mgmtdb6mgmtdb7=volume_location_of_mgmtdb7mgmtdb1=volume_location_of_mgmtdb8mgmtdb1=volume_location_of_mgmtdb9
Using an Optimal Database Cache Size on the Inventory Database Server to Improve Performance
Using the Inventory Database Service Configuration Tool for Windows NT/2000
Sybase Database Startup Parameters
Deleting the Inventory Information from the Inventory Database
Synchronizing the Inventory Database with NDS (NDS-DB Sync Tool)
Backing Up the Inventory Database
Backing Up the Inventory Database (Sybase)
Backing Up the Inventory Database (Oracle)
control_files=location_of_CTLl.ORA\CTL1.ORAbackground_dump_dest=location_of_TRACE_dir\TRACEuser_dump_dest=location_of_TRACE_dir\TRACEstartup pfile=location_of_the_INIT.ORA\INIT.ORAstartup nomount pfile=oracle:\zfd3\oracle\database\INIT.ORAlogfile group 1 'oracle:\zfd3\oracle\database\log1.ora' size 256K,logfile group 2 'oracle:\zfd3\oracle\database\log2.ora' size 256Kdatafile 'oracle:\zfd3\oracle\database\sys1.ora','oracle:\zfd3\oracle\database\rbs1.ora','oracle:\zfd3\oracle\database\cim1.ora','oracle:\zfd3\oracle\database\cim2.ora','oracle:\zfd3\oracle\database\cim3.ora','oracle:\zfd3\oracle\database\cim4.ora','oracle:\zfd3\oracle\database\cim5.ora','oracle:\zfd3\oracle\database\cim6.ora','oracle:\zfd3\oracle\database\cim7.ora','oracle:\zfd3\oracle\database\cim8.ora','oracle:\zfd3\oracle\database\cim9.ora','oracle:\zfd3\oracle\database\tmp1.ora'