VPN Client Using an ISP Connection


This section explains the advanced tasks you complete to configure a client-to-site VPN and to make a client-to-site connection. This section contains the following procedures:
The phone book capability enables you to easily dial an ISP by selecting a phone number from a preconfigured phone book or from a phone book that you created. Because the VPN client can use any phone book created in the Microsoft* Connection Manager, the VPN client can find any phone book distributed by an ISP that was created in that format and enables you to select entries from it. Furthermore, ISP phone books that were not created by the Microsoft Connection Manager can be converted to a usable format using the VPN client phone book capability.
When the phone book capability is selected, any phone books found on the workstation are listed in the Phone Book drop-down menu. The list can contain the following phone book names:
To select a phone number from a phone book, complete the following steps:
From the VPN Login dialog box, click the Dial-Up tab, then click Settings.
Click Phone Book.
Select a phone book from the Phone Book drop-down menu.
Select a country from the Country drop-down menu.
Only countries that contain phone book entries are displayed.
Select a state or region from the State or Region drop-down menu.
When a state or region is selected, only phone book entries for that state or region are displayed. If no states or regions were assigned to the phone book entries, the drop-down menu is grayed out and all phone book entries for the selected country are displayed.
To sort the phone book entries, click the Sort by Name or Sort by Number radio buttons.
To select a phone book entry, double-click the desired entry and click OK.
To convert an ISP phone book to the Microsoft Connection Manager format, complete the following steps:
From the VPN Login dialog box, click the Dial-Up tab, then click Settings.
Click Phone Book, then click Manage.
Select Convert an ISP Phone Book.
Select the type of ISP phone book that will be converted and click Convert.
A default directory is indicated for each phone book. If you choose to not load a phone book in the default directory, you must set the path to the correct directory, as described in Defining the Phone Book Path.
When the phone book is converted, it is displayed in the Phone Book drop-down menu, allowing you to select phone book entries.
To create a new phone book, complete the following steps:
From the VPN Login dialog box, click the Dial-Up tab, then click Settings.
Click Phone Book, then click Manage.
Select Create a New Phone Book.
Enter a name for the phone book.
For each phone book entry, complete the following substeps:
Select a country.
Select a state or region.
If a state or region does not exist for the selected country, select All or add a new state or region by editing the file \NOVELL\VPNC\PHONE BOOKS\DEFAULT.PBR. Use a text editor to add new regions to the end of the file and increment the number on the first line of the file to match the new number of regions in the file.
Enter a location name.
Enter an area code.
Enter a phone number.
Click Add.
Click Save to save the phone book entries.
When a phone book is created, states and regions are retrieved for display from the DEFAULT.PBR file in the PHONE BOOKS directory. When a newly created phone book is saved, the states and regions are saved in a newly created phone book directory under the PHONE BOOKS directory. The system administrator can change the DEAULT.PBR file to add, replace, or delete states or regions and then distribute the file to the users. When editing the file, you must make sure that the first entry indicates the number of states or regions listed in the file.
You can edit the entries in any phone book that you created or converted. You cannot edit phone books that were created by an ISP in Microsoft Connection Manager format.
To edit a phone book,
From the VPN Login dialog box, click the Dial-Up tab, then click Settings.
Click Phone Book, then click Manage.
Select Edit an Existing Phone Book.
Select the name of the phone book that you want to edit from the drop-down menu.
Double-click the phone book entry that you want to edit and make the desired changes.
Click Save to save your changes.
To disable the user's capability to edit a phone book that you created,
Remove the line UpdateFlags=1 from the .ini file in the phone book directory.
Without this line, the phone book will not appear as a phone book selection when you attempt to edit it.
Change the attributes of all files in the phone book directory to Read-only.
Make a copy of the phone book directory and distribute it to the users.
Normally, the VPN phone book utility can locate phone books that use the Microsoft Connection Manager format. However, if the VPN phone book utility cannot find a phone book that uses the Microsoft Connection Manager format, you should move the phone book files to the directory listed in the Define Phone Book Path dialog box or change the path configured in the dialog box.
To change the phone book path, complete the following steps:
From the VPN Login dialog box, click the Dial-Up tab, then click Settings.
Click Phone Book, then click Manage.
Select Define Phone Book Path.
Set Alternate Phone Book Path to the location of the phone book files and click OK.
If you have a file named VPNHOSTS.TXT in the DISK1 directory of your VPN client installation directory, the installation program will take IP addresses from this file and enter them into the workstation's Registry. Each line of the VPNHOSTS.TXT file might contain one address, optionally followed by a description of the entry. For example:
130.1.1.1 My Corporate VPN in San Jose
These entries can be edited using any text editor. You can create the VPNHOSTS.TXT file in the DISK1 directory of your VPN client installation directory, and distribute the DISK1 and DISK2 directories to the users.
You can configure the dial properties for Microsoft Dial-Up Networking connections using the VPN client login interface. For more information about the dial properties, refer to the Microsoft documentation for Dial-Up Networking.
To configure the dial properties using the VPN client interface, complete following steps:
From the VPN Login dialog box, click the Dial-Up tab, then click Settings.
Click Dial Properties.
Configure the properties for each Microsoft Dial-Up Networking connection, as required, and click OK.
This section describes how to configure the remote access software to support Novell BorderManager 3.7 VPN clients. Remote access is required only for VPN clients that dial in to a VPN server directly. It is not required for VPN clients that access a VPN server through an ISP connection.
The configuration of remote access consists of the following procedures:
This section describes how to configure a board to support dial-in clients. Two separate procedures are required to configure a board using a serial port driver. This section contains the following procedures:
To load the appropriate driver, complete the following steps:
Insert a physical AIO board into your system or enable one of your COM ports.
Load NIASCFG.
Select Configure NIAS > Remote Access > Set Up > Add a Serial Adapter Board.
If you are loading NIASCFG for the first time, the program prompts you with instructions to configure remote access. These instructions roughly correspond to the procedures contained in this section.
For each communications adapter you have installed, load its AIO driver once by selecting the appropriate serial adapter entry from the list.
If no AIO ports are defined or the board cannot be loaded, you see a warning message. Press Enter and step through configuring the board. Otherwise, skip to Step 8.
To configure a board, you must enter its name and other specific information. Follow the prompts on the screen.
If you are using an ISDN connection, press Ins and select the WHSMCAPI driver.
NOTE: Some ISDN boards, such as the USRobotics* Allegra series for the NetWare® software, use WAN ODI drivers instead of WHSMCAPI. Select the appropriate driver, or press Ins and use your manufacturer-supplied driver diskette. Specify your board parameters, then continue with Step 8.
If you are using a Point-to-Point Tunneling Protocol (PPTP) connection, do the following:
Select Continue with Automated Setup after the remote access software has determined which ports have modems attached. Select Try Modem Discovery Again if modems were not discovered (not turned on).
You use the NIASCFG utility to configure the remote access ports. When the utility starts, function keys are enabled. The keys that are enabled for a particular remote access window are displayed at the bottom of the utility window. Table 4, Remote Access Function Key Definitions summarizes the key functions:
Table 4. Remote Access Function Key Definitions
To configure ports for remote access, complete the following steps:
Load NIASCFG.
Select Configure NIAS > Remote Access.
The Remote Access Options window is displayed.
Select Configure Ports.
A window listing port information by port name is displayed. The window lists the ports that the AIO NLM recognizes. Default port names are assigned, depending on the existing configuration.
The Status column displays the status of the port: Available, Unavailable (the driver is not loaded), or Port_Acquired.
Select the port that you want to configure and press Enter.
Specify the following port parameters:
Contents > Connectivity Services (under Network Services heading) > Remote Access Configuration
If your modem is not listed, select a similar modem. If no similar modems are listed, select Hayes* Compatible. Select Automatic Detection to have the remote access software determine the modem type for you. The default is None, which means that the line is a direct connection and does not use a modem. For direct connections, select None. For X.25 ports, select AIOPAD. For ISDN adapters (not ISDN terminal adapters that connect to a serial port like a modem), select ISDN (AT Controlled). For PPTP ports, select AIOPPTP.
NOTE: For a list of supported modems and the current support file, download NWCMOD.EXE from developer.novell.com/devres/wan/modemscr/mdmscr.htm. Note that the modem script files in Novell BorderManager 3.7 are not backward-compatible with the NetWare Connect® 2.0 software. More information about creating and editing modem scripts is located in the NetWare 5 online documentation at the following path:
Contents > Connectivity Services (under Network Services heading) > Routing Configuration
(Optional) Select Additional Parameters and press Enter.
The Port Configuration window displays additional port configuration parameters. Usually, you can keep the defaults for most of these parameters. More information about configuring these parameters is located in the NetWare 5 online documentation at the following path:
Contents > Connectivity Services (under Network Services heading) > Remote Access Configuration
When you have configured the port, press Esc and select Yes to save the changes.
Press Esc to return to the Remote Access Options window.
This section describes how to configure your server to support remote IP users. Several separate procedures are required to configure Point-to-Point Protocol Remote Node Service (PPPRNS) for remote IP nodes. This section contains the following procedures:
To provide remote access to other TCP/IP hosts on the network, you must configure the remote access server as an IP router. TCP/IP routing enables forwarding IP traffic from one network to another.
You use the Protocols and Routing option in NIASCFG to configure your server as an IP router. More information about using this option and configuring a TCP/IP router is located in the NetWare 5 online documentation at the following path:
Contents > Connectivity Services (under Network Services heading) > Routing Configuration
When you configure the server as an IP router, the appropriate LOAD and BIND commands are added to the INITSYS.NCF and NETINFO.CFG files in the SYS:\ETC subdirectory.
IMPORTANT: Modifications to existing IP addresses take effect the next time you load TCPIP.NLM, start the remote access server, or reinitialize the system.
You can also use the Protocols and Routing option in NIASCFG to configure PPTP on a remote access server. PPTP allows the remote access software to accept PPP calls from remote users through any ISP that supports PPTP by tunneling PPP packets through an IP tunnel.
NOTE: Your ISP must have a PPTP access concentrator, and your network must have access to a port on that concentrator. Contact your ISP for details.
You can configure the remote access server as a Dynamic Host Configuration Protocol (DHCP) server. Use this option to assign IP addresses to remote access clients from the remote access server address range through DHCP (refer to Loading PPPRNS with IP Support). You can also use this option when the clients want to obtain client information such as the domain name server from the remote access server (refer to Setting Up PPPRNS for IP Support).
To install the DHCP server, complete the following steps:
Enter the following command at the console prompt on the remote access server:
For NetWare 4.11 systems, LOAD DHCPD
For NetWare 5 systems, LOAD DHCP
Set the following parameters.
For more information about these parameters, refer to Loading PPPRNS with IP Support.
Set the Client Address Range parameter to Yes.
Enter the IP addresses for the Client Address Range Start and Client Address Range End parameters.
If necessary, enter IP addresses for the Secondary Local IP Address, Secondary Address Range Start, and Secondary Address Range End parameters.
If your clients want to receive domain information from the DHCP server, specify the Domain Name Server Address and Domain Name parameters.
NOTE: The DHCPD and DHCP NLM files can be used only for remote node clients. They cannot be used for LAN clients. You must set up a separate DHCP server for LAN clients.
Loading PPPRNS with IP support allows IP clients to dial in and become remote nodes on the network. This procedure adds the appropriate LOAD and BIND commands to the NETINFO.CFG file.
Table 5, PPPRNS IP Parameters describes the IP parameters that you configure for PPPRNS with IP support:
Table 5. PPPRNS IP Parameters
To load PPPRNS with IP support,
Load NIASCFG.
Select Configure NIAS > Remote Access > Set Up > Select Remote Access Services > PPPRNS > IP.
Select Local IP Address and enter a valid, unique local IP address.
The local IP address must be on the same subnet as the client address range.
Select Subnet Mask > enter a 4-byte value in dotted decimal notation.
Select Use Header Compression > specify Yes to use TCP header compression. Otherwise, specify No.
Make sure the settings for header compression on the server and the client agree, that is, both are enabled or disabled.
Select Specify Client Address Range and do the following:
The Client Address Range parameters must be set when the remote access server is configured as a DHCP server.
Specify Yes if you want the remote access server to assign IP addresses to the remote nodes. Otherwise, specify No and continue with Step 7.
Specify the Client Address Range Start and Client Address Range End parameters.
The address range is for address assignment only, and is not for authenticating the remote IP address. If the client already has an address configured locally and does not need address assignment from the remote access server, the remote access software will not check the client address against the address range to make sure it is within the range.
(Optional) Select Specify Secondary Client Address Range and do the following:
Specify Yes if you want the remote access server to assign secondary IP addresses to the remote nodes. Otherwise, specify No and continue with Step 8.
Specify the Secondary Subnet Mask, Secondary Address Range Start, and Secondary Address Range End parameters.
The secondary address parameters might not be available on your system. If these parameters are available, you can use them to limit access to certain network locations.
Press Esc and specify Yes to save your changes.
The service is selected but is not necessarily running. When a service is selected, it is added to the NWCSTART.NCF file. To verify that the service is running, you can view service statistics.
The changes take effect the next time you start the PPPRNS service.
This section is optional. You can set up your remote access server to function as a DHCP server for remote clients. When your remote access server is configured as a DHCP server, specify the following parameters per user or container:
For these parameters to apply, you must load DHCPD (for NetWare 4.11 systems) or DHCP (for NetWare 5 systems).
To configure IP addresses for PPPRNS, complete the following steps:
Load NIASCFG.
Select Configure NIAS > Remote Access > Configure Services.
The Remote Access Services window is displayed.
Select PPPRNS.
The PPPRNS Configuration Options window is displayed.
Select Set IP Parameters.
A list of users and containers in the default NDS or eDirectory context is displayed.
Select the single period (.) to set IP information for the current container. If users are distributed over multiple contexts, select the double period (..) to move up the NDS or eDirectory tree to a common branch. Select names with a plus (+) prefix to move down the tree.
If the CONNECT object does not have Browse rights to move up the NDS or eDirectory tree, press Ins and enter the new NDS or eDirectory context. This enables you to jump to another branch of the tree where the CONNECT object does have rights.
Select a user or container.
The User IP Parameters window is displayed. You can set the remote access parameters if the CONNECT object has Write attribute rights, in addition to having Browse and Read attribute rights, to that container.
Select Set Domain Information and specify Yes.
The domain information can be specified when the remote access server is set up as the DHCP server for remote clients and the clients want to receive this information.
Specify the following domain parameters:
NOTE: The following parameters are available to clients only if the remote access server is a DHCP server and the clients request the information using DHCP. If the remote access server is not set up as a DHCP server (refer to Setting Up PPPRNS to Support Remote IP Nodes) or if the clients do not use DHCP to request information, these parameters are not used.
You can specify the Domain Name Server Address parameter without specifying the Domain Name parameter if the client uses complete hostnames. Specifying the Domain Name parameter without the server address is not useful.
Press Esc twice to save your changes.
The changes take effect when you have saved them.
After you have completed the procedure to support remote IP nodes, you can configure the PPPRNS client software. The Windows* client software for PPPRNS is available on a separate client CD-ROM. Install and configure the client software on the remote PC and try to establish an IP connection. For more information, refer to the remote access online help.
To configure PPPRNS security,
Load NIASCFG.
Select Configure NIAS > Remote Access > Configure Security.
The Remote Access Security window is displayed.
Select PPPRNS.
The PPPRNS Configuration Options window is displayed.
Select Configure Security.
The PPPRNS Configuration window is displayed.
Select Enable Security and specify Yes or No to enable or disable PPPRNS security.
When security is disabled, callers can establish a connection successfully by entering a valid username without a password. However, callers must still log in to the network.
Specify Yes or No to enable or disable the NetWare Connect Authentication Protocol (NWCAP).
This method is supported by the remote access dialer. NWCAP allows the NetWare password to be used as the Remote Client password (the default).
Specify Yes or No to enable or disable the Password Authentication Protocol (PAP).
The default is No. If you enable this protocol, callers configured for PAP must specify the Remote Client password to successfully establish a connection. This method is supported by the remote access dialer. Enable this option if you have UNIX* clients that support PAP.
NOTE: For dial-in VPN clients, either PAP or CHAP must be enabled. If you want PAP or CHAP users to authenticate and they do not have a Remote Client password, enter Set PPPRNS AdmitNoConfig=ON at the server console. The default is OFF. Setting this option to ON is not recommended.
Specify Yes or No to enable or disable the Challenge Handshake Authentication Protocol (CHAP).
This method is not supported by the remote access dialer shipped with NetWare. This method requires callers to specify a Remote Client password to establish a connection. To set Remote Client passwords, refer to Setting Up a Remote Client Password.
You must complete the following procedures to configure a remote client password:
The Remote Client password is required to establish a connection, and the NetWare password is required for logging in to the NetWare network. Both passwords are specified for the same username.
You can set Remote Client passwords for the following types of callers:
You assign Remote Client passwords at first, then later allow callers to choose and change their own passwords. The remote access software has Windows and Macintosh tools to enable users to change their passwords. Refer to the remote access online help for more information about these tools. More information about using the NetWare Administrator utility to assign and change Remote Client passwords is located in the NetWare 5 online documentation at the following path:
Contents > Connectivity Services (under Network Services heading) > Remote Access Configuration
Enhance security for Remote Client passwords by requiring the following:
The user has a grace login limit of three logins after a password has expired. During this grace period, the password must be changed by either the user or the administrator. NCS dial-in users can see the number of grace logins remaining as they authenticate with the Service Selector (if their password has expired) before they select a host session. A separate utility on the remote access client allows the user to check for the number of remaining grace logins. Refer to the remote access online help for more information.
To set Remote Client passwords, complete the following steps:
Load NIASCFG.
Select Configure NIAS > Remote Access > Configure Security.
The Remote Access Security window is displayed.
Select Set User Remote Client Password.
A list of authorized users is displayed.
If users are distributed over multiple contexts, select the double period (..) to move up the NDS or eDirectory tree to a common branch. Select any other container object to move down the tree.
If the CONNECT object does not have Browse rights to move up the NDS or eDirectory tree, press Ins and enter the new NDS or eDirectory context. This allows you to jump to another branch of the tree where the CONNECT object does have rights.
Select a username.
The current status of the user's password is displayed, for example, never set or expired.
Enter a password.
The password must be alphanumeric and can contain up to 16 characters. The password is case sensitive.
IMPORTANT: You must enable the long password option in order to specify passwords longer than eight characters. Refer to Setting Password Restrictions for more information.
You can configure user passwords if the CONNECT object has Write attribute rights, in addition to having Browse and Read attribute rights, to the container.
IMPORTANT: The Remote Client password is less secure than the NetWare password. Make sure it is not the same as the NetWare password.
Reenter the password.
Press Esc to save your changes.
Distribute the passwords to the corresponding users.
A user must enter this password to establish an initial connection with remote access.
An NCS dial-in user is prompted for a Remote Client password when dialing into the remote access server. If no Remote Client password is defined for this user, access will be denied.
NOTE: An undefined password is not the same as a NULL password. If the password is set to NULL, the user must press Enter when prompted for a password.
The Service Selector indicates when a Remote Client password has expired and enables the NCS dial-in user to change the password at login time.
To set password restrictions for Remote Client passwords, complete the following steps:
Load NIASCFG.
Select Configure NIAS > Remote Access > Configure Security.
The Remote Access Security window is displayed.
Select Set Remote Client Password Restrictions.
Select Enable Long Passwords > specify Yes or No to enable or disable this option.
IMPORTANT: You cannot disable the long passwords feature after you have enabled it. If you enable long passwords, you must upgrade all your NetWare Connect 2.0 servers to the latest version of the remote access software. Users will no longer be able to use NetWare Connect 2.0. You must also set the Enable Long Passwords parameter on each server.
Enter a value between -1 and 20 for the Maximum Invalid Login Attempts parameter.
This sets the number of times the user can enter the wrong password. The Remote Client password is disabled and cannot be used after the specified number of failed tries. The default of -1 allows the user to reenter an incorrect password indefinitely.
Enter a value between -1 and 16 for the Set Minimum Password Length parameter.
This sets the minimum number of characters for a password. The change takes effect the next time the password is set. To increase security, have users specify passwords of five or more characters. The default of -1 means no limit is set.
Press Esc to save your changes.
You can allow or disallow users to change their passwords. If you allow users to change passwords, you can increase password security by requiring them to change passwords periodically. More information about allowing users to change their passwords is located in the NetWare 5 online documentation at the following path:
Contents > Connectivity Services (under Network Services heading) > Remote Access Configuration
NOTE: The user has a grace login limit of three logins after a password has expired. During this grace period, the password must be reset or changed by either the user or the administrator. NCS dial-in users can see the number of grace logins remaining if their passwords have expired during authentication with the Service Selector.
The remote access software has Windows tools that enable users to change their Remote Client passwords, and it has Windows and Macintosh tools that enable users to check for the remaining number of grace logins. Refer to the remote access online help for more information.
The Service Selector also has a menu option for changing the Remote Client password. This option is available to NCS dial-in users or PPP dialers using the Terminal Window After Dial-in option.
The Novell VPN client software enables remote clients to connect to a VPN server and exchange confidential information without risk. As with site-to-site configurations, the information is encrypted and its confidentiality is preserved until it reaches the VPN server. This section describes the various options for establishing a client-to-site VPN.
This section contains the following examples:
With this option, the client connects to the VPN server using the Point-to-Point Protocol (PPP) through an ISP, as shown in VPN Client Using an ISP Connection. Although using an ISP connection does not offer guaranteed bandwidth and could be slower than a direct dial-in connection, this option has the advantage of being less expensive than a direct dial-in connection. In addition to the cost of the phone line, a direct dial-in connection requires that you maintain a dial-up server, modems, and other related equipment.
If your ISP supports PPTP, the VPN client can use the PPTP to access the VPN server through an ISP connection.
Although VPN Client Using an ISP Connection does not show that the VPN server is a member of a site-to-site VPN, VPN servers can support both client-to-site and site-to-site connections. If the VPN server is part of a site-to-site VPN, the client can also access all the other members of the site-to-site VPN and the networks that they protect. In addition, the site-to-site connections can be either Internet connections or intranet connections.
Figure 18
VPN Client Using an ISP Connection
To set up a VPN client to connect to the VPN server using PPP through an ISP,
Install and configure the VPN client.
For detailed instructions, refer to Novell BorderManager 3.7 Install and Setup guide.
Configure the VPN server to support the VPN client.
For detailed instructions, refer to Novell BorderManager 3.7 Install and Setup guide.
Configure IP routing on your network so that packets can return to the VPN client through the VPN server.
With this option, the client uses PPP to dial directly in to the VPN server, as shown in VPN Client Using a Direct Dial-In Connection. Although a direct PPP connection has guaranteed bandwidth, it is more expensive and might not be any faster than an ISP connection.
For some remote clients, a direct dial-in connection might be the only option available.
Although VPN Client Using a Direct Dial-In Connection does not show that the VPN server is a member of a site-to-site VPN, VPN servers can support both client-to-site and site-to-site connections. If the VPN server is part of a site-to-site VPN, the client can also access all the other members of the site-to-site VPN and the networks that they protect. In addition, the site-to-site connections can be either Internet connections or intranet connections.
Figure 19
VPN Client Using a Direct Dial-In Connection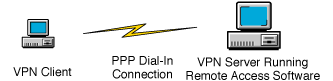
To set up a VPN client to dial directly in to the VPN server, complete the following steps:
Install and configure the VPN client.
For detailed instructions, refer to Novell BorderManager 3.7 Install and Setup guide.
Configure the remote access software.
For detailed instructions, refer to the Setting Up Remote Access on a VPN Server to Support Dial-In VPN Clients.
Configure the VPN server to support the VPN client.
For detailed instructions, refer to Novell BorderManager 3.7 Install and Setup guide.
With this option, the client accesses the VPN server through an ISP using a cable modem, an ADSL device, a LAN connection, or an established dial-up connection, as shown in VPN Client Using a LAN Connection. If it is available, a broadband connection is faster and less expensive than a dial-in connection.
Although VPN Client Using a LAN Connection does not show that the VPN server is a member of a site-to-site VPN, VPN servers can support both client-to-site and site-to-site connections. If the VPN server is part of a site-to-site VPN, the client can also access all the other members of the site-to-site VPN and the networks that they protect. In addition, the site-to-site connections can be either Internet connections or intranet connections.
Figure 20
VPN Client Using a LAN Connection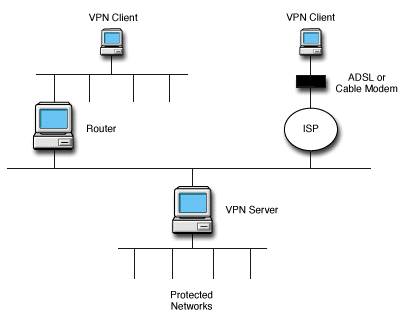
Install and set up the VPN client.
For detailed instructions, refer to Novell BorderManager 3.7 Install and Setup guide.
Set up the VPN server to support the VPN client.
For detailed instructions, refer to Novell BorderManager 3.7 Install and Setup guide.
Configure IP routing on your network so that packets can return to the VPN client through the VPN server.