2.1 Configuring Application Proxies
You can use the application proxy for the following services:
-
HTTP, Gopher, FTP, Simple Mail Transfer Protocol (SMTP), Domain Name System (DNS), RealAudio*, and Real Time Streaming Protocol (RTSP).
-
As a protocol filter to prevent certain kinds of user connections.
-
As a gateway to hide the names and addresses of internal systems so that the gateway is the only hostname known outside the system.
This section has the following information:
2.1.1 Configuring an HTTP Proxy
HTTP proxy resolves URL requests on behalf of Web clients on your network. These requests are cached, if possible, on the proxy server to increase the speed of delivering the content the next time the same information is requested.
To set up an HTTP proxy server:
-
Log in to iManager.
-
Select
-
Browse to and select the BorderManager server or container that you want to configure, then click .
-
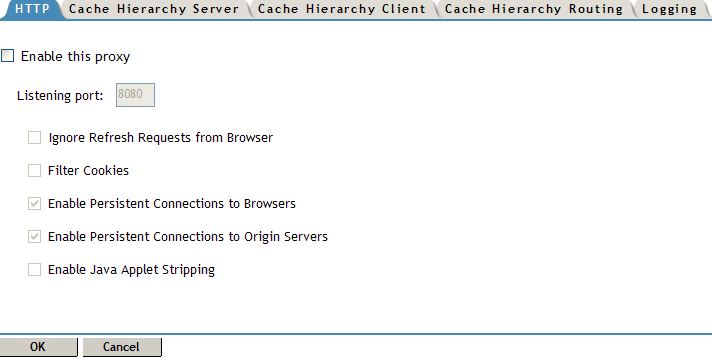
Click in the section. The HTTP Proxy page is displayed.
-
Select , to enable the proxy.
-
Specify the HTTP listening port number in the field.
This is the port on which the proxy server listens for incoming URL requests from browser clients. The default is 8080.
The HTTP proxy listens on interfaces identified as Private or Both, but not on interfaces identified as Public.
-
Specify information in the following fields:
Ignore Refresh Requests from Browser: If you select this option, the proxy does not access the Web server for a URL when a user specifies to reload or refresh from the browser. All user requests are filled from the cache.
Filter Cookies: If you select this option, the cookie header is not forwarded to the origin server, and pages with the Set-Cookie header are not cached. You can enable this option to increase security.
Enable Persistent Connections to Browsers: If you select this option, the connection between a browser and a proxy server remains active even if there is no data flow.
Enable Persistent Connections to Origin Servers: If you select this option, the connection between the origin server and the proxy remains active even if there is no data flow.
Enable Java Applet Stripping: When this option is enabled, Java* applets are stripped from the HTML file before the file is displayed in the browser window.
-
Click .
-
Click to save the changes.
2.1.2 Configuring an FTP Proxy
You can use an FTP proxy server to control access to FTP sites. This enforces centralized control over Internet or intranet access. You can also use an FTP proxy server to cache data for anonymous users to enable faster downloads.
To set up an FTP proxy server:
-
Log in to iManager.
-
Select
-
Browse to and select the BorderManager server or container that you want to configure, then click .
-
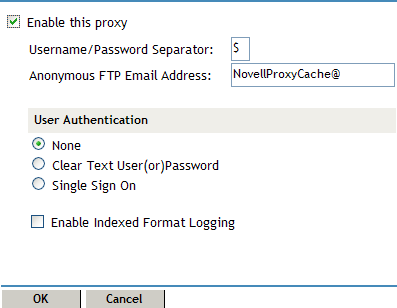
Click , in the section. The FTP proxy configuration page is displayed.
-
Select , to enable the proxy.
-
Specify a username and password separator in the field.
The username/password separator is used to separate the NDS® or eDirectory® username, FTP username, and FTP hostname in the USER command; and the NDS or eDirectory user password and FTP password in the PASS command. The user enters these commands when connecting to the FTP proxy. The default is the dollar sign ($).
For example, enter the following at the user and pass prompts:
user> john_smith.novell$anonymous$ftp.novell.com[lnbrk]pass> xxxxx$yyyyy
where john_smith.novell is the NDS or eDirectory username, anonymous is the FTP username, ftp.novell.com is the FTP host, xxxxx is the NDS or eDirectory password for john_smith, and yyyyy is the FTP password for anonymous users at ftp.novell.com.
-
Specify an anonymous FTP e-mail address in the field.
This is the e-mail address used as the password for the anonymous FTP login by the FTP client of the proxy server. The default is NovellProxyCache@.
-
Select a user authentication method from the following:
None: The user is not required to specify the FTP proxy username and password when accessing the FTP server, and needs to supply only the FTP hostname and password.
Clear Text User (or) Password: The user must specify a fully distinguished NDS or eDirectory username, FTP username, and FTP hostname at the user prompt; and an NDS or eDirectory password and FTP password at the pass prompt.
Single Sign-On: If a user is logged in to NetWare through the latest Novell Client™, the user is not prompted to authenticate to the proxy.
-
Select to enable indexed format logging for the FTP proxy server.
You can view data from the FTP indexed format (audit) log only by exporting the log.
-
Click .
-
Click to save the changes.
2.1.3 Configuring FTP Proxy in Active Mode
With this release, Novell BorderManager has added the capability to the FTP proxy to connect in active mode to the origin FTP server.
-
Open the proxy.cfg proxy configuration file located in SYS:\ETC\PROXY.
-
Add the following line in the [Extra Configuration]section:
EnableActiveFTP=1
NOTE:Add the [ Extra Configuration]section, if your configuration file does not already have it.
-
Save the proxy.cfg file.
-
Restart the proxy.
-
To disable this feature, remove the line from the file or set EnableActiveFTP=0.
2.1.4 Configuring a Mail Proxy
A mail proxy server provides secure SMTP mail services for incoming and outgoing mail. It can also be used to hide internal domain names and mail hosts for scanning incoming mail. You can use the mail proxy between the existing intranet mail server and the Internet, or directly between the intranet and the Internet without an intranet mail server.
If mail proxy is selected during install, the DNS name of the server is available in iManager. Specify the IP address manually.
To configure the mail proxy server:
-
Log in to iManager.
-
Select
-
Browse to and select the BorderManager server or container that you want to configure, then click .
-
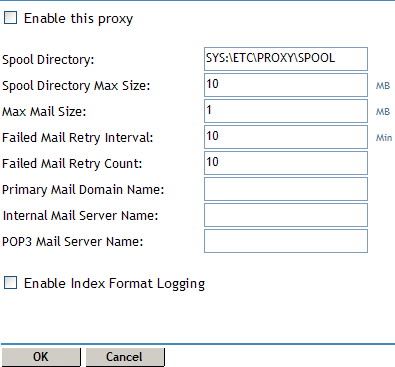
Click in the section. The mail proxy configuration page is displayed.
-
Select the check box, to enable the proxy.
-
Specify values for the following mail proxy parameters:
-
Spool Directory: The directory in which the mail files are temporarily stored.
This must be an absolute path on the server, including the volume name, for example, sys:\etc\proxy\spool.
-
Spool Directory Max Size: The maximum size (in MB) of the mail spool directory.
-
Max Mail Size: The maximum size (in MB) of a mail item.
-
Failed Mail Retry Interval: The maximum number of minutes before the next attempt by the Mail proxy to forward undeliverable mail.
-
Failed Mail Retry Count: The maximum number of times the Mail proxy attempts to forward undeliverable mail.
-
Primary Mail Domain Name: (Optional) The domain name that is used to substitute the From address in an e-mail message. This name replaces the internal domain name in outbound mail headers and hides the internal network architecture. If this parameter is unspecified, the local DNS domain name is used as the primary mail domain name. If the local DNS domain name is not configured as well, the From address remains as is.
-
Internal Mail Server Name: The Mail eXchange (DNS MX record) name or internal mail domain name of the mail server on the internal network.
-
POP3 Mail Server Name: The name or IP address of the server running the Post Office Protocol 3 (POP3) software.
-
-
Select to enable indexed format logging for the Mail proxy server.
You can view data from the Mail proxy indexed format (audit) log only by exporting the log.
-
Click .
-
Click to save the changes.
2.1.5 Configuring RealAudio and RTSP Proxies
RealAudio and RTSP proxies access a RealAudio server on the Internet and enable an intranet user to download and play back audio and video information in real time.
To enable RealAudio and RTSP proxies:
-
Log in to iManager.
-
Select
-
Browse to and select the BorderManager server or container that you want to configure, then click .
-
Click in the section. The RealAudio and RTSP configuration page is displayed.

-
Select the check box to enable the RealAudio and RTSP proxy.
-
Select to enable indexed format logging for the RealAudio or RTSP proxy server.
You can view data from the RealAudio or RTSP indexed format (audit) log only by exporting the log.
-
Click .
-
Click to save the changes.
2.1.6 Configuring a DNS Proxy
The DNS proxy acts as a DNS name server for clients on the intranet. The DNS proxy caches DNS records.
NOTE:The intranet client must have the private IP address of the DNS proxy configured as the address of the DNS name server.
For servers, you can set up the IP addresses of the DNS name servers and the domain name in the sys:\etc\resolv.cfg file.
To enable DNS proxy:
-
Log in to iManager.
-
Select
-
Browse to and select the BorderManager server or container that you want to configure, then click .
-
Select in the section. The DNS proxy configuration page is displayed.
-
Select the check box to enable the RealAudio and RTSP proxy.
-
Select the check box to enable indexed format logging for the DNS proxy server.
You can view the logged data from the DNS indexed format (audit) log by exporting the log.
-
Click .
-
Click to save the changes.
2.1.7 Configuring a Generic TCP Proxy
This proxy is a circuit-level passthrough proxy used to serve multiple protocols for which an application proxy is not available.
Use a Generic TCP proxy server to access multiple protocols if the application proxy you need (for example, Telnet and rlogin) is not already defined in Novell BorderManager. Generic proxy tunnels data without caching it.
To set up a Generic TCP proxy server:
-
Log in to iManager.
-
Select
-
Browse to and select the BorderManager server or container that you want to configure, then click .
-
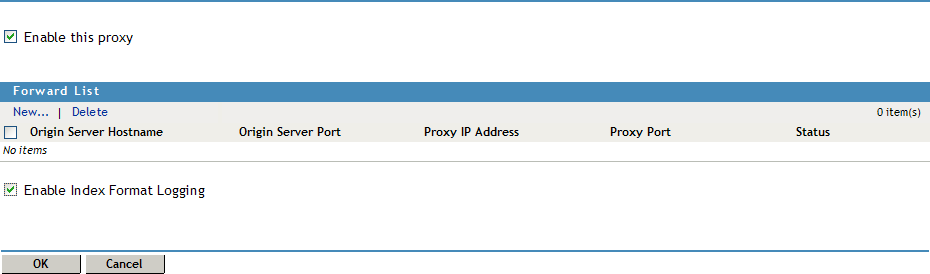
Select in the section. The Generic TCP Proxy page is displayed.
-
Select to enable the Generic TCP proxy.
-
To add a server to the , click .
-
Specify the following information in the New dialog box:
Enable This Particular Proxy: Select this check box to specify whether to enable the Generic proxy server after you have set it up.
Origin Server Hostname: Specify the hostname of the origin server.
Origin Server Port: Specify the port number for the origin server as that origin server is listening on for incoming connections. The default port number is 0.
Proxy IP address: Select one or more public proxy IP addresses of the proxy server. These are the addresses you want the proxy to listen on for incoming connections from the Internet.
Proxy Port: Specify the port number for the proxy server. The default port number is 0. You can associate one or several public IP addresses with a particular domain name, but make sure you have a unique IP address and the port number combination.
-
Click to add the new server to the .
-
Select to enable indexed format logging for the Generic TCP proxy server.
You can view data from the Generic TCP proxy indexed format (audit) log only by exporting the log.
-
Click .
-
Click .
2.1.8 Configuring a Generic UDP Proxy
Use a Generic UDP proxy server to access multiple protocols if the application proxy you need (for example, Telnet and rlogin) is not already defined in Novell BorderManager. Generic proxy tunnels data without caching it.
To set up a Generic UDP proxy server:
-
Log in to iManager.
-
Select
-
Browse to and select the BorderManager server or container that you want to configure, then click .
-
Select in the section. The Generic UDP Proxy page is displayed.
-
Select to enable the Generic UDP proxy.
-
To add a server to the , click .
-
Specify the following information in the New dialog box:
Enable This Particular Proxy: Select this check box to specify whether to enable the Generic proxy server after you have set it up.
Origin Server Hostname: Specify the hostname of the origin server.
Origin Server Port: Specify the port number for the origin server as that origin server is listening on for incoming connections. The default port number is 0.
Proxy IP address: Select one or more public proxy IP addresses of the proxy server. These are the addresses you want the proxy to listen on for incoming connections from the Internet.
Proxy Port: Specify the port number for the proxy server. The default port number is 0. You can associate one or several public IP addresses with a particular domain name, but make sure you have a unique IP address and the port number combination.
-
Click to add the new server to the .
-
Select the check box to enable indexed format logging for the Generic UDP proxy server.
You can view data from the Generic UDP proxy indexed format (audit) log only by exporting the log.
-
Click .
-
Click to save the changes or to cancel the changes.