Setting Up User Workstations for E-Mail and Instant Messaging
After your GroupWise system is up and running (see Setting Up GroupWise E-Mail and Messenger) and you have created eDirectory user accounts and GroupWise mailboxes (see Creating GroupWise E-Mail Accounts), users can start communicating quickly and efficiently using e-mail and instant messaging.
Setting Up E-Mail
After the GroupWise agents are running and users have GroupWise accounts set up, users can access their GroupWise mailboxes to send and receive e-mail in a variety of ways:
- Using the GroupWise WebAccess Client
- Installing and Using the GroupWise Linux Client
- Installing and Using the GroupWise Macintosh Client
- Installing and Using the GroupWise Windows Client
- Using a POP or IMAP E-Mail Client
- Using Microsoft Outlook
Using the GroupWise WebAccess Client
The GroupWise WebAccess client allows users to access their GroupWise mailboxes from a Web browser on the road, in the office, or at home. The WebAccess Agent and a Web server must be running on your Small Business server in order for WebAccess to be available to GroupWise users. You must give the users the IP address or hostname of your Small Business server in order for them to use WebAccess. Then give them the following instructions.
-
Open the Small Business home page.
http://server_address
You can use either the server IP address or hostname.
-
In the right pane, click Access E-Mail from the Web.
The WebAccess Login page appears.
-
Save this URL as a bookmark.
-
Provide the username and password associated with your GroupWise mailbox.
-
Click Login to log in to GroupWise WebAccess.
For assistance in learning to use GroupWise WebAccess, click Help or refer to the GroupWise 6.5 WebAccess Client User Guide in the Groupwise 6.5 online documentation.
Installing and Using the GroupWise Linux Client
The GroupWise Linux client is ideal for e-mail, calendaring, scheduling, and much more on Linux workstations. The GroupWise Linux client software must be installed on each user's workstation.
-
Open the Small Business home page.
http://server_address
You can use either the server IP address or hostname.
-
In the right pane, click Download the GroupWise Linux Client.
-
Review the installation instructions, and then click the link to download the file.
-
Save the install.bin file to a convenient location on your workstation.
-
Open a new terminal window, and then change to the directory where you saved the install.bin file.
-
Become root by entering su and the root password.
-
Enter sh install.bin.
Progress is displayed in the terminal window.
-
To start the GroupWise Linux client, click the GroupWise shortcut on your desktop.
-
Provide your GroupWise user ID, your eDirectory password, and the address (IP address or hostname) of your Small Business server, and then click OK.
For assistance in learning to use the GroupWise Linux client, click Help or refer to the GroupWise 6.5 Cross-Platform Client User Guide in the GroupWise 6.5 online documentation.
Installing and Using the GroupWise Macintosh Client
The GroupWise Macintosh client is ideal for e-mail, calendaring, scheduling, and much more on Macintosh workstations. The GroupWise Macintosh client software must be installed on each user's workstation.
-
Open the Small Business home page.
http://server_address
You can use either the server IP address or hostname.
-
In the right pane, click Download the GroupWise Macintosh Client.
The GroupWise.app.sit file automatically installs the Cross-Platform client software on your Macintosh workstation.
-
To start the GroupWise Macintosh client, click the GroupWise shortcut on your desktop.
-
Provide your GroupWise user ID, your eDirectory password, and the address (IP address or hostname) of your Small Business server, and then click OK.
For assistance in learning to use the GroupWise Macintosh client, click Help or refer to the GroupWise 6.5 Cross-Platform Client User Guide in the GroupWise 6.5 online documentation.
Installing and Using the GroupWise Windows Client
The GroupWise Windows client is ideal for e-mail, calendaring, scheduling, and much more on Windows workstations. The GroupWise Windows client software must be installed on each user's workstation. You have two options for distributing the GroupWise client software to users:
- Make copies of the Novell GroupWise 6.5 Client CDs and give them to users. The client Installation program is located at the root of the CD.
- Have users download the GroupWise Windows client from the GroupWise 6.5 Product Updates Web page.
The following procedure assumes that users have the Novell GroupWise 6.5 Client CDs or have downloaded and extracted the client software files.
-
Make sure you are logged in as yourself on your workstation.
-
Click Start > Run, browse to the location of setup.exe on the Novell GroupWise 6.5 Client CD or the download location, select setup.exe, and then click OK.
-
Follow the instructions in the Setup program to install the Windows client software on your workstation.
Immediately after installation, the client Setup program gives you the opportunity to start the GroupWise Windows client. It also places an icon on your desktop to use when starting GroupWise in the future.
-
When you start GroupWise, provide your GroupWise user ID, your eDirectory password, and the address (IP address or hostname) of your Small Business server, and then click OK.
For assistance in learning to use the GroupWise Windows client, click Help or refer to the GroupWise 6.5 Windows Client User Guide in the GroupWise 6.5 online documentation.
Using a POP or IMAP E-Mail Client
If your users are familiar with a common POP or IMAP e-mail client such as Outlook* Express on Windows or EvolutionTM on Linux, they can continue to use it to access their GroupWise mailboxes. Users of POP or IMAP e-mail clients have access to the feature sets of their familiar e-mail clients, but there are many GroupWise features that are not available to POP and IMAP e-mail clients.
The GroupWise Internet Agent is required in order for users to access their mailboxes using POP and IMAP e-mail clients. If you have not already installed the Internet Agent, you can rerun the GroupWise installation in YaST (as described in Setting Up GroupWise E-Mail and Messenger) selecting only the Internet Agent, or you can follow the instructions for installing the Internet Agent in the GroupWise 6.5 Installation Guide.
In order for users to access their GroupWise mailboxes from a POP or IMAP e-mail client, they must configure their e-mail clients to access their GroupWise accounts.
- Configuring Outlook Express to Access Your GroupWise System
- Configuring Evolution to Access Your GroupWise System
Configuring Outlook Express to Access Your GroupWise System
NOTE: Steps might vary depending on the versions of Windows and Outlook Express installed on the workstation.
-
In Outlook Express, click Tools > Accounts > Add > Mail.
-
Follow the prompts and provide personal information until you are prompted for the e-mail server information.
-
Select POP3 or IMAP as your incoming mail server type.
-
In the Incoming and Outgoing Mail fields, specify the IP address or hostname of your Small Business server, and then click Next.
-
Continue following the prompts and providing personal information until the new account has been set up in Outlook Express.
-
Click Tools > Accounts.
-
Select the new account you just created, and then click Properties > Servers.

-
Select My Server Requires Authentication, and then click OK.
The default setting for this option is Use Same Settings as My Incoming Mail Server, so you do not need to change any settings.
-
To access your GroupWise mailbox in Outlook Express, click Tools > Send and Receive.
-
Click the IP address or hostname of your Small Business server.
-
Provide your username and password, and then click OK.
Configuring Evolution to Access Your GroupWise System
NOTE: Steps might vary depending on the version of Evolution installed on the workstation.
-
Click Settings > Mail Accounts > Add.
-
Click Forward to start the Evolution Mail Configuration Assistant.
-
On the Identity page, provide your e-mail address in the GroupWise system (for example, mycompany.com), and then click Forward.
-
On the Receiving Email page, select IMAP in the Server Type list, specify the hostname of your Small Business server in the Host field, set the other Receiving Email options as appropriate for your system, and then click Forward.
-
On the Sending Email page, select SMTP in the Server Type list, specify the hostname of your Small Business server in the Host field, set the other Sending Email options as appropriate for your system, and then click Forward.
-
On the Account Management page, specify the name you want to use to identify this account on the Evolution Settings page, and then click Forward.
-
Click Apply to create the GroupWise account.
Your GroupWise mailbox now appears in the list of available e-mail accounts.
Using Microsoft Outlook
If your users have been using the Microsoft Outlook e-mail client that comes standard with Microsoft Office, they can continue to use it to access their GroupWise mailboxes. However, not all GroupWise functionality is available in Outlook.
In order for users to access their GroupWise mailboxes from Outlook, they must configure Windows to access their GroupWise accounts.
NOTE: Steps might vary depending on the versions of Windows and Outlook installed on the workstation.
-
In the Windows Control Panel, click Mail and Fax.
The default profile is displayed.
-
Click Show Profiles > Add to add a new profile for your GroupWise account.
-
Select Internet E-Mail, and then follow the prompts and provide personal information until you reach the Servers property page.
-
In the Outgoing Mail and Incoming Mail fields, specify the IP address or hostname of your Small Business server.
-
In the Account Name and Password fields, specify your GroupWise user ID and password.
IMPORTANT: Do not select Logon Using Secure Password Authentication.
-
Continue providing information on the Connection and Advanced property pages as needed, and then click OK to save the mail account information.
-
Continue following the prompts and providing personal information until the new account has been set up.
-
To access your GroupWise mailbox in Outlook, click Tools > Check for New Mail On, and then select the mail service that you set up from the Control Panel.
-
Provide your username and password, and then click OK.
What's Next
After you have set up users' workstations for e-mail, you can set up instant messaging (see Setting Up Instant Messaging) or you can consider long-term GroupWise system management issues (see Maintaining E-Mail and Instant Messaging).
Setting Up Instant Messaging
After your Messenger system is set up, you must implement Secure Sockets Layer (SSL) encryption on your Small Business server because the Messaging Agent requires SSL on Linux. After your Messenger system is secured by SSL encryption, users can set up their workstations for instant messaging.
Configuring Messenger for SSL
If you do not yet have a public certificate and private key file on your Small Business server, follow the instructions in "Server Certificates and SSL Encryption" in "Security" in the GroupWise 6.5 Administration Guide. These files must exist on your Small Business server before you can set up secure instant messaging.
-
In a terminal window, become root by entering su and the root password.
-
Copy your public certificate file and private key file into the /opt/novell//messenger/certs directory on your Small Business server.
-
Stop the Messaging Agent by entering
/etc/init.d/novell-nmma stop
-
Start ConsoleOne.
See Using ConsoleOne.
-
Browse to and expand the Messenger Service object.
-
Right-click the Messenger Server object, and then click Properties.
-
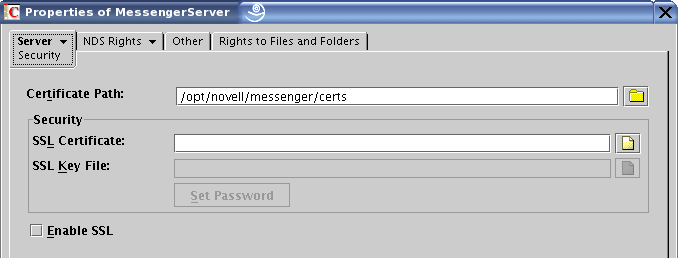
Click Server > Security.
-
Fill in the following fields:
Certificate Path: This field defaults to /opt/novell/messenger/certs.
SSL Certificate: Browse to and select the public certificate file. If it is located in the directory specified in the Certificate Path field, you can simply type the filename.
SSL Key File: Browse to and select your private key file. If it is located in the directory specified in the Certificate Path field, you can simply type the filename.
Enable SSL: Select this option to enable SSL encryption for your Messenger system.
Because you provided the SSL information on the Messenger Server object, it applies to both the Messaging Agent and the Archive Agent.
-
Click OK to save the SSL settings.
-
Restart the Messaging Agent by entering
/etc/init.d/novell-nmma start
Setting Up Messenger Software
In order for users to send instant messages, they must install Novell GroupWise Messenger on their workstations.
-
Open the Small Business home page.
http://server_address
You can use either the server IP address or hostname.
-
In the right pane, click Download the GroupWise Messenger Client.
-
Follow the instructions on the Messenger Welcome page to install and start Messenger on the platform of your choice (Linux, Macintosh, or Windows).
For assistance in learning to use Messenger, click Help or refer to the GroupWise Messenger 1.0 Client User Guide.
For administrative information about your Messenger system, see the Messenger 1.0 Administration Guide.
What's Next
After you have set up users' workstations so they can use e-mail and instant messaging, you are ready to consider long-term GroupWise and Messenger management issues, as described in the next section,Maintaining E-Mail and Instant Messaging.