3.5 Distributing the Messenger Client Software
You have many alternatives for helping users install the Messenger client:
3.5.1 Using the Novell Messenger Download Page
The Novell Messenger download page is available to users as soon as you finish running the Messenger Installation program, as described in the Messenger 2.0 Installation Guide, and start the Messaging Agent, as described in Section 2.1, Starting the Messaging Agent.
In order for users to access the Novell Messenger download page in their Web browsers, you need to tell them the IP address or DNS hostname of the server where the Messaging Agent is running and the port number (8300 by default). So, for example, if you installed the Messaging Agent on a server with an IP address of 172.16.5.18, the Novell Messenger download page is:
http://172.16.5.18:8300
When users view this URL, they see the following page:
Figure 3-4 Novell Messenger Download Page
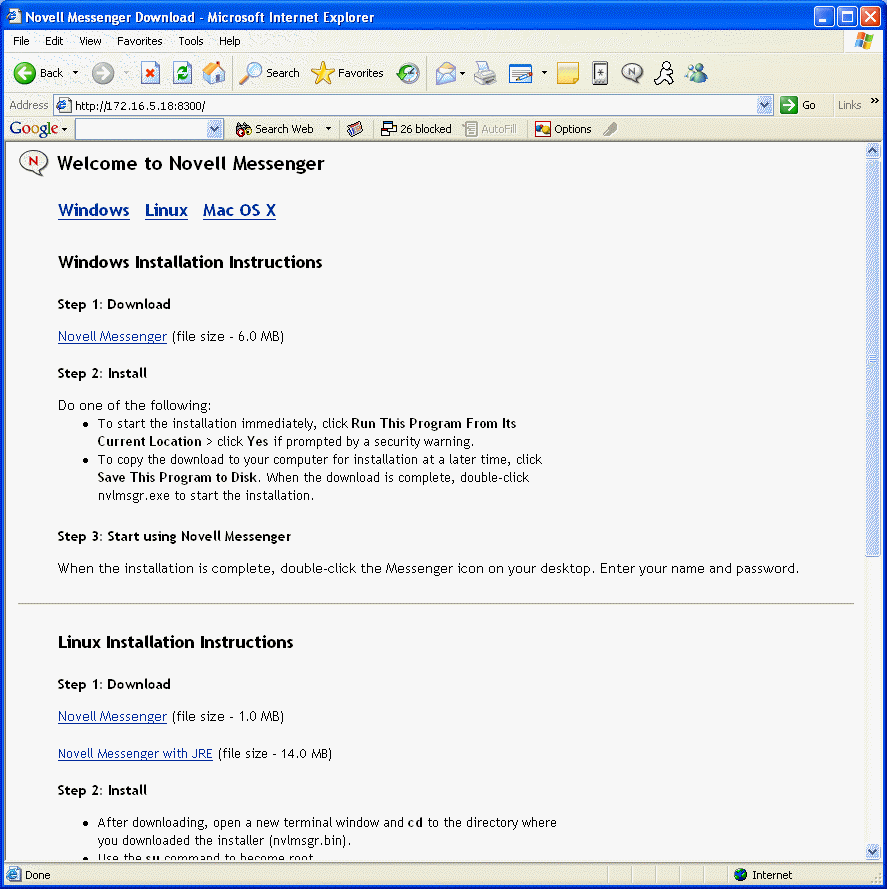
When users click the Novell Messenger link, they download the nvlmsgr.exe file from the \novell\nm\ma\software\client\win32 directory. By following the instructions on the download page, users can install and start the Messenger client quickly and easily.
3.5.2 Setting Up Auto-Update
You can require Messenger users to update their Messenger client software whenever a new version of the client is available
-
In ConsoleOne, browse to and right-click the Messenger Service object, then click .
-
Click > .
-
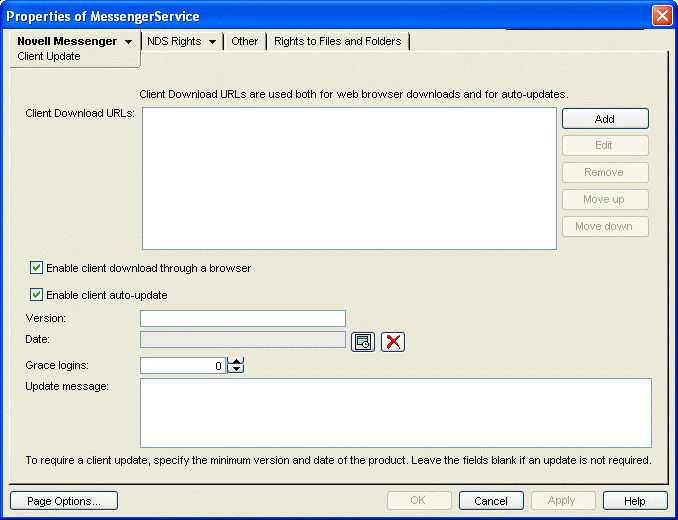
Fill in the following fields to configure the update process:
Client Download URLs: Click to specify each URL where the user's browser or the Messenger client are redirected when attempting to download the updated client software.
The URLs in the list you create are tried in the order you list them. Make sure that the Messenger nvlmsgr.exe file is available for download from each URL in the list. For more information, see Configuring Your Web Server to Download the Messenger Client.
Enable Client Download Through a Browser: Select this option so that users can download the updated Messenger client software from the Novell Messenger download page, as described in Using the Novell Messenger Download Page.
Update Message: If desired, type the message that you want Messenger users to see when they are notified about the Messenger client update.
-
If you want to require Messenger users to update, fill in the following fields:
Version: Specify the minimum acceptable version number for the Messenger client software.
Date: Click the button to specify the earliest acceptable date for the Messenger client software.
If you fill in the and/or , users cannot run the Messenger client until they update their software, unless you allow grace logins.
Grace Logins: Specify the number of times users can log in to the Messenger system without updating their Messenger client software.
If you leave the and fields blank, users can choose whether or not to update their Messenger client software when they are notified that a new version is available.
Client version information is stored on each user's workstation in the nmcl32.ver file.
-
Click to establish the update process.
When Messenger users start the Messenger client, they are notified whenever updated client software is available.
3.5.3 Configuring Your Web Server to Download the Messenger Client
By default, the Messaging Agent handles downloading Messenger client software to Messenger users. If this activity seems to interfere with its ability to handle its instant messaging functions in a timely manner, you can configure your Web server to download the client software instead. Before performing the following steps, you should already have created your Messenger system and have the Messenger agents running. You can download either Messenger client (Windows or Cross-Platform) from a Messenger system on any platform (NetWare, Linux, or Windows).
-
In ConsoleOne, browse to and right-click the Messenger Service object, then click .
-
Click > .
-
Click > .
-
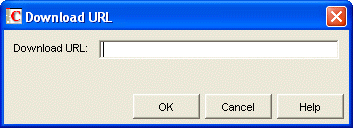
Next to the list, click .
-
Specify the URL of your Web server, for example:
http://nm.novell.com:80
Be sure to include both the http:// and the port number where your Web server listens for service requests.
-
Click to close the Download URL dialog box, then click again to save the updated information on the Client Update page.
-
From the Messenger software subdirectory, copy the index.htm file and the msgricon.gif file to the primary document directory of your Web server.
On NetWare and Windows, the Messenger software directory is \novell\nm\ma\software. On Linux, it is /opt/novell/messenger/software.
If you want to provide the Novell Messenger download page in a language other than English, copy the index.htm file from the appropriate language subdirectory beneath the Messenger software directory.
-
Edit the index.htm file to remove all instances of ~down, for example:
Before: /~down/client/win32/nvlmsgr.exe /~down/client/linux/nvlmsgr.bin /~down/client/mac/nvlmsgr.sit
After: /client/win32/nvlmsgr.exe /client/xplat/linux/nvlmsgr.bin /client/xplat/mac/nvlmsgr.sit
-
Depending on the requirements of your Web server, save the file as either index.htm or index.html.
-
Under the primary document directory of your Web server, create a client subdirectory, then create a platform-specific subdirectory in it, to create the following directory structure:
primary_doc_dir/client/win32 primary_doc_dir/client/xplat/linux primary_doc_dir/client/xplat/mac
-
From the platform-specific subdirectory (win32, linux, or mac) of the Messenger software directory, copy the appropriate Messenger file (nvlmsgr.exe, nvlmsgr.bin, or nvlmsgr.sit) into the corresponding primary_doc_dir platform-specific subdirectory.
-
In the platform-specific primary_doc_dir subdirectory, create an ASCII text file named files.txt with one of the following lines depending on your client platform:
client/win32/nvlmsgr.exe client/xplat/linux/nvlmsgr.bin client/xplat/mac/nvlmsgr.sit
-
After typing the appropriate, platform-specific line shown in Step 12, press Enter so that there is an empty line at the end of the file.
-
Save the updated files.txt file.
-
Repeat Step 12 through Step 14 for each platform-specific subdirectory you created in Step 10, so that you have three files.txt files, one for each platform.
-
Restart the Messenger agents to put the list of client download URLs into effect.
You do not need to restart the Web server in order for Messenger users to be able to download the Messenger client software.
3.5.4 Distributing the Messenger Windows Client Software Using ZENworks for Desktops
You can use the Application Management functionality in Novell ZENworks® for Desktops to distribute the Messenger client software to workstations. The following sections provide instructions:
IMPORTANT:This information assumes that you are familiar with ZENworks for Desktops. For background information, or for help completing the ZENworks tasks outlined in the steps below, see the ZENworks for Desktops documentation at the Novell ZENworks documentation site.
Understanding the Messenger Client .aot Files
The most effective way to create a Messenger client Application object is from an Application Object Template (.aot) file. If desired, you can use the ZENworks for Desktops snAppShot™ utility to create a Messenger client .aot file, or you can use one of the predefined .aot files included with Messenger:
-
english.aot: Creates an Application object you can use to install the English.
-
multi.aot: Creates an Application object you can use to install all languages that are available except English.
The .aot files contain the basic information required to create Messenger client Application objects in Novell eDirectory. For example, the multi2.aot file can be used to create an Application object that, when associated with users, causes the English, Czech, Hungarian, Polish, and Russian versions of the Messenger client to be installed to a user's Windows workstation. For this to work, you must have already installed the files for these language versions to a location that is accessible to users.
Creating a Messenger Client Application Object
The following steps explain how to use ZENworks for Desktops 4 to create a Messenger client Application object from one of the .aot files. If you are using a different version of ZENworks for Desktops, the steps you need to complete might be slightly different.
-
Copy the contents of the \novellnm\ma\software\client\win32 directory to a location on a server that is accessible to all users (for example, \\server\volume\novell\messenger).
-
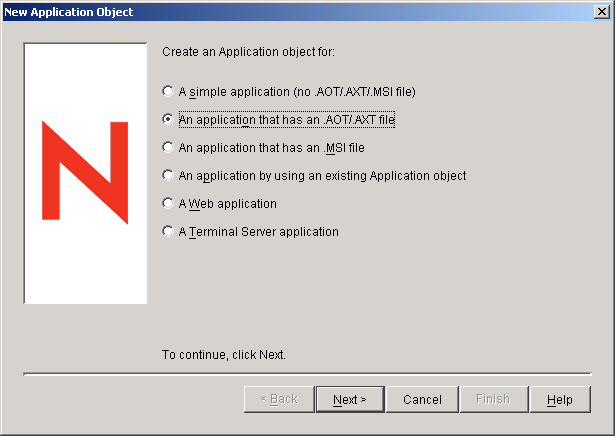
In ConsoleOne, right-click the container where you want to create the Messenger client Application object, then click > to display the New Object dialog box.
-
In the list of objects, select , then click to display the New Application dialog box.
-
Select , then click to display the .AOT/.AXT file path page.
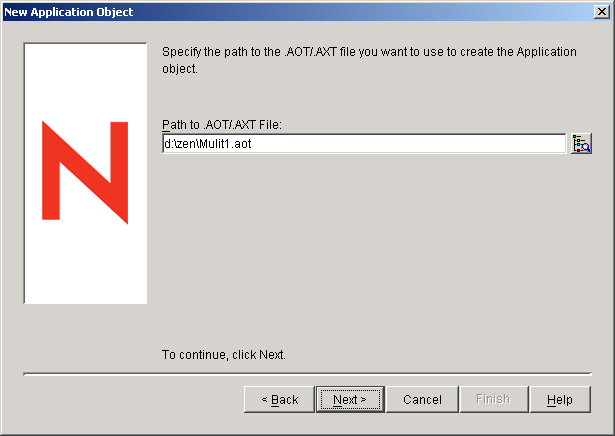
-
In the field, browse for and select the .aot file you want to use.
By default, the .aot files are located in the zen subdirectory in the downloaded GroupWise Messenger 2 image.
For example, if you want to create an Application object to install the English, Czech, Hungarian, Polish, and Russian versions of the Messenger client, select the multi2.aot file.
-
Click to display the Application object information page, then customize the object name, source path, and target path information if necessary.
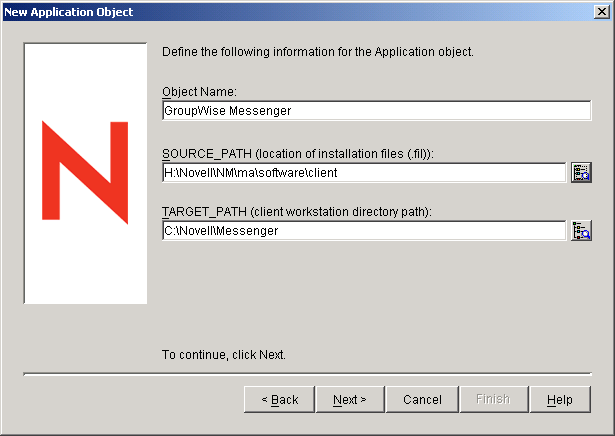
Object Name: This is the name for the Application object created in eDirectory. You might want to use a descriptive name (for example, “Messenger ECHPR Client” for the Czech, Hungarian, Polish, and Russian versions.
SOURCE_PATH: This is the directory from which the Messenger client will be installed. Specify the full path to the client directory (for example, \\server\volume\novell\messenger). Unless all users have the same drive mapping to the volume, make sure you use a UNC path.
This path is saved as the SOURCE_PATH variable. If you need to change it later, you can do so on the Application object's Macros page (Application object > tab > Macros page).
TARGET_PATH: This is the workstation directory where the Messenger client will be installed. Specify a path relative to the user's workstation.
This path is saved as the TARGET_PATH variable. If you need to change it later, you can do so on the Application object's Macros page (Application object > tab > Macros page).
-
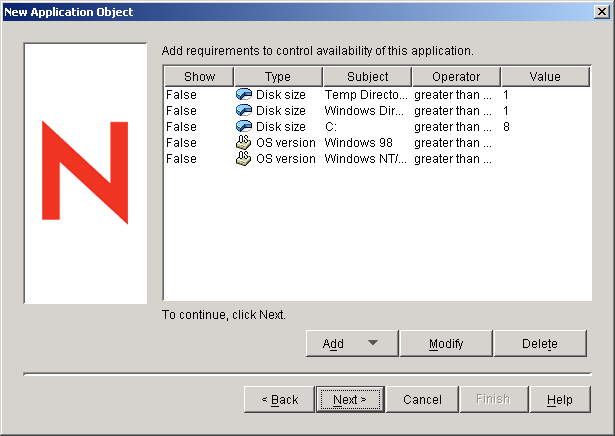
Click to display the system requirements page, then modify the system requirements if necessary.
-
Click to display the user associations page.
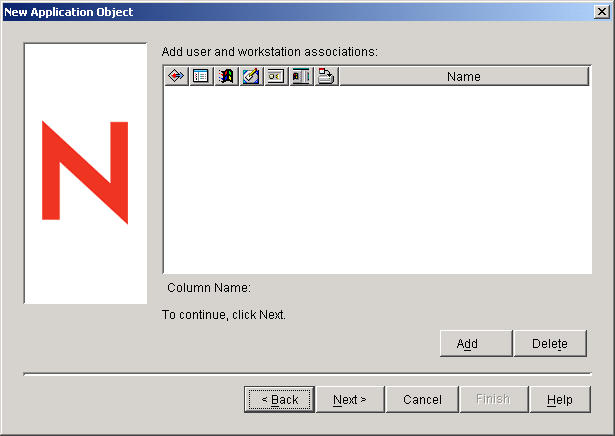
You can associate the Application object with the users and workstations you want it distributed to at this time, or you can create the associations later.
-
After you have added the associations you want, click , review the information, then click to create the Application object.
-
Right-click the newly created Messenger client Application object, then click .
-
Click > to display the Macros page.
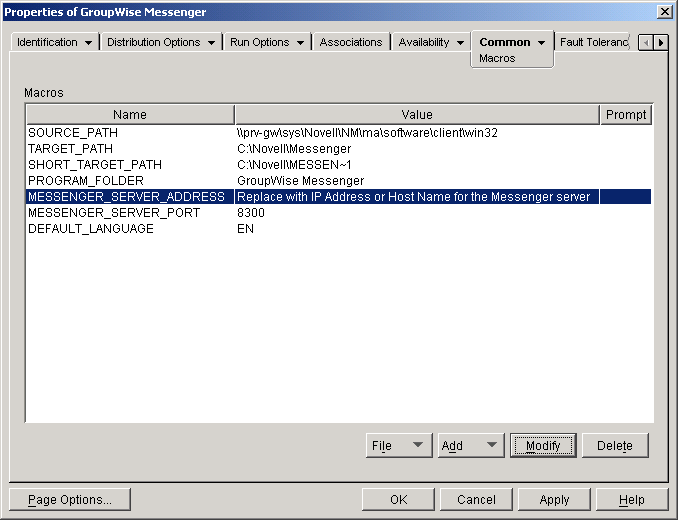
The MESSENGER_SERVER_ADDRESS and MESSENGER_SERVER_PORT variables provide the location of the Messaging Agent, so that users do not need to provide this information when starting the Messenger client.
If you used one of the multix.aot files to create the Application object, the Macros list includes a DEFAULT_LANGUAGE variable. This variable specifies the interface language that the Messenger client defaults to when it is installed. If necessary, individual users can change the language when they start the Messenger client. If you modify the default language, use the language codes listed under /l.
If you have users who use different language versions and you do not want them to be required to change the default language, you can use the same .aot file to create multiple Application objects. For each Application object, you should specify a default language and then associate the Application object with the users who might want that default language.
-
Configure any other Application object settings required to provide the performance or functionality you want.
For example, you can configure the Application object so that the Messenger client is installed immediately upon distribution to the user's workstation, without any intervention by the user. Or, you can change the locations where the Messenger client's icon is displayed. For information about Application object settings, see the ZENworks for Desktops documentation at the Novell Documentation Web site.
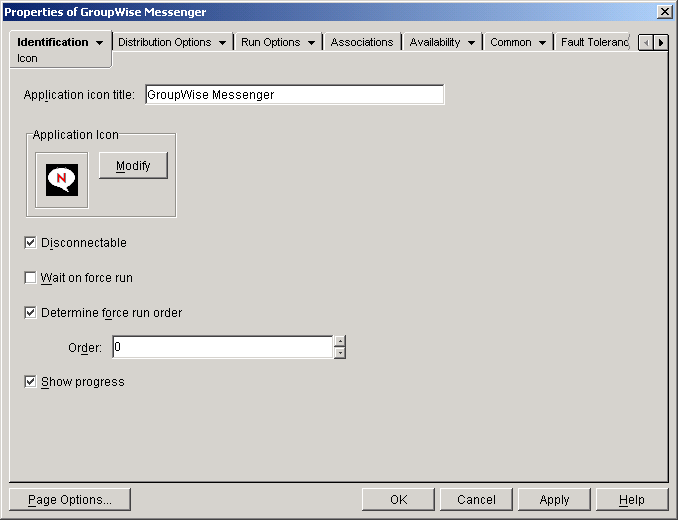
After you associate the Application objects with the users you want, Novell Application Launcher™ displays the Application object's icon on the users' workstations, if the workstation meets the operating system requirements. If the Application object's icon does not appear immediately, have the user refresh Novell Application Launcher.
-
If necessary, repeat the above steps to create additional Messenger client Application objects from the Messenger client .aot files.
3.5.5 Distributing the Cross-Platform Messenger Client Software Using Red Carpet on Linux
You can distribute the Messenger by using Red Carpet® on Linux. For additional information, see the Red Carpet Web site.