22.2 Managing User Data Quotas
Each user’s data quota establishes how much disk space the user’s files can occupy in the Filr site. Folders that do not contain files do not count toward a user’s data quota.
By default, users are not limited in the disk space that their files occupy in the Filr site. As the Filr administrator, you can decide when limiting users’ disk space usage becomes appropriate.
22.2.1 Planning User Data Quotas
Understanding User Data Quota Priority
Because users can have multiple data quotas assigned to them (either individually, through group membership, or through the site-wide default), Filr prioritizes the existing data quotas and uses only one for each individual Filr user. If users have multiple data quotas that pertain to them, the priority level is as follows:
-
User Quota: A quota that is set for an individual user overrides the site-wide default quota and any other quotas that are associated with any groups where the user is a member.
-
Group Quota: A quota that is set for an individual group overrides the site-wide default quota. This pertains to all users who are members of that group.
When a user is a member of multiple groups that have data quotas associated with them, the user is given the highest data quota. For example, if a Filr user is a member of Group A, Group B, and Group C, and the data quotas for each of these groups is 10, 20, and 30, the Filr user’s data quota is 30.
-
Site-Wide Default: The site-wide default quota is used for all Filr users who have not been assigned individual quotas, and who are not associated with any groups where a quota has been set.
Selecting the Default User Data Quota for All Users
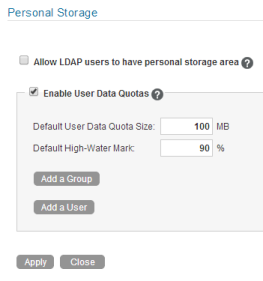
When you enable the data quota feature, the initial default data quota is 100 MB. This means that each Filr user can upload 100 MB of files and attachments to the Filr site.
When you select the default data quota for your Filr site, consider the size of your Filr site, the number of Filr users, the amount of available disk space, and so on. You can override the default data quota on a per-user and per-group basis, as described in Section 22.2.2, Setting User Data Quotas.
As described in Exceeding the Data Quota, when a user adds enough files and attachments to exceed the data quota, the user can no longer attach files or create versions until existing files have been deleted and purged to free up storage space.
For information about purging deleted files to make storage space available, see Section 22.3.1, Purging Deleted Files.
For information about which data quota is used when users have multiple data quotas that pertain to them, see Understanding User Data Quota Priority.
Selecting an Appropriate High-Water Mark
The high-water mark is the percentage of the data quota that must be reached before the user is made aware that he or she is approaching the data quota (a warning message is displayed on the user’s profile page). The default high-water mark is 90% of a user’s data quota.
This high-water mark also applies to data quotas that are set on workspaces and folders.
Determining Data Quotas for Specific Users
If there is a user in your Filr site who needs either a higher or lower data quota than the site-wide default, you can assign that user an individual user data quota.
When you set data quotas for specific users, remember that individual user data quotas override the default user data quota, as well as quotas that are assigned to any groups where the user is a member, as described in Understanding User Data Quota Priority.
Determining Data Quotas for Specific Groups
When you set data quotas for specific groups, remember that group data quotas override the default site-wide data quota, but do not override individual user quotas, as described in Understanding User Data Quota Priority.
22.2.2 Setting User Data Quotas
You can set data quotas for the entire Filr site, for individual groups, and for individual users.
Setting a Default Data Quota
When you set a default data quota, the quota applies to all Filr users who have not been assigned individual quotas, and who are not associated with any groups where a quota has been set.
-
Log in to the Filr site as the Filr administrator.
-
Launch a web browser.
-
Specify one of the following URLs, depending on whether you are using a secure SSL connection:
http://filr_hostname:8080
https://filr_hostname:8443
Replace filr_hostname with the host name or fully qualified domain name of the Filr server that you have set up in DNS.
Depending on how you have configured your Filr system, you might not be required to enter the port number in the URL. If you are using NetIQ Access Manager, the Filr login screen is not used.
-
-
Click the link in the upper-right corner of the page, then click the icon
 .
.
-
Under , click .
-
Select .
-
Set the and options as determined in Section 22.2.1, Planning User Data Quotas.
-
Click > to save the user data quota settings.
Setting Data Quotas for Individual Groups
-
Log in to the Filr site as the Filr administrator.
-
Launch a web browser.
-
Specify one of the following URLs, depending on whether you are using a secure SSL connection:
http://filr_hostname:8080
https://filr_hostname:8443
Replace filr_hostname with the host name or fully qualified domain name of the Filr server that you have set up in DNS.
Depending on how you have configured your Filr system, you might not be required to enter the port number in the URL. If you are using NetIQ Access Manager, the Filr login screen is not used.
-
-
Click the link in the upper-right corner of the page, then click the icon
.
-
Under , click .
-
Select .
-
Click .

-
In the field, start typing the name of the group for which you want to set a quota, then click the group name when it appears in the drop-down list.
Repeat this process to add additional groups for which you want to assign the same data quota.
-
In the field, specify the disk space limit for the group.
-
Click , then click > to save the user data quota settings.
Setting Data Quotas for Individual Users
-
Log in to the Filr site as the Filr administrator.
-
Launch a web browser.
-
Specify one of the following URLs, depending on whether you are using a secure SSL connection:
http://filr_hostname:8080
https://filr_hostname:8443
Replace filr_hostname with the host name or fully qualified domain name of the Filr server that you have set up in DNS.
Depending on how you have configured your Filr system, you might not be required to enter the port number in the URL. If you are using NetIQ Access Manager, the Filr login screen is not used.
-
-
Click the link in the upper-right corner of the page, then click the icon
.
-
Under , click .
-
Select .
-
Click .

-
In the field, start typing the name of the user for which you want to set a quota, then click the user’s name when it appears in the drop-down list.
Repeat this process to add additional users for which you want to assign the same data quota.
-
In the field, specify the disk space limit for the user.
-
Click , then click > to save the user data quota settings.
22.2.3 Modifying User Data Quotas
Filr enables you to modify data quotas that you have previously set. You can modify data quotas for your entire Filr site, or modify data quotas for individual groups and users.
Modifying User Data Quotas for the Entire Filr Site
Filr enables you to easily modify the site-wide default user data quota.
-
Log in to the Filr site as the Filr administrator.
-
Launch a web browser.
-
Specify one of the following URLs, depending on whether you are using a secure SSL connection:
http://filr_hostname:8080
https://filr_hostname:8443
Replace filr_hostname with the host name or fully qualified domain name of the Filr server that you have set up in DNS.
Depending on how you have configured your Filr system, you might not be required to enter the port number in the URL. If you are using NetIQ Access Manager, the Filr login screen is not used.
-
-
Click the link in the upper-right corner of the page, then click the icon
.
-
Under , click .

-
In the field, delete the existing quota and specify the new quota.
You can also modify the default high-water mark in the field. For more information about the high-water mark, see Selecting an Appropriate High-Water Mark.
-
Click > to save the user data quota settings.
Modifying User Data Quotas for Individual Groups and Users
Filr enables you to easily modify individual group and user data quota settings that you have previously set.
-
Log in to the Filr site as the Filr administrator.
-
Launch a web browser.
-
Specify one of the following URLs, depending on whether you are using a secure SSL connection:
http://filr_hostname:8080
https://filr_hostname:8443
Replace filr_hostname with the host name or fully qualified domain name of the Filr server that you have set up in DNS.
Depending on how you have configured your Filr system, you might not be required to enter the port number in the URL. If you are using NetIQ Access Manager, the Filr login screen is not used.
-
-
Click the link in the upper-right corner of the page, then click the icon
.
-
Under , click .
-
In the table or table, click the group name or user name that represents the group or user whose quota you want to modify.

-
In the field, delete the existing quota and specify a new quota.
-
Click , then click > to save the user data quota settings.
22.2.4 Removing User Data Quotas
Filr enables you to disable data quotas that you have previously set. You can disable data quotas for your entire Filr site, or remove data quotas from individual groups and users.
Disabling User Data Quotas for the Entire Filr Site
If you decide that you no longer need to impose limits on the amount of data that users are permitted to upload into the Filr site, you can disable the data quota feature. Disabling the data quota feature enables all Filr users to upload as much data to the Filr site as they want.
-
Log in to the Filr site as the Filr administrator.
-
Launch a web browser.
-
Specify one of the following URLs, depending on whether you are using a secure SSL connection:
http://filr_hostname:8080
https://filr_hostname:8443
Replace filr_hostname with the host name or fully qualified domain name of the Filr server that you have set up in DNS.
Depending on how you have configured your Filr system, you might not be required to enter the port number in the URL. If you are using NetIQ Access Manager, the Filr login screen is not used.
-
-
Click the link in the upper-right corner of the page, then click the icon
.
-
Under , click .
The Data Quotas and File Upload Limits page is displayed.
-
Deselect , then click .

Data quotas are no longer enabled for your Filr site.
Removing User Data Quotas from Individual Groups and Users
You can remove data quotas that you have previously set for individual groups and users. Users are held to the site-wide data quota default setting if they do not have an individual quota defined for them and they are not members of any groups where a group quota has been assigned.
-
Log in to the Filr site as the Filr administrator.
-
Launch a web browser.
-
Specify one of the following URLs, depending on whether you are using a secure SSL connection:
http://filr_hostname:8080
https://filr_hostname:8443
Replace filr_hostname with the host name or fully qualified domain name of the Filr server that you have set up in DNS.
Depending on how you have configured your Filr system, you might not be required to enter the port number in the URL. If you are using NetIQ Access Manager, the Filr login screen is not used.
-
-
Click the link in the upper-right corner of the page, then click the icon
.
-
Under , click .
-
In the table or table, select the check box next to the group or user whose quota you want to remove.
-
Click , then click > to save the user data quota settings.
22.2.5 Repairing a User’s Data Quota
It is possible for a user’s data quota calculation to become inaccurate if errors occur during processing that is related to a user’s file handling. If this happens and a user’s quota calculation is inaccurate, you can repair the data quota:
Repairing a User’s Quota When an Individual Data Quota Is Set
You can repair a user’s data quota when an individual data quota is set on the user.
-
Remove the data quota that is set on the user, as described in Removing User Data Quotas from Individual Groups and Users.
-
Set the data quota for the user again, as described in Setting Data Quotas for Individual Users.
Repairing a User’s Quota When a Default or Group Data Quota Is Set
You can repair a user’s data quota when a default data quota is set, or when a group data quota is set and the user is a member of the group.
-
Set an individual data quota for the affected user, as described in Setting Data Quotas for Individual Users.
-
Remove the individual data quota that you just set, as described in Removing User Data Quotas from Individual Groups and Users.
22.2.6 Managing Your Personal Data Quota
NOTE:As a Filr administrator, you are also held to a data quota if quotas are enabled. If you want to assign yourself a larger quota than the site-wide default, you can add an individual quota for yourself, as described in Setting Data Quotas for Individual Users.
All Filr users need to manage their personal data quotas. When you have a limited allocation of disk space, you need to be aware of the amount of disk space that you have available and how to make more disk space available as you approach your quota.
For information on how to accomplish these and other important tasks as you manage your data quota, see Managing Your Data Quota
in the Novell Filr 1.1 Web Application User Guide.
22.2.7 Monitoring User Data Quotas
You can monitor which users in the Filr site have exceeded or are close to exceeding their data quotas by generating the following reports: