5.2 Installing the MySQL Database Appliance
IMPORTANT:The MySQL database appliance is not intended for enterprise installations. If your organization has an existing MySQL or Microsoft SQL database, it is recommended that you configure Filr to use the existing database.
If you already have a MySQL or Microsoft SQL database server that you want Filr to use, you can skip this section and continue with Section 5.3, Configuring an Existing Database Server.
5.2.1 Downloading the MySQL Database Appliance and Configuring the Virtual Environment
You need to download the MySQL database appliance and configure the virtual environment where you plan to run the appliance. This includes configuring system resources and so forth.
The process of downloading the MySQL database appliance and configuring the virtual environment differs depending on which virtual environment you plan to use to run the MySQL database appliance.
VMware Configuration
-
Download the MySQL database software (MySQL.x86_64-version.ovf.zip) to your management workstation.
You can access the software from the Novell Customer Center (NCC). Or, you can access an evaluation version of the software from this location on the Novell Downloads page.
-
Extract the MySQL.x86_64-version.ovf.zip file on your management workstation until the MySQL-version file folder appears.
-
In the vSphere client, click > .
-
Browse to and select the .ovf file in the MySQL-version file folder.
-
Click .
-
Click again.
-
In the field, rename the Filr appliance to a name of your choosing, then click .
-
Select the datastore where you want to store the virtual machine files, then click .
-
Click to accept the default for the disk format.
-
Click .
-
Create a separate VMware hard disk (Hard Disk 2) for the appliance. This hard disk is used to store configuration files that are used for appliance upgrades.
IMPORTANT:If you do not create a separate VMware hard disk as described here, you cannot upgrade to a new version of Filr.
-
In the vSphere client, right-click the virtual machine that you just created, and for which you want to create secondary storage, then click .
The Virtual Machine Properties page is displayed.
-
On the tab, click .
The Add Hardware dialog box is displayed.
-
Select , then click .
-
Leave selected, then click .
-
In the section, specify the amount of hard disk space that you want to allocate.
To see a formula to calculate the storage requirement for your environment, see MySQL Database Appliance Storage.
-
In the section, select either or , depending on the VMware version that you are running.
-
In the section, select , then click .
-
Select a datastore, then click .
-
Click .
-
In the section, select from the drop-down list.
IMPORTANT:Do not change the controller to VMware Paravirtual at this point of the installation process.
If you want to change the SCSI controller to :
-
Finish the installation and power on the Filr system.
-
Ensure that the Filr system is running. (Log in as the Filr administrator, create a user, and log in as that user.)
-
Shut down each appliance in the Filr system. (For information about how to safely shut down an appliance, see
Shutting Down and Restarting the Novell Appliance
in the Novell Filr 1.1 Administration Guide.) -
In VMware, change the controller to .
-
Power on each appliance in the Filr system.
-
-
Leave the section blank, then click .
-
Click .
-
-
Create a separate VMware hard disk (Hard Disk 3) for the appliance. This hard disk is used to store the /var directory for the appliance. (The /var directory is where system events for the Novell appliances are logged.)
-
In the Virtual Machine Properties window, on the tab, click .
-
Select , then click .
-
Leave selected, then click .
-
In the field, specify the amount of hard disk space that you want to allocate. The recommended minimum is 20 GB.
For more detailed information about the type of information that is stored here, see Filr Appliance Storage.
-
In the section, select either or , depending on the VMware version that you are running.
-
In the section, select , then click .
-
Select a datastore, then click .
-
Click .
-
In the section, select from the drop-down list.
IMPORTANT:Do not change the controller to VMware Paravirtual at this point of the installation process.
If you want to change the SCSI controller to :
-
Finish the installation and power on the Filr system.
-
Ensure that the Filr system is running. (Log in as the Filr administrator, create a user, and log in as that user.)
-
Shut down each appliance in the Filr system. (For information about how to safely shut down an appliance, see
Shutting Down and Restarting the Novell Appliance
in the Novell Filr 1.1 Administration Guide.) -
In VMware, change the controller to .
-
Power on each appliance in the Filr system.
-
-
Leave the section blank, then click .
You do not need to select anything in this section, because unlike Hard Disk 2, this hard disk does not need to be carried over on an upgrade.
-
Click .
-
-
(Optional) Add an additional Network Interface Controller (NIC).
An additional NIC should be used only if you have multiple networks associated with the Filr installation; bonding or teaming NICs is not supported with Filr. For example, if your search index and database are on a separate network from the main Filr appliance, you can configure an additional NIC for the second network.
-
In the Virtual Machine Properties window, on the tab, click .
The Add Hardware dialog box is displayed.
-
Select , then click .
-
In the section, select the secondary network associated with the Filr installation.
-
Click > .
-
-
Increase the amount of memory that VMware allocates for the appliance.
The default is 4 GB. This default is appropriate for a system that has a few hundred to 1,000 users. You should increase this if your user count exceeds 1,000. Novell also recommends 2 CPUs.
Increasing the memory for the appliance does not automatically provide MySQL with more resources. In addition to increasing the memory in VMware, you also need to increase the memory within MySQL itself. For information about how to accomplish this, see the MySQL documentation.
-
In the Virtual Machine Properties window, select , then increase this setting to a suitable size for your environment.
-
Click to exit the Virtual Machine Properties window.
-
-
Power on the appliance (virtual machine).
IMPORTANT:Do not power on the appliance until you have created the hard disk, as described in Step 11.
-
Continue with Installing the MySQL Database Appliance.
Xen Configuration
-
Log in to the host server either locally or from a remote workstation.
You can use the following command to log in to the host server from a remote workstation on Linux:
ssh -X root@host_ip_address
You must use the -X in the command in order to display the GUI installation program. The steps in this section use the GUI installation program to configure the server.
-
Navigate to the /var/lib/xen/images directory on the host server.
-
Create a new directory inside the images directory where you can download the Filr software. The name of this directory must be the same as the name that you plan to use for your Filr virtual appliance. For example, if you plan to name the Filr appliance FilrDatabase1, the name of this new directory must also be FilrDatabase1.
-
Change to the directory that you just created. For example, /var/lib/xen/images/FilrDatabase1.
-
Download the Filr software (MySQL.x86_64-version.xen.tar.gz) to the following directory on the host server:
/var/lib/xen/images
You can access the software from the Novell Customer Center (NCC). Or, you can access an evaluation version of the software from this location on the Novell Downloads page.
-
Untar the MySQL.x86_64-version.xen.tar.gz file in the directory where you downloaded the file, as described in Step 5.
You can use the following command to untar the file:
tar -Sxvzf MySQL.x86_64-version.xen.tar.gz
A filr -version directory is created; it contains a .raw file that you will use to run the virtual image.
-
From the host server, run the following command to launch the GUI configuration menu:
vm-install
The Create a Virtual Machine wizard is displayed.
-
Click .
-
Select , then click .
-
Leave selected, then click .
-
Rename the virtual machine by clicking and specifying a new name in the field. Then click . For example, FilrDatabase1.
-
Configure the amount of memory that Xen allocates for the Filr appliance.
-
On the Summary page, click , then specify the following information:
Available Memory: Displays the amount of memory that is available on the host server.
Maximum Memory: 4 GB is the recommended minimum for a system that has a few hundred to 1,000 users. You should increase this if your user count exceeds 1,000.
Virtual Processors: Specify 2 CPUs. At least half of the memory should be dedicated to the Java heap.
-
Click .
-
-
Configure the bootable disk image:
-
On the Summary page, click s.
-
Click .
-
On the Virtual Disk page, specify the following information:
Source: Click , then browse to the .raw file that you untarred in Step 6.
Protocol: Select .
Size (GB): The default size is 20 GB. This cannot be changed.
Create Sparse Image File: This option is not available.
Read-Only Access: Do not select this option.
-
Click OK.
-
-
Create a separate Xen hard disk (Hard Disk 2) for the appliance. This hard disk is used to store configuration files that are used for appliance upgrades.
IMPORTANT:If you do not create a separate Xen hard disk as described here, you cannot upgrade to a new version of Filr.
-
On the Summary page, click .
-
Click .
-
On the Virtual Disk page, specify the following information:
Source: Click , then browse to the location of a datastore where you want Filr files to be stored.
Protocol: Select .
Size (GB): Specify the amount of hard disk space that you want to allocate. A minimum of 100 GB is recommended, but you might need more for your environment.
To see a formula to calculate the storage requirement for your environment, see MySQL Database Appliance Storage.
Create Sparse Image File: Select this option.
Read-Only Access: Do not select this option.
-
Click .
-
-
Create a separate Xen hard disk (Hard Disk 3) for the appliance. This hard disk is used to store the /var directory for the appliance. (The /var directory is where system events for the Novell appliances are logged.)
-
On the Disks page, click .
-
On the Virtual Disk page, specify the following information:
Source: This field should already contain the path to the .raw file that will be created when the virtual machine is created. If desired, you can rename the disk in the source field from disk0 to a name of your choosing.
Protocol: Select .
Size (GB): Specify the amount of hard disk space that you want to allocate. The recommended minimum is 25 GB.
For more detailed information about the type of information that is stored here, see Filr Appliance Storage.
Create Sparse Image File: Select this option.
Read-Only Access: Do not select this option.
-
-
Click .
-
(Optional) Add an additional Network Interface Controller (NIC).
An additional NIC should be used only if you have multiple networks associated with the Filr installation; bonding or teaming NICs is not supported with Filr. For example, if your search index and database are on a separate network from the main Filr appliance, you can configure an additional NIC for the second network.
-
On the Summary page, click .
-
Click New, then specify the desired settings for the new network adapter.
Select the secondary network associated with the Filr installation.
-
Click > .
-
-
Click to save your changes and to create the virtual machine.
-
Power on the appliance (virtual machine).
IMPORTANT:Do not power on the appliance until you have created a separate Xen hard disk for the appliance, as described in Step 14.
-
Continue with Installing the MySQL Database Appliance.
Hyper-V Configuration
-
Log in to the host server either locally or from a remote workstation.
You can use Windows Remote Desktop to log in to the host server from a remote workstation.
-
Create a new directory in the location where you want the virtual machine to reside (for example, C:\Users\Public\Documents\Hyper-V\Virtual Hard Disks). In a later step, you will download the Filr software to this directory.
As a best practice, give this directory the same name as the name that you plan to use for your Filr virtual appliance. For example, if you plan to name the Filr appliance FilrDatabase1, the name of this new directory should also be FilrDatabase1.
-
Download the Filr software (MySQL.x86_64-version.vhd.zip) to the directory on the host server that you created in Step 2.
You can access the software from the Novell Customer Center (NCC). Or, you can access an evaluation version of the software from this location on the Novell Downloads page.
-
Extract the MySQL.x86_64-version.vhd.zip file to the directory on the host server that you created in Step 2.
-
Open the Hyper-V Manager.
-
In Hyper-V Manager, right-click the disk name in the Action Pane where you want to create the new virtual machine, then click > .
The New Virtual Machine Wizard is displayed.
-
Review the Before You Begin page, then click .
-
In the field, specify a name for the new virtual machine. For example, FilrDatabase1.
-
Click .
-
In the field, specify the amount of memory (in MB) to allocate to the virtual machine. 4 GB is the recommended minimum for a system that has a few hundred to 1,000 users. You should increase this if your user count exceeds 1,000. Novell also recommends 2 CPUs.
-
Click .
-
On the Configure Networking page, select the networking card of your choice, then click .
-
Configure the bootable disk image:
-
On the Connect Virtual Hard Disk page, select , then browse to the .vhd file that was in the downloaded .zip file that you extracted in Step 4.
-
Click to select the file, then click .
-
-
Click .
-
Create a separate Hyper-V hard disk (Hard Disk 2) for the appliance. This hard disk is used to store configuration files that are used for appliance upgrades.
IMPORTANT:If you do not create a separate Hyper-V hard disk as described here, you cannot upgrade to a new version of Filr.
-
In Hyper-V Manager, right-click the disk that you just created, then click .
-
In the Hardware section, select , select , then click .
-
Select , then click .
-
Review the Before You Begin page, then click .
-
On the Choose Disk Format page, select , then click .
-
On the Choose Disk Type page, select , then click .
-
On the Specify Name and Location page, specify the following information, then click :
Name: Specify a name for the hard disk. For example, FilrDisk2.
Location: Specify the location where you want the hard drive to be located.
-
On the Configure Disk page, select , then specify a size for the hard disk. The recommended minimum is 100 GB. A minimum of 100 GB is recommended, but this might be more for your environment.
To see a formula to calculate the storage requirement for your environment, see MySQL Database Appliance Storage.
-
Click .
-
Review the summary information, then click .
-
-
Create a separate Hyper-V hard disk (Hard Disk 3) for the appliance. This hard disk is used to store the /var directory for the appliance. (The /var directory is where system events for the Novell appliances are logged.)
-
In Hyper-V Manager, right-click the virtual machine for which you want to create a new hard disk, then click .
-
In the Hardware section, select , select , then click .
-
Select , then click .
-
Review the Before You Begin page, then click .
-
On the Choose Disk Format page, select , then click .
-
On the Choose Disk Type page, select , then click .
-
On the Specify Name and Location page, specify the following information, then click :
Name: Specify a name for the hard disk. For example, FilrDisk3.
Location: Specify the location where you want the hard drive to be located.
-
On the Configure Disk page, select , then specify a size for the hard disk. The recommended minimum is 25 GB.
For more detailed information about the type of information that is stored here, see Filr Appliance Storage.
-
Click .
-
Review the summary information, then click > .
-
-
(Optional) Add an additional Network Interface Controller (NIC).
An additional NIC should be used only if you have multiple networks associated with the Filr installation; bonding or teaming NICs is not supported with Filr. For example, if your search index and database are on a separate network from the main Filr appliance, you can configure an additional NIC for the second network.
-
In Hyper-V Manager, right-click the virtual machine for which you want to create an additional NIC, then click .
-
In the Hardware section, select , select , then click .
-
Specify the desired settings for the new network adapter.
Select the secondary network associated with the Filr installation.
-
Click .
-
-
Right-click the virtual machine, then click .
IMPORTANT:Do not start the appliance until you have created a separate Hyper-V hard disk for the appliance, as described in Step 15.
-
Right-click the virtual machine, then click .
-
Continue with Installing the MySQL Database Appliance.
5.2.2 Installing the MySQL Database Appliance
-
After you have downloaded the MySQL database appliance, configured the virtual environment, and powered on the appliance, click the tab.
-
After the appliance starts, select your preferred keyboard layout in the drop-down, then accept the license agreement. (You can change the language that the license agreement is displayed in from the drop-down.)
-
On the configuration page, specify the following information:
Root password and confirmation: The root password for your database appliance. The root user name is case sensitive and should not be capitalized.
Vaadmin password and confirmation: The preferred user to use when logging in to the appliance. The user name is case sensitive and should not be capitalized.
NTP Server: The IP address or DNS name of the reliable external Network Time Protocol (NTP) server that your OES server uses. For example, time.example.com.
Region: Your local region.
Time Zone: Your local time zone.
After installation, if you are not able to access the appliance and you need to change any of these settings, you can use the VACONFIG utility from the Filr command prompt. For more information, see
Using VACONFIG to Modify Network Information
in the Novell Filr 1.1 Administration Guide. -
Click .
-
On the configuration page, specify the following network information:
Hostname: The fully qualified DNS host name associated with the appliance’s IP address. For example, myFilr.mynetwork.example.com.
IP Address: The static IP address for the appliance. For example, 172.17.2.3.
Network Mask: The network mask associated with the appliance’s IP address. For example, 255.255.255.0.
Gateway: The IP address of the gateway on the subnet where your database appliance is located. For example, 172.17.2.254.
DNS Servers: The IP address of a primary DNS server for your network. For example, 172.17.1.1.
Domain Search: The domain that is associated with the Filr host name.
-
Click .
-
(Conditional) If you configured multiple NICs (as described in Section 5.2.1, Downloading the MySQL Database Appliance and Configuring the Virtual Environment), select from the following options, then click :
-
Do Not Configure: Select this option to configure this network at a later time. If you do not currently know your network information, you can configure the network after installation, as described in
Changing Network Settings
in the Novell Filr 1.1 Administration Guide. -
DHCP Dynamic Address: Select this option to dynamically assign an IP address to this network.
-
Statically Assigned IP Address: Select this option to assign a static IP address to this network, then specify the IP address, network mask, and host name.
-
-
The secondary hard disk for /vastorage that you created for this appliance is automatically detected and is displayed as the hard drive. Accept the defaults for the other options on this page, then click .
This is the location (/vastorage) where information specific to the appliance is stored and is used when the appliance is upgraded. Each appliance has its own /vastorage location.
If you have not already assigned a second hard disk to the virtual machine (as described in Downloading the MySQL Database Appliance and Configuring the Virtual Environment), click , modify the virtual machine settings to add a hard disk, then power on the virtual machine.
For more information about the type of data that is stored here, see Data Storage for the Appliance.
-
The third hard disk for /var that you created for this appliance is automatically detected and is displayed as the hard drive. Accept the defaults for the other options on this page, then click .
This is the location where the /var directory for the appliance is stored. (The /var directory is where system events for the Novell appliances are logged.)
If you have not already assigned a third hard disk to the virtual machine (as described in Downloading the MySQL Database Appliance and Configuring the Virtual Environment), click , modify the virtual machine settings to add a hard disk, then power on the virtual machine.
For more information about the type of data that is stored here, see Data Storage for the Appliance.
The appliance might take a few minutes to install. When the installation is complete, you see a message telling you that the appliance is now ready to configure.
-
Configure the MySQL database appliance to change the database administrator password.
IMPORTANT:You must do this before you configure the Filr appliance for the first time.
-
Navigate to the following URL:
https://ip_address:9443
Replace with the IP address of your database appliance.
-
Sign in to the database appliance using the vaadmin user and the password that you set during installation.
The Novell MySQL Appliance landing page is displayed.
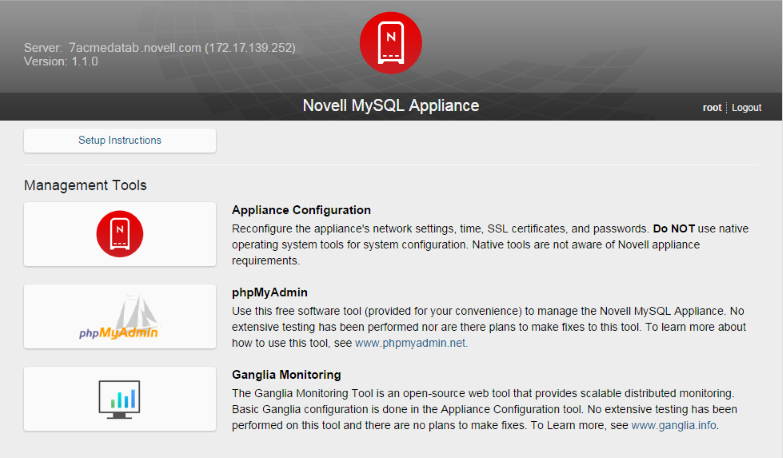
-
Click the icon, then click to log in to phpMyAdmin.

-
Log in to the phpMyAdmin tool as the root user. (The default password for the root user is root. You will be instructed to change the default password in a future step.)
-
Create a new Filr user to administer the MySQL database:
-
At the top of the page, click .
-
Click .
-
In the field, specify filr as the new user.
-
In the field, select in the drop-down list, then specify the IP address or host name of the Filr application server.
-
In the field, specify a new password for the user, then confirm it in the field.
-
In the section:
-
If you are installing the MySQL database for the first time: select .
-
If you are upgrading the MySQL database: select .
-
-
In the section, select , then deselect all privileges in the section.
-
Click . Note the user name and password of this user. This is the user you will use to access the MySQL database when you configure the Filr appliance.
You can now administer the Filr MySQL database by using this new user.
-
-
(Conditional) If you have a clustered Filr system with multiple Filr appliances, edit the privileges of the Filr user that you created in the previous step so that each of the Filr appliances is granted remote access to the database.
-
On the page, click next to the user that you created in Step 5.
-
Scroll to the section. In the field, specify the IP address or host name of the next Filr appliance in the cluster.
-
In the section, ensure that is selected, then click .
-
Repeat this process for each Filr appliance in the cluster.
-
-
(Recommended) Change your MySQL root password if you have not done so already:
-
At the top of the page, click .
-
In the Users Overview table, locate the root user with in the column, then click for that user in the column.
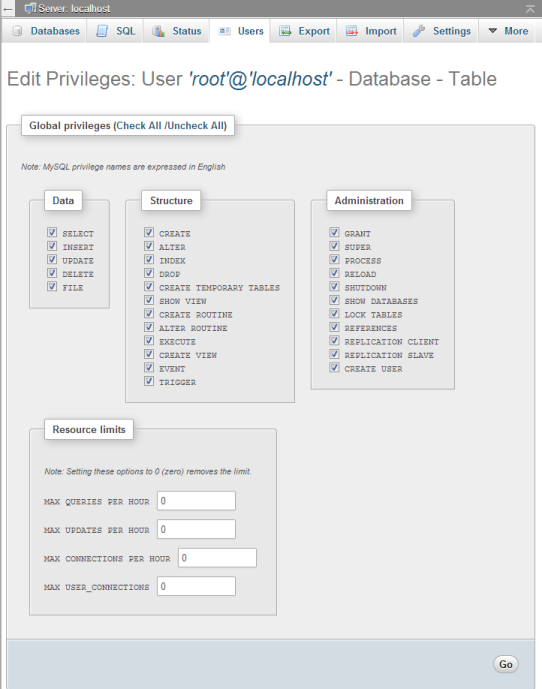
-
Scroll to the section. In the field, specify your password, then confirm it in the field.
-
Click .
-
-
Make any other configuration changes.
-
-
Continue with Section 5.4, Installing the Filr Appliance.