3.1 Installing the Filr Appliance

3.1.1 Downloading the Filr Appliance and Configuring the Virtual Environment

You need to download the Filr appliance and configure the virtual environment where you plan to run the appliance. This includes configuring system resources and so forth.

The process of downloading the Filr appliance and configuring the virtual environment differs, depending on which virtual environment you plan to use to run the Filr appliance.

VMware Configuration

  1. Download the Filr software (Filr.x86_64-version.ovf.zip) to your management workstation.

    You can access the software from the Novell Customer Center (NCC). Or, you can access an evaluation version of the software from this location on the Novell Downloads page.

  2. Extract the Filr.x86_64-version.ovf.zip file on your management workstation so that the Filr-version file folder appears.

  3. In the vSphere client, click File > Deploy OVF Template.

  4. Browse to and select the .ovf file in the Filr-version file folder.

  5. Click Next.

  6. Click Next again.

  7. In the Name field, rename the Filr appliance to a name of your choosing, then click Next.

  8. Select the datastore where you want to store the virtual machine files, then click Next.

  9. Click Next to accept the default for the disk format.

  10. Click Finish.

  11. Create a separate VMware hard disk (Hard Disk 2) for the appliance. This is the location where you will store your Filr files (files that are located in users’ My Files area).

    IMPORTANT:If you do not create a separate VMware hard disk as described here, you cannot upgrade to a new version of Filr.

    1. In the vSphere client, right-click the virtual machine that you just created, and for which you want to create secondary storage, then click Edit Settings.

      The Virtual Machine Properties page is displayed.

    2. On the Hardware tab, click Add.

      The Add Hardware dialog box is displayed.

    3. Select Hard Disk, then click Next.

    4. Leave Create a new virtual disk selected, then click Next.

    5. In the Disk Size field, specify the amount of hard disk space that you want to allocate. The recommended minimum is 25 GB.

      For more detailed information about the type of information that is stored here, see Filr Appliance Storage.

    6. In the Disk Provisioning section, select either Thick Provision Eager Zeroed or Support clustering features such as Fault Tolerance, depending on the VMware version that you are running.

    7. In the Location section, select Specify a datastore or datastore cluster, then click Browse.

    8. Select a datastore, then click OK.

    9. Click Next.

    10. In the Virtual Device Node section, select SCSI (1:0) from the drop-down list.

      IMPORTANT:Do not change the controller to VMware Paravirtual at this point of the installation process.

      If you want to change the SCSI controller to VMware Paravirtual:

      1. Finish the installation and power on the Filr system.

      2. Ensure that the Filr system is running. (Log in as the Filr administrator, create a user, and log in as that user.)

      3. Shut down each appliance in the Filr system. (For information about how to safely shut down an appliance, see Shutting Down and Restarting the Novell Appliance in the Filr 2.0: Administration Guide.)

      4. In VMware, change the controller to VMware Paravirtual.

      5. Power on each appliance in the Filr system.

    11. In the Mode section, select Independent, select Persistent, then click Next.

    12. Click Finish.

  12. Create a separate VMware hard disk (Hard Disk 3) for the appliance. This hard disk is used to store the /var directory for the appliance. (The /var directory is where system events for the Novell appliances are logged.)

    1. In the Virtual Machine Properties window, on the Hardware tab, click Add.

    2. Select Hard Disk, then click Next.

    3. Leave Create a new virtual disk selected, then click Next.

    4. In the Disk Size field, specify the amount of hard disk space that you want to allocate. The recommended minimum is 20 GB.

      For more detailed information about the type of information that is stored here, see Filr Appliance Storage.

    5. In the Disk Provisioning section, select either Thick Provision Eager Zeroed or Support clustering features such as Fault Tolerance, depending on the VMware version that you are running.

    6. In the Location section, select Specify a datastore or datastore cluster, then click Browse.

    7. Select a datastore, then click OK.

    8. Click Next.

    9. In the Virtual Device Node section, select SCSI (2:0) from the drop-down list.

      IMPORTANT:Do not change the controller to VMware Paravirtual at this point of the installation process.

      If you want to change the SCSI controller to VMware Paravirtual:

      1. Finish the installation and power on the Filr system.

      2. Ensure that the Filr system is running. (Log in as the Filr administrator, create a user, and log in as that user.)

      3. Shut down each appliance in the Filr system. (For information about how to safely shut down an appliance, see Shutting Down and Restarting the Novell Appliance in the Filr 2.0: Administration Guide.)

      4. In VMware, change the controller to VMware Paravirtual.

      5. Power on each appliance in the Filr system.

    10. Leave the Mode section blank, then click Next.

      You do not need to select anything in this section, because unlike Hard Disk 2, this hard disk does not need to be carried over on an upgrade.

    11. Click Finish.

  13. For a clustered Filr deployment, you must create a shared storage location (/vashare) for shared storage among all Filr appliances in the cluster.

    For a large Filr deployment with only one Filr appliance, it is still recommended that you create a shared storage location, because having a shared storage location allows you to easily scale your system in the future if the need arises by adding additional Filr appliances.

    For a small Filr deployment, you do not configure shared storage.

    You can configure Shared storage either on a remote Linux server via NFS or on a remote Windows server via CIFS.

    For information about how to set up remote NFS for the Filr shared storage location, see Section C.0, Setting Up Remote NFS or Remote CIFS for the Filr Shared Storage Location.

  14. (Optional) Add an additional Network Interface Controller (NIC).

    IMPORTANT:An additional NIC should be used only if you have multiple networks associated with the Filr site for one or more of the following purposes:

    • Appliance administration

    • An NFS mount or CIFS share for the /vashare mount point

    • Security of memcached in a Filr-clustered deployment

    Bonding or teaming NICs is not supported with Filr.

    1. In the Virtual Machine Properties window, on the Hardware tab, click Add.

      The Add Hardware dialog box is displayed.

    2. Select Ethernet Adapter, then click Next.

    3. In the Network Connection section, select the secondary network associated with the Filr installation.

    4. Click Next > Finish.

  15. Increase the amount of memory that VMware allocates for the Filr appliance.

    The default of 8 GB is the recommended minimum amount of memory for a large deployment. Novell also recommends 2 CPUs.

    For an all-in-one deployment, you should increase the default to at least 12 GB of memory and 4 CPUs.

    Small deployments require more CPUs and memory because in a small deployment, all components are running on a single virtual machine.

    IMPORTANT:When you increase or decrease server memory for the Filr appliance or the search index appliance, you should also modify the Java heap size, as described in Changing the JVM Configuration Settings in the Filr 2.0: Administration Guide.

    At least half of the memory should be dedicated to the Java heap. You cannot adjust the Java heap until after the appliance is installed.

    1. In the Virtual Machine Properties window, select Memory, then increase the setting to a suitable size for your environment.

    2. Click OK to exit the Virtual Machine Properties window.

  16. (Optional) Upgrade the virtual machine hardware version to the latest that your infrastructure can support. To do so, in the vSphere client, right-click the virtual machine that you just created, and for which you want to upgrade the hardware, then click Upgrade Virtual Hardware.

  17. Power on the appliance (virtual machine).

    IMPORTANT:Do not power on the appliance until you have created a separate VMware hard disk for the appliance, as described in Step 11.

  18. (Optional) Install VMware Tools on the host server.

  19. Continue with Section 3.1.2, Installing the Filr Appliance.

Hyper-V Configuration

  1. Log in to the host server either locally or from a remote workstation.

    You can use Windows Remote Desktop to log in to the host server from a remote workstation.

  2. Create a new directory in the location where you want each virtual machine to reside (for example, C:\Users\Public\Documents\Hyper-V\Virtual Hard Disks). In a later step, you will download the Filr software to this directory.

    As a best practice, give this directory the same name as the name that you plan to use for your Filr virtual appliance. For example, if you plan to name the Filr appliance Filr1, the name of this new directory should also be Filr1.

  3. Download the Filr software (Filr.x86_64-version.vhd.zip) to the directory on the host server that you created in Step 2.

    You can access the software from the Novell Customer Center (NCC). Or, you can access an evaluation version of the software from this location on the Novell Downloads page.

  4. Extract the Filr.x86_64-version.vhd.zip file to the directory on the host server that you created in Step 2.

  5. Open the Hyper-V Manager.

  6. In Hyper-V Manager, right-click the disk name in the Action Pane in the left column of the Hyper-V Manager window. This is the disk where you want to create the new virtual machine. Then click New > Virtual Machine.

    The New Virtual Machine Wizard is displayed.

  7. Review the Before You Begin page, then click Next.

  8. In the Name field, specify a name for the new virtual machine. For example, Filr1.

  9. Click Next.

  10. (Conditional) If your host server is Windows Server 2012 R2, the Specify Generation page is displayed. This page allows specify the generation of the virtual machine. You must select Generation 1, then click Next.

    IMPORTANT:If you do not select Generation 1 and you select Generation 2 instead, the Filr virtual machine cannot be deployed.

  11. In the Startup memory field, specify the amount of memory (in MB) to allocate to the virtual machine. 8 GB (8192 MB) is the recommended minimum for a large deployment of Filr. Novell also recommends 2 CPUs.

    For an all-in-one (small) deployment, you should increase the default to at least 12 GB (12288 MB) of memory and 4 CPUs.

    Small deployments require more CPUs and memory because in a small deployment, all components are running on a single virtual machine.

    IMPORTANT:When you increase or decrease server memory for the Filr appliance or the search index appliance, you should also modify the Java heap size, as described in Changing the JVM Configuration Settings in the Filr 2.0: Administration Guide.

    At least half of the memory should be dedicated to the Java heap. You cannot adjust the Java heap until after the appliance is installed.

  12. Click Next.

  13. On the Configure Networking page, select the networking card of your choice, then click Next.

  14. Configure the bootable disk image:

    1. On the Connect Virtual Hard Disk page, select Use an existing virtual hard disk, then browse to the .vhd file that was in the downloaded .zip file that you extracted in Step 4.

    2. Click Open to select the file, then click Next.

  15. Click Finish.

  16. Create a separate Hyper-V hard disk (Hard Disk 2) for the appliance. This is the location where you will store your Filr files (files that are located in users’ My Files area).

    IMPORTANT:If you do not create a separate Hyper-V hard disk as described here, you cannot upgrade to a new version of Filr.

    1. In Hyper-V Manager, right-click the virtual machine that you just created, then click Settings.

    2. In the Hardware section, select IDE Controller 1, select Hard Drive, then click Add.

    3. Select Virtual hard disk, then click New.

    4. Review the Before You Begin page, then click Next.

    5. On the Choose Disk Format page, select VHD, then click Next.

    6. On the Choose Disk Type page, select Fixed size, then click Next.

    7. On the Specify Name and Location page, specify the following information, then click Next:

      Name: Specify a name for the hard disk. For example, FilrDisk2.

      Location: Specify the location where you want the hard drive to be located.

    8. On the Configure Disk page, select Create a new blank virtual hard disk, then specify a size for the hard disk. The recommended minimum is 25 GB.

      For more detailed information about the type of information that is stored here, see Filr Appliance Storage.

    9. Click Next.

    10. Review the summary information, then click Finish > OK.

  17. Create a separate Hyper-V hard disk (Hard Disk 3) for the appliance. This hard disk is used to store the /var directory for the appliance. (The /var directory is where system events for the Novell appliances are logged.)

    1. In Hyper-V Manager, right-click the virtual machine for which you want to create a new hard disk, then click Settings.

    2. In the Hardware section, select IDE Controller 1, select Hard Drive, then click Add.

    3. Select Virtual hard disk, then click New.

    4. Review the Before You Begin page, then click Next.

    5. On the Choose Disk Format page, select VHD, then click Next.

    6. On the Choose Disk Type page, select Fixed size, then click Next.

    7. On the Specify Name and Location page, specify the following information, then click Next:

      Name: Specify a name for the hard disk. For example, FilrDisk3.

      Location: Specify the location where you want the hard drive to be located.

    8. On the Configure Disk page, select Create a new blank virtual hard disk, then specify a size for the hard disk. The recommended minimum is 25 GB.

      For more detailed information about the type of information that is stored here, see Filr Appliance Storage.

    9. Click Next.

    10. Review the summary information, then click Finish > OK.

  18. For a clustered Filr deployment, you must create a shared storage location (/vashare) for shared storage among all Filr appliances in the cluster.

    For a large Filr deployment with only one Filr appliance, it is still recommended that you create a shared storage location, because having a shared storage location allows you to easily scale your system in the future if the need arises by adding additional Filr appliances.

    For a small Filr deployment, you do not configure shared storage.

    You can configure Shared storage either on a remote Linux server via NFS or on a remote Windows server via CIFS.

    For information about how to set up remote NFS for the Filr shared storage location, see Section C.0, Setting Up Remote NFS or Remote CIFS for the Filr Shared Storage Location.

  19. (Optional) Add an additional Network Interface Controller (NIC).

    IMPORTANT:An additional NIC should be used only if you have multiple networks associated with the Filr site for one or more of the following purposes:

    • Appliance administration

    • An NFS mount or CIFS share for the /vashare mount point

    • Security of memcached in a Filr-clustered deployment

    Bonding or teaming NICs is not supported with Filr.

    1. In Hyper-V Manager, right-click the virtual machine for which you want to create an additional NIC, then click Settings.

    2. In the Hardware section, select Add Hardware, select Network Adapter, then click Add.

    3. Specify the desired settings for the new network adapter.

      Select the secondary network associated with the Filr installation.

    4. Click OK.

  20. Right-click the virtual machine, then click Start.

    IMPORTANT:Do not start the appliance until you have created a separate Hyper-V hard disk for the appliance, as described in Step 16.

  21. Right-click the virtual machine, then click Connect.

  22. Continue with Section 3.1.2, Installing the Filr Appliance.

Xen Configuration

  1. Log in to the host server either locally or from a remote workstation.

    You can use the following command to log in to the host server from a remote workstation on Linux:

    ssh -X root@host_ip_address

    You must use the -X in the command in order to display the GUI installation program. The steps in this section use the GUI installation program to configure the server.

  2. Navigate to the /var/lib/xen/images directory on the host server.

  3. Create a new directory inside the images directory where you can download the Filr software.

    The name of this directory must be the same as the name that you plan to use for your Filr virtual appliance. For example, if you plan to name the Filr appliance Filr1, the name of this new directory must also be Filr1.

  4. Change to the directory that you just created. For example, /var/lib/xen/images/Filr1.

  5. Download the Filr software (Filr.x86_64-version.xen.tar.gz) to the current directory on the host server. For example: /var/lib/xen/images/Filr1.

    You can access the software from the Novell Customer Center (NCC). Or, you can access an evaluation version of the software from this location on the Novell Downloads page.

  6. Untar the Filr.x86_64-version.xen.tar.gz file in the directory where you downloaded it.

    You can use the following command to untar the file:

    tar -Sxvzf Filr.x86_64-version.xen.tar.gz

    A filr-version directory is created; it contains a .raw file that you will use to run the virtual image. This process can take a few minutes.

  7. From the host server, run the following command to launch the GUI configuration menu:

    vm-install

    The Create a Virtual Machine wizard is displayed.

  8. Click Forward.

  9. Select I have a disk or disk image with an installed operating system, then click Forward.

  10. Leave SUSE Linux Enterprise Server 11 selected, then click Forward.

  11. Rename the virtual machine by clicking Name of Virtual Machine and specifying a new name in the Name field. Then click Apply. For example, Filr1.

  12. Configure the amount of memory and number of CPUs that Xen allocates for the Filr appliance.

    1. On the Summary page, click Hardware, then specify the following information:

      Available Memory: Displays the amount of memory that is available on the host server.

      Initial Memory: 8 GB is the recommended minimum amount of memory for a large deployment.

      For an all-in-one deployment, you should increase the default to at least 12 GB of memory.

      Small deployments require more memory because in a small deployment, all components are running on a single virtual machine.

      IMPORTANT:When you increase or decrease server memory for the Filr appliance or the search index appliance, you should also modify the Java heap size, as described in Changing the JVM Configuration Settings in the Filr 2.0: Administration Guide.

      At least half of the memory should be dedicated to the Java heap. You cannot adjust the Java heap until after the appliance is installed.

      Maximum Memory: Set this to the same value that you set for Initial Memory.

      Available Processors: Displays the number of available processors on the host server.

      Virtual Processors: Specify 2 CPUs for a large deployment and 4 CPUs for a small deployment. At least half of the memory should be dedicated to the Java heap. (Java heap is set in the Filr configuration.)

      Small deployments require more CPUs because in a small deployment, all components are running on a single virtual machine.

    2. Click Apply.

  13. Configure the bootable disk image:

    1. On the Summary page, click Disks.

    2. Click Harddisk.

    3. On the Virtual Disk page, specify the following information:

      Source: Click Browse, then browse to the .raw file that you untarred in Step 6.

      Protocol: Select file:.

      Size (GB): The default size is 20 GB. This cannot be changed.

      Create Sparse Image File: This option is not available.

      Read-Only Access: Do not select this option.

    4. Click OK.

  14. Create a separate Xen hard disk (Hard Disk 2) for the appliance. This is the location where you will store your Filr files (files that are located in users’ My Files area).

    IMPORTANT:If you do not create a separate Xen hard disk as described here, you cannot upgrade to a new version of Filr.

    1. On the Disks page, click Harddisk.

    2. On the Virtual Disk page, specify the following information:

      Source: This field should already contain the path to the .raw file that will be created when the virtual machine is created. If desired, you can rename the disk in the source field from disk0 to a name of your choosing.

      Protocol: Select file:.

      Size (GB): Specify the amount of hard disk space that you want to allocate. The recommended minimum is 25 GB.

      For more detailed information about the type of information that is stored here, see Filr Appliance Storage.

      Create Sparse Image File: Select this option.

      Read-Only Access: Do not select this option.

    3. Click OK.

  15. Create a separate Xen hard disk (Hard Disk 3) for the appliance. This hard disk is used to store the /var directory for the appliance. (The /var directory is where system events for the Novell appliances are logged.)

    1. On the Disks page, click Harddisk.

    2. On the Virtual Disk page, specify the following information:

      Source: This field should already contain the path to the .raw file that will be created when the virtual machine is created. If desired, you can rename the disk in the source field from disk0 to a name of your choosing.

      Protocol: Select file:.

      Size (GB): Specify the amount of hard disk space that you want to allocate. The recommended minimum is 25 GB.

      For more detailed information about the type of information that is stored here, see Filr Appliance Storage.

      Create Sparse Image File: Select this option.

      Read-Only Access: Do not select this option.

  16. Click OK > Apply.

  17. For a clustered Filr deployment, you must create a shared storage location (/vashare) for shared storage among all Filr appliances in the cluster.

    For a large Filr deployment with only one Filr appliance, it is still recommended that you create a shared storage location, because having a shared storage location allows you to easily scale your system in the future if the need arises by adding additional Filr appliances.

    For a small Filr deployment, you do not configure shared storage.

    You can configure Shared storage either on a remote Linux server via NFS or on a remote Windows server via CIFS.

    For information about how to set up remote NFS for the Filr shared storage location, see Section C.0, Setting Up Remote NFS or Remote CIFS for the Filr Shared Storage Location.

  18. (Optional) Add an additional Network Interface Controller (NIC).

    IMPORTANT:An additional NIC should be used only if you have multiple networks associated with the Filr site for one or more of the following purposes:

    • Appliance administration

    • An NFS mount or CIFS share for the /vashare mount point

    • Security of memcached in a Filr-clustered deployment

    Bonding or teaming NICs is not supported with Filr.

    1. On the Summary page, click Network Adapters.

    2. Click New, then specify the desired settings for the new network adapter.

      Select the secondary network associated with the Filr installation.

    3. Click Apply > Apply.

  19. Click OK to save your changes and to create and power on the virtual machine.

    IMPORTANT:Do not power on the appliance until you have created a separate Xen hard disk for the appliance, as described in Step 14.

  20. Continue with Section 3.1.2, Installing the Filr Appliance.

Citrix Xen Configuration

Do the following in order.

  1. Expand the .xva.tar.gz file.

  2. From the Citrix XenCenter, connect to a Citrix 6.5 or 6.5 SP1 XenServer.

  3. Import the .xva file.

  4. Assign two disks to the imported virtual appliance.

  5. Modify the CPU and memory settings as required for your environment.

  6. Start the VA.

  7. Install the xs-tools and optimize according to the needs of your environment.

  8. Continue with Section 3.1.2, Installing the Filr Appliance.

3.1.2 Installing the Filr Appliance

  1. After you have downloaded the Filr appliance, configured the virtual environment, and powered on the appliance, click the Console tab.

  2. After the appliance starts, select your preferred keyboard layout in the Keyboard Language drop-down, then accept the license agreement. (You can change the language that the license agreement is displayed in from the License Language drop-down.)

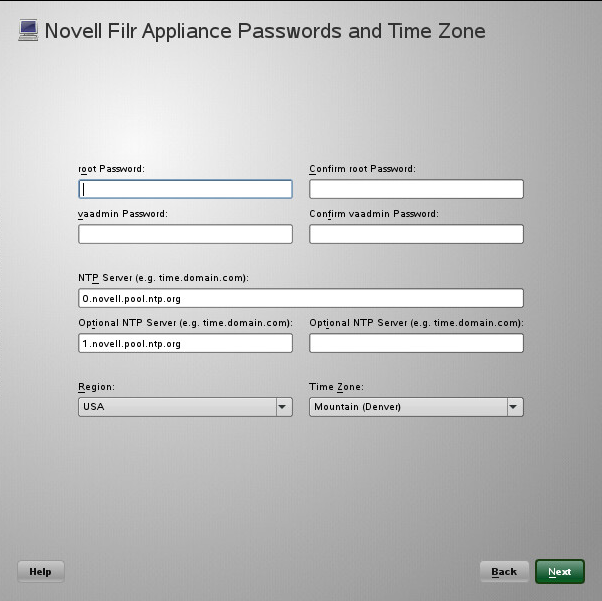
    The Appliance Passwords and Time Zone page appears.

  3. On the configuration page, specify the following information:

    Root password and confirmation: The root password for your Filr appliance. The root user name is case sensitive and should not be capitalized.

    Vaadmin password and confirmation: The preferred user to use when logging in to the appliance. The user name is case sensitive and should not be capitalized.

    When configuring passwords for the vaadmin user for multiple appliances in a large installation, consider using different passwords between appliances for enhanced security.

    NTP Server: The IP address or DNS name of the reliable external Network Time Protocol (NTP) server that your OES server uses. For example, time.example.com.

    For the best results, set up NTP in accordance with the VMware best practices guidelines.

    Region: Your local region.

    Time Zone: Your local time zone.

    The time zone of your Filr server should match the time zone of all file servers that Filr will point to via Net Folders.

    After installation, if you are not able to access the appliance and you need to change any of these settings, you can use the VACONFIG utility from the Filr command prompt. For more information, see Using VACONFIG to Modify Network Information in the Filr 2.0: Administration Guide.

  4. Click Next.

  5. On the Network Settings page, specify the following network information:

    Hostname: The fully qualified DNS host name associated with the appliance’s IP address. For example, myFilr.mynetwork.example.com.

    IP Address: The static IP address for the appliance. For example, 172.17.2.3.

    Network Mask: The network mask associated with the appliance’s IP address. For example, 255.255.255.0.

    Gateway: The IP address of the gateway on the subnet where your Filr virtual appliance is located. For example, 172.17.2.254.

    In a clustered environment, Filr appliances are not tolerant to latency, and should exist in the same subnet or near-subnet.

    DNS Servers: The IP address of a primary DNS server for your network. For example, 172.17.1.1.

    Domain Search: The domain that is associated with the Filr host name.

  6. Click Next.

  7. (Conditional) If you configured multiple NICs (as described in Section 3.1.1, Downloading the Filr Appliance and Configuring the Virtual Environment), select from the following options, then click Next:

    • Do Not Configure: Select this option to configure this network at a later time. If you do not currently know your network information, you can configure the network after installation, as described in Changing Network Settings in the Filr 2.0: Administration Guide.

    • DHCP Dynamic Address: Select this option to dynamically assign an IP address to this network.

    • Statically Assigned IP Address: Select this option to assign a static IP address to this network, then specify the IP address, network mask, and host name.

  8. The secondary hard disk for /vastorage that you created for this appliance is automatically detected and sdb is displayed as the hard drive. Accept the defaults for the other options on this page, then click Next.

    This is the location (/vastorage) where information specific to the appliance is stored and is used when the appliance is upgraded. Each appliance has its own /vastorage location.

    If you have not already assigned a second hard disk to the virtual machine (as described in Downloading the Filr Appliance and Configuring the Virtual Environment), power off the virtual machine, modify the virtual machine settings to add a hard disk, then power on the virtual machine.

    For more information about the type of data that is stored here, see Data Storage for the Appliance.

  9. The third hard disk for /var that you created for this appliance is automatically detected and sdc is displayed as the hard drive. Accept the defaults for the other options on this page, then click Next.

    This is the location where the /var directory for the appliance is stored. (The /var directory is where system events for the Novell appliances are logged.)

    If you have not already assigned a third hard disk to the virtual machine (as described in Downloading the Filr Appliance and Configuring the Virtual Environment), power off the virtual machine, modify the virtual machine settings to add a hard disk, then power on the virtual machine.

    For more information about the type of data that is stored here, see Data Storage for the Appliance.

  10. In a large or clustered deployment, select the shared storage location (remote NFS or remote CIFS). This storage (/vashare) is shared storage among all of the Filr appliances in the cluster. There is only one /vashare storage location that is used by all Filr appliances in the cluster.

    IMPORTANT:You must select a shared storage location in a clustered deployment (if your Filr system contains multiple Filr appliances).

    It is recommended that you select a shared storage location in a large deployment with only one Filr appliance. This ensures that you can scale your system in the future if the need arises by adding additional Filr appliances.

    In a small deployment, select Do Not Configure Shared Storage.

    • Remote NFS: Select this option for all large or clustered deployments for which you want to configure shared storage on remote NFS. You must export the remote directory before you choose this option. Also, set the rw and no_root_squash options on the remote directory.

      IMPORTANT:Before you choose this option, understand the following:

      • You must configure NFS on the remote linux server by setting the rw and no_root_squash options on the remote directory.

        For detailed information about how to configure NFS, see Section C.1, Setting Up Remote NFS for the Filr Shared Storage Location.

      • Filr does not support using an NSS volume as an exported NFS mount point.

      • Remote NFS is not supported when hosted on a Windows server.

    • Remote CIFS: Select this option for all large or clustered deployments for which you want to configure shared storage on a remote Windows share. If you select this option, skip to Step 12.

      For detailed information about how to configure CIFS, see Section C.2, Setting Up Remote CIFS for the Filr Shared Storage Location.

    • Do Not Configure Shared Storage: You must choose this option if you are creating a small deployment where all components are part of a single appliance, then skip to Step 13.

      Do not select this option with a clustered Filr deployment. This option is recommended only for a small deployment, but can be selected for a large (non-clustered) deployment if you do not plan to add Filr appliances in the future.

    For more information about possible configurations when running Filr in a clustered environment, see Section 2.1.2, Large Deployment.

  11. (Conditional) If you are configuring Filr for a clustered environment with remote NFS:

    1. Click Next.

    2. Specify the following options:

      NFS Server Hostname: Specify the host name of the NFS server. This is the remote Linux server or the MySQL appliance that you previously configured for NFS (as described in Section C.0, Setting Up Remote NFS or Remote CIFS for the Filr Shared Storage Location). Windows servers are not supported.

      Remote Directory: Specify the path to the remote directory.

      When using a remote Linux server for the NFS location (as described in Section C.0, Setting Up Remote NFS or Remote CIFS for the Filr Shared Storage Location), specify the path on the remote NFS server.

  12. (Conditional) If you are configuring Filr for a clustered environment with remote CIFS:

    1. Click Next.

    2. Specify the following options:

      CIFS Folder: Specify the path to the CIFS share.

      For example, \\server\share.

      CIFS User Name: Specify the user name for accessing the CIFS share.

      CIFS User Password: Specify the password for the user that is accessing the CIFS share.

  13. Click Configure.

    A message indicating that the installation was successful is displayed.

  14. (Conditional) If you are performing a large deployment with multiple Filr appliances, install another Filr appliance as described in this section, until you have installed your desired number of Filr appliances.

    You cannot install multiple Filr appliances in a small deployment.

  15. Continue with the first-time configuration, as described in the following section.