3.2 Installing and Setting Up Your Novell Messenger System
You should have already reviewed Section 3.1, Planning Your Novell Messenger System and filled out the worksheet. The following sections guide you through the installation process:
3.2.1 Installation Prerequisites
Before starting the Messenger Installation program, make sure that your system has been prepared for the Messenger system configuration for which you have planned:
-
Make sure that the container object exists where you want to create your Messenger system.
-
If you are planning to have the Messenger agents use LDAP access to eDirectory but you are not providing a root certificate, make sure that your LDAP server supports clear text passwords. In ConsoleOne, check the properties of the LDAP Group object that your LDAP server is a part of. Depending on your version of eDirectory, the option should be selected or the option should be deselected.
-
If you are planning to install the Windows Messenger agents as Windows services and you do not want them to run under the local system account, make sure that the account you want them to use has been created on the Windows server.
-
If you are running the Messenger Installation program at a Windows workstation or server, make sure that you are logged in as an Admin equivalent to the eDirectory tree where you are planning to create your Messenger system. If you are installing the Messaging agents on a Windows server, you should run the Installation program at that server.
Follow the setup instructions for the platform where you are creating your Messenger system:
3.2.2 Installing and Setting Up a Messenger System on NetWare or Windows
Starting the Messenger Installation Program
-
At a Windows workstation or server, download the Novell Messenger 2.2 image.
-
In the server directory, run the setup.exe file to start the installation program.
-
Select the language in which you want to run the Installation program, then click .
-
Click to accept the License Agreement.
-
Continue with Creating Your Messenger System.
Creating Your Messenger System
The Installation Options page lets you select what type of installation you want to perform.
Throughout the installation process, you can refer to the Installation Guide by clicking in the lower left corner of each Installation program page.
Figure 3-2 Installation Options Dialog Box
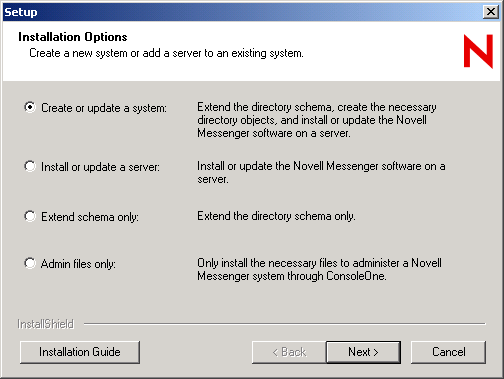
-
Select or , then click to display the Server Information page.

-
Select or .
-
If you selected , set the Windows server options as planned under item 2 of the worksheet.
-
Specify the directory path or browse to and select the directory where you want to install the Messenger agents as planned under item 3 of the worksheet, then click to display the System Configuration page.

-
Provide the Messenger system configuration information as planned under item 4 through item 6 of the worksheet, then click to display the Installation Components page.

-
Leave all the components selected for your initial Messenger installation, then click .
If you are installing the Windows Messenger agents and selected to install them as Windows services, the Windows Service Options page appears.

-
For the Windows Messenger agents, provide the Windows service information as planned under item 8 of the worksheet, then click to display the Directory Access page.

For NetWare installs, the field does not appear.
-
Provide the eDirectory access information as planned under item 9 of the worksheet, then click to display the Directory Authentication page.

-
Provide the eDirectory authentication information as planned under item 10 of the worksheet, then click to display the User Configuration page.
If you are installing Messenger 2.0.2 Hot Patch 1 or later, the screen text for the Directory Authentication page might be different.

The context of the eDirectory user is automatically added to the context list.
-
If necessary, click , then browse to and select another user context as planned under item 11 of the worksheet.
-
Select if User objects exist in nested container objects beneath the selected context.
IMPORTANT:If you do not select , User objects in containers beneath the selected context are not considered part of your Messenger system.
-
Click to add the context to the contact list.
-
Repeat Step 10 through Step 12 for each context where User objects reside, then click to display the Server Address page.

-
Verify the IP address or DNS host name of the server where the agents will run, and the port number that each agent will use as planned under item 12 of the worksheet.
If you are using IPV6 for the agents, you must us the DNS hostname instead of the IP address.
-
If the NetWare server you are installing to is already part of an existing cluster, select .
-
Click to display the Security Configuration page.

-
If planned under item 15 on the worksheet, select and specify the necessary information, then click to display the Admin Configuration page.

-
Verify the path to ConsoleOne.
-
Click .
-
If you are installing Messenger in a cluster, see the appropriate section of the GroupWise 8 Interoperability Guide for additional instructions.
-
Continue with Installing the Messenger Software.
Installing the Messenger Software
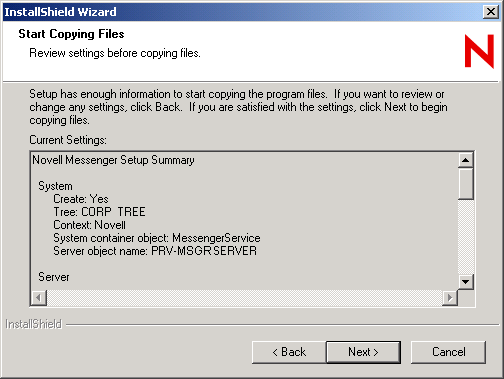
The installation summary lets you review the information you have provided before the installation actually begins.
Figure 3-3 Installation Summary Dialog Box
-
Review the summary of the selections you have made.
If necessary, click to change information as needed before proceeding with the installation.
-
Click to begin the installation.
When the installation is complete, you can choose to view the Readme, start the Messenger agents immediately, and, for the NetWare Messenger agents, update the autoexec.ncf file so that the Messenger agents start automatically whenever the server restarts.
-
Select the post-installation options you want, then click .
-
Continue with Section 3.4, What’s Next.
3.2.3 Installing and Setting Up a Messenger System on Linux
Starting the Messenger Installation Program on Linux
-
At the Linux server, become root by entering su and the root password.
-
Change to the /server directory on the downloaded Messenger 2.2 image.
-
Ensure that the install.sh file has execute permissions. If it does not, enter chmod +x install.sh.
-
Enter the following:
./install.sh
-
Press Enter to continue and display the license agreement.
-
Press Enter or the Spacebar to scroll through the license agreement. At the end of the license agreement, enter y to accept the agreement, or enter n to not accept the license agreement.
-
If you accept the license agreement, the necessary .rpm files are installed to the server. Enter y to continue with the installation.
-
Continue with Configuring Your Messenger System on Linux.
Configuring Your Messenger System on Linux
-
After the packages are installed, enter y to configure the Messenger system.
The following options are displayed:
-
Enter 1 to create a new system.
If you are installing from a support pack file:
Enter Y when asked . For additional clustering configuration steps, see the GroupWise 8 Interoperability Guide.
The following options are displayed:
-
Enter 1 or 2 (worksheet item 9).
If 32-bit eDirectory is not installed on the Linux server, only the option for using LDAP is displayed.
-
If you selected LDAP in Step 3, specify the following information:
-
The IP address of the LDAP server
-
y or n to select whether or not to use SSL
-
The port of the LDAP server (worksheet item 9)
-
If you select to use SSL, you next need to enter the path to the LDAP server’s root certificate (worksheet item 15). For more information, see Messenger System Security
or
If you selected direct access, specify the name of the eDirectory tree to extend and create objects in, and the replica address for that tree (IP address of the server running eDirectory) (worksheet item 9).
-
-
Specify the context to create the objects in, for example, ou=linuxsystem,o=novell (worksheet item 5).
-
Specify the Messenger system object name (worksheet item 6).
You can press Enter to accept the default name of MessengerService.
-
Specify the Messenger server object name (worksheet item 6).
You can press Enter to accept the default name, which is the Linux server name plus the word server.
-
Specify the full context of the directory user object that will be used to extend the schema and create the objects. For example, cn=admin,ou-linuxsystem,o=novell.
This user must have rights to extend the schema and create objects in eDirectory. This user is not saved to disk and is deleted from memory after the installation.
You see this step only if you are installing Messenger 2.0.2 Hot Patch 1 or later.
-
Specify the full context of the directory user object that will be used by the agents to access the directory, for example, cn=admin,ou=linuxsystem,o=novell (worksheet item 10).
For more information, see eDirectory Access and Authentication.
-
Enter the password for this user twice (worksheet item 10).
-
Specify the default contexts where Messenger will authenticate and search for users. For example, ou=linuxsystem,o=novell (worksheet item 11).
For more information, see Messenger User Locations.
-
Specify the IP address of the Linux server (worksheet item 12).
-
Specify y or n to select whether or not to use SSL.
If you select to use SSL, specify the path to the server’s root certificate and the path to the server’s root certificate key, then enter the password for the server’s root certificate.
-
Enter a non-root system user for the Messenger service to run as.
You can press Enter to accept the default name of nvlmsgr.
If you are installing to an NSS volume, select root as the default user. For additional information on configuring Novell Messenger for an NSS volume, see Section 3.2.5, Setting Up Non-root Access on an NSS Volume on Novell Open Enterprise Server Linux.
A summary of the information you supplied is displayed.
-
Enter y to continue with the installation.
-
After the installation and configuration are complete, enter n to not start the agents at this time.
-
Continue with Configuring the Linux Messenger Agents for SSL.
Configuring the Linux Messenger Agents for SSL
The Messenger Cross-Platform client requires an SSL connection with the Messenger agents. If you are not already familiar with SSL, or if SSL is not already set up on your system, you can add SSL security to your Messenger system, as described in Establishing Messaging Security with SSL Encryption
in Managing the Messaging Agent
in the Novell Messenger 2.2 Administration Guide.
NOTE:The Messenger Windows client does not require an SSL connection with the Messenger agents.
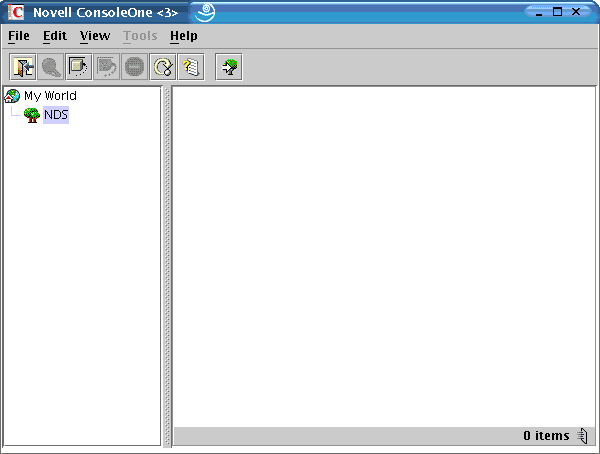
The required SSL connection is most easily configured in ConsoleOne. On Linux, ConsoleOne does not automatically authenticate to any eDirectory trees when it starts, so the NDS object is not immediately expandable.
Figure 3-4 ConsoleOne on Linux
-
In ConsoleOne, select , then click > .
-
Fill in the following fields:
Login Name: Provide a Novell eDirectory username that has rights to modify eDirectory objects.
Password: Provide the password for the username.
Tree: Type or select the eDirectory tree where you created your Messenger system.
If the eDirectory tree is located on a Windows server, you might need to specify the IP address of the server instead of the tree name.
Context: Provide the full context of the User object associated with the username you provided.
-
Click .
-
Under the NDS object, select the tree where you created your Messenger system.
-
Browse to and right-click the Server object in your Messenger system, then click .
-
Click > .

-
Fill in the fields (worksheet item 15).
-
Click to save the security settings.
-
Continue with Starting the Linux Messenger Agents.
Starting the Linux Messenger Agents
To start the agents manually, use the startup scripts provided in the /etc/init.d directory.
-
At the Linux server, become root by entering su and the root password.
-
Change to the /etc/init.d directory.
-
To start the Messaging Agent, enter the following command:
./novell-nmma start
-
To start the Archive Agent, enter the following command:
./novell-nmaa start
You can also use the stop, restart, and status options for these agents from the same directory.
Messenger agent log files are created in /var/opt/novell/log/messenger directory. The Messenger agents can be monitored by using the agent Web consoles from your Web browser, as described in
Using the Messaging Agent Web Console
inManaging the Messaging Agent
in the Novell Messenger 2.2 Administration Guide.For additional agent startup alternatives, see
Starting the Messaging Agent
andStarting the Archive Agent
in the Novell Messenger 2.2 Administration Guide. -
Skip to Section 3.4, What’s Next.
3.2.4 Setting Up the High Availability Service
-
Become root by entering su and the root password.
-
Copy the novell-groupwise-gwha RPM file to your local drive.
-
From the location that you copied the novell-groupwise-gwha rpm, enter the following command to install the gwha service.
rpm -Uvf novell-groupwise-gwha-7.0.xxxxxxxx.i386.rpm
-
Modify the GroupWise High Availability service file (gwha):
-
Change to the /etc/xinetd.d directory.
-
Edit the gwha file in a text editor.
-
In the port = field, specify a unique port number, for example 8303.
-
Save the file, then exit the text editor.
-
-
If you use SSL, you need to modify the High Availability service configuration file.
-
Change to the /etc/opt/novell/groupwise directory.
-
Edit the gwha.conf file in a text editor.
-
Under the [gwha] section, fill in the fields as follows:
[gwha] ssl = yes key = filename.key cert = filename.crt password = password
-
Save the file, then exit the text editor.
-
-
Enable the High Availability service:
-
In YaST, click > .
-
If necessary, select to activate the list of services.
-
Scroll down to the gwha line, select it, then click (On or Off) to change the status to On.
-
Click .
-
-
Start the agents as daemons.
-
Change to the /etc/init.d directory.
-
Enter the following commands to start the Messaging Agent and the Archiving Agent:
./novell-nmma start ./novell-nmaa start
-
If the agents started correctly, a message displays indicating “Done.”
-
-
Create a new user and associated password on your Linux server to represent the High Availability service.
You might name it gwha.
-
Test your configuration of the High Availability service.
NOTE:If you configured the High Availability service for SSL, you cannot use a telnet session to test it. The connection will be refused. You can try to test it by killing the PID for the Agents and watch for Monitor to restart the Agents.
-
Telnet into the High Availability server.
For example, on the Linux server where you have configured the High Availability service, you could use the following command:
telnet localhost port_number
Use the unique port number you specified in Step 4.c.
-
Specify the username and password you set up in Step 8.
If telnet returns 000 Ok, then the gwha service is configured correctly.
-
To exit the telnet session, press Ctrl+].
-
3.2.5 Setting Up Non-root Access on an NSS Volume on Novell Open Enterprise Server Linux
When the Novell Messenger agents are located on a Novell Open Enterprise Server (OES) Linux NSS volume, you must create an eDirectory user for the agents to run as, and you must LUM-enable that user. On OES Linux, you can use Novell iManager to accomplish these tasks.
After you have installed the agents on OES Linux, you need to configure the agents to switch users after startup and provide access to an NSS volume.
Creating an eDirectory User
You might want to create a new user specifically for the Novell Messenger service, perhaps named novellmsgr.
-
On the Open Enterprise Server Welcome page in your Web browser, expand Network Management, then click .
-
In the box, click .
-
To log in to iManager, specify a username, a password, and a tree.
-
In the left pane, expand , then click .
-
Provide the required information, then click .
The user does not need a password.
Enabling a LUM User
To LUM-enable the user you just created:
-
In the left pane, expand , then click .
-
Browse to and select the user you just created, then click .
-
Browse to and select a primary group for the LUM user.
-
Select as the desired shell (because the LUM user does not need a shell), then click .
Configuring Novell Messenger for the NSS Volume
After you have finished LUM-enabling the eDirectory user, you need to set the user as the default user for the Novell Messenger service. In addition, you need to change the store path, queue path, and log path to be on the NSS volume
Changing the Service User
-
In a terminal window, enter the following command:
cd /etc/opt/novell/messenger
-
Using a text editor, edit the uid.conf file, remove root as the user, and add the LUM-enabled user.
Changing the Store Path
-
In ConsoleOne, log in to the eDirectory tree containing your Novell Messenger service.
-
Browse to the File Module object, right-click it, then select .
The File Module object is located at > > > > .
-
Change the to the NSS volume, then click .
Changing the Messenger Agent Queue Path
-
In ConsoleOne, log in to the eDirectory tree containing your Novell Messenger service.
-
Browse to the Messenger Agent object, right-click it, then select .
-
Change the to the NSS volume, then click .
Changing the Archive Agent Queue Path
-
In ConsoleOne, log in to the eDirectory tree containing your Novell Messenger service.
-
Browse to the Archive Agent object, right-click it, then select .
-
Change the to the NSS volume, then click .
Changing the Messenger Agent Log Path
-
In ConsoleOne, log in to the eDirectory tree containing your Novell Messenger service.
-
Browse to the Messenger Agent object, right-click it, then select .
-
Change the to the NSS volume, then click .
Changing the Archive Agent Log Path
-
In ConsoleOne, log in to the eDirectory tree containing your Novell Messenger service.
-
Browse to the Archive Agent object, right-click it, then select .
-
Change the to the NSS volume, then click .
Granting Access to the LUM-Enabled User
The new LUM-enabled user must have rights to the store, queue, and log paths on the NSS volumes.
In a terminal window, use the following command to grant the user the required rights to the directories that the agents need to access on the local server:
rights -f /directory -r rwcemf trustee user.context.tree
When you have finished changing the rights to the directories, you must stop and then start the agents.