9.0 Protecting an Identity Server with an Access Gateway
For security reasons, you might want to set up your Access Manager configuration so that the Identity Server is a resource protected by an Access Gateway. This configuration reduces the number of ports you need to open between the outside world and your network. Figure 9-1 illustrates such a configuration.
Figure 9-1 Identity Servers behind an Access Gateway
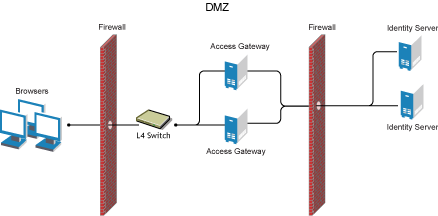
With this configuration, you do not need an L4 switch to add multiple Identity Servers to a cluster configuration. When the Identity Server is configured to be a protected resource of the Access Gateway, the Access Gateway uses its Web server communication channel. Each Identity Server in the cluster must be added to the Web server list, and the Access Gateway uses its Web server load balancing and failover policies for the clustered Identity Servers.
This configuration has been tested with the Access Gateways plugged directly into the L4 switch.
The following features are not supported in this configuration:
-
The Identity Server cannot respond to Identity Provider introductions.
-
Federation to an external service provider cannot be supported with this configuration.
-
The proxy service that is protecting the Identity Server cannot be configured to use mutual SSL. For example with this configuration, X.509 authentication cannot be used for any proxy service. To perform X.509 authentication (which is a form of mutual SSL), a user's browser must have direct access to the Identity Server.
To configure Access Manager in this manner, you must perform the following changes to the basic configuration.
-
Change the port of the Base URL of the Identity Server to 443. (This configuration has not been tested with port 80.) See Section 1.3, Creating a Basic Identity Server Configuration.
If you are using path-based multi-homing, the domain name of the Base URL must match the public DNS of the proxy service set up in the Access Gateway.
If you are using domain-based multi-homing, the domain name of the Base URL can be different than the Access Gateway, but your DNS server must resolve the name to the IP address of the Access Gateway.
-
(Conditional) If you are using domain-based multi-homing, create a wildcard certificate to be used by the Identity Server and the Access Gateway.
For example, *.novell.com, where the Identity Server DNS is idp.novell.com and the Access Gateway DNS is esp.novell.com.
If you are using path-based multi-homing, you can use the same certificate for the Identity Server and the Access Gateway.
-
Set up a proxy service on the Access Gateway for the Identity Server. See
Creating a Reverse Proxy and Proxy Service
in the Novell Access Manager 3.0 SP4 Administration Guide.-
When creating the proxy service, set the following fields to the specified values:
Published DNS Name: Specify the same name you have specified for the domain name of the Base URL of the Identity Server. Your DNS server must be set up to resolve this name to the Access Gateway.
Web Server IP Address: Specify the IP address of the Identity Server. If the cluster configuration for the Identity Server contains more than one Identity Server, provide the IP address of one of the servers here. This must be the actual IP address of the Identity Server and not the VIP address if the Identity Server is behind an L4 switch.
Host Header: Specify
Web Server Host Name: Specify the domain name of the Base URL of the Identity Server. This entry matches what you specify in the field.
If proxy service is not the first proxy service of the reverse proxy, you can use either domain-based or path-based multi-homing.
-
(Conditional) For a domain-based proxy service, set the field to .
-
(Conditional) For a path-based proxy service, set the field to and set the field to /nidp.
On the Path-Based Multi-Homing page, do not select the option. The Identity Server needs the /nidp path.
-
-
Configure a protected resource for the proxy service. See
Configuring Protected Resources
in the Novell Access Manager 3.0 SP4 Administration Guide.Set the field to . The Identity Server needs to be set up as a public resource.
Set the of the protected resource to /nidp/*.
-
Set up the Access Gateway to use SSL between the browsers and the Access Gateway. See
Configuring SSL Communication with the Browsers and the Identity Server
in the Novell Access Manager 3.0 SP4 Administration Guide. -
Set up SSL between the proxy service that is protecting the Identity Server and the Identity Server. See
Configuring SSL between the Proxy Service and the Web Servers
in the Novell Access Manager 3.0 SP4 Administration Guide. Use the following settings:-
Select the option
-
Configure a .
-
Do not configure an .
-
Set the to 8443.
-
-
(Conditional) If the cluster configuration for the Identity Server contains more than one Identity Server, configure the following options:
-
Click > > > > > .
-
Specify the IP addresses of the other Identity Servers in the .
If the Identity Servers are behind an L4 switch, you need to add the IP address of each Identity Server and not the VIP address.
-
Click , then configure the following options.
Policy for Multiple Destination IP Addresses: (Linux only) For the Identity Servers, select . This is the configured behavior for the NetWare Access Gateway.
Enable Persistent Connections: Make sure this option is selected. After the user has established an authenticated session with an Identity Server, you want that user to continue using the same Identity Server as long as that server is running.
-
-
Configure HTML rewriting.
-
Click > > > > >
-
Make sure the option is selected.
-
In the , click , then specify a name for the profile and select for the .
-
Specify the following URLs in the section. The following URLs use ag76.provo.novell.com/nidp as the DNS name of the reverse proxy for the Identity Server.
ag76.provo.novell.com/nidp/idff/soap
ag76.provo.novell.com/nidp/idff/soap/
ag76.provo.novell.com/nidp/idff/soap/*
ag76.provo.novell.com:443/nidp/idff/soap
ag76.provo.novell.com:443/nidp/idff/soap/
ag76.provo.novell.com:443/nidp/idff/soap/*
-
Click .
-
Use the up-arrow icon to move your profile to the top of the list.
-
-
Configure the Pin List so that the Identity Server pages are not cached. Click > > . In the list, create a of /nidp/* and set the to . See
Configuring a Pin List
in the Novell Access Manager 3.0 SP4 Administration Guide.