3.3 Assigning Certificates to Access Manager Devices
After you assign certificates to devices, the certificates are placed in keystores. Ensure that you update the device so that the certificates are pushed into active use.
This section discusses how you update, renew, and assign certificates to Access Manager devices.
-
Section 3.3.1, Importing a Trusted Root to the LDAP User Store
-
Section 3.3.5, Configuring SSL for Authentication between the Identity Server and Access Gateway
-
Section 3.3.6, Changing a Non-Secure (HTTP) Environment to a Secure (HTTPS) Environment
-
Section 3.3.8, Reviewing the Command Status for Certificates
3.3.1 Importing a Trusted Root to the LDAP User Store
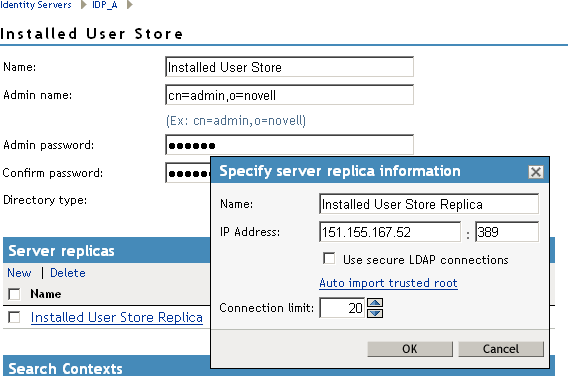
When you specify the settings of a user store for an Identity Server configuration, or add a user store, you can import the trusted root certificate to the LDAP user store device.
-
In the Administration Console, click > > > > .
-
Under , click the name of the server replica.
-
Enable the option.
This option allows SSL communication to occur between the Identity Server and the user store.
-
Click .
-
Click to confirm the import.
Ensure that you have pop-ups enabled, or the browser cannot display the Confirm dialog box.
-
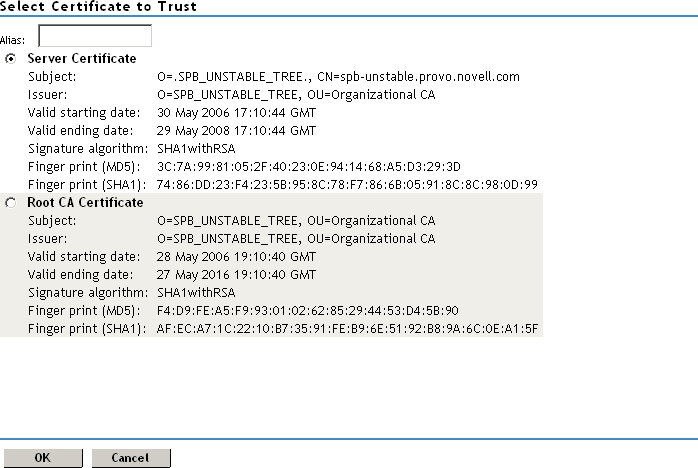
Select one of the certificates in the list.
You are prompted to choose either a server certificate or a root CA certificate. To trust one certificate, choose . Choose to trust any certificate signed by that certificate authority.
-
Specify an alias, then click .
You use the alias to identify the certificate in Access Manager.
-
On the User Store page, click .
-
Restart the Identity Server.
3.3.2 Replacing Identity Server SSL Certificates
This procedure allows you to replace a trusted root certificate that is stored in the trust store assigned to the Identity Server. You must create an SSL certificate for the Identity Server and then replace the predefined test-connector certificate that comes with Access Manager. You can also replace the test-provider and test-consumer certificates in the and keystores. The steps for replacing the signing, encryption, provider, and consumer certificates are similar.
You can also add the trusted roots to the trust stores used by the Identity Server, or auto-import them from a server. The NIDP trust store is the certificate container for CA certificates associated with the Identity Server.
You can also access the OCSP trust store to add OCSP server certificates. Online Certificate Status Protocol is a method used for checking the revocation status of a certificate. For this feature, you must set up an OCSP server. The Identity Server sends an OCSP request to the OCSP server to determine if a certain certificate has been revoked. The OCSP server replies with the revocation status. If this revocation checking protocol is used, the Identity Server does not cache or store the information in the reply, but sends a request every time it needs to check the revocation status of a certificate. The OCSP reply is signed by the OCSP server. To verify that it was signed by the correct OCSP server, the OCSP server certificate needs to be added to this trust store. The OCSP server certificate itself is added to the trust store, not the CA certificate
-
In the Administration Console, click > > > .
-
Click the certificate link that you want to replace:
Encryption: Displays the encryption certificate keystore. The encryption certificate is used to encrypt specific fields or data in the assertions.
Signing: Displays the signing certificate keystore. Click this option to access the keystore and replace the signing certificate as necessary. The signing certificate is used to sign the assertion or specific parts of the assertion.
SSL: Displays the SSL connector keystore. Click this option to access the keystore and replace the SSL certificate as necessary. This certificate is used for SSL connections.
Provider: Displays the identity provider keystore. Click this option to access the keystore and replace the identity provider certificate.
Consumer: Displays the identity consumer keystore. Click this option to access the keystore and replace the identity consumer certificate as necessary.
-
Click .
A keystore stores only one certificate at a time. When you replace a certificate, you overwrite the existing one.
-
In the Replace dialog box, click the icon and browse to select the certificate you created in Section 3.2.1, Creating Certificates.
-
Click .
-
Click in the Replace dialog box.
-
Restart Tomcat, as prompted by the system.
The system restarts Tomcat for you if you click at the prompt. If you want to restart at your convenience, select and then manually restart Tomcat.
Linux: Enter the following command:
/etc/init.d/novell-tomcat5 restart
Windows: Enter the following commands:
net stop Tomcat5
net start Tomcat5
-
Update the Identity Server configuration on the Servers page, as prompted.
3.3.3 Assigning Certificates to an Access Gateway
The Access Gateway can be configured to use certificates for SSL communication with three types of entities:
-
Identity Server: The Access Gateway uses the Embedded Service Provider to communicate with the Identity Server. The Access Manager CA automatically generates the required certificates for secure communication when you set up a trusted relationship with the Identity Server. To manage these certificates in the Administration Console, click > > . For more information, see
Managing Embedded Service Provider Certificates
in the Novell Access Manager 3.1 SP1 Access Gateway Guide. -
Client browsers: You can enable SSL communication between the client browsers and the Access Gateway. When setting up this feature, you can either have the Access Manager CA automatically generate a certificate key or you can select a certificate key you have already imported (or created) for the reverse proxy. To manage this certificate in the administration console, click > > . For more information, see
Creating a Reverse Proxy and Proxy Service
in the Novell Access Manager 3.1 SP1 Access Gateway Guide. -
Protected Web servers: You can enable SSL communication between the Access Gateway and the Web servers it is protecting. This option is only available if you have enabled SSL communication between the browsers and the Access Gateway. You can enable SSL or mutual SSL. To manage these certificates in the Administration Console, click > > > > . For more information, see
Configuring the Web Servers of a Proxy Service
in the Novell Access Manager 3.1 SP1 Access Gateway Guide.
3.3.4 Assigning Certificates to J2EE Agents
To enable the J2EE agent for SSL, you must set up the following trust relationships:
-
The J2EE server with the Identity Server
-
The J2EE agent with the Identity Server
For instructions on setting up these certificates, see Configuring SSL Certificate Trust
in the Novell Access Manager 3.1 SP1 Agent Guide.
3.3.5 Configuring SSL for Authentication between the Identity Server and Access Gateway
By default, all Access Manager components (Identity Server, Access Gateway, SSL VPN, and J2EE agents) trust the certificates signed by the local CA. However, if the Identity Server is configured to use an SSL certificate signed externally, the trusted store of the service provider for each component must be configured to trust this new CA. Import the public certificate of the CA into the following trust stores:
-
For an Access Gateway, click > > > > .
-
For a J2EE agent, click > > > .
-
For an SSL VPN server, click > > > > .
If an Access Gateway, a J2EE agent, or an SSL VPN server is configured to use an SSL certificate signed externally, the trusted store of the Identity Server must be configured to trust this new CA. Import the public certificate of the CA into the Identity Server configuration that the component is using for authentication.
In the Administration Console, click > > > > and add the certificate to the Trusted Roots list.
NOTE:Whenever you replace certificates on a device, you must update the Identity Server configuration (by clicking on the Servers page), or restart the Access Gateway ESP application.
3.3.6 Changing a Non-Secure (HTTP) Environment to a Secure (HTTPS) Environment
If you are running in a non-secure staging environment, and you’re ready to move to production, you must perform the following steps to enable security.
-
Change the Identity Server configuration protocol to HTTPS. (See
Configuring Secure Communication on the Identity Server
in the Novell Access Manager 3.1 SP1 Setup Guide) -
Replace the test certificates with your own. (See
Using Access Manager Certificates
orUsing Externally Signed Certificates
in the Novell Access Manager 3.1 SP1 Setup Guide.) -
Update all devices that are trusting this Identity Server configuration.
This causes the Embedded Service Provider to reimport the metadata of the Identity Server.
-
(Conditional) If you have set up federation, reimport metadata for trusted service and identity providers. (See
Managing Metadata
in the Novell Access Manager 3.1 SP1 Identity Server Guide.) -
Change the Access Gateway configuration to HTTPS. (See
Configuring the Access Gateway for SSL
in the Novell Access Manager 3.1 SP1 Setup Guide.)
3.3.7 Creating Keystores and Trust Stores
A keystore is storage file containing keys, certificates, and trusted roots. Access Manager agents can access them to retrieve certificates, keys, and trusted roots as needed. A trust store is a keystore containing only trusted roots. Intermediate CAs and end entity public certificates can be part of a trust store.
Access Manager comes with predefined stores for certificate management. However, in certain situations you might need to create a keystore or trust store. For example, if you are using JBoss keystore certificates that you need to import into Access Manager, you must create a keystore and assign it to the JBoss agent. It is probable that the keystore already exists on the JBoss file system, as created and configured by JBoss. Creating it again through Access Manager does not delete the existing keystore. This does allow Access Manager to recognize the existing keystore and add or remove the certificates. Access Manager cannot manage certificates that were created before the keystore is created in Access Manager.
The easiest way to create a keystore is to do so when you are adding the certificate to the keystore. If you want to create a trust store, the steps are identical, except you select trusted roots from the Trusted Roots page, rather than the certificates from the Certificates page.
A keystore stores only one certificate at a time. When you replace a certificate, you overwrite the existing one.
-
In the Administration Console, click > .
-
Import the certificate, if you have not done so already. See Importing a Private/Public Key Pair.
-
Click the certificate name.
-
In the Certificate Details page, click
-
On the Add Certificate to Keystores dialog box, click the button to browse for key stores.
-
On the Keystore page, click .

-
Fill in the following fields:
Keystore name: Specifies the name of the keystore. This maps to a name that the server communication recognizes to identify the keystore on the device.
Keystore type: Specifies whether to use Java, PEM, or PKCS12.
Keystore password: Specifies the password to revise the keystore settings.
Device: Specifies the device (by IP) to which you assign the keystore. The device can be an Identity Server or SSL VPN. You cannot assign one keystore to multiple devices.
Directory: Specifies the directory where PKCS12 or PEM files are stored.
For example, /var/opt/novell/keystores/.
File: Specifies the path and filename of the Java keystore (JKS).
For example, /var/opt/novell/keystores/myKeystore.keystore.
Description: Describes the keystore.
-
Click .
This creates the keystore.
-
(Optional) On the Keystore page, assign a certificate to the new keystore by selecting the store’s check box.
-
Click in the dialog box.
3.3.8 Reviewing the Command Status for Certificates
You can view the status of the commands that have been sent to the certificate server for execution.
-
In the Administration Console, click > , then click .
-
Use the following options to review or change a server’s certificate command status:
-
Delete: To delete a command, select the check box for the command, then click . The selected command is cleared.
-
Refresh: Click to update the current cache of recently executed commands.
-
Name: Click this box to select all the commands in the list, then click or .
The following table describes the features on this page:
-
-
To review command information, click the link under a .
This page displays status information about the command and allows you to perform the following tasks:
Refresh: Select this option to update the current cache of recently executed commands.
Delete: Select this option to clear the current cache of recently executed commands.
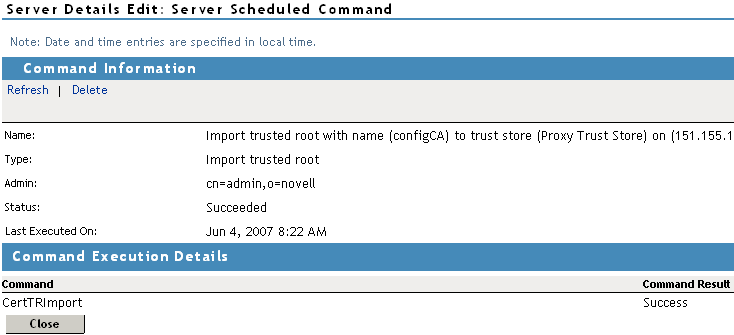
The following command information is listed:
Name: Specifies the display name that has been given to the command.
Type: Specifies the type of command.
Admin: Specifies whether the system or a user issued the command. If a user issued the command, the field contains the DN of the user.
Status: Specifies the status of the command, and includes such states as , , , and .
Last Executed On: Specifies when the command was issued. The date and time are displayed in local time. If the command failed, additional information is available.
For a command that the Administration Console can successfully process, the page displays a section with the name of the command and the command results.
-
Click .