2.3 Restoring Data Using SBCON
-
Know the session description that you want to restore. You can get this information from your session log and error files. (See Section 1.7, Session Files.)
-
For an Advanced Options restore session, ensure that you know the file system structure of the data you are restoring. You will be prompted for specific paths and filenames while setting the restore options.
If you restore the server-specific information from the file system backup of the failed server to a functioning server or location, you can use the vol$info.txt file as a reference for this information.
-
If you want to restore data to a new location (different from where the original data was located), you must specify the full path to both the original data and the new location. If the new location does not exist, SBCON will create a new file system structure.
You can get the original path from your backup logbook or from the session log files if you noted the path at the time the backup was performed.
-
Replace faulty hardware or correct the problems that caused data loss (if applicable).
-
Ensure that media is inserted in your storage device.
-
Load the drivers for your specific device and controller board.
See Before Running the Backup Software in the OES 2: Storage Management Services Administration Guide.
-
Load the appropriate Target Service Agents.
See Loading the Target Service Agents in the OES 2: Storage Management Services Administration Guide.
-
Load SBCON.
See Loading SBCON.
-
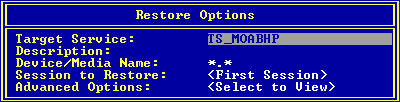
Select Main Menu > Job Administration > Restore.
The Restore Options screen appears.
-
Select Target Service, then the NetWare or SLES server running your backup and restore Target Service Agent.
This is the name of the server on which you want to restore your data. Before selecting it, you must load the correct TSA. See Loading the Target Service Agents in the OES 2: Storage Management Services Administration Guide.
If you do not see the target you want on the list, check for these possible causes:
-
The proper TSA is not loaded on the target.
-
Network traffic is heavy. In these circumstances, it might take SBCON a few moments to detect all the targets. Press Esc to return to the Main Menu, and then press Enter again. Your target should now be listed. From the Target Services list, select a target.
If the target you select has more than one TSA loaded, SBCON shows you a list of their full names in the Backup/Restore Target Services on This Server.
NOTE:When you are trying to connect to a different server, SBCON uses the same username and password you gave the first time. It prompts only if it fails.
-
-
When prompted for the target username, enter your username (and context if required) as the network administrator for the target.
If SBCON rejects the username you entered, you probably need to include the context of where the user object is located. For example, instead of entering ADMIN as the username, enter a complete name such as .CN=ADMIN.O=COMPANY_NAME or .ADMIN.COMPANY_NAME.
You must include the context in the username at this point if the username exists in an eDirectory container that is different from the context set on the server running SBCON.
-
If a password is requested, enter the password for the target.
SBCON will take a few moments to attach to the target. Wait for the confirmation box, and then press any key to continue.
-
Enter a descriptive name for the restore session in the Description field.
The descriptive name of the job will help you identify the session.
-
Select the device and media for restore by pressing Enter at the Device/Media Name field, then decide where you want to restore from.
A list of available objects is displayed in the Select a Device screen.
If you enter *.* (DEVICE NAME.MEDIA NAME), the engine selects the device and media that it encounters first.
If your device has more than one storage device attached, select an available device from the list. If the device contains multiple media, select the media for the backup.
If the storage media does not have a label, SBCON displays a message indicating that the media cannot be identified. You should set the label before selecting it for a backup job.
-
On the Select a Session screen, select the Session to Restore.
WARNING:TSAFS backs up files in compressed or uncompressed format as specified by the user. However, if you try to restore a compressed file to a volume without compression, the file is corrupted and no error message is displayed.
-
Specify the path to the session log file of the session you want to restore.
Use one or more of the following methods:
Press Insert any time during this process to choose parts of the existing path from a list.
NOTE:At the present, it takes the default. The parts of the existing path can be chosen in the future release.
-
When a list of sessions is displayed, select the session you want to restore.
If the media on which the data resides is not loaded on the device you choose, you will be prompted to insert the correct media.
-
Select Advanced Options to make the selective restore.
The Advanced Restore Options screen appears. See Customizing Restore. You can perform the advanced restore, specify the execution time, reschedule the job, etc., using this form.
-
Complete the Advanced Restore Options form.
-
Press Esc and answer the prompt at the Submit Job screen to begin the restore session.
-
Press Alt+Esc to view the activity log screen.
If the job execution starts and is not successfully completed, the error messages appear on this screen. The activity log file, activity.log, is located at the server’s sys:\system\tsa\log directory.
-
To view the Run Time Status of a job, select Job Administration > Current Job List > job name.
-
When the restore session finishes, your screen display reads the following:
The restore process was completed normally.
-
To return to the Main Menu, press Esc as required.
The Esc key allows you to exit SBCON one screen at a time until you reach the Main Menu. If you want to exit SBCON, answer the confirmation prompt.
NOTE:To unload SBCON and applicable Target Service Agents, see Section 3.9, Unloading SBCON.
2.3.1 Customizing Restore
Using the Advanced Restore Options form at the server, you can perform a custom restore of the database you need.
-
Select Main Menu > Job Administration > Restore.
The Restore Options screen appears.
-
Select Advanced Options.
-
Select Rename Data Sets to restore data to a location different from the backup location.
-
At the Restore Datasets to a Different Location screen, do the following:
-
Press Insert to select the namespace type.
-
Enter the source path (where the data originally was backed up from).
-
Enter the destination path you want the data restored to, in the entry box.
If the source or the destination target is a NetWare server, then the paths must include the volume names for network server.
IMPORTANT:When you specify a particular portion of the file structure as the source location, it does not necessarily mean that this will be the only data restored. What is restored can be influenced by the include and exclude settings on the Subsets of What You Want to Restore form. If you do not want to overwrite any subdirectories that might exist in the area you have included, you must specifically exclude them by their full path.
-
-
Select Subsets of What to Restore.
Use this screen to specify which parts of the file structure you want to restore. Various data sets to be included or excluded are listed in this form. You can include or exclude any or all items listed. For more information about including and excluding items, see Choosing Subsets of Data to Back Up.
The screen lists major and minor resources. Default indicates that none of that type of subset has been specified.
-
To specify a subset:
-
Select any item on the screen.
-
Edit the Include or Exclude screens using Insert and Enter.
-
Press Esc to save changes.
-
To view a list of values associated with major TSA resources (for example, server or volumes) select either the include or exclude line.
The Selection List Options form appears. Any value you previously selected is shown on the form. If you did not select a value, the form is blank.
-
To select a value for this major resource, press Insert and select the value from the list that appears by pressing Enter.
-
-
Select Open Mode Options and select parts of the backed up data structure to be restored.
The backed-up data set contains various types of data that are listed on the screen. By default, all the types of data are included in the restore.
-
To exclude a particular type of data from the restore, select that line and type Y.
-
When all the data items are selected correctly, press Esc.
-
-
Specify whether to overwrite the existing parent by typing Y (Yes) or N (No).
For more information, see Overwriting a Parent or Child.
-
Specify whether to overwrite the existing child by typing Y (Yes) or N (No).
-
Specify the execution time.
-
Select Scheduling to reschedule the job.
-
Press Esc as required and then select Yes to confirm the Submit Job? prompt.
The job is submitted and is listed in the Current Job List menu.
2.3.2 Restoring eDirectory
The procedures in the following sections are performed at the beginning of the restore process.
Restoring a Volume Other Than Sys:
WARNING:Do not delete the Volume object for the failed volume from the eDirectory tree structure. The Volume object preserves any references that other objects (such as Directory Map and Queue objects) might have to that volume. If the Volume object is deleted and you have objects that depend on this volume, you must re-establish the relationships through a selective eDirectory restore. See Custom eDirectory Restore.
-
Bring down the server.
-
Correct the problem.
-
Bring the server back up and re-create the volume.
-
Perform an advanced file system restore.
See Customizing Restore for the procedure.
Restoring Volume Sys: in a Single-Server Network
Because there are no replicas in a single-server network, you cannot recover any eDirectory information from a replica. After repairing or replacing the failed hardware, you must restore the entire NetWare environment, including eDirectory, from an SMS backup.
To restore a single sys: volume:
-
Correct the problem that caused volume sys: to fail.
-
Reinstall NetWare and eDirectory.
When NWCONFIG asks for the names for Organization objects immediately under the [Root] object, use the same names that previously existed in the eDirectory tree. Otherwise you will end up with new, empty containers in the restored eDirectory tree structure.
Make sure disk partitions are at least as large as they were before, and that the volumes are defined as before.
-
Restore eDirectory using Customizing Restore.
Restoring Volume Sys: in a Multiple-Server Network
To restore sys: volumes on several servers:
-
Restore the server-specific eDirectory information file (servdata.nds) to another server on the network following the custom (advanced) file system restore (see Customizing Restore).
By default, the file is placed into the sys:\system\server_name directory on the server you have selected.
-
Use the dsmisc.log file (part of the information restored with the server specific information) to see if the failed server had a master replica of any partition.
-
If the failed server had a master replica of any partition, select the server you want to hold the master replica and load DSREPAIR on that machine.
-
Select Available Options > Advanced Options Menu.
-
Select Replica and Partition Operations.
NOTE:Use the NDS Manager utility to perform regular partition operations.
-
Select the partition you want to edit.
-
To see the list of servers that have replicas of that partition, select View Replica Ring.
-
Press Esc.
-
Select Designate This Server as the New Master Replica.
-
Repeat Steps 3a through 3f for each master replica that the failed server contained.
-
-
(Conditional) If the failed server contained any replicas, remove them.
-
Select Available Options > Advanced Options > Replica and Partition Operations.
-
Select the partition the server held replicas of.
-
Select View Replica Ring.
-
Select the name of the failed server.
-
Select Remove This Server from the Replica Ring.
-
Enter the supervisor name and password.
-
Select Yes to continue.
-
-
Exit DSREPAIR.
-
Reinstall NetWare.
-
Begin the installation.
-
When prompted for DS install, select Create a New DS Tree and complete the installation.
-
Load NWConfig and remove DS.
-
Install DS when prompted for DS install and select Install into an Existing Tree.
-
When prompted to choose a eDirectory tree structure, press F5.
This allows you to choose to restore the servdata.nds file to the failed server.
-
To specify the path where the servdata.nds file exists, press F3 and enter the path.
HINT:If the information fits on a diskette, you can save the information on a diskette instead of another server on the network.
-
Press Enter to accept the path.
-
Log in to the server that contains the servdata.nds file.
-
Log in to the eDirectory database.
-
If the start.ncf file of the failed server is different from the default, you can edit the default file.
-
You now can choose from the following:
-
To continue the install use the backup tapes instead of the files from the install, to finish restoring the information, press Enter.
-
To go back to the previous screen, press Esc.
-
To copy the files from the install and then restore the files from tape, press F3.
-
-
-
Restore the file system following the instructions in How SMS Restores Data in the OES 2: Storage Management Services Administration Guide.
Restoring the Entire eDirectory Tree Structure
To restore an entire network from a full backup in a multiple-server environment:
-
Reinstall NetWare on the first server.
By default, this server will hold the master replica of the [Root] partition.
When NWCONFIG asks for the names of Organization objects immediately under the [Root] object, use the same names that previously existed in the eDirectory tree.
In NWCONFIG, select Directory Options > Directory Backup and Restore Options to obtain the information.
If you do not use the same names, you will end up with new empty containers in the restored eDirectory tree.
When this installation is complete, you will have a working eDirectory tree containing one NetWare server with a master [Root] partition.
-
Add name spaces as required.
-
Install the remaining servers to complete a skeleton of your network.
Before restoring a full eDirectory session, you should create a skeleton of your network.
-
All servers and volumes should be up and running.
-
The eDirectory objects should exist in the eDirectory tree in the same context as before. (NWCONFIG prompts you for the container in which you want each server to be placed.)
-
Make sure all servers are communicating with one another.
-
Make sure time synchronization is working properly.
NOTE:If you can get some but not all of the servers backed up, you can still proceed with the restoration. However, you might see errors and experience problems because of eDirectory objects having dependencies that cannot be resolved.
The User object (Admin or equivalent) used to create the backup session must exist in the same container with the same password and eDirectory rights as when the backup was performed.
After this step is completed, you still have just one partition: [Root]. Because of the NWCONFIG program defaults, you now have two replicas of that partition. These are stored on the second and third servers you installed.
-
-
Restore eDirectory on one server using the information in the Section A.2, Backup Types.
eDirectory Restore Session Types
You can choose to restore eDirectory in one of the following ways:
Single Server or Entire Tree Restore
Custom eDirectory Restore
To perform a custom eDirectory restore:
-
Enter SBCON at the server console prompt.
-
Select Job Administration.
-
Select Restore Options > Advanced Restore Options > Subsets of What to Restore.
-
To specify a subset:
-
Select any item on the screen.
-
Edit the Include or Exclude screen using Insert and Enter.
-
Press Esc to save your changes.
-
-
Specify whether or not to overwrite the existing parent or child.
A parent is a container. A child is an object, which is the lowest level of the eDirectory tree.
If you want to overwrite the parent or child that exists on the hard disk, regardless of whether the existing version or the backed-up version has the latest date, accept YES for parent, child, or both.
If you do not want to overwrite the parent or child that exists on the hard disk, regardless of whether the existing version or the backed-up version has the latest date, select the option (parent or child or both), and enter N.
Custom File System Restore
To perform a custom file system restore:
-
Enter SBCON at the server console prompt.
-
Select Job Administration > Restore Options > Advanced Restore Options > Subsets of What to Restore.
The screen lists major and minor resources. The word DEFAULT indicates that none of that type of subset has been specified.
-
To specify a subset:
-
Select any item on the screen.
-
Edit the Include or Exclude screen using Insert and Enter.
-
Press Esc to save your changes.
-
-
(Conditional) If you want to exclude certain types of data from the restore session, select Job Administration > Restore Options > Advanced Restore Options > Open Mode Options, and then edit the form.
The backed-up data set contains the various types of data items listed on the screen. By default, all types of data items are included in the restore.
If you want to exclude any item, select it and enter Y. Press Esc when you are finished editing the form.
-
(Optional) Restore data to a different location on a different NetWare server.
-
Back up the data from the server where it resides.
-
Exit to the Main Menu.
-
Select Change Target to Back Up From or Restore To from the Main Menu.
-
-
(Optional) Restore data to a different location within the backed-up server’s file system structure.
Follow these important rules about restoring to a new location:
-
When you specify a particular portion of the file system structure as the source location, it does not necessarily mean that this will be the only data restored. You can influence what is restored by using the Include and Exclude options on the Choose Subsets Of What You’re Restoring screen (Job Administration > Restore Options > Advanced Restore Options > Subsets of What to Restore).
-
You can restore only to a new location in the name space that is supported by the drive you are restoring to.
-
If you do not want to overwrite any subdirectories that might exist in the area you have included, you must specifically exclude them by their full path.
-
Go to Subsets of what you want to restore, press Enter, press Insert, select the name space you want, then enter the name you used for your backup at the Enter the Data Set Name field.
-
Enter the full directory path of the source including the volume name.
-
Enter the full directory path to the new destination.
-
Press Esc to save your changes.
NOTE:The eDirectory Target Service Agent (TSANDS) does not support restoration of data to a different location.
-
-
Specify whether to overwrite the existing parent or child.
A parent might be a server, a volume, or a directory. A child is a file, which is the lowest level of the file system structure.
If you want to overwrite the parent or child that exists on the hard disk, regardless of whether the existing version or the backed-up version has the latest date, accept YES for parent or child or both.
If you don’t want to overwrite the parent or child that exists on the hard disk, regardless of whether the existing version or the backed-up version has the latest date, select the option (parent or child or both), enter N.
If you want to overwrite the child that exists on the hard disk only if the date of the backed-up copy on the media is later than the date of the copy on the hard disk, select Overwrite Existing Child and select the option you want.
Server-Specific Information Restore
To view and restore server information:
-
Select Main Menu > Job Administration > Restore Options > Advanced Options > Subsets of What to Restore > Include Major TSA Resources.
The Selection List Options screen appears and is empty.
-
Press Enter to see the Selection List Options. Press Insert to see the server-specific information.
-
Select the Server-Specific Info and press Enter.
Esc returns you to the Selection List Options.
This will return you to the Choose Subset of the Session to be Restored screen.
-
Complete the form and press Esc.
This will return you to the Restore Options screen.
-
Complete the Restore Options form and press Esc.
The server-specific information will be restored to the sys:\system\failed_server_name directory of the server on which you are running SBCON.
Single File or Directory Restore
-
Select Main Menu > Job Administration > Restore Options > Advanced Options > Subsets of What to Restore.
-
Enter the full path and name of the file or directory, including full directory and volume names.
The following options appear:
Include/Exclude Directories (full path)
Include/Exclude Files
Include/Exclude Path/Files
-
Press Insert and enter the name space for the name space format you used when entering the file or directory name.
The name space allows SBCON to correctly interpret the path information entered earlier in this menu in either the directory field or the location field.
IMPORTANT:If files are restored to a new location, the name spaces must be the same or an error message will occur.
You can restore to a new location only in the name space that is supported by the drive to which you are restoring.
The supported name spaces are DOS, Macintosh, NFS, and Long.
SBCON provides a list of the name spaces currently loaded on the target to which you are restoring.
For example, if you are restoring to a new Macintosh location, enter a path, (such as sys::test:monday) and then enter Macintosh as your name space.
-
(Optional) Restore to a new location (located in Rename Data Sets).
-
Enter the source path, including the volume name, to the target directory (a location different from where the data was backed up). Enter volume:/directory/directory
-
If the new location you are restoring to is a different NetWare server, do the following:
1. Back up the data from the server where it resides.
2. Exit to the Main Menu.
3. Change your target to the server you want to restore the data to. See Section 3.2, Changing Your Target.
-
Completing the eDirectory Restore
If you restored the eDirectory database to volume sys:, you should complete the restoration for the following to make sure the eDirectory database is working properly:
Volume Other than Sys:
To finish restoring eDirectory on a volume other than sys:
-
Bring the server up.
-
(Optional) Verify proper restoration of the data, trustee assignments, file ownership, and other related information by spot-checking some of the restored directories and files.
Single-Server Network
To finish restoring eDirectory on a server:
-
Restore the full file system following the information in Section 2.3, Restoring Data Using SBCON.
-
(Optional) Verify proper restoration of the data, trustee assignments, file ownership, and other related information by spot-checking some of the restored directories and files.
Multiple-Server Network
To finish restoring eDirectory on multiple servers:
-
Restore replicas to the server.
The dsmisc.log file, which is created when the servdata.nds is restored, contains the partition and replica information that resided on the failed server at the time of the backup. This will show you what replicas were on the server when it failed.
-
(Optional) Verify proper restoration of the data, trustee assignments, file ownership, and other related information by spot-checking some of the restored directories and files.
Commands that might be helpful include rights/t /s (displays users, groups and other objects that have explicit trustee assignments in a directory and its subdirectories) and ndir (displays owners and other NetWare file information).
Entire Tree
To finish restoring eDirectory on the tree:
-
Restore the file system following the instructions in How SMS Restores Data in the OES 2: Storage Management Services Administration Guide.
-
Re-create partitions and replicas.
-
(Optional) Verify proper restoration of the data, trustee assignments, file ownership, and other related information by spot-checking some of the restored directories and files.
Commands that might be helpful include rights/t /s (displays users, groups and other objects that have explicit trustee assignments in a directory and its subdirectories) and ndir (displays owners and other NetWare file information).
Partial eDirectory Restores
Certain conditions might arise in special cases involving the backup and restoration of eDirectory information.
The SMS TSA software allows you to do selective restores from the backup media. However, partial restoration of eDirectory from a backup can have many subtle consequences, particularly when only a single object or a selected group of objects is restored.
For partial eDirectory restores, keep these two main issues in mind:
-
Object ID numbers: If you restore objects that no longer exist in the eDirectory tree, those objects receive new ID numbers when restored. New object IDs affect file system trustees, print queue directories, user mail directories, etc.
If you restore objects on top of objects that exist in the eDirectory tree, the objects do not receive new ID numbers. These objects’ current attribute and property information is overwritten with previous information from the SMS backup.
-
Objects that depend on other objects: In the eDirectory schema, objects are defined to have certain attributes. Some of these attributes are mandatory (meaning they must contain a value); others are optional.
For some eDirectory objects, the value for a particular attribute is a reference to another object upon which the object depends. For example, Queue object has a Queue Directory attribute that contains the file system path to the queue directory. It also has a Host Server attribute that identifies the file server on which the queue directory resides. This information is used to determine the physical location of the resource.
The specifics of restoring objects vary depending on what type of object is involved and whether the object’s dependencies are physical entities (servers and volumes) or logical entities.
In some cases, you can simply restore an object and everything will work fine. In other cases, an object might be restored but not be functional unless you first restore its dependent objects.
2.3.3 Restoring Cluster-Enabled Resources
Restore of cluster-enabled resources is similar to a normal restore session.
See How SMS Restores Data in the OES 2: Storage Management Services Administration Guide.
NOTE:Auto recovery of the restore session on failover or failback is currently not supported.