3.4 Setting Up, Enabling, and Managing PCI Hot Plug
PCI Hot Plug technology allows industry-standard PCI network boards to be added or removed without disrupting the operation of the NetWare server. This reduces unplanned down time for maintaining or adding disk or LAN network boards. To use hot plug technology, your server hardware must be hot-plug capable.
Features of industry-standard, PCI Hot Plug technology include the following:
-
Uninterrupted service: You can add or replace network or other I/O controller boards while a system is operating through hot insertion or hot removal.
Hot insertion: The process of physically plugging a network board into a PCI slot without stopping power to the server.
Hot removal: The process of physically pulling a network board from a PCI slot without stopping power to the server.
-
Compatibility: Multiple system providers, operating system suppliers, and network board vendors can implement Hot Plug, which is compatible with existing PCI standards.
-
Backward compatibility: You can use a mix of Hot Plug and non-Hot-Plug components in the same system. This allows for some slots to be Hot Plug capable while others might not be capable of Hot Plug.
For a general description of Hot Plug architecture and components, see PCI Hot Plug Architecture.
To learn how to enable PCI Hot Plug, see Enabling PCI Hot Plug.
To learn how to use the Novell Configuration Manager to manage Hot Plug devices, see Managing Hot Plug.
3.4.1 PCI Hot Plug Architecture
The PCI Hot Plug architecture is modular, which minimizes the changes required of third-party network board software. The system relies on a central component, the Novell Event Bus (NEB), which facilitates communication among different software modules.
The NEB is an integral part of the PCI Hot Plug architecture. NEB facilitates communication between the PCI Hot Plug software modules, management agents, and device drivers.
The following figure provides a graphical representation of the Novell NetWare Hot Plug Architecture.
Figure 3-1 Novell NetWare Hot Plug Architecture
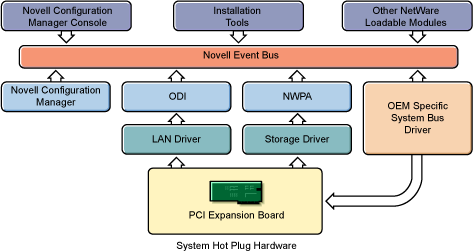
Novell Configuration Manager (ncm.nlm)
For PCI Hot Plug servers, the Novell Configuration Manager manages the Hot Plug system and ensures proper system behavior.
The primary function of the Configuration Manager is to sequence Hot Plug operations by shutting down the network board’s device driver before turning off power to the slot. This ensures the stability of the system.
The Configuration Manager also maps hardware resources to device driver software.
System Bus Driver
The system bus driver provides access to the hardware platform-specific implementation of PCI Hot Plug. This driver controls the system hardware necessary to perform Hot Plug functions and is responsible for the following:
-
Enabling or removing power from a Hot Plug slot upon request.
-
Configuring PCI network boards in Hot Plug slots by assigning such things as memory, IO space, and interrupts.
NetWare allows multiple system bus driver modules to exist simultaneously. The controller manufacturer provides the system bus driver specific to the PCI Hot Plug hardware. Some system bus drivers are included with NetWare.
Novell Configuration Manager Console (ncmcon.nlm)
The Novell Configuration Manager console provides the interface for controlling all PCI Hot Plug operations. In addition, it displays slot configuration details, including network board driver information and status.
The Configuration Manager console consists of three screens: the Main Menu, Slot Options, and Slot Detailed Information.
The Novell Configuration Manager Console is described in detail in Novell Configuration Manager Console.
3.4.2 Enabling PCI Hot Plug
The following Hot Plug PCI modules are installed when you install NetWare on Hot Plug-capable hardware:
-
Ncm.nlm—The Novell Configuration Manager, which manages the Hot Plug system.
-
Ncmcon.nlm—The Hot Plug user interface, called the Novell Configuration Manager Console.
-
Odineb.nlm—A module combining the Open Data-Link Interface and the Novell Event Bus (NEB) that enables the NEB to control device drivers.
-
Specific System bus drivers—The cpqsbd.nlm for Compaq, ibmsbd.nlm for IBM platforms, and phpsbd.nlm for Intel platforms are included. To support other hardware platforms, you need to provide a different driver.
If the NetWare installation process determines that your server supports Hot Plug and has the appropriate driver, the installation process adds the following two load commands to the autoexec.ncf file:
-
load driver_name (for example, cpqsbd.nlm)
This command loads the system bus driver. After this command is executed, NetWare autoloads ncm.nlm.
-
;load sys:\system\ncmcon.nlm
This command loads the Novell Configuration Manager Console, which, in turn, loads the odineb.nlm.
This command is commented out. If you want NetWare to load the Novell Configuration Manager Console every time the autoexec.ncf file is executed, remove the semicolon (;) from the command.
To enable PCI Hot Plug technology, execute the autoexec.ncf file by restarting the server. You can also execute the load commands for the driver and enter ncmcon at the System Console prompt.
3.4.3 Managing Hot Plug
After you have enabled PCI Hot Plug Technology on your server, you can use NCMCON (the Novell Configuration Manager console) to manage your hardware.
For a general introduction to the Novell Configuration Manager console, see Novell Configuration Manager Console.
For general information about how to use the NCMCON interface, see Navigating NCMCON Menus.
For step-by-step instructions for managing your hardware network boards, see Adding a Network Board and Removing a Network Board.
Novell Configuration Manager Console
The Novell Configuration Manager console (ncmcon.nlm) lets you view status information on PCI slots and to remove and add PCI Hot Plug network boards.
The NCMCON interface constantly monitors and displays the status of all slots. If there are any errors, the appropriate error message is displayed.
In the NCMCON interface, the following three screens are used:
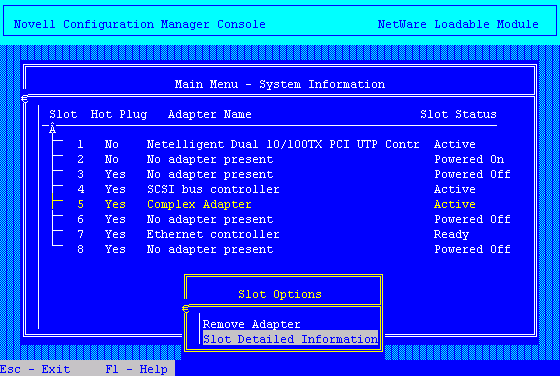
Main Menu
The Main Menu displays a list of all PCI slots in the system.
Figure 3-2 Novell Configuration Management Console, Main Menu System Information Screen
For each slot, the Main Menu displays the following information:
-
The system board slot number
-
Whether or not the slot is hot-pluggable
-
A network board description field or name
-
The status of the slot/network board, which might include the following:
-
Powered Off: Power to the slot is turned off.
-
Powered On: The lever has been closed, power to the slot is turned on, and the slot is empty (this is different from Ready because there is no card in the slot).
-
Ready: A network board is in the slot and ready to be used but there is currently no driver loaded for it.
-
Active: A loaded driver is using this network board and the board is believed to be working.
-
Failed: The driver for the network board or Hot Plug driver indicated some type of device failure. The network board can be removed and a new one added at this time.
-
Degraded: A device on the multi-device network board has failed, but other devices on the network board continue to function.
-
Processing: An action is being performed on a slot/network board.
-
Pressing Enter on a selected slot of the Main Menu displays either the Slot Options or the Slot Detailed Information screen. Online, context-sensitive help is available to guide you through PCI Hot Plug actions.
Slot Options Menu
The Slot Options menu lists the options available for the highlighted Hot Plug slot (selection of a non-Hot Plug slot automatically displays the Slot Detailed Information screen).
Figure 3-3 Slot Options Menu
Depending on the driver, the state of the slot or network board, and the capabilities of the system, different options appear on the menu.
The interlock mechanism is one feature that can influence what appears on the Slot Options menu. The interlock is a safety mechanism that shuts off power to a slot if the slot is opened while the power is still on. Not all hardware manufacturers provide an interlock mechanism, and not all interlock mechanisms work the same way. For more information, refer to your hardware documentation.
The following table describes the options on the Slot Options menu and the conditions under which they appear.
Table 3-2 Slot Menu Options
Slot Detailed Information Screen
The Slot Detailed Information screen displays information about a specific slot and the network board in that slot.
Figure 3-4 Slot Detailed Information Screen
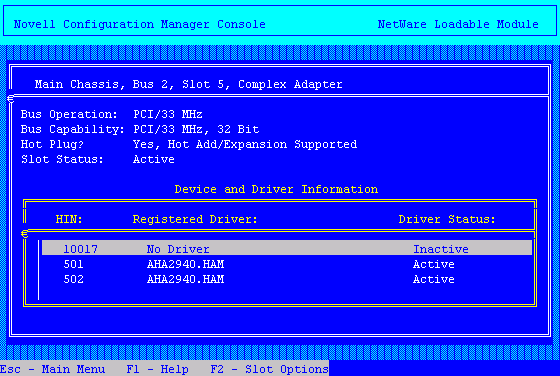
Items on the screen include the following:
-
Slot number
-
Description of network board in slot
-
The bus type (PCI, EISA, or EMBEDDED)
-
The bus number of the slot
-
The operating speed of the bus and its capabilities
-
Whether or not the network board is hot-pluggable
-
The status of the slot/network board
-
The NetWare Hardware Instance Number (HIN) of each device
-
Device driver name and status for each HIN
Status possibilities include the following:
-
Active: Driver is loaded for the device.
-
Inactive: No driver is loaded for the device.
-
Failed: The device has failed.
-
Suspended: The driver is loaded but activity is suspended while the network board is being added.
-
Pressing F2 activates the Slot Options menu, which allows you to take actions such as removing the card from a particular slot.
Navigating NCMCON Menus
To navigate NCMCON menus, follow these guidelines:
-
In the Main menu, use the arrow keys to move up and down the list of slots.
If you select a hot-plug-capable slot, the Slot Options menu is displayed.
If you select a non-hot-plug-capable slot, the Slot Detailed Information screen is displayed.
-
From the Slot Options menu, select the desired option.
-
At the Slot Detailed Information screen, select a slot and press F2 to open the Slot Options menu.
-
To return to the Main menu, press Esc.
-
For online help, press F1.
Removing a Network Board
-
From the NCMCON menu, select the slot with the network board you want to remove.
The menu is displayed.
-
Select .
NCMCON processes the remove request.
-
After the slot has a status of Powered Off and the slot’s green LED is no longer lit, open the lever and take the network board out of the slot.
NCMCON then updates the status of the slot on the screen.
Adding a Network Board
-
If the slot already contains a network board, remove the board from the slot.
-
Insert the new network board in the slot and close the lever.
The new network board is detected automatically and you are prompted to apply power to the slot.
-
Respond to the prompt to apply power.
If you respond Yes: The slot’s green LED is illuminated and you are reminded to attach cables. The system then attempts to autodetect and load drivers for the network board. Follow any prompts that appear on the screen.
If you respond No: The console status does not change. Go to Step 4 when you are ready to apply power to the slot.
-
When you are ready to apply power to the slot, select the slot and network board from the Main menu.
-
From the menu, select or (whichever is displayed).
The Novell Configuration Manager attempts to autodetect and load drivers for the network board. Follow any prompts that appear on the screen.