4.4 Tuning Server Memory
NetWare is a self-tuning operating system; however, there are some things you can do to adjust the server’s memory subsystem (as well as other aspects of server operation) to fine tune its performance.
Before attempting to tune a new server’s memory, let the server operate at full capacity for a week or two to allow NetWare to self-tune. After the server settles into a predictable pattern of daily use, you can begin to fine-tune the server’s memory as described in the following sections.
If you are using both Novell Storage Services™ (NSS) and the Traditional file system, you should tune both the file and directory caches.
4.4.1 Tuning File Cache
File caching speeds access to file data. If you want to tune your NetWare server in general, tune the file cache.
Novell Storage Services File System
In NetWare 6.5, NSS is always loaded on the server in order to run, and cache memory is always allocated. NSS uses memory differently than the Traditional file system does, and you must use specific parameters for tuning your server when using NSS.
In cases where you have upgraded a server to NetWare 6.5 and you have no NSS logical volumes, you need to set the following NSS cache values as noted:
- nss /noCacheBalance
- nss /MinBufferCacheSize=2048
In NetWare 6.5, all CD and DVD drives are recognized as NSS devices; therefore, you need to set NSS cache parameters to accommodate the usage of these devices.
To view statistics for cache buffers used by NSS, enter one of the following commands at the System Console prompt:
nss /cachestats
or
nss /reset stats
With heavy access on an NSS logical volume, the server might incur some performance issues. NSS has its own caching and parameters to be set during the loading of the NSS modules.
Cache Hit Percentage
From an overall server performance perspective, the most important statistic to look at is cache hit percentage. This indicates how often NSS looked in cache for a file and found it there. To view the cache hit percentage, use the nss /cachestats command.
The long-term cache hit percentage should be above 90. A long-term hit percentage below 90 can indicate you have too little RAM on the server, or that one or more of the following SET parameters is set too low.
-
NSS Cache Balance Percent Set Parameter: Controls how much memory is available for NSS to use for cache. The percentage setting determines how many cache blocks NSS takes from the Traditional file system for its own cache. A high cache balance percentage impedes the performance of the Traditional file system. A low cache balance impedes the performance of NSS.
We recommend that you set the Cache Balance Percent Set parameter to equal the percentage of the total disk space you allocate for NSS. The default is 85 percent. If you are using mostly NSS volumes, you can run at a higher percentage, such as 90 percent.
-
NSS Close File Cache Size Set Parameter: Dictates how many closed files are kept in cache. The default is 100,000. If applications on a server consistently open and close many files, increase this setting. If the applications use only a few file large files, decrease this setting so more memory can be used for the buffer cache.
NSS adjusts the number of closed files it keeps in cache to balance the needs of the file system with the needs of other processes. NSS does not automatically keep the number of closed files in cache that are indicated by this parameter. This parameter just indicates a maximum amount.
-
NSS File Flush Timer and NSS Buffer Flush Timer Set Parameters: Sets the number of seconds that modified files and buffers stay in memory before being written to disk. Increasing these parameters from their defaults helps the caching up to a certain point, but too much increase causes a throttling problem with writing out the metadata. This is somewhat dependent on processor speed and disk speed, so you could try adjusting them for your system. If NSS performance is very poor, 75 might be too high and you could try 50 percent. If performance is just below normal, you could try increasing the values a little.
To activate these parameters, you can issue the following command at the startup of NSS, or place it in the autoexec.ncf file:
nss /cachebalance=80 /fileflushtimer=75 /bufferflushtimer=75 /closedfilecachesize=50000
NSS caches files greater than 128 KB in the memory above 4 GB. This improves performance for these files and for smaller files because they won’t be competing for the same space in the memory below 4 GB.
For more information on setting Cache Buffers for NSS, see Tuning NSS Performance on NetWare
in the NW 6.5 SP8: NSS File System Administration Guide.
Assessing Changes to NSS Settings
After making changes to NSS settings, enter the following command at the System Console prompt:
nss/cachestats
Note the statistics and how long the server has been up. After noting the statistics, enter the following command at the System Console prompt:
nss/resetstats
This command clears the file system cache statistics and starts keeping new statistics. This allows you to see the result of your changes.
Because it takes time for the system to adjust to the loads, you must allow NSS to keep statistics for at least two full business days before you consider the results valid. If the server has been up for more than a few weeks before you reset the statistics, wait at least a week before you consider the results valid.
Do not add RAM over 4 GB to improve cache performance. The Intel* Architecture* has no DMA capabilities above 4 GB; therefore, NSS deliberately does not use any memory above this amount.
Traditional File System
Because it is much faster to get data from memory than to get it from disk, caching frequently requested data increases server performance. The more RAM installed in the server, the more cache memory is available. Cache hits occur when a client requests data and the server supplies the data from cache memory instead of from disk. The Least Recently Used (LRU) algorithm determines whether data is kept in cache memory or written to disk.
File cache buffers are organized into a linked list. Most Recently Used (MRU) buffers are at the head of the list and least recently used (LRU) buffers are at the end of the list. The length of time the oldest buffer has been in the list is shown as the LRU Sitting Time statistic.
In tuning file cache for the Traditional file system, the goal is to determine how much memory the server needs so that recently accessed data can always be retrieved from cache. Monitoring the LRU Sitting Time statistic is key to tuning file cache.
Understanding LRU Sitting Time
The LRU Sitting Time status is updated and displayed once per second. The statistic is calculated by taking the difference between the current time and the time stamp of the last block in the cache list. (The time stamp is the time when the last block entered the list.) The result is displayed in dd:hh:mm:ss.ts format. The LRU Sitting Time measures the length of time it takes for a cache buffer at the head of the list to make its way down to the tail, where it becomes the least recently used (LRU) buffer. Every cache buffer in the list is being reused within that period of time.
In configurations with excessive cache, the LRU Sitting Time can be very high, even many hours. In configurations with too little cache, the LRU Sitting Time can be measured in seconds. The time can vary widely, depending on circumstances.
On inactive servers, such as those sitting unused overnight or those in lab environments with long periods of idle time, the LRU Sitting Time statistic is incremented by one second every second. This is because the LRU Sitting Time indicates the age of the LRU cache buffer. The LRU Sitting Time statistic is useless under these circumstances, except to confirm the obvious: that data is not being read from or written to the server’s cache. This statistic is most useful during peak workloads when the server’s cache is servicing the greatest number of users and the broadest possible data set.
You can view the LRU Sitting Time statistic using Novell Remote Manager:
-
Click View Memory Config under the heading in the navigation frame.
-
Click .
-
Look in the table.
Calculating Cache Memory Needs
To determine how much file cache your server needs:
-
Track server resource utilization statistics.
Chart the results for daily, weekly, monthly, period-end, and year-end cycles. Identify recurring periods of peak workloads.
-
Observe the LRU Sitting Time statistic during peak workload periods of the day.
Keep a record of the lowest LRU Sitting Time during the peak periods for at least one week, or longer if necessary, to see a consistent pattern.
-
Based on the observations you made of the server’s resource utilization and LRU Sitting Time, determine an average low LRU Sitting Time.
-
Tune the cache.
Size the cache in such a way that the server can sustain an average low LRU Sitting Time of at least 12 minutes during peak workloads.
For example, if your server’s original average low LRU was 7 minutes, you will need to add enough memory to increase the LRU Sitting Time to an average low of 12 minutes during peak workloads. This added memory increases the likelihood that repeatedly used data will still be cached when the next user request is received.
On the other hand, if the server’s original lowest LRU sitting time was 18 minutes, the server has more than adequate cache. You can leave the excess memory in the server for future growth or remove it and use it somewhere else.
Setting a File Cache Buffer Alert
You can control when the server alerts you to serious decreases in the number of available file cache buffers. In Novell Remote Manager, click under the heading in the navigation frame, and then click .
-
Minimum File Cache Buffers: Establishes the minimum number of buffers that will always be reserved for file cache and not made available for other processes. When this minimum is reached, the server displays the message Cache memory allocator exceeded minimum.
-
Minimum File Cache Report Threshold: Instructs the server to send an alert before the minimum number of file cache buffers is reached. Set this parameter to the number of buffers above the minimum at which you want the server to send an alert. For example, if the Minimum File Cache Buffers value is 20 and the Minimum File Cache Report Threshold value is 30, the server sends an alert when 50 file cache buffers are left.
eDirectory
If you suspect that your server is slow in accessing eDirectory™, see Improving eDirectory Performance
in the Novell eDirectory 8.8 Administration Guide.
4.4.2 Tuning Logical Address Spaces
Tuning logical address spaces can reduce memory fragmentation problems that might occur because there are not enough physical address spaces to map to logical address spaces in the system. When fragmentation occurs, applications might not be able to use existing memory in the system even though plenty is available. Adjusting the recommended parameters can relieve this problem.
You should tune logical address spaces only after the system has been running for a while in its current condition and when the system shows that there are parameters that you should consider changing.
For example, if you just added a new application or patch to your server; or you started using the server in different circumstances (such as an e-mail server, database server, or storage server), or the number of users accessing the server has increased, you should let the server run in this condition for a week or more before you consider changing anything.
After you have run the server in the current conditions for a week or more, you can use the Tune Logical Address page in Novell Remote Manager to check and optimize logical address space usage and reduce memory fragmentation problems.
Figure 4-1 Tune Logical Address Space Page by Using Novell Remote Manager
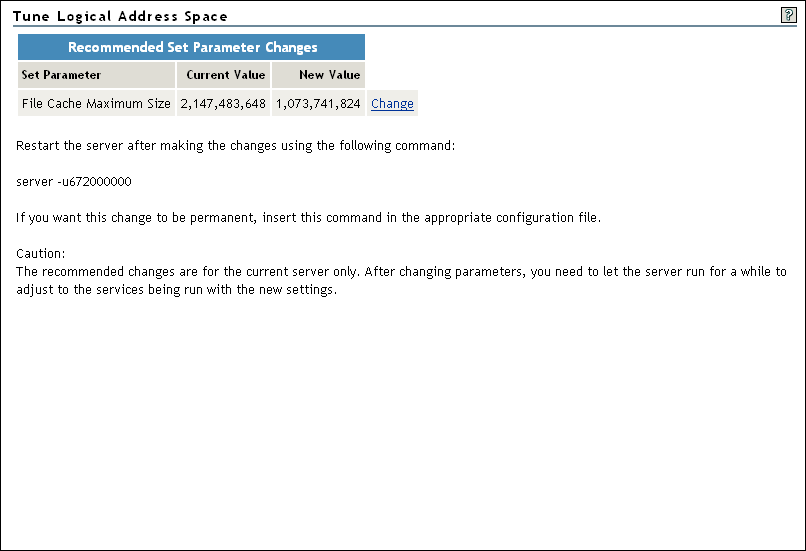
To tune logical address spaces:
-
Click under the heading in the navigation frame.
-
Click .
-
Do one of the following:
-
If you see a page returned similar to the one shown above with recommended SET parameter changes, click the link next to the parameter shown and restart the server using the recommended server -uvalue command.
If you want the change to be permanent, edit the line in your server's autoexec.bat (or other applicable file) that starts the server to include the -uvalue parameter.
If you are using the NetWare Boot Loader instead of booting from DOS, the server -‑uvalue command goes in the config.nw file, in the server startup directory.
-
If you see a page that displays the No Recommend changes at this time message, do nothing.
-
4.4.3 Tuning Directory Cache for the Traditional File System
This information for tuning directory cache applies only to NetWare servers using the Traditional NetWare file system. Directory cache is not used by the Novell Storage Services™ (NSS) file system. You should tune the directory cache only if you are using the Traditional file system.
As directory entries are read and operated upon by a user, NetWare caches the entries to make repeated use of an entry more efficient. In a default configuration, NetWare allocates 500 cache buffers of 4 KB each. Each block read into a cache buffer contains 32 entries.
The default number of buffers is appropriate for only a small number of users. The tuning strategies in this section can help you tune the directory cache to meet your network’s requirements.
Directory Cache Tuning Strategies
Sizing the directory cache depends largely on the characteristics of the workload the server supports. The key is the frequency and breadth of directory searches, file opens, closes, and creations.
-
A low-use scenario involves any number of users in which a small number of directories are shared or in which each user’s activity is limited to a small region of the directory, such as a home directory.
-
A high-use scenario involves any number of users, but user activity spans a very large number of directories and files. An extreme case might be a document-based system in which document searches routinely traverse large portions of a very large directory.
Strategy 1: Tuning for Low Use
To handle low memory use, you probably won’t need to allocate any more cache than the NetWare operating system does by default. By default, NetWare allocates 500 buffers immediately upon request, followed by a maximum allocation of up to 2000 buffers (about 2 MB). This is sufficient for the majority of low-use scenarios.
Strategy 2: Tuning for High Use
To tune for very high use, change the following SET parameters to the values shown using SET commands at the System Console prompt:
minimum directory cache buffers = 2000
maximum directory cache buffers = 4000
Or use Novell Remote Manager to make the change:
-
Click under the heading In the navigation frame.
-
Click , then select the parameter value link that you want to change.
-
Type the new value, then click .
To specify a maximum number of concurrent writes of directory cache buffers using Novell Remote Manager:
-
Click under the heading in the navigation frame.
-
Click > value.
-
Type the new value, then click .
The range is from 5 to 500.
Strategy 3: Tuning for Name Spaces
When a name space is installed on a Traditional NetWare volume, the volume’s Directory Entry Table (DET) must include an additional directory entry for each file. So, for example, if a volume supports DOS, NFS, and long name spaces, there are three directory entries in the DET for each file instead of just one.
In such a case, a directory cache buffer with 32 directory entries no longer represents 32 files; it represents only 10 files, because each file now requires three directory entries.
This means the efficiency of your directory cache is decreased by a factor equal to the number of name spaces loaded. Therefore, you might need to add more memory if you load multiple name spaces. By carefully tuning the directory cache, you can maintain high performance even under these conditions.
Before adding name spaces, allow your server to operate in its production environment for several weeks. This lets NetWare allocate the appropriate number of directory cache buffers for the native DOS environment.
After this settling-in period, check the Directory Cache Buffer value in the Monitor General Information window. This is the highest number of directory cache buffers allocated since the server was last started.
Use the following formulas to determine the optimum minimum and maximum number of directory cache buffers:
- (# of names spaces, including DOS) x (highest number of Directory Cache buffers since server was last started) = minimum cache buffers
- (minimum cache buffers) + 100 = maximum cache buffers
For example, if your server’s highest number of Directory Cache buffers since the server was last started is 500 and you want to load one additional name space, you would calculate the minimum and maximum values of directory cache buffers as follows:
- 2 x 500 = 1000
- 2000 + 100 = 2100
Before loading the additional name space, change the following SET parameter values using Novell Remote Manager or SET commands at the System Console prompt:
- minimum directory cache buffers
- maximum directory cache buffers
These settings increase the likelihood that repeatedly used directory cache buffers will remain in cache and that those buffers will remain in cache longer, providing the best possible read response times.
Monitoring the New Settings
After you tune the directory cache, let the server operate for a few weeks to settle in. Then check to see whether the server allocates the additional directory cache buffers that the new settings allow. If the allocated buffers do not increase to near the level allowed, then you know that your users’ directory access patterns don’t require the additional cache. On the other hand, if your server uses all the cache you made available, your user community’s directory access patterns might be more intensive than you anticipated.