C.2 Copying and Upgrading Legacy Volumes with Volume Copy Upgrade
Volume Copy Upgrade (VCU) is a volume conversion utility that lets you copy metadata and user data from legacy NetWare Traditional volumes to NSS volumes. Volume copy upgrade moves the volume to an NSS pool and all of the volume’s file and directory attributes remain the same.
IMPORTANT:For Traditional NetWare volumes, VCU does not migrate the deleted.sav directory and the deleted files it contains to the new NSS volume. The deleted files are essentially purged. If you need to salvage deleted files, do it before using VCU to migrate the data.
Copying the data to the new location can take several hours, depending on the size of the volume. You can run VCU from the server command line or from a GUI application that runs on the server or on a workstation.
C.2.1 Understanding Volume Copy Upgrade
Volume Copy Upgrade (vcu.nlm) provides the following capabilities:
-
VCU creates an inherited rights filter file, called irf.out. This file contains information about whether the Inherited Rights Filters were moved correctly during a volume copy or restore. Mismatches are preceded by three asterisks (***).
The irf.out file is stored in the same location as errors.out (at the root directory of the destination volume).
IMPORTANT:When you use VCU to upgrade a Traditional NetWare sys: volume to the NSS sys: volume, the implied trustee rights do not transfer with this method. After you upgrade volume sys: to NSS, you must manually add a public trustee with Read and File Scan rights to the sys:login directory.
-
You can use VCU to copy NetWare Traditional volumes to NSS volumes.
-
You can run vcu.nlm from a Windows client.
VCU uses NetWare Traditional volume APIs that have 32 bit file sizes, so it works only with file sizes of up to 4 GB, which is the Traditional volume maximum. The APIs use local code-page ASCII for all filename representations. VCU cannot correctly copy filenames on mixed-language systems, where the ASCII code-page might be English (437) but where Unicode characters from other languages may exist in the filenames.
IMPORTANT:VCU uses traditional APIs only, and is not Unicode enabled.
Before you begin to upgrade NetWare Traditional volumes, make sure that the NSS pool that you are copying data to has enough space to accommodate the source volume’s uncompressed data. Use the ndir command to determine how much space is saved by using compression on the volume. For information, see Section 24.10, Viewing Compression Statistics with the NDIR Command. Add the space saved to the space used to find the total uncompressed volume size of the Traditional volume.
An NSS volume is about 110% of the size of NetWare Traditional volumes because files and directories stored on NSS have more metadata associated with them. For example, if you want to move 2 GB of viable data (disregard free blocks or salvage blocks), the destination NSS volume needs to have at least 2.2 GB of free space available.
IMPORTANT:Upgrade only one volume at a time.
The syntax for vcu.nlm is:
|
Copy Upgrade |
vcu [/p|/l|/d|/m] origVolName nssPool |
|
Restore the Original Volume |
vcu [/r|/m] origVolName renamedVolName |
|
Help |
vcu /h |
The VCU parameters are listed in the following table:
The following table lists the possible VCU switches when copying or upgrading volumes. The switches are optional; you can include them in any order in your VCU command line.
The following table lists the possible VCU options when restoring volumes:
For example, to convert a NetWare Traditional volume named users to an NetWare NSS volume named users, enter:
vcu /m users p_users
To continue the example, suppose that you decide to undo the copy and return to the legacy volume. To remove the NSS volume users and restore the original name to the NetWare Traditional volume, enter:
vcu /r /m users users_old
C.2.2 Using VCU from the Command Line
Copying Volumes
-
Stop all applications on the server that access the volumes you are copying.
WARNING:Before using this utility to copy Traditional volumes, stop all applications that access the volume you are copying. This is especially important for the sys: volume. If any applications are open on the sys: volume when you begin the volume copy, your sys: volume might become corrupted and render your server unusable.
-
At the command line, specify the volume that you want to copy, then specify the existing NSS pool (on the same server) where you want to store the data from the volume (VCU can convert volumes with long names) by using this format:
vcu original_volume_name NSS_pool_nameFor customization options, see Understanding Volume Copy Upgrade.
For example, if you wanted to copy the Apps volume and put the data on a volume in Pool2, you would enter the following at the server console:
vcu apps pool2
In this example, VCU copies the data in the volume apps and places it in a volume on Pool2, named apps_new.
When volumes are copied using VCU, a new NSS volume named originalvolumename_new is automatically created for you in the specified pool. If the original volume name is longer than 10 characters, or if the newly created NSS volume name conflicts with another existing volume, the new NSS volume is named vcu xxxx_new, where the xxxx is a random number generated by NSS.
-
Select to rename your volumes.
After the volume copy is finished, VCU asks you if you want to rename your volumes. If you select , VCU renames your original volume to originalvolumename_old and the new NSS volume from originalvolumename_new back to the name of the original volume. If you select , you must manually rename the new volume later.
NOTE:By using the /m switch, VCU also lets you rename the volume’s default eDirectory™ object for both NSS and Traditional volumes (except for the sys: volume).
-
Review the information in After the Volume Copy or Volume Upgrade and perform any required follow-up actions.
Restoring Volumes
-
At the server console, enter
vcu /r VCUTargetVolName VCUTargetVOlName_old
For example, if you want to restore Vol2, enter the following:
vcu /r Vol2_new Vol2_old
VCU deletes Vol2_new, then renames Vol2_old back to its original name of Vol2.
HINT:To rename the volume’s default eDirectory object, insert the /m switch into the command line.
C.2.3 Using VCU from a Java Application
You can also upgrade volumes using the VCU Java application called vcuApp.jar. You can access the VCU GUI application from a server or a workstation.
Accessing VCU from the Server
-
Use one of the following methods:
-
At the server console, enter
vcux
-
At the GUI console, click .
-
Accessing VCU from a Workstation
-
Make sure that Java 1.4 or later is installed on your workstation.
-
Map a drive to the _Admin volume.
-
To run the VCU application from a server:
-
Map a drive on the workstation to sys:java\lib\ on the server.
-
Open a directory browser to the mapped drive, then double-click the vcuApp.jar icon.
-
-
To run the VCU application locally on the workstation:
-
Browse to sys:\java\lib\vcuApp.jar on the server.
-
Copy vcuApp.jar to a directory on your workstation.
-
To run the application, use one of these methods:
-
Open the local directory, then double-click the vcuApp.jar icon.
-
At the DOS prompt, enter
java -jar your_directory\vcuApp.jar
-
-
Continue with the next section, “Copying Volumes.”
Copying Volumes
-
Stop all applications on the server that access the volumes you are copying.
WARNING:Before using this utility to copy Traditional volumes, stop all applications that access the volume you are copying. This is especially important for the sys: volume. If any applications are open on the sys: volume when you begin the volume copy, your sys: volume might become corrupted and render your server unusable.
-
Launch VCU.
For instructions, see Using VCU from a Java Application.
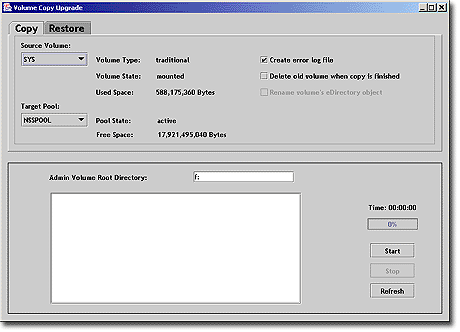
The following graphic is an example of the VCU Copy screen.
-
Click the tab.
-
(Conditional) If you are running VCU from a workstation, specify the drive letter of the drive that you mapped to the _admin volume, followed by a colon (:), in the text box, then click .
If you are running VCU from the server, the text box is automatically filled in for you.
-
Select the source volume and the target pool from the drop-down lists.
If you have recently added a pool or volume via iManager, click the button to see the new pool or volume appear in the drop-down list.
Make sure the target pool has enough space to accommodate the data that will be copied from the source volume.
-
Refer to the following table to determine whether you want to create an error log, rename the copied volume’s default eDirectory object, or delete the old volume after the volume data is copied:
Options
Results
Create an Error Log
Creates an error log called ERROR.OUT and saves it at the root directory of the destination volume.
For more information, see Section C.2, Copying and Upgrading Legacy Volumes with Volume Copy Upgrade.
Delete Old Volume When Copy Is Finished
Deletes the old (original) physical volume; however, the volume’s eDirectory object remains.
Rename Volume’s eDirectory Object
Renames the volume’s default eDirectory object.
For more information, see Copying Volumes.
-
Click Start to begin the volume copy.
If you stop the volume copy for any reason, then click again, the volume copy does not resume where it left off, but starts again at the beginning.
-
(Optional) Rename your volumes.
After the volume copy is finished, VCU asks you if you want to rename your volumes. If you click , VCU is finished. If you click , VCU renames your original volume to originalvolumename_old and the new NSS volume from originalvolumename_new back to the name of the original volume.
-
Review the information in After the Volume Copy or Volume Upgrade and perform any required follow-up actions.
Restoring Volumes
-
Stop all applications on the server that access the volumes you are copying.
WARNING:Before using this utility to copy Traditional volumes, stop all applications that access the volume you are copying. This is especially important for the sys: volume. If any applications are open on the sys: volume when you begin the volume copy, your sys: volume might become corrupted and render your server unusable.
-
Launch VCU.
For instructions, see Using VCU from a Java Application.
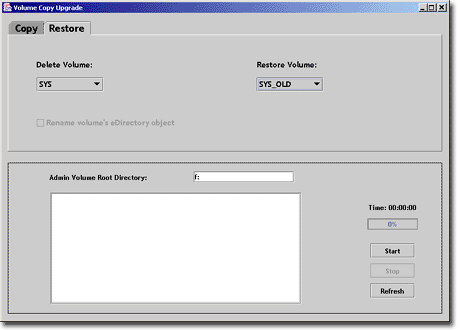
The following graphic is an example of the VCU Restore dialog box.
-
Click the tab.
-
(Conditional) If you are running VCU from a workstation, specify the drive letter of the drive that you mapped to the _Admin volume, followed by a colon (:), in the text box, then click .
If you are running VCU from the server, the text box is automatically filled in for you.
-
From the drop-down list, select the volume that you want to delete and restore.
If you have recently added a pool or volume via iManager, click the button to see the new pool or volume appear in the drop-down list.
-
Determine if you want to rename the volume’s default eDirectory object.
-
Click .
When you click , the volume that you are restoring is automatically renamed to the name of the volume that you are deleting.
C.2.4 After the Volume Copy or Volume Upgrade
-
Restart the server if you are upgrading the sys: volume to ensure that the volume copied properly.
-
Verify that the volume data was copied successfully.
IMPORTANT:After you copy Traditional volume data to an NSS volume, you cannot access the new NSS volume from NetWare 5.1. You need to either retain the data in the Traditional volume, or copy the data back to the Traditional volume.