4.2 Upgrading the Media Format for Existing NSS Volumes
4.2.1 Prerequisite
The media format upgrade modifies the transaction record structure. For NSS volumes on NetWare, you must disable the Transaction Tracking System™ (TTS™) attribute for the volume and leave it disabled while the upgrade is in progress. After a successful media upgrade, you can enable TTS again.
Before you upgrade the media format for existing NSS volumes on NetWare where TTS is enabled, do the following to disable TTS:
-
Determine the names of all volumes where TTS is enabled.
-
At the server console, enter
nss /volumes
-
Examine the Attributes column to see which volumes have User Transactions enabled.
-
-
For each affected volume, enter the following command to disable TTS on the specified volume:
nss /NoTransaction=volumenameA message is displayed noting that this request takes effect on the next volume deactivation. This prevents the UXACTION.LOG file from being opened on subsequent volume activates, and makes it subject to deletion. You delete the file in Step 5.
-
For each affected volume, enter the following command to deactivate the specified volume:
nss /VolumeDeactivate=volumename -
For each affected volume, enter the following command to activate the specified volume:
nss /VolumeActivate=volumename -
For each affected volume, use any convenient means to delete the existing user transaction log file (volname:\UXACTION.LOG), which is located at the root of each volume.
4.2.2 Upgrading the Media Format
The media format upgrade process runs in the background. The elapsed time for the upgrade process varies according to the number of storage objects in the volume; the more objects a volume contains, the longer it takes. Volumes with a large number of objects can take a substantial time to upgrade.
The commands in this section perform the one-time upgrade for currently active NSS volumes. A message is sent to the logger screen when the process is successfully completed.
Issue the commands at the server console on NetWare as the administrator user, or in the NSS Console (nsscon) in a Linux terminal console as the root user.
- nss /ZLSSUpgradeCurrentVolumeMediaFormat=volumename
-
Upgrades the specified active volume. If it is a shared volume, the clustering system vetoes the upgrade until all nodes in the cluster are running a supported operating system.
- nss /ZLSSUpgradeCurrentVolumeMediaFormat=all
-
Upgrades all currently active volumes. If a shared volume is encountered, the clustering system vetoes the upgrade until all nodes in the cluster are running a supported operating system.
- nss /ZLSSUpgradeCurrentVolumeMediaFormat=all /include=shared
-
Upgrades all currently active volumes that are part of a shared pool, but only if the clustering system permits it.
- nss /ZLSSUpgradeCurrentVolumeMediaFormat=all /include=local
-
Upgrades all currently active volumes that are not part of a shared pool.
- nss /ZLSSUpgradeCurrentVolumeMediaFormat=all /include=local,shared
-
Upgrades all currently active volumes whether they are shared or local. If a shared volume is encountered, the clustering system vetoes the upgrade until all nodes in the cluster are running a supported operating system.
4.2.3 Enabling Hard Links After the Media Upgrade
After the media is upgraded successfully, you must set the Hard Links attribute on volumes where you want to create hard links. The Hard Links attribute is automatically enabled if there are existing hard links on the volume. For information about using hard links on NSS volumes, see Section 27.0, Managing Hard Links.
IMPORTANT:Do not attempt to enable the Hard Links attribute until the upgrade process is complete.
-
Issue on of the following commands at the server console on NetWare as the administrator user, or in the NSS Console (nsscon) in a Linux terminal console as the root user.
-
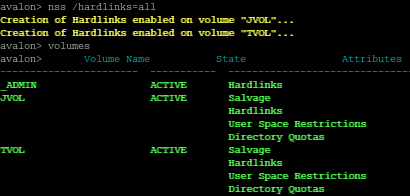
You can verify that the hard links attribute is set for the volume by entering the following command at the server console on NetWare, or at the NSS Console (nsscon) on Linux:
volumes
The Hard Links attribute appears in the Attributes column for volumes where it is enabled.
4.2.4 Post Upgrade Task
If you disabled the Transaction Tracking System on an NSS volume on NetWare prior to the media format upgrade, you can enable it again after the upgrade completes successfully.
-
For each affected volume, enter the following command to enable TTS on the specified volume:
nss /Transaction=volumename -
Verify that TTS is enabled on the volumes.
-
At the server console, enter
nss /volumes
-
Examine the Attributes column to verify that the volumes have User Transactions enabled.
-