8.2 Setting Up a Personalized List of Clusters to Manage
The My Clusters page in the Clusters plug-in for iManager allows each cluster administrator to set up a personalized list of clusters to manage. This allows an administrator to view at a glance the status of the specified clusters. The list persists between the administrator's logins to the same iManager server.
Your personalized list of clusters and display preferences are saved on the iManager server in the following location:
/var/opt/novell/iManager/nps/WEB-INF/config/NDS<tree_name>-<user_name_and_context_without_dots>/ncs.xml
For example, for tree AVALONTREE and user admin.novell, the file path is:
/var/opt/novell/iManager/nps/WEB-INF/config/NDSAVALONTREE-adminnovell/ncs.xml
The following sections describe how manage the list of clusters and to personalize the display.
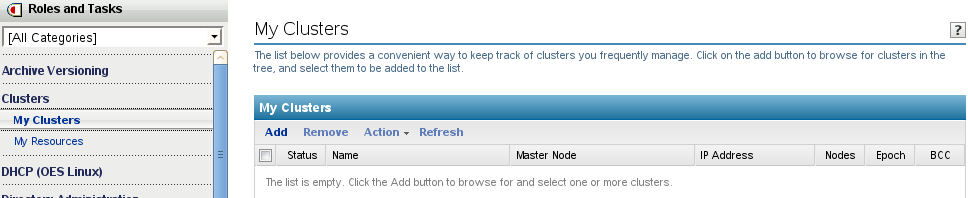
8.2.1 Adding Clusters to Your My Clusters List
-
Log in to iManager as a cluster administrator.
-
In , select > .
The list is initially empty.
-
Click to open the eDirectory browser pop-up window.
-
Browse the tree where you are currently logged in to locate and select one or more Cluster objects, then click .
Newly selected clusters are added to your personalized list.
-
(Optional) Personalize the display as described in Section 8.2.3, Personalizing the My Clusters Display.
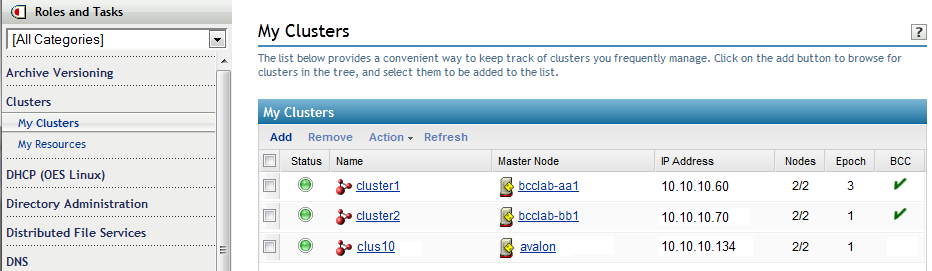
8.2.2 Viewing Information about Clusters in Your My Clusters List
-
Log in to iManager as a cluster administrator.
-
In , select > .
The My Clusters page displays your personalized list of clusters in the tree.
-
View the Status icon next to a Cluster object to understand the current overall state of the cluster.
State
Icon
Description
Normal

The cluster is up and running.
Stopped

The cluster is stopped. Administrator intervention is needed.
Critical

One or more nodes in the cluster have failed. Administrator intervention is needed.
Warning

An alert condition has occurred. A node or resource needs administrator attention.
Unknown

The state of the cluster cannot be determined.
-
The My Clusters list displays the following information about each cluster:
Parameter
Description
Name
The name assigned to the cluster.
Distinguished Name
(Not displayed by default) The dot-delimited fully distinguished name of the cluster, such as clustername.context.domain.
Master Node
The name of the currently assigned master node for the cluster.
IP Address
The unique IP address that represents the cluster.
Nodes
The number of active nodes in the cluster.
Epoch
The number of times the cluster state has changed. The cluster state changes every time a server joins or leaves the cluster.
BCC
A check mark in this column indicates that the cluster is enabled for a Business Continuity Cluster (BCC).
-
(Optional) Personalize the display as described in Section 8.2.3, Personalizing the My Clusters Display.
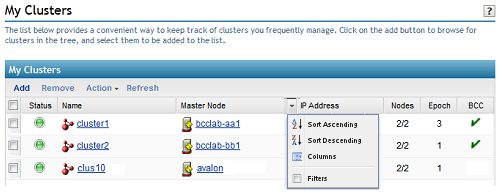
8.2.3 Personalizing the My Clusters Display
The My Clusters page provides menus in the column headings that allow you to personalize the display. You can sort the entries, modify the columns, or filter the entries.
-
Log in to iManager as a cluster administrator.
-
In , select > .
-
If the list is empty, you must add at least one cluster in order to be able to personalize the display. Select , browse to select the Cluster object, then click .
-
Select , then choose a refresh rate that is long enough to allow you to view all items in the list.
-
Click or mouse-over a column heading to activate its options, then click the arrow to access the menu for that column.
-
Perform one of the available actions when you access the column’s menu. Some actions are not available for all fields.
-
Sort: Select (A to Z) or (Z to A) to specify the preferred sort order. Cluster objects are sorted based on values in the selected column. Numbers are treated as text values and are sorted alphabetically, not numerically.
-
Columns: Select to display the parameters, select or deselect a parameter’s check box to add or remove the column, then press Enter to apply the changes. The parameters are described in Step 4 in Section 9.17, Viewing the Cluster Node Properties.

-
Filter: Specify a filter to display only the Cluster objects with values that match.
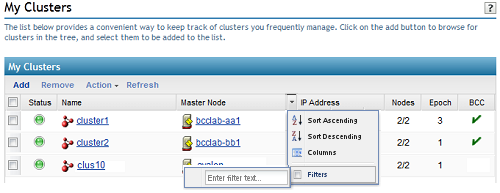
To add or modify a column’s filter, select , place the cursor in the field, type the desired filter text, then press Enter to apply the filter. If a cluster’s parameter value matches the specified filter, the Cluster object and its information are displayed.
To remove a column’s filter, select Filter, place the cursor in the field, delete the filter text, then press Enter to refresh the display. The filter no longer applies for that column.
-