5.5 Creating a Samba Cluster Resource with the Samba Template
The Samba template for Novell Cluster Services requires that you create a shared volume group and then use the Samba template to create a Samba cluster resource. This includes configuring Samba load, unload, and monitor scripts; setting Samba start, failover, and failback modes; and assigning the Samba resource to specific servers in your cluster.
The examples in this section use following setup. Make sure to replace the sample values with the information for your system.
|
Variable |
Sample Value |
|---|---|
|
Device name for the shared device |
/dev/sdd |
|
Volume group name |
sambavg44 |
|
Volume name |
sambavol44 |
|
Volume size |
100 GB |
|
Linux POSIX file system |
ext3 |
|
Mount device |
/dev/sambavg44/sambavol44 |
|
Mount point |
/mnt/smbvol44 |
|
Resource IP address |
10.10.10.44 |
-
Section 5.5.2, Creating a Mount Point for the Volume on Each Node
-
Section 5.5.5, Configuring Samba Load, Unload, and Monitor Scripts
-
Section 5.5.6, Setting Samba Start, Failover, and Failback Modes
-
Section 5.5.7, Editing the Samba Resource Preferred Nodes List
-
Section 5.5.8, Verifying the Samba Cluster Resource Configuration
5.5.1 Creating a Shared Volume with LVM Commands
In order for Samba users to access files on a shared disk, you must prepare the shared storage for this purpose. The procedure involves creating an LVM volume group, a logical volume, and POSIX file system on a single shared disk. You do not create the cluster resource at this time.
For an overview of the LVM commands that you use in the following procedure, see Using LVM Commands
in the OES 11 SP3: Novell Cluster Services for Linux Administration Guide.
-
Before you begin, make sure you have met the requirements described in
Requirements for Creating LVM Cluster Resources
in the OES 11 SP3: Novell Cluster Services for Linux Administration Guide. -
Log in to the server as the root user, then open a terminal console.
-
If the device you want to use is not initialized, initialize the device:
-
At the prompt, enter
nssmu
-
From the NSSMU main menu, select , then press Enter.
-
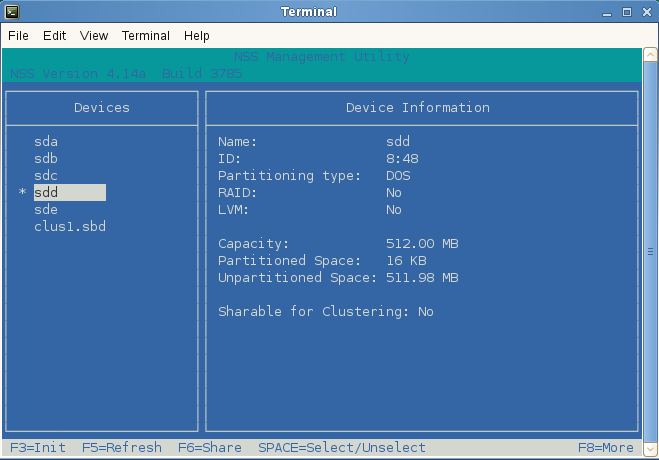
From the list of devices, select the device you want to use, such as sdd.
-
View the device information to confirm it is the device you want to initialize.
Devices that have never been initialized do not have a partition type assigned and are annotated as being . If the device contains data, ensure that you are prepared to delete all of the data on the device.
WARNING:Initializing a device destroys all data on the device.
-
Press F3 to initialize the device, then press Enter to confirm, or press Esc to abort the operation.
-
Specify a partitioning scheme, then press Enter to finish:
-
DOS: Supports devices up to 2 TB in size.
-
GPT: Supports devices of any size.
-
-
View the device information to confirm that it is initialized.
Notice that the Shareable for Clustering parameter is set to . Do not enable it. Clustered LVM will control the share state after you create the volume group.
-
-
Create a clustered Linux LVM volume group and logical volume:
-
Create a physical volume for the device by entering
pvcreate <device_name>For example, to create an LVM physical volume on the /dev/sdd device, enter
pvcreate /dev/sdd
-
Create an LVM volume group on the device by entering
vgcreate -c y <"vg_name"> <device_name>
For example, to create the volume group named sambavg44 on the /dev/sdd device, enter
vgcreate -c y "sambavg44" /dev/sdd
-
Create a logical volume in the LVM volume group by entering
lvcreate -n <"lv_name"> -L <size> <"vg_name">
For example, to create a logical volume named sambavol44 on the sambavg44 volume group that is 100 GB in size, enter
lvcreate -n "sambavol44" -L 100G "sambavg44"
-
Make a file system on the logical volume by entering
mkfs -t <fs_type> <"full_lv_path">
For example, to create an Ext3 file system on the sambavol44 logical volume, enter
mkfs -t ext3 "/dev/sambavg44/sambavol44"
-
-
Deactivate the volume group and logical volume. As the root user, enter
vgchange -a n <"vg_name">For example:
vgchange -a n "sambavg44"
-
Continue with Section 5.5.2, Creating a Mount Point for the Volume on Each Node.
5.5.3 Creating Subdirectories on the LVM Volume
While the shared LVM volume is mounted, you must create some subdirectories on it that Samba will use. At this point, the resource you created should still be on the master node.
To create the subdirectories log and share/locks at the root of the mounted volume (/mnt/smbvol44):
-
Activate the LVM volume group exclusively on the server by entering
vgchange -a ey <"vg_name">For example, to mount the LVM volume group sambavg44, enter
vgchange -a ey "sambavg44"
-
Mount the volume by entering
mount -t <fs_type> </dev/vg_name/lv_name> <mount_point>
For example, to mount the logical volume /dev/sambavg44/sambavol44 on the mount point /mnt/smbvol44, enter
mount -t ext3 /dev/sambavg44/sambavol44 /mnt/smbvol44
-
Create the subdirectory paths log and share/locks at the root of the mounted volume (/mnt/smbvol44) by entering the following commands:
mkdir -p /mnt/smbvol44/log

mkdir -p /mnt/smbvol44/share/locks
The subdirectories are created on the mounted volume (not at the file system root (/) directory). These paths reside on the shared volume, and are available on a node only when the shared volume is mounted at the /mnt/smbvol44 mount point.
-
Verify that the new subdirectories exist and are owned by the root user, and the default group is root. Also, the directories must have the Linux POSIX permissions of drwx r_x r_x.
For example, list the directories and view the Linux POSIX permissions, file owner, and group owner.

-
Unmount the volume and deactivate the volume group on this node by entering
umount </dev/vg_name/lv_name>
vgchange -a n <"vg_name">
For example:
umount /dev/sambavg44/sambavol1
vgchange -a n "sambavg44"
-
Continue with Section 5.5.4, Creating a Samba Cluster Resource.
5.5.4 Creating a Samba Cluster Resource
Novell Cluster Services includes a Samba resource template, which greatly simplifies the process for creating a Samba cluster resource. The Samba resource template configures the Samba resource by automatically creating Samba load and unload scripts, setting failover and failback modes, and assigning Samba as a resource to all nodes in the cluster.
-
Continue from Section 5.5.3, Creating Subdirectories on the LVM Volume.
The shared file system should still be deactivate on all nodes.
-
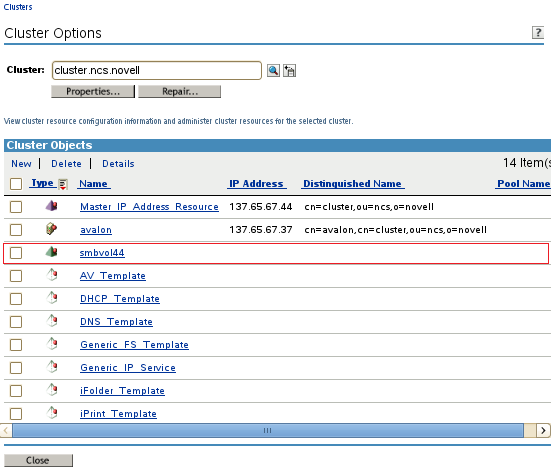
Open iManager in a Web browser, then log in as an administrator user.
-
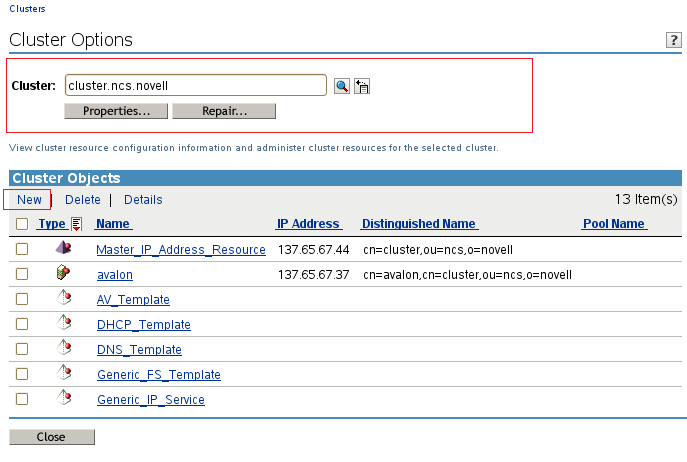
In , select > .
-
In the field, specify the cluster name, or browse and select it.
iManager displays links that you can use to configure and manage your cluster.
-
Above the Cluster objects, click .
-
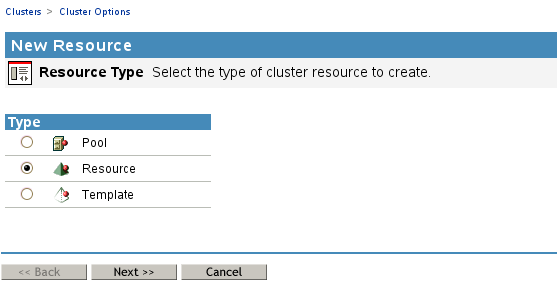
Specify as the resource type you want to create, then click .
-
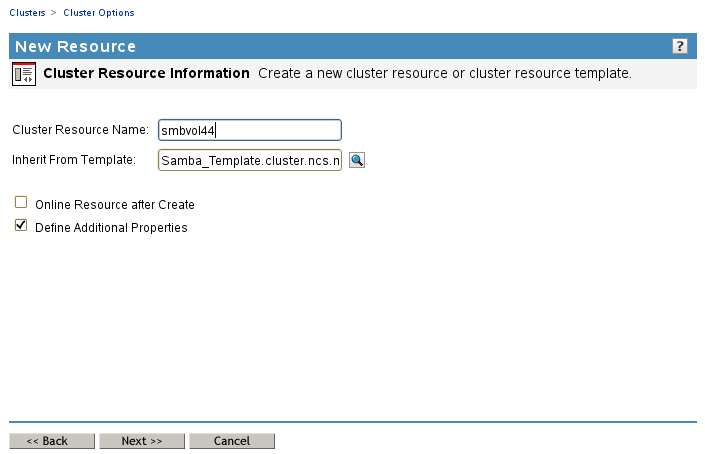
Specify a name for the Samba resource.
This is the name that identifies the resource for the cluster-enabled file system, such as smbvol44.
-
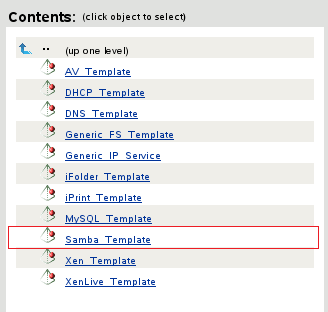
In the field, browse to the Cluster object for the cluster, then select the Samba resource template () from the list.
-
Select .
The option is automatically deselected and should not be selected. You must configure the load, unload, and monitor scripts and the resource settings before you online the Samba resource for the first time.
-
Click , then continue with Section 5.5.5, Configuring Samba Load, Unload, and Monitor Scripts.
5.5.5 Configuring Samba Load, Unload, and Monitor Scripts
Continue the Samba resource configuration by modifying the settings in the load, unload, and monitor scripts to use the Linux POSIX file system that you created in Section 5.5.1, Creating a Shared Volume with LVM Commands.
Load Script Configuration
The Samba load script page should already be displayed.
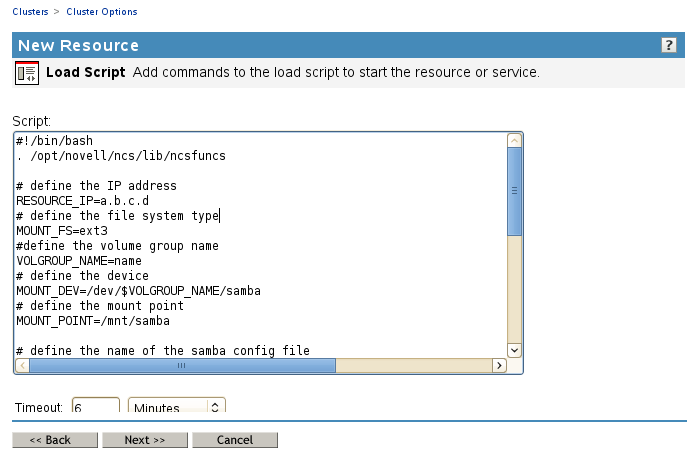
The load script contains commands to start the Samba resource, including mounting the shared file system on a server in the cluster. It is called when you migrate the service or when the primary server fails. You must customize some of the commands in the script for your specific Samba configuration.
-
Edit the following lines for your specific IP address, file system type, volume group, volume, and mount point:
# define the IP address
RESOURCE_IP=a.b.c.d
# define the file system type
MOUNT_FS=ext3
#define the volume group name
VOLGROUP_NAME=name
# define the device
MOUNT_DEV=/dev/$VOLGROUP_NAME/samba
# define the mount point
MOUNT_POINT=/mnt/samba
Replace a.b.c.d with the IP address for the Samba cluster resource, such as 10.10.10.44. The IP address for the Samba cluster resource allows clients to reconnect to that address regardless of which server is hosting it.
If you created a POSIX file system other than Ext3 (such as ReiserFS or XFS), specify the file system for the MOUNT_FS variable. Specify the file system in lowercase.
For the VOLGROUP_NAME variable, replace name with the LVM volume group name (such as sambavg44) that you created in Section 5.5.1, Creating a Shared Volume with LVM Commands.
For MOUNT_DEV, replace samba with the name of the volume (such as sambavol44) that you created in the LVM volume group in Section 5.5.1, Creating a Shared Volume with LVM Commands.
For MOUNT_POINT, replace /mnt/samba with the mount point (such as /mnt/smbvol44) that you created on each cluster server in Section 5.5.2, Creating a Mount Point for the Volume on Each Node.
For example, set the following values:
# define the IP address
RESOURCE_IP=10.10.10.44
# define the file system type
MOUNT_FS=ext3
#define the volume group name
VOLGROUP_NAME=sambavg44
# define the device
MOUNT_DEV=/dev/$VOLGROUP_NAME/sambavol44
# define the mount point
MOUNT_POINT=/mnt/smbvol44
-
Comment out the configuration file definition line by inserting a # (hash mark) at the beginning of the line:
# CONFIG_FILE=SambaResource-smb.conf
You will uncomment this line later, after the Samba cluster resource configuration is complete.
-
Comment out the two lines under # start Samba by inserting a # (hash mark) at the beginning of each line:
# start Samba

#exit_on_error /usr/sbin/nmbd --log-basename=$MOUNT_POINT/log --configfile=$MOUNT_POINT/$CONFIG_FILE

#exit_on_error /usr/sbin/smbd --log-basename=$MOUNT_POINT/log --configfile=$MOUNT_POINT/$CONFIG_FILE
You will uncomment these lines later, after the Samba cluster resource configuration is complete.
-
Click , and continue with Unload Script Configuration.
Unload Script Configuration
The Samba unload script page should now be displayed.
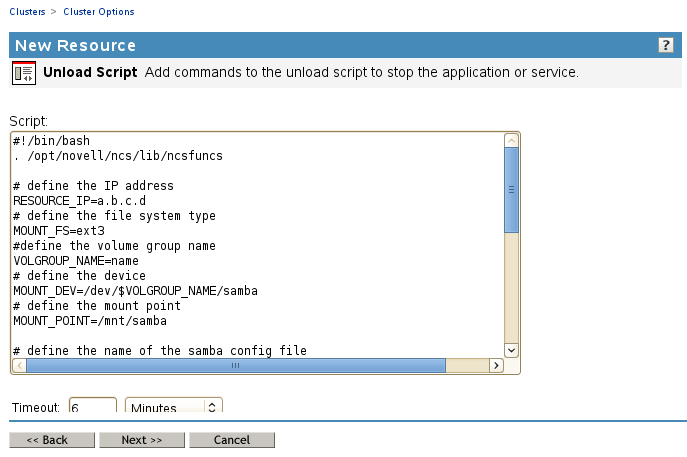
The unload script contains commands to stop the Samba resource, including unmounting the shared file system on a server in the cluster. You must customize some commands for your specific Samba configuration.
-
Edit the following lines for your specific IP address, file system type, volume group, volume, and mount point:
# define the IP address
RESOURCE_IP=a.b.c.d
# define the file system type
MOUNT_FS=ext3
#define the volume group name
VOLGROUP_NAME=name
# define the device
MOUNT_DEV=/dev/$VOLGROUP_NAME/samba
# define the mount point
MOUNT_POINT=/mnt/samba
Replace the variables with the same values you specified for the load script.
For example, set the following values:
# define the IP address
RESOURCE_IP=10.10.10.44
# define the file system type
MOUNT_FS=ext3
#define the volume group name
VOLGROUP_NAME=sambavg44
# define the device
MOUNT_DEV=/dev/$VOLGROUP_NAME/sambavol44
# define the mount point
MOUNT_POINT=/mnt/smbvol44
-
Comment out the configuration file definition line by inserting a # at the beginning of the line:
# CONFIG_FILE=SambaResource-smb.conf
You will uncomment this line later, after the Samba cluster resource configuration is complete.
-
Comment out the two lines under # request Samba stop, and modify the .pid file’s directory path from /var/run/samba to $MOUNT_POINT/share/locks as follows:
# request Samba stop
# ignore_error killproc -p $MOUNT_POINT/share/locks/nmbd-$CONFIG_FILE.pid /usr/sbin/nmbd
# ignore_error killproc -p $MOUNT_POINT/share/locks/smbd-$CONFIG_FILE.pid /usr/sbin/smbd
You will uncomment these lines later, after the Samba cluster resource configuration is complete.
-
Click , and continue with Monitor Script Configuration.
Monitor Script Configuration
The Samba monitor script page should now be displayed.
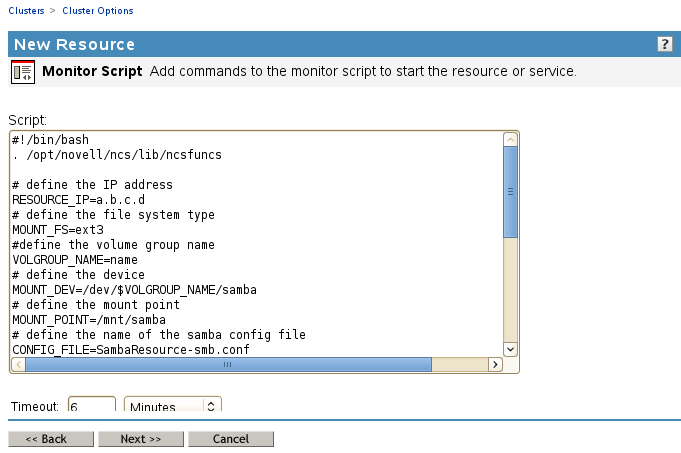
The monitor script contains commands to monitor the status of the Samba resource. You must customize some commands for your specific Samba configuration.
-
Edit the following lines for your specific IP address, file system type, volume group, volume, and mount point:
# define the IP address
RESOURCE_IP=a.b.c.d
# define the file system type
MOUNT_FS=ext3
#define the volume group name
VOLGROUP_NAME=name
# define the device
MOUNT_DEV=/dev/$VOLGROUP_NAME/samba
# define the mount point
MOUNT_POINT=/mnt/samba
Replace the variables with the same values you specified for the load and unload scripts.
For example, set the following values:
# define the IP address
RESOURCE_IP=10.10.10.44
# define the file system type
MOUNT_FS=ext3
#define the volume group name
VOLGROUP_NAME=sambavg44
# define the device
MOUNT_DEV=/dev/$VOLGROUP_NAME/sambavol44
# define the mount point
MOUNT_POINT=/mnt/smbvol44
-
Comment out the configuration file definition line by inserting a # at the beginning of the line:
# CONFIG_FILE=SambaResource-smb.conf
You will uncomment this line later, after the Samba cluster resource configuration is complete.
-
Comment out the two lines under # check Samba, and modify the .pid file’s directory path from /var/run/samba to $MOUNT_POINT/share/locks as follows:
# check Samba
#exit_on_error checkproc -p $MOUNT_POINT/share/locks/smbd-$CONFIG_FILE.pid /usr/sbin/smbd
#exit_on_error checkproc -p $MOUNT_POINT/share/locks/nmbd-$CONFIG_FILE.pid /usr/sbin/nmbd
You will uncomment these lines later, after the Samba cluster resource configuration is complete.
-
Click and continue with Section 5.5.6, Setting Samba Start, Failover, and Failback Modes.
5.5.6 Setting Samba Start, Failover, and Failback Modes
The page to set Start, Failover, and Failback modes should now be displayed.
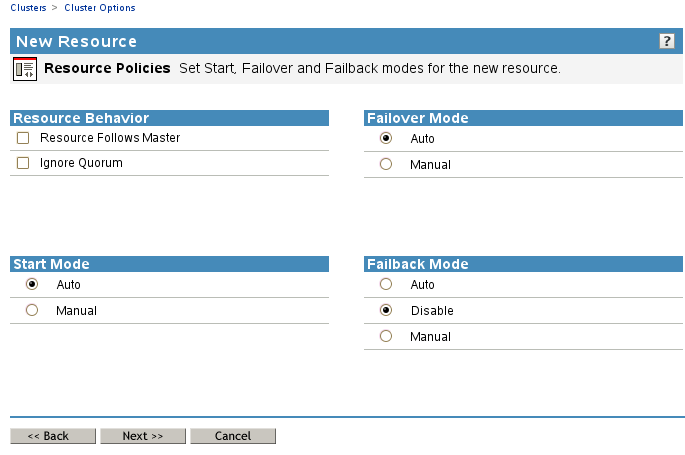
-
By default, the Samba resource template sets the Samba resource Start mode and Failover mode to Auto and the Failback Mode to Disable. You can change the default settings as needed.
-
If the Start mode is set to Auto, the Samba resource automatically loads on a designated server when the cluster is first brought up. If the Start mode is set to Manual, you can manually start the Samba resource on a specific server when you want, instead of having it automatically start when servers in the cluster are brought up.
-
If the Failover mode is set to Auto, the Samba resource automatically moves to the next server in the Assigned Nodes list if there is a hardware or software failure. If the Failover mode is set to Manual, you can intervene after a failure occurs and before the Samba resource is started on another node.
-
If the Failback mode is set to Disable, the Samba resource continues running on the node it has failed to. If the Failback mode is set to Auto, the Samba resource automatically moves back to its preferred node when the preferred node is brought back online. Set the Failback mode to Manual to prevent the Samba resource from moving back to its preferred node when that node is brought back online, until you are ready to allow it to happen.
-
-
When you have finished making the desired changes to these settings, click .
-
Continue with Section 5.5.7, Editing the Samba Resource Preferred Nodes List.
5.5.7 Editing the Samba Resource Preferred Nodes List
The page to view or change the preferred nodes for the Samba resource should now be displayed.
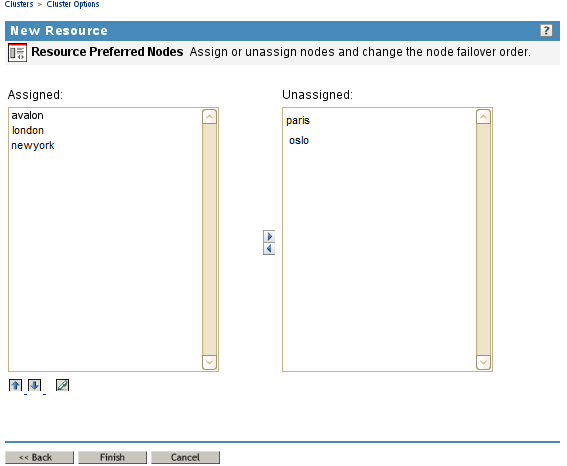
The Samba resource template automatically assigns the Samba resource to all nodes in the cluster. The order of assignment is the order the nodes appear in the resource list.
To view or edit preferred node assignments or change the server failover order:
-
From the list of unassigned nodes, select a server you want the resource assigned to, then click the right-arrow button to move the selected server to the list.
Repeat this step for all servers you want assigned to the resource. You can also use the left-arrow button to unassign servers from the resource.
-
Click (pen icon) to open the list in a text editor. Reorder the entries, then click .
You can also click the up-arrow and down-arrow buttons to change the failover order of the servers assigned to the resource.
-
Click or to save preferred node assignment changes.
The newly created resource appears in the list.
-
Continue with Section 5.5.8, Verifying the Samba Cluster Resource Configuration.
5.5.8 Verifying the Samba Cluster Resource Configuration
At this point, it is a good practice to verify the configuration of the Samba cluster resource.
-
Bring the cluster resource online by entering the following command on one node:
cluster online <samba_resource_name> <node_name>
If the resource is in a comatose state, you must take the resource offline, then try again to online the resource.
For example, enter the following command to online the resource, then view its confirmation message:
cluster online smbvol44 server1

  Status for Resource: smbvol44
  Loading on server 1   Lives: 1
  Revision: 1
-
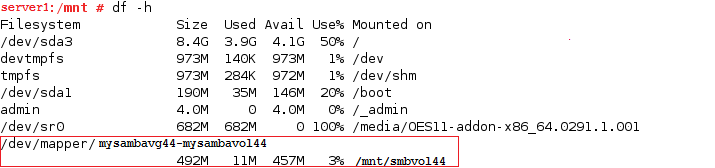
Enter the following commands and verify that the IP address of the node and the shared file system are listed:
ip add
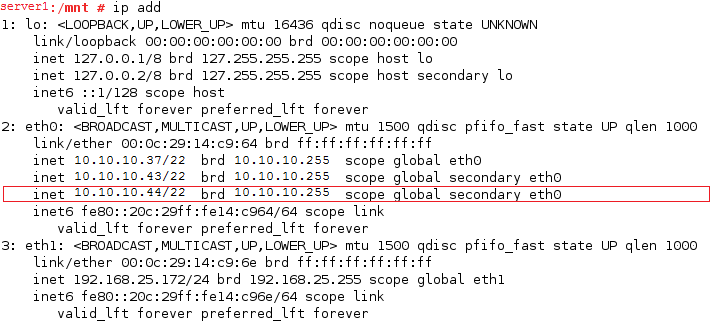
df -h
-
Migrate the Samba resource to each node in its Preferred Nodes list, and verify that the migration is successful:
-
Cluster migrate the Samba resource to a node in the Preferred Nodes list:
cluster migrate <samba_resource_name> <node_name>
-
Check whether the migration operation was successful:
cluster status
-
Correct any configuration problems before continuing.
-
-
After you have verified the resource, bring the Samba cluster resource online on its most preferred node.
-
Continue with Section 5.6, Samba Configuration.