14.2 Installation and Configuration

14.2.1 Verifying the Novell Cluster Services Setup

To ensure that Novell Cluster Services is set up properly:

  1. In iManager, click the View Objects button.

    This view contains browsing and searching functionality to find objects, including a Tree View feature.

  2. All the cluster nodes are listed inside the cluster object. Select the cluster node object within the cluster object for which you want to set the server attribute, then click Edit. This opens the Modify Object window.

    Do not select the NCP server object.

  3. Ensure that the NCS: NCP Server attribute is included in the Valued Attribute list. If the NCS:NCP Server attribute is in the Unvalued Attribute list, use the button to move the attribute to the Valued Attribute list as illustrated in the following figure.

  4. Select the NCS:NCP Server attribute from the Valued Attributes list. Click Edit.

  5. The Edit Attribute window is displayed. Ensure that the value of the NCS:NCP attribute is set as the name of the Physical NCP Server.

  6. Click Apply to save and exit.

14.2.2 Installing and Configuring a Cluster

  1. A DNS server by default uses the named user that is created in the local system during the installation process. If you want to use a user other than the named user, create the user using the Security and Users> User Management option in YaST.

  2. In iManager, click the Users > Create User task to open the Create User window. Specify the details and click OK to create a new user.

  3. The user created in Step 2 needs to be LUM-enabled. The default user (named) also needs to be LUM-enabled. To do this, click the Linux User Management > Enable Users for Linux task. This opens the Enable Users for Linux window. Search for and select the named user or the user created in Step 2, then click OK to select the user.

    1. Every user must belong to a primary group. To add a user to a group, search for an Existing eDirectory Group object.

    2. Select the DNSDHCP-Group object from the list.

    3. Select the workstations to which the Linux-enabled user should have access.

    4. Click Next to confirm the selection.

      The user is now Linux-enabled, included in the DNSDHCP-GROUP, and granted access to cluster nodes.

    5. Update the UID of the user created above to the named user’s default UID.

      Select Modify User task in iManager. Select the user, go to Linux Profile tab of the user and Modify User ID to 44 that is named user's default UID.

  4. Mount the shared volume on one of the nodes in the cluster.

  5. Execute the following command at the command prompt:

    /opt/novell/named/bin/ncs_dir.sh MountPath [Username] It creates the following directory:

    <mountpath>/etc/opt/novell/named

    The MountPath parameter indicates the target directory in the volume where named specific directories are created.

    For example, /opt/novell/named/bin/ncs_dir.sh /media/nss/DNSVOL/ cn=named.o=novell.T=MyTree

    When the script is executed, it creates the following directories:

    • /media/nss/DNSVOL/etc/opt/novell/named

    The script also assigns rights and ownership to these directories to the named user.

    rights -f /media/nss/<Volumename>/etc/opt/novell/named -r rwfcem trustee username.context.treename

    In cluster environment, the login directs to /var/opt/novell/log/named/named.run on the local volume where DNS server is running.

    NOTE:By default the ncs_dir.sh script assigns permissions to the named user. If you want to use another user instead of named, modify the ncs_dir.sh script. Follow Step 2 and Step 3 for named user.

  6. Create the DNS server on a Virtual NCP server.

    Add DNS-DHCPGroup or Proxy user as trustee of the Virtual NCP Server with the following rights:

    • All Attribute rights - Compare, Read

    • Entry Rights - Browse

  7. Run the DNS Server by using the following command:

    • /opt/novell/named/bin/novell-named -u <username> -d <debug log level> -V <shared volume>

    This step ensures that DNS server can work on a cluster that is set up with shared volumes. However, kill this process again before you continue.

    NOTE:Using the -V parameter, you must specify only the volume name and not the volume path.

  8. In iManager, select the Clusters > My Cluster task, then select the cluster.

    If the cluster does not appear in your personalized list of clusters to manage, you can add it. Click Add, browse and select the cluster, then click OK. Wait for the cluster to appear in the list and report its status, then select the cluster.

  9. Select Cluster Options, then select the Cluster resource and click Details. The Cluster Pool Properties are displayed. Click the Scripts tab.

    Click the Load Script, Unload Script, or Monitor Script links to view or modify the scripts. If you modify a script, click Apply to save your changes before you leave the page. Changes do not take effect until you take the resource offline, and bring it online again.

    1. Click Load Script.

    2. Ensure that the DNS load script is same as the script specified in DNS Load Script. Click Apply if you make changes.

    3. Click Unload Script.

    4. Ensure that the DNS unload script is same as the script specified in DNS Unload Script and paste it in the Unload Script editor just before the exit 0 statement. Click Apply if you make changes.

    5. Click Monitor Script.

    6. Ensure that the DNS monitor script is the same as the script specified in Configuring the DNS Monitor Script. Click Apply if you make changes.

    7. Click OK to save the changes.

  10. Set the DNS resource online by using the Clusters > Cluster Manager task in iManager. If the resource is in a comatose state, you must take the resource offline before it can be brought online again.
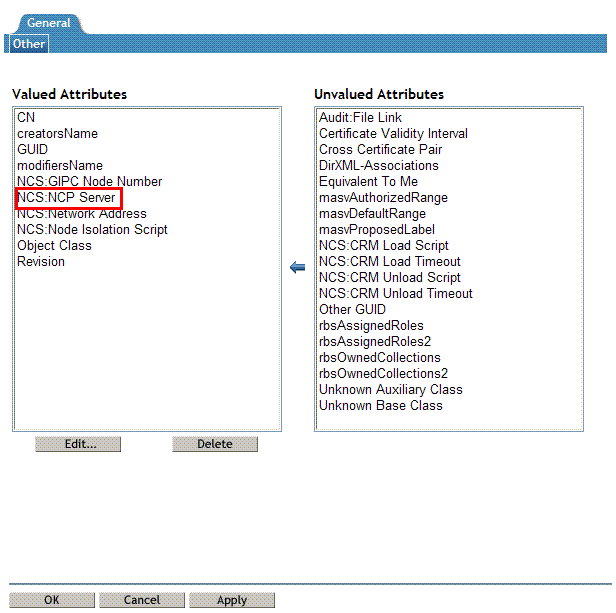
14.2.3 DNS Load, Unload, and Monitor Scripts

DNS Load Script

The load script contains commands to start the DNS service.The load script appears similar to the following example:

#!/bin/bash
. /opt/novell/ncs/lib/ncsfuncs
exit_on_error nss /poolact=DNSPOOL
exit_on_error ncpcon mount DNSVOL=254
exit_on_error add_secondary_ipaddress IP address of the secondary
server
exit_on_error ncpcon bind --ncpservername=Virtual NCP server name
--ipaddress=secondary server IP address
exit_on_error /opt/novell/named/bin/novell-named -u named -V Volume Name 
exit 0

Configuring DNS Load Script

To customize the DNS load script for your specific configuration:

  1. Add the following line to the DNS load script after the ncpcon bind line:

    exit_on_error export LD_LIBRARY_PATH=/opt/novell/xad/lib64:$LD_LIBRARY_PATH
    
    #!/bin/bash
    . /opt/novell/ncs/lib/ncsfuncs
    exit_on_error nss /poolact=DNSPOOL
    exit_on_error ncpcon mount DNSVOL=254
    exit_on_error add_secondary_ipaddress IP address of the secondary
    server
    exit_on_error ncpcon bind --ncpservername=Virtual NCP server name
    --ipaddress=secondary server IP address
    
    exit_on_error export LD_LIBRARY_PATH=/opt/novell/xad/lib64:$LD_LIBRARY_PATH
    
    exit_on_error /opt/novell/named/bin/novell-named -u named -V Volume Name 
    exit 0
    
  2. Edit the following line to assign a volume name:

    exit_on_error /opt/novell/named/bin/novell-named -u named -V volume name

Replace volume name with the name of the volume and secondary server IP address with the IP address of the secondary server.

DNS Unload Script

The unload script contains commands to stop the DNS service. The unload script appears similar to the following example:

#!/bin/bash
. /opt/novell/ncs/lib/ncsfuncs
ignore_error killproc -p /var/opt/novell/run/named/named.pid -TERM
/opt/novell/named/bin/novell-named
ignore_error ncpcon unbind --ncpservername=NCP server name
--ipaddress=IP address of the secondary server
ignore_error del_secondary_ipaddress IP address of the secondary server
ignore_error nss /pooldeact=DNSPOOL
exit 0

Configuring DNS Unload Script

To configure DNS unload script, add the following command:

ignore_error killproc -p /var/opt/novell/run/named/named.pid -TERM
/opt/novell/named/bin/novell-named 

DNS Monitor Script

The monitor script contains commands to monitor the DNS service. The monitor script appears similar to the following example:

#!/bin/bash
. /opt/novell/ncs/lib/ncsfuncs
exit_on_error status_fs /dev/pool/POOL1 /opt/novell/nss/mnt/.pools/DNSPOOL nsspool
exit_on_error status_secondary_ipaddress 10.10.10.100 
exit_on_error ncpcon volume DNSVOL
exit 0 

Configuring the DNS Monitor Script

  1. Add the following before exit 0

    rcnovell-named status 
    if test $? != 0; then 
         exit_on_error /opt/novell/named/bin/novell-named -u named -V <Volume Name> 
    fi 
    exit_on_error rcnovell-named status