3.3 Creating an LVM Volume Group and Logical Volume
After you have installed MySQL, you are ready to set up the LVM volume group and logical volume where you will store a MySQL database. Sample values are used in the procedures in this section to help you understand what is required at each step. The overview provides only the Linux commands that you need to create and prepare the volume group for use by MySQL. The detailed description provides more information about the process, including the syntax and sample commands.
3.3.3 Setting up the VG and LV (Detailed)
For detailed instructions, use the following procedure to create the LVM volume group and logical volume:
-
Log in as the Linux root user to the first node of the cluster, then open a terminal console.
-
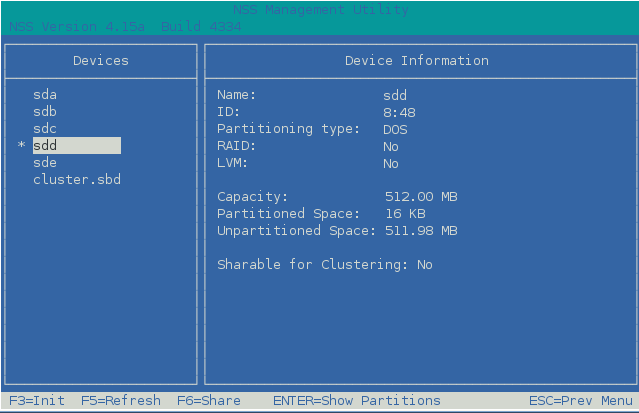
In NSSMU, initialize the SAN device that you want to use for the MySQL database, but do not mark it as shareable for clustering:
-
At the console prompt, launch NSSMU by entering:
nssmu
-
Select , then press Enter.
-
In the list, select the unpartitioned device that you want to use, then press F3 to initialize it.
-
Read the advisory, then press Y to confirm that you want to initialize the device.
-
Specify the Master Boot Record (MBR) type as DOS or GPT, then press Enter.
Typically, you use DOS format for devices up to 2 TB. You use GPT for devices greater than 2 TB.
-
Verify that the device is initialized and that it is unshared (that is, is set to ).
-
Exit NSSMU to return to the command prompt.
-
-
Create an LVM physical volume on the device (such as /dev/sdd) by entering:
pvcreate <device>For example:
pvcreate /dev/sdd No physical volume label read from /dev/sdd Physical volume "/dev/sdd" successfully created
-
Create an LVM volume group (such as mysqlvg) on the physical volume by entering:
vgcreate -c y <vg_name> <device>
For example:
vgcreate -c y "mysqlvg" /dev/sdd Clustered volume group "mysqlvg" successfully created
The volume group is automatically activated.
-
Activate the volume group exclusively on the current server by entering:
vgchange -a ey <vg_name>The -a option activates the volume. The ey parameter specifies the values exclusively and yes.
For example:
vgchange -a ey mysqlvg
-
View information about the volume group by using the vgdisplay command:
vgdisplay <vg_name>Notice that 4 MB of the device are used for the volume group’s Physical Extent (PE) table. You must consider this reduction in available space on the volume group when you specify the size of the LVM logical volume in the next step (Step 7).
For example:
vgdisplay mysqlvg --- Volume group --- VG Name mysqlvg System ID Format lvm2 Metadata Areas 1 Metadata Sequence No 1 VG Access read/write VG Status resizable MAX LV 0 Cur LV 0 Open LV 0 Max PV 0 Cur PV 1 Act PV 1 VG Size 508.00 MB PE Size 4.00 MB Total PE 127 Alloc PE / Size 0 / 0 Free PE / Size 127 / 508.00 MB VG UUID rqyAd3-U2dg-HYLw-0SyN-loO7-jBH3-qHvySe
-
Create an LVM logical volume (such as mysqllv) on the volume group by entering:
lvcreate -n <lv_name> -L size <vg_name>
Specify the logical volume name, size, and the name of the volume group where you want to create it. The size is specified in megabytes by default.
The logical volume full path name is /dev/<vg_name>/<lv_name>.
For example:
lvcreate -n "mysqllv" -L 500 "mysqlvg" Logical volume "mysqllv" created
This volume’s full path name is /dev/mysqlvg/mysqllv.
-
View information about the logical volume by entering:
lvdisplay -v <lv_path_name>For example:
lvdisplay -v /dev/mysqlvg/mysqllv Using logical volume(s) on command line --- Logical volume --- LV Name /dev/mysqlvg/mysqllv VG Name mysqlvg LV UUID nIfsMp-alRR-i4Lw-Wwdt-v5io-2hDN-qrWTLH LV Write Access read/write LV Status available # open 0 LV Size 500.00 MB Current LE 125 Segments 1 Allocation inherit Read ahead sectors auto - currently set to 1024 Block device 253:1 -
Create a file system (such as Ext2, Ext3, ReiserFS, or XFS) on the LVM logical volume by entering:
mkfs -t <fs_type> <lv_path_name> [fs_options]
You can specify file system options according to the type of file system you are making. For information, see the mkfs(8) man page and the related man page for the file system type, such as mkfs.ext2(8), mkfs.ext3(8), mkfs.reiserfs(8), or mkfs.xfs(8).
For example:
mkfs -t ext3 /dev/mysqlvg/mysqllv mke2fs 1.41.9 (22-Aug-2009) Filesystem label= OS type: Linux Block size=1024 (log=0) Fragment size=1024 (log=0) 128016 inodes, 512000 blocks 25600 blocks (5.00%) reserved for the super user First data block=1 Maximum filesystem blocks=67633152 63 block groups 8192 blocks per group, 8192 fragments per group 2032 inodes per group Superblock backups stored on blocks: 8193, 24577, 40961, 57345, 73729, 204801, 221185, 401409 Writing inode tables: done Creating journal (8192 blocks): done Writing superblocks and filesystem accounting information: done This filesystem will be automatically checked every 29 mounts or 180 days, whichever comes first. Use tune2fs -c or -i to override. -
Create a mount point for the logical volume by entering:
mkdir /mnt/mysql
-
Mount the logical volume on the MySQL mount point by entering:
mount -t <fs_type> <lv_path_name> <mount_point>
For example:
mount -t ext3 /dev/mysqlvg/mysqllv /mnt/mysql
-
Go to the mount point location (/mnt/mysql), then create the /var/lib/mysql subdirectory structure by entering:
cd /mnt/mysql
mkdir /mnt/mysql/var
mkdir /mnt/mysql/var/lib
mkdir /mnt/mysql/var/lib/mysql
-
Change the owner and group owner of the /mnt/mysql directory and its contents to use the mysql user and group. Enter the chown command with the recursive (-R) option:
cd /mnt
chown -R mysql:mysql mysql
Another way to do this is to explicitly specify the directory path:
chown -R mysql:mysql /mnt/mysql
-
Continue with Section 3.4, Configuring MySQL on the LVM Logical Volume.