3.2 Installing the Novell Samba Components
The Novell Samba components can be installed at the same time as Open Enterprise Server, or they can be added to an OES 2 server after the initial installation.
NOTE:These instructions assume you are using the default graphical user interface for SLES 10 (GNOME) and installing from a network installation source. If you are using the ncurses (text) version of YaST, these instructions provide only an approximate guide through the interface. If you are installing from CDs, insert them when prompted.
3.2.1 Installing Novell Samba During Initial Server Installation
To install Novell Samba as part of an initial OES 2 server installation, follow the general instructions in Installing OES 2 SP3 as a New Installation
in the OES 2 SP3: Installation Guide. Take note of the following Samba-specific guidelines as you go through the installation:
-
When installing an OES 2 server for Samba, the hostname you specify for the server must be shorter than 13 characters in length. The NetBIOS name for Samba is limited to 15 characters, including the “-W” that is appended to the hostname automatically, which leaves 13 characters for the hostname.
WARNING:If you enter a hostname that is longer than 13 characters, the Novell Samba setup truncates the NetBIOS name to 15 characters. As a result, iManager won’t be able to find the associated server and group objects. If you need to change the NetBIOS name, see Section B.2.3, Changing the NetBios Name.
-
Be sure to select the Novell Samba pattern when you are specifying what software you want to install on the server, along with any other OES Services patterns you need for your implementation.
-
When you reach the OES Configuration portion of the install, follow the instructions in Section 3.2.3, Configuring LUM and Novell Samba to configure LUM and Samba correctly for OES 2.
3.2.2 Installing Novell Samba After Initial Server Installation
To install Novell Samba on an existing OES 2 server:
-
Log in to the server as the root user.
-
Start YaST by clicking > (located in Favorite Applications).
-
If you don’t already have the OES 2 software installed as an add-on product, select > and follow the on-screen prompts to specify the location of your OES 2 installation media.
-
Select > .
-
Under OES Services, select .
SMS, LUM, and NRM are automatically selected as well. Select any other patterns you need for the server (such as iManager and NSS), then click .
-
When prompted, click to install Novell Samba and related RPMs.
-
If prompted for the eDirectory Admin user password, enter it and click .
-
Continue with Section 3.2.3, Configuring LUM and Novell Samba.
3.2.3 Configuring LUM and Novell Samba
The proper configuration of both LUM and Novell Samba is critical to the successful implementation of Samba on an OES 2 server.
-
In the first LUM configuration screen, review the default settings and make any necessary changes.
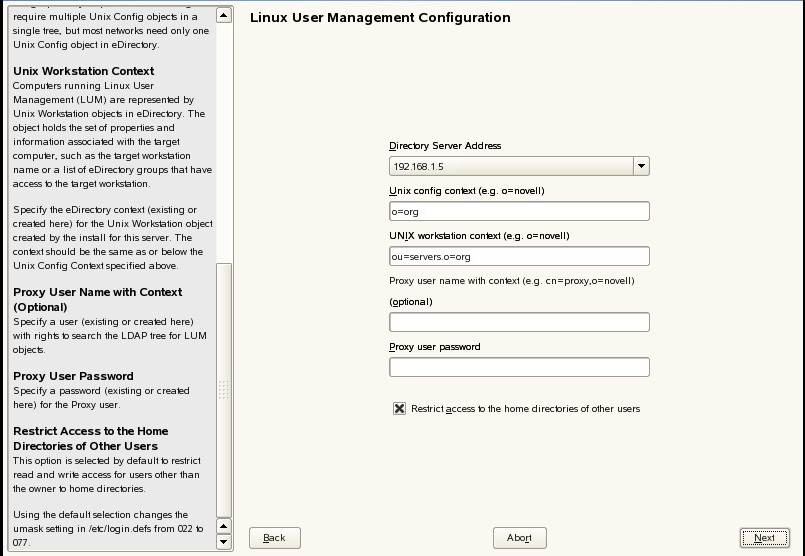
-
The UNIX Configuration object is created in the default context shown. You can specify a different location for the Unix Configuration object, but the default should suffice in most implementations. There is one configuration object per eDirectory tree.
-
By default, the UNIX Workstation object is created in the same context as the OES 2 server’s NCP Server object. It is recommended that you leave this setting at the default.
-
(Optional) If you want to specify a proxy user for LUM, enter a username with context and a password.
-
(Optional) If you want users to have read and write access to each others’ home directories, deselect the option.
This option is selected by default, which restricts read and write access to home directories for users other than the owner. The default selection changes the umask setting in /etc/login.defs from 022 to 077.
-
Click to continue.
-
-
In the second LUM configuration screen, select the PAM-enabled Linux services you want to enable for LUM and Samba users.
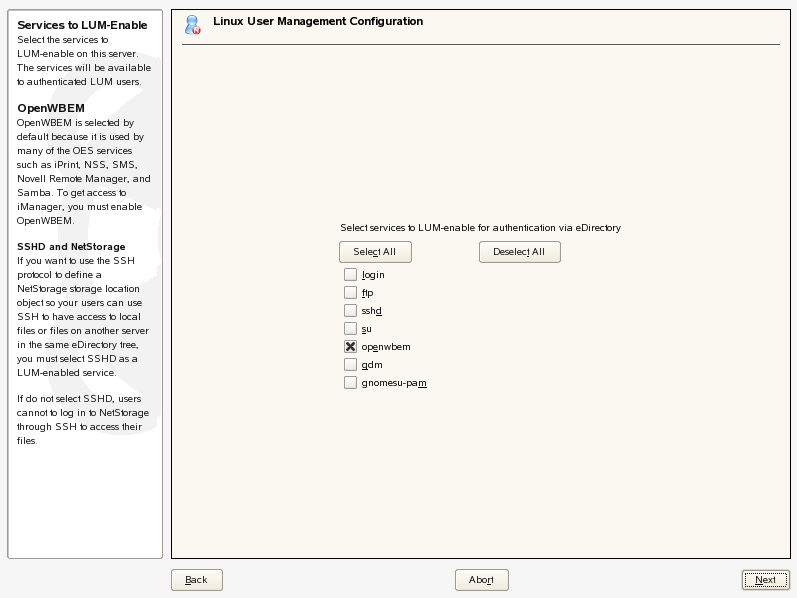
-
The only service selected by default is OpenWBEM. If you want eDirectory users to be able to run Linux commands such as login, ssh, and so on, you must enable the services by selecting them in this list.
To select a service, click the checkbox next to its name.
Click to select all services in the list.
Click to deselect all services in the list.
-
Click to continue.
-
-
In the Samba configuration screen, specify the and proxy user settings.
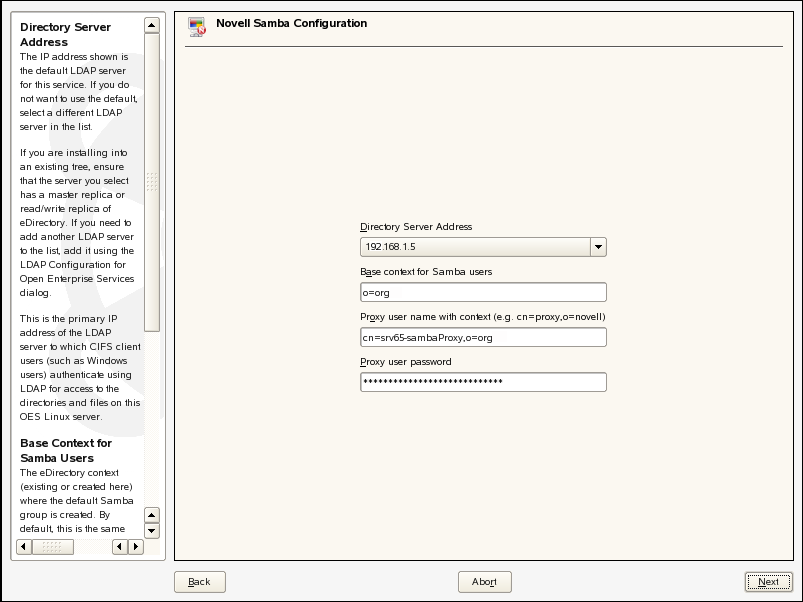
-
By default, the Base Context is set to the context (eDirectory container) where the tree admin user is created. Typically, this is the Organization (O) container, and users are created in Organizational Unit (OU) containers beneath the O container.
If your Samba users are (or will be) located in the same container as the tree admin or in a subcontainer of that container, you do not need to change this setting. Otherwise, specify a container in your tree that is at the same level or above the container where the Samba users will be created.
-
The proxy user is an eDirectory user that has rights to search the tree for Samba users.
The Novell Samba configuration suggests a default proxy user for Samba (cn=server_name-sambaProxy,o=org). If you want to use a different eDirectory user as the proxy user, specify the username in typeful format (for example, cn=proxy_user,ou=users,o=novell)
If you specify an existing eDirectory user, it is assumed that you have already assigned the user the necessary rights and no modification is made to the user.
If you specify a new user that does not already exist in eDirectory, the user is created and assigned the necessary rights.
IMPORTANT:Do not specify the Common Proxy User as the Samba proxy user. Password requirements for the two users are not compatible with each other.
Continue with Step 3.c for password instructions.
-
A password is generated automatically for the default proxy user. You can change this if desired.
If you specified an alternate user, refer to the following points:
-
If you specified a new user that does not already exist in eDirectory, you can use either the auto-generated password or a password that you specify.
-
If you specified an existing eDirectory user, you can specify either the current password for the user or a new password, in which case you are prompted to change the password for the user.
-
-
Click to continue.
-
-
Follow the on-screen prompts to continue with the OES configuration. When it is completed, click to close YaST.
Now that LUM and Novell Samba are installed and configured, you must create eDirectory users and give them access to Samba shares on the OES server.
For instructions, refer to Section 6.1, Creating eDirectory Users for Samba.