9.5 Generating Inventories for Directories or NCP Volumes
With this feature, you can inventory NCP mounted volumes, or general file system directories or subdirectories as well as view graphs, profiles, reports, and key statistics about each of these items, including space usage trends.
IMPORTANT:To view the graphical displays in the inventory report, the Sun Java plug-in must be installed on the browser you use to access Novell Remote Manager, and the browser must have Java and Javascript enabled.
Generating this report can take a while, depending on the number of files and folders in the specified directory path. There is no facility to view previous inventory scans as there was on NetWare.
With a few clicks, you get available space trend graphs; profiles for file types, file owner, last accessed, last modified, creation time, and file size; and links to specific reports for each of these. You can also customize the scan to look for specific file information.
The gathers the ownership statistics as follows:
-
For OES 2 SP3 plus the latest patches, the file inventory gathers information from the NSS management interface. If the eDirectory user name is available from the NSS management interface, the file owner is reported as the eDirectory user name such as jsmith. Otherwise, the owner is reported as the nobody user. It is not required to enable the users with Linux User Management (LUM) to get the file owner’s name.
-
For OES 2 SP2 and earlier, the file inventory gathers file ownership information from the POSIX ownership field that the file system reports to be the file owner. If an eDirectory user name is LUM-enabled, the NSS and NCP volumes report the real user name to Linux, such as jsmith, and the POSIX ownership field reports the actual user. For non-LUM-enabled users, the file system reports the user name as either root or nobody, depending on the user’s permissions when accessing the file system. In order to effectively use the feature to retrieve the eDirectory user name, you must LUM-enable the users.
This section includes the following tasks:
9.5.1 Generating an File Inventory Report
To generate an inventory report for a the entire server or any subdirectory including mounted NCP volumes:
-
Click > .
This opens the General File Inventory page. By default the / (root) directory is selected.

-
From this point you can do the following:
Click the button to generate an inventory of the entire server (the default selection is the / [root] subdirectory).
or
Select a subdirectory to generate a report from by clicking the subdirectory_name links until the desired subdirectory appears in the field, then clicking the button.

If you are viewing the File System Listing page for the desired directory, you can generate the same reports by clicking the link on this page.
A report similar to the following is generated.
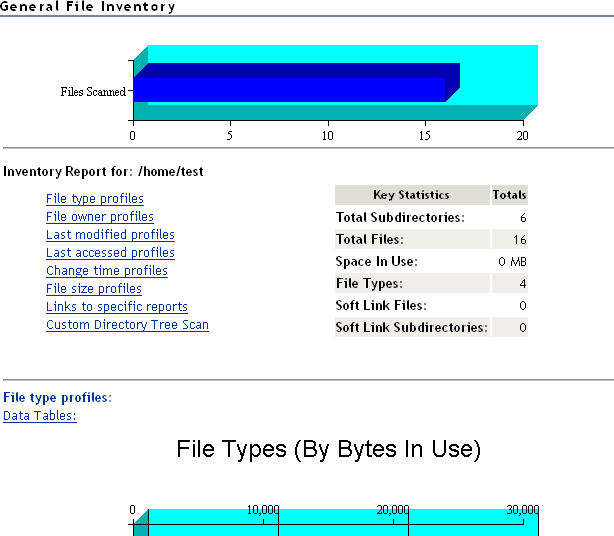
At this point, you can click any of the links to the left of the table to move quickly to the generated information or you can create a custom report. See Generating a Customized Report.
9.5.2 Generating a Volume Inventory Report
To quickly generate a inventory report for a mounted NCP volume:
-
Click > .
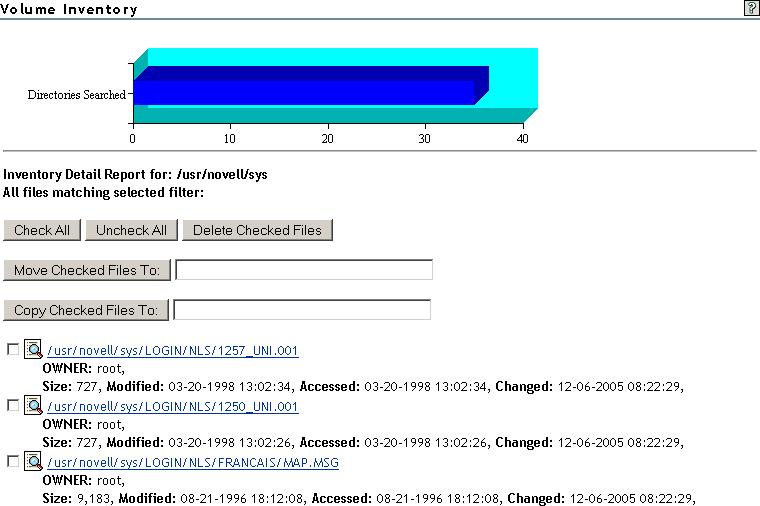
This opens the Volume Inventory page that shows all mounted volumes available for inventory.

-
Click the volume_name link to generate an inventory of the volume selected.
A report similar to the following is generated.

At this point, you can click any of the links to the left of the table to move quickly to the generated information or you can create a custom report. See Generating a Customized Report.
9.5.3 Viewing a Saved NCP Volume Report
An inventory report is saved when you run an inventory on an NCP volume. You can view the last saved report by going to the > page and clicking the > option for the volume. The saved report provides the same statistics as running > . Graphics are not available in a saved report.
9.5.4 Emailing a Saved NCP Volume Report
You can email a saved NCP volume inventory report to addresses that are configured in the /etc/opt/novell/httpstkd.conf file. To send the report, go to the > page and click the > option for the volume.
9.5.5 Generating a Customized Report
After generating an inventory report for a volume or directory, you can create a customized scan to report more specific information and perform additional actions on the files such as move, copy, or delete files selected in the report.
-
Create the initial report as specified in Generating an File Inventory Report or
-
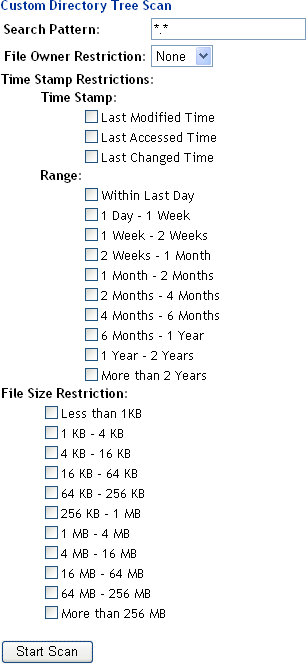
In the generated report, click the link.
A page similar to the following is returned.
-
Type the specific search criteria in the field.
is the default entry.
-
Select the desired settings in the drop-down box.
is the default selection.
-
Select the check boxes desired to customize the report by or restrictions.
No restrictions is the default setting.
-
Click .
A page similar to the following is returned.
Performing Actions on Files from Custom Reports
After a custom report is generated, you can perform the following actions on the files listed in the report.
Moving Selected Files
-
From the generated report, select the check box to the left of each file that you want to move. If you want to move all the files in the list, click the button.
-
Specify the path where you want to move the selected files to in the field to the right of the button.
-
Click the button.
Copying Selected Files
-
From the generated report, select the check box to the left of each file that you want to copy. If you want to copy all the files in the list, click the button.
-
Specify the path where you want to copy the selected files to in the field to the right of the button.
-
Click the button.
Deleting Selected Files
-
From the generated report, select the check box to the left of each file that you want to delete. If you want to delete all the files in the list, click the button.
-
Click the button.
Opening or Downloading a File
-
From the generated report, select the filename link for the file you want to open or download.
-
From the resulting dialog box, select or , then click .
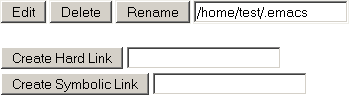
Managing Individual Files
-
From the generated report, click the
 icon.
icon.
-
Perform the desired actions by entering the required information in the applicable field and clicking the applicable button.