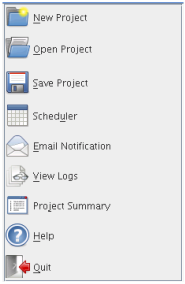
2.1 Project Pane
This is the left pane. You use it to access common project options:
Figure 2-2 Project Pane
2.1.1 Create Project
When you start Migration Tool GUI, a default project opens. You can save that project, create a new project or open an existing migration project.
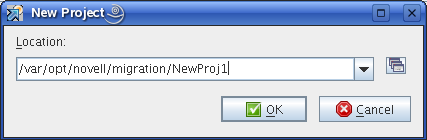
New Project
To create a new project, click . Specify the location to create the new project.
Figure 2-3 New Project
Load Project
To open an existing migration project, click . Select the project, then click .
Save Project
To save a migration project, click , then click . Click to save the project to a different location.
For example, /var/opt/novell/migration/NewProj1.xml. The migration project file NewProj1.xml is saved to the default location.
2.1.2 Schedule Service
You can schedule the migration project to run at your convenience.
Figure 2-4 Scheduler
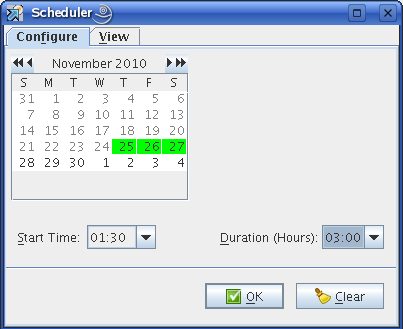
Use the scheduler to perform the following tasks:
Configure
You can schedule the migration project to run on multiple days.
-
Select the date in the calendar.
-
Specify the to run the project.
-
Specify the to run the project.
-
Click to save the schedule
-
In the main migration window, click to migrate, or click , to synchronize the data at the specified time.
The migration project runs on the scheduled date and time.
View
Use this tab to see the week view of the scheduled project.
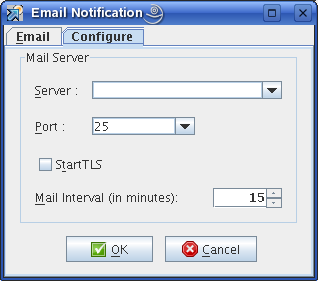
2.1.3 Mail Notification
You can set e-mail notifications for receiving the status of the migration.
Figure 2-5 Notification

-
In the field, type the e-mail address of an individual or group to receive notifications. You can include multiple e-mail addresses separated by a comma.
-
In the field, type the e-mail address that the notification e-mail messages will be sent from.
-
Under , select the option to generate mail.
If you select all the options, you receive notification through mail, depending on the state of migration. For example, when migration fails, you receive an e-mail message notifying you that migration has failed.
-
Click to save the settings.
Configure
-
In the field, specify the hostname or IP address of the recipient's inbound mail queue.
-
Specify the port for the recipient's mail server. In non-secure mode the default port is 25.
-
To send an e-mail message through a secure SMTP connection, select .
For example, to send an e-mail to a gmail account, the IP address is gmail-smtp-in.l.google.com and the port is 26.
-
Specify the mail interval (in minutes) to send e-mail messages for errors encountered. The default time is 15 minutes, but you can increase or decrease the interval as necessary. The e-mail messages are sent only if error notification in the tab is set and if errors are encountered.
NOTE:To set up your default mail settings, update the details in the migconf.properties file.
The e-mail settings can be set by using the /opt/novell/migration/plugin/conf/migconf.properties file. Update the values for the following parameters according to your requirements:
-
mail_server
-
mail_server_port
-
mail_to
-
mail_from
-
populate_values_from_httpstkd
However, if you want default e-mail settings specified in /etc/opt/novell/httpshkd.conf file, then set the populate_values_from_httpstkd parameter to yes in the migconf.properties file.
-
-
Click to save the settings.
2.1.4 Log Files
The progress of overall migration is recorded in the migration.log file. For example, /var/opt/novell/migration/NewProj1/log/migration.log.
You can modify the size and number of log files to be created for any log, including the service-specific logs, by editing the Log.xml configuration file, which is located in the /etc/opt/novell/migration folder. Customize the following parameters for each log file you want to modify:
|
Parameter |
Description |
|---|---|
|
MaxFileSize |
Specifies the size of the log file. Default value: 10 MB |
|
maxBackupIndex |
Specifies the maximum number of files created before the first log file is overwritten. Default value: 10 |
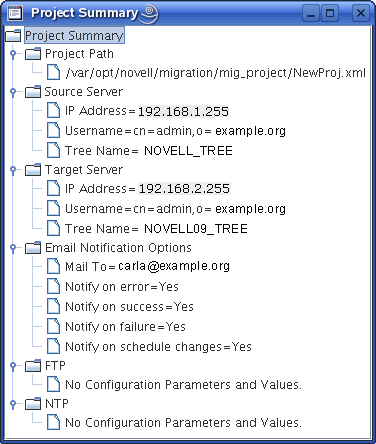
2.1.5 Project Summary
This displays a tree view of the options configured for all the services selected for migration.
Figure 2-6 Project Summary
2.1.6 Help
This displays the help for the Migration Tool.
2.1.7 Quit
This closes the migration window and stops the migration process. If the migration project is not saved, you are prompted to save the project.
2.1.8 Whiteboard
This display instructions and tips to perform a successful migration.