20.3 Migration Procedure
Follow the instructions in either of these sections to perform the CIFS migration.:
20.3.1 Using the Migration Tool
-
Launch the Migration Tool on the target server in one of the following ways:
Desktop: Click .
Terminal: Log in as the root user and at a terminal prompt, enter miggui
For details on configuring source and target Server information, selecting a migration type, opening a project, and all the tool buttons, see Section 2.0, Overview of the Migration GUI.
-
Click , select to migrate, and click .
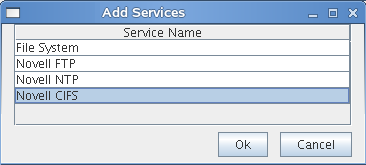
The is displayed as .

-
Select and click to configure the migration parameters.
-
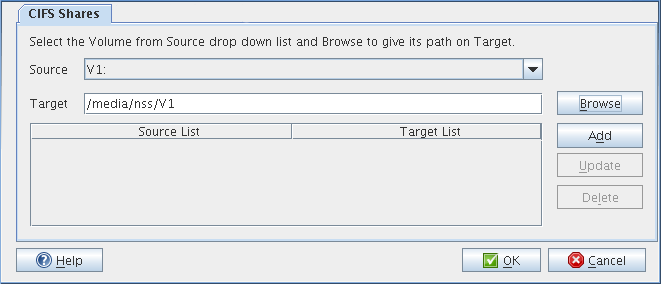
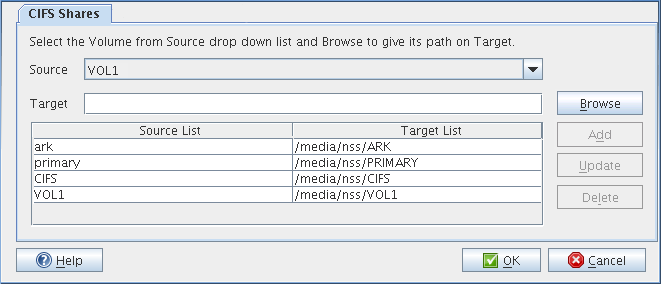
Under , select the and shares for migration. Use to browse for target shares. Use to add more source and target share mappings. Use to modify the configuration. Use to remove the share mappings.
When you have filled in the information, the dialog will be similar to the following:
-
Click to complete the configuration.
The is displayed as .

-
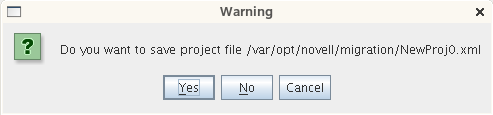
Click to start the migration process. When you are prompted to save the project, click
-
In the next dialog box, click to proceed with the migration.

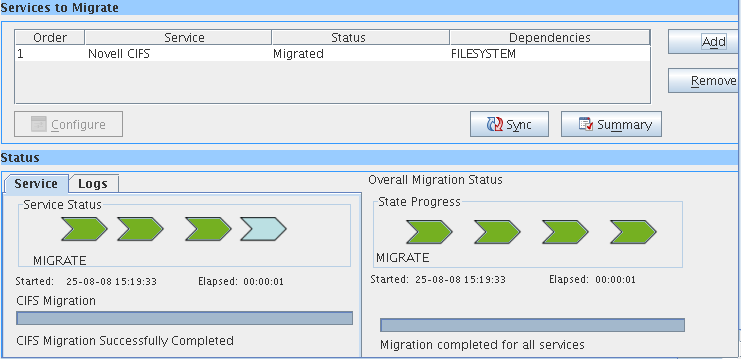
Wait for the migration to be completed. The changes to . The message is displayed.
NOTE:Use the > tab to verify for errors during migration. If there are errors, fix them and restart the migration procedure.
20.3.2 Using the Command Line
CIFS migration requires the complete source and target server details. Run the migCifs utility on the target server for migrating. An example migCifs command is shown below. For details on the command, see Table 20-2 and see migCifs
in Section 20.6, Man Page for Migration.
migCifs -s <sourceIPaddr> -p <sourceportnum> -a <sourceFDN> -w <passwd> -f <sec/nonsecConn> -d <targetIPaddr> -q <targetportnumber> -b <targetFDN> -x <passwd> -g <secure/nonsecureconn> -S <MigrationType> [-m <cifssharemappings>]
migCifs -s <sourceIPaddr> -p <sourceportnum> -a <sourceFDN> -w <passwd> -f <sec/nonsecConn> -d <targetIPaddr> -q <targetportnumber> -b <targetFDN> -x <passwd> -g <secure/nonsecureconn> -S <MigrationType> -c
migCifs -s <sourceIPaddr> -p <sourceportnum> -a <sourceFDN> -w <passwd> -f <sec/nonsecConn> -d <targetIPaddr> -q <targetportnumber> -b <targetFDN> -x <passwd> -g <secure/nonsecureconn> -S <MigrationType> [-m <sourcecifsshares>] -r
Table 20-2 migCifs Command Details
|
Command Option |
Description |
|---|---|
|
-s <sourceIPaddr> |
Source server IP address. For example, -s 192.168.0.1. |
|
-p <sourceportnum> |
Port number of the source server. For example, -p 636. |
|
-a <sourceFDN> |
Source server FDN. For example, -a cn=admin,o=novell. |
|
-w <passwd> |
Password for the source server FDN. For example, -w mysrc. |
|
-f <sec/nonsecConn> |
Secure (SSL) or non-secure (Non-SSL) connection type of the source server. 1 for SSL and 0 for Non-SSL. SSL is preferred. For example, -f 1 or -f 0. |
|
-d <targetIPaddr> |
Target server IP address. For example, -d 192.168.0.2. |
|
-q <targetportnum> |
Port number of the target server. For example, -q 636. |
|
-b <targetFDN> |
Target server FDN. For example, -b cn=admin,o=novell. |
|
-x <passwd> |
Password for the target server FDN. For example, -x mytgt. |
|
-g <sec/nonsecConn> |
Secure (SSL) or non-secure (Non-SSL) connection type of the target server. 1 for SSL and 0 for Non-SSL. SSL is preferred. For example, -g 1 or -g 0. |
|
-S <MigrationType> |
One of the migration types, such as Same Tree, Different Tree, Transfer ID, or Consolidation. 0 for Same Tree, 3 for Transfer ID, and 5 for Consolidation. For example, -S 0 or -S 3 or -S 5. |
|
-m <cifsSharesmap> |
CIFS source to the target share mapping file. This is an optional command. Create the file using any text editor. Separate individual sharemaps by a line.
|
|
-c |
Synchronizes the migration after consolidation. Only the CIFS context is synchronized. CIFS shares and server configuration information are not synchronized. |
|
-r |
Removes the shares related to the source (NetWare) server from the target server after a Transfer ID migration. Pass the source only CIFS share file. The source shares are listed and each share terminated with a #. For example, /media/nss/CIFSV1:#. Do not pass the CIFS Password Policies files with this option. |