25.4 Migration Procedure
Perform the following steps for iPrint migration.
25.4.1 Pre-migration iPrint Configuration
Perform the following pre-migration steps in the target server:
-
Create Driver Store.
If eDirectory server1 value is not pointing to the reliable replica holding server, go to the /etc/opt/novell/iprint/conf/idsd.conf and modify the eDirectory server1 value to a reliable replica holding server. Change the IDSHostAddress value to the IP address (temporary IP Address) of the migration server. Restart the Driver Store (rcnovell-idsd restart).
-
Create Print Manager.
If eDirectory server1 value is not pointing to the reliable replica holding server, go to the /etc/opt/novell/iprint/conf/ipsmd.conf and modify the eDirectory server1 value to a reliable replica holding server. Change the PSMHostAddress value to the IP address (temporary IP Address) of the migration server. Restart the Print Manager (rcnovell-ipsmd restart).
-
Change the iPrint Apache configuration.
If AuthLDAPDNURL is not pointing to the reliable LDAP server, change the AuthLDAPDNURL in the /etc/opt/novell/iprint/httpd/conf/iprint_ssl.conf to a reliable LDAP server. Restart Apache (rcapache2 restart).
-
Ensure that admin user is LUM enabled.
To check that, enter id admin at the terminal. If admin user is LUM enabled, UID and GID information is returned.
-
Ensure that iprintman authentication is successful.
Check the authentication using IP Address and DNS name both.
To check the authentication using IP Address, enter
iprntman psm -l -s <IP address>
To check the authentication using DNS name, enter
iprntman psm -l -s<DNS name>
-
Test iPrint prior to the migration.
Using iManager, view the Print Manager and Driver Store. Click on few options to verify that you are not encountering any error.
On the completion of pre-migration steps, perform the iPrint Consolidate Migration.
NOTE:You can run the psminfo.nlm on the source server and then copy the psminfo.xml file to the target server at /opt/novell/iprint/share location. This avoids contacting the source server during migration.
25.4.2 iPrint Consolidate Migration
Migration of iPrint configuration can be done through the Migration Tool or through the command line interface.
Using the Migration Tool
-
Launch the Migration Tool on the target server in one of the following ways:
Desktop: Click .
Terminal: Log in as the root user and at a terminal prompt, enter miggui.
For details on configuring source and target server information, selecting a migration type, opening a project, and all the tool buttons, see Section 2.0, Overview of the Migration GUI.
-
Authenticate to the source and target servers.
-
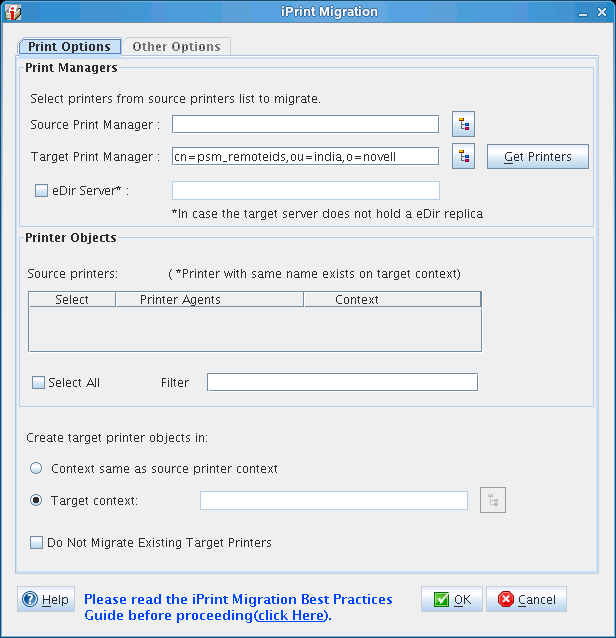
Select , then click . The iPrint configuration window is displayed.
-
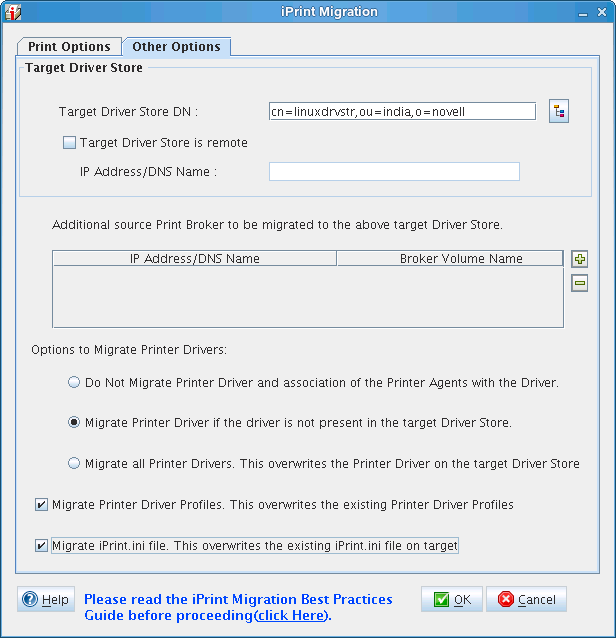
Configure the following parameters to proceed with the migration process:
-
Click to finish the configuration and go back to the migration screen.
-
On completion of the migration, if you have created or added any additional printers on the source server you can use the option to migrate those printers and its associated drivers to the target server.
option can only be used when you have migrated all the printers from the source server (that is, if you have selected option from the GUI).
Using the Command Line Utility
You can use iprintmig to migrate iPrint. For more information, see iPrintmig Man Page.
-
Use one of these methods to migrate to an OES 2 SP3 Linux server.
-
From a terminal prompt on the target server, run iprintmig to migrate the printers on the source server to the target server. Before running the utility set the environment variable for safely transferring the password.
For safe transmission of passwords to the script via an environment variable or via the -P/-T options, see Using Passwords.
IMPORTANT:This method is safe and recommended.
Syntax: iprintmig -s source_server -u source_username_only -U target_username_only -a -x psminfo.xml -I cn=ids,o=example,c=us -i ids.example.com -c ou=iPrint,o=example,c=us
-
From a terminal prompt on the target server, run iprintmig to migrate the printers on the source server to the target server by providing the password.
IMPORTANT:The password is visible to users in this method.
Syntax: iprintmig -s source_server -u source_username_only -p source password -U target_username_only -t target password -a -x psminfo.xml -I cn=ids,o=example,c=us -i ids.example.com -c ou=iPrint,o=example,c=us
-
Migrating One Printer at a Time
Example: iprintmig -s source_server_name -u source_admin -U target_admin -n printer1 -x psminfo.xml -I cn=ids,o=example,c=us -i ids.example.com -c ou=iPrint,o=example,c=us -N
Migrating a Few Printers at a Time
Example: iprintmig -s source_server_name -d target_server_name -u source_admin -U target_admin -x psminfo.xml -I cn=ids,o=example,c=us -i ids.example.com -c ou=iPrint,o=example,c=us -n printer1 -n printer2 -n printer3 -n printer4 -L
Migrating all Printers
Example: iprintmig -s source_server_name -d target_server_name -u source_admin -U target_admin -x psminfo.xml -I cn=ids,o=example,c=us -i ids.example.com -c ou=iPrint,o=example,c=us -a -N
Migrating Printers by Using SSL
Example: iprintmig -s source_server -u source username -U target username -a -I cn=ids,o=example,c=us -i ids.example.com -c ou=iPrint,o=example,c=us -ssl -port LDAP port -N
Migrating Printers without SSL
Example: iprintmig -s source_server -u source username -U target username -a -I cn=ids,o=example,c=us -i ids.example.com -c ou=iPrint,o=example,c=us -port LDAP port -N
25.4.3 Testing the Result of iPrint Migration
-
Manage your iPrint objects using iManager.
-
Install few printers on test workstation.
-
Run reports to verify all the information migrated.
-
Go to https://<MigrationServerIP>/PsmStatus/GenerateReportSettings.
-
Select the check box for Printer Drivers, Associated NDS Printer, and other options known to exist on the NetWare Printer Agents.
-
Click .
-
Verify that all the printer agents have the expected values.
-
25.4.4 Transfer ID
Before performing transfer ID ensure that you have met all the prerequisites and the migration is completed successfully.
We recommend to complete the consolidate migration before starting the Transfer ID without selecting the Novell iPrint service. For more information, see Section 9.0, Preparing for Transfer ID.
25.4.5 Post Transfer ID Migration Steps
On completion of Transfer ID, do the following:
-
Go to the /etc/opt/novell/iprint/conf/ipsmd.conf and change the PSMHostAddress value to the source server's IP or DNS (preferably a CNAME was used). Ensure to use whatever address was used when you loaded with the /dnsname or /ipaddress switch. If you are unsure, view the name by which the iPrint printers are installed to the workstations.
Change the eDirectory server1 value to a reliable eDirectory server address.
-
Go to the /etc/opt/novell/iprint/conf/idsd.conf and change the IDSHostAddress value to the source server's IP or DNS (which is now the target server's IP or DNS).
Change the eDirectory server1 value to a reliable eDirectory server address.
-
Go to the /etc/hosts and ensure that entries are correct for the new identity.
-
Go to the /etc/opt/novell/iprint/httpd/conf/iprint_ssl.conf and update the AuthLDAPDNURL "ldaps://[address..]" to any reliable LDAP server.
-
Go to the /etc/opt/novell/iprint/httpd/conf/iprint_g.conf and update the address after the ServerName entry. Ensure to choose the new identity IP address.
-
Restart Print Manager (rcnovell-ipsmd restart), Driver Store (rcnovell-idsd restart), and Apache (rcapache2 restart).
-
Test your iPrint. Using iManager, manage the Print Manager, Driver Store, and printers to test iPrint.
NOTE:If you encounter error managing the Print Manager, the possible reason for that could be that one of the certificates is not updated. To troubleshoot, refer the cool solution Certificate Re-creation Script for OES1 and OES2.