14.2 Installation and Configuration
14.2.1 Verifying the Novell Cluster Services Setup
To ensure that Novell Cluster Services is set up properly:
-
In iManager, click the button.
This view contains browsing and searching functionality to find objects, including a Tree View feature similar to that used in ConsoleOne.
-
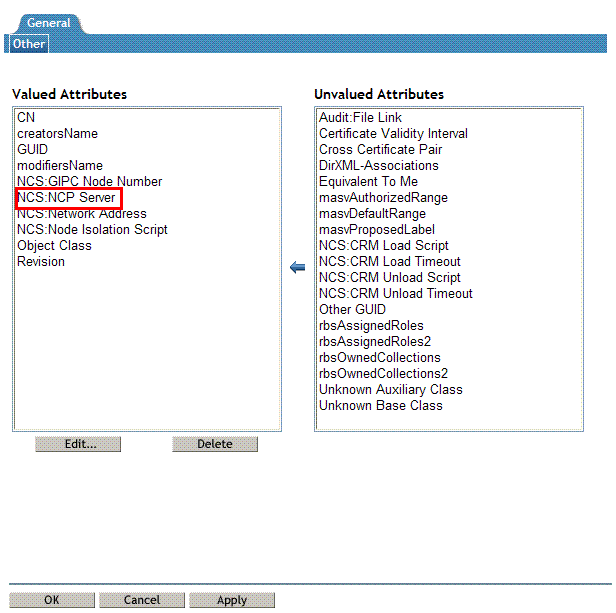
All the cluster nodes are listed inside the cluster object. Select the cluster node object within the cluster object for which you want to set the server attribute, then click Edit. This opens the Modify Object window.
Do not select the NCP server object.
-
Ensure that the NCS: NCP Server attribute is included in the list. If the NCS:NCP Server attribute is in the list, use the
 button to move the attribute to the list as illustrated in the following figure.
-
Select the NCS:NCP Server attribute from the list. Click .
-
The Edit Attribute window is displayed. Ensure that the value of the NCS:NCP attribute is set as the name of the Physical NCP Server.
-
Click to save and exit.
14.2.2 Installing and Configuring a Cluster
-
A DNS server by default uses the named user that is created in the local system during the installation process. If you want to use another user, create the user using the option in YaST.
-
In iManager, click the task to open the Create User window. Specify the details and click to create a new user.
-
The user created in Step 2 needs to be LUM-enabled. To do this, click the task. This opens the Enable Users for Linux window. Search for and select the user created in Step 2, then click to select the user.
-
Every user must belong to a primary group. To add a user to a group, search for an .
-
Select the DNSDHCP-Group object from the list.
-
Select the workstations to which the Linux-enabled user should have access.
-
Click to confirm the selection.
The user is now Linux-enabled, included in the DNSDHCP-GROUP, and granted access to cluster nodes.
-
Update the UID of the user created above (For example: named) to 44.
Select task in iManager. Select the user, go to tab of the user and to 44 that is named user's default UID.
-
-
Mount the shared volume on one of the nodes in the cluster.
-
Execute the following command at the command prompt:
/opt/novell/named/bin/ncs_dir.sh MountPath [Username] It creates the following directory:
<mountpath>/etc/opt/novell/named
The MountPath parameter indicates the target directory in the volume where named specific directories are created.
For example, /opt/novell/named/bin/ncs_dir.sh /media/nss/DNSVOL/ cn=named.o=novell.T=MyTree
When the script is executed, it creates the following directories:
-
/media/nss/DNSVOL/etc/opt/novell/named
The script also assigns rights and ownership to these directories to the named user.
rights -f /media/nss/<Volumename>/etc/opt/novell/named -r rwfcem trustee username.context.treename
In cluster environment, the login directs to /var/opt/novell/log/named/named.run on the local volume where DNS server is running.
-
-
Create the DNS server on a Virtual NCP server.
Add DNS-DHCPGroup or Proxy user as trustee of the Virtual NCP Server with the following rights:
-
All Attribute rights - Compare, Read
-
Entry Rights - Browse
-
-
Run the DNS Server by using the following command:
-
/opt/novell/named/bin/novell-named -u <username> -d <debug log level> -V <shared volume>
This step ensures that DNS server can work on a cluster that is set up with shared volumes. However, kill this process again before you continue.
-
-
Click the task. The Cluster objects are displayed.
-
Select the Cluster resource and click . The Cluster Pool Properties are displayed. Click the tab. You can now view or edit the Load or Unload scripts.
-
Click .
-
Ensure that the DNS load script is same as the script specified in DNS Load Script.
-
Click .
-
Ensure that the DNS unload script is same as the script specified in DNS Unload Script and paste it in the Unload Script editor just before the exit 0 statement
-
Click to save the changes.
-
-
Set the DNS resource online by using the task in iManager
14.2.3 DNS Load and Unload Scripts
DNS Load Script
The load script contains commands to start the DNS service.The load script appears similar to the following example:
#!/bin/bash
. /opt/novell/ncs/lib/ncsfuncs
exit_on_error add_secondary_ipaddress IP address of the secondary
server
exit_on_error nss /poolact=DNSPOOL
exit_on_error ncpcon mount DNSVOL=254
exit_on_error ncpcon bind --ncpservername=Virtual NCP server name
--ipaddress=secondary server IP address
exit_on_error /opt/novell/named/bin/novell-named -u named -V Volume Name
exit 0
Configuring DNS Load Script
To customize the DNS load script for your specific configuration:
-
Edit the following line to assign a volume name:
exit_on_error /opt/novell/named/bin/novell-named -u named -V volume name
Replace volume name with the name of the volume and secondary server IP address with the IP address of the secondary server.
DNS Unload Script
The unload script contains commands to stop the DNS service. The unload script appears similar to the following example:
#!/bin/bash
. /opt/novell/ncs/lib/ncsfuncs
ignore_error killproc -p /var/opt/novell/run/named/named.pid -TERM
/opt/novell/named/bin/novell-named
ignore_error ncpcon unbind --ncpservername=NCP server name
--ipaddress=IP address of the secondary server
ignore_error nss /pooldeact=DNSPOOL
ignore_error del_secondary_ipaddress IP address of the secondary server
exit 0
Configuring DNS Unload Script
To configure DNS unload script, add the following command:
ignore_error killproc -p /var/opt/novell/run/named/named.pid -TERM
/opt/novell/named/bin/novell-named