18.1 Understanding Volume Properties
18.1.1 Volume Attributes
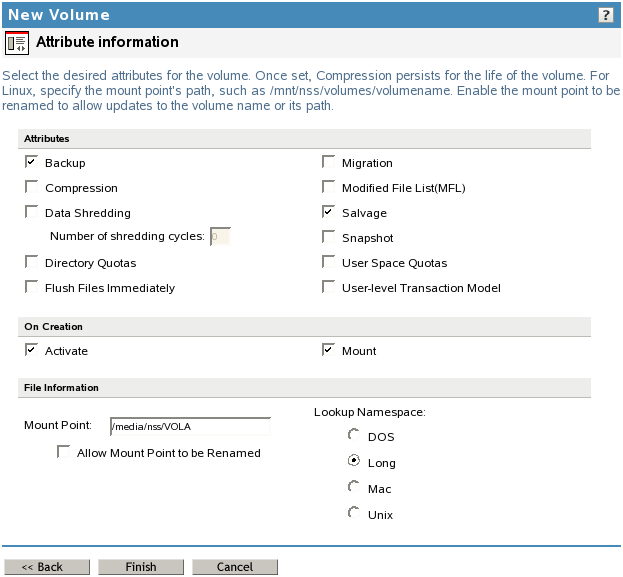
Figure 18-1 shows the volume attributes for an NSS volume that can be set in iManager when you create volumes. An explanation of each attribute is provided below.
Figure 18-1 Volume Attributes
Backup
The Backup attribute sets a flag to indicate to the backup software that the volume contains data you want to back up. Disable this flag if the volume is empty or if backing up the data is unnecessary. This backup flag is independent of the third-party backup system you use; your backup system might not recognize this option, even if you select it. The Backup attribute is enabled by default.
Compression
The Compression attribute activates file compression in NSS volumes. Compression can be activated at creation time only and this choice persists for the life of the volume. Data in the volume might be stored normally or in compressed form, depending on how frequently it is used. Compression parameters can be set at the server level to control compression behavior. For information, see Managing Compression on NSS Volumes.
Data Shredding
The Data Shredding attribute allows you to electronically overwrite deleted and purged data areas to prevent unauthorized users from using a disk editor to access purged files. You can specify the number of times (1 to 7) to shred data. For information, see Section 20.3, Using Data Shredding to Prevent Access to Purged Files.
Directory Quotas
The Directory Quotas attribute enables you to assign a maximum quota of space that a directory can consume. For information, see Managing Space Quotas for Volumes, Directories, and Users.
Flush Files Immediately (NetWare)
The Flush Files Immediately attribute enables NSS to immediately write to disk all data in cache that is pending writes to the file when you close the file. Otherwise, the data in cache must wait until the next write cycle to be written to the disk, putting the information at risk for loss during the interim, for example, if the server failed. For information, see Enabling Flush Files Immediately to Write Data to the Disk on Close
in the NW 6.5 SP8: NSS File System Administration Guide.
IMPORTANT:On Linux, a group write function controls how writes to disk occur. For information, see Section 27.3, Configuring or Tuning Group I/O.
Migration (to Third-Party Near-Line or Offline Storage)
The Migration attribute sets a flag that indicates to third-party software that this volume’s data can be migrated to near-line or offline storage media after it is inactive for specified lengths of time. This attribute requires third-party software to take advantage of the capability.
Modified File List
The Modified File List (MFL) attribute enables NSS to create a list of all files modified since the previous backup. The log is available only through third-party software.
NOTE:This feature is seldom-used since the introduction of the Event File List support in OES 1 SP1 Linux. Consider using the Event File List instead. For information, see FileEvents.xml Definitions
in NDK: Virtual File Services.
Salvage Files
The Salvage Files attribute enables deleted files to remain on the volume until the Purge Delay time expires or until space is needed on the volume for other data. Until the Purge Delay time expires, the Salvage feature tracks the deleted files and allows the deleted files to be salvaged and restored. If space is needed, the oldest deleted files are purged to clear space. Salvage is enabled by default.
If the Salvage Files attribute is disabled, deleted files are purged immediately on deletion.
IMPORTANT:The Salvage Files attribute does not affect whether deleted volumes can be salvaged or purged. Salvage for deleted volumes is determined at the server level with the nss /ImmediatePurgeOfDeletedFiles=<on | off> setting. For more information, see Section 23.2.2, Setting the Immediate Purge of Deleted Files for All NSS Volumes.
For information, see Section 23.0, Salvaging and Purging Deleted Volumes, Directories, and Files.
Snapshot (File-Level) (NetWare)
The File-level Snapshot attribute enables a backup utility to capture the last closed version of a file that is open at the time a backup is in progress. You must manually deactivate the volume, then activate the volume after setting this attribute to let the volume set up the virtual volume for the metadata about file snapshots.
If the File Snapshot attribute is enabled, Novell Storage Management Services (SMS) saves the snapshot version of the file to backup media if a file is in use when the backup occurs.
IMPORTANT:Not all third-party backup software can take advantage of the file snapshot attribute, even if you set it.
For more information, see Using the File-Level Snapshot Attribute to Enable the Backup of Open Files
in the NW 6.5 SP8: NSS File System Administration Guide.
User Space Quotas
The User Space Quotas (user space restrictions) attribute enables you assign a maximum quota of space that a user’s data can consume across all directories in the volume.
For information, see Managing Space Quotas for Volumes, Directories, and Users.
User-Level Transaction Mode (NetWare)
The User-Level Transaction mode enables the Transaction Tracking System (TTS) function for NSS volumes on Netware. TTS logs changes made to a file contents, and protects database applications by backing out transactions that are incomplete because of a system failure. For information, see Using the Transaction Tracking System for Application-Based Transaction Rollback (NetWare)
in the NW 6.5 SP8: NSS File System Administration Guide.
IMPORTANT:The TTS capability is available only on NetWare. If you enable this attribute for an NSS volume on Linux, it is ignored.
When working on OES 2 Linux, if your data requires content-level transaction tracking and you want to continue to control access to data with trustees, you can use NCP volumes on Linux Reiser, XFS, or Ext3 file systems. Configure the journaling mode for the file system to the Journaling level, which provides content-level transaction tracking. For information about creating and managing NCP volumes on Linux, see Managing NCP Volumes
in the OES 2 SP3: NCP Server for Linux Administration Guide.
Mount Point
For a Linux server, specify the mount point for the NSS volume, such as /media/nss/VOLA.
The default mount path for NSS volumes is /media/nss/volumename, where volumename is the name of the volume. You can optionally specify another path as the mount point.
Allow Mount Point to Be Renamed: Select this option if you want to allow the mount point to be renamed if the volume is renamed.
This feature works only if the volume is mounted in its default location (/media/nss/volumename). For example, you have a volume VOL1 and the default mount point location is /media/nss/VOL1. For this volume, you have selected the option .
You renamed VOL1 to MYVOL, the default mount point after renaming becomes as /media/nss/MYVOL.
Lookup Namespace
NSS provides multiple name spaces for the volume: Long, UNIX, DOS, and Macintosh. The Lookup Namespace attribute sets the primary name space to use when you mount the volume, but all name spaces are available for use by various applications.
For NSS volumes, the Long name space is highly recommended because names on NSS are case insensitive by default. The UNIX name space supports case-sensitive naming.
For OES 2 SP1 and later, Long is also the default name space for NSS volumes. Using the Long name space as primary improves performance over using the UNIX name space, especially if you expect to store millions of files on the volume.
NOTE:In OES 2 Linux and earlier, UNIX was the default name space for mounting NSS volumes on Linux.
For Linux, NCP tools require that only the Long or UNIX be set as the primary name space. With DOS or Mac set as the primary name space, you cannot view or manage the volume from Novell Remote Manager, and users are unable to map to the volume using NCP clients. If you use the Long or UNIX name space, the DOS and Mac name spaces are still available, but they are not the primary.
The UNIX name space supports some special characters that are not allowed in the Long name space, such as characters 0x01 through 0x07 and 0x10 through 0x1f. If you need to use these special characters in filenames, choose UNIX as the default name space.
If you change the name space for an existing shared volume by using NSSMU or the Storage plug-in for iManager, you must modify the load script for the pool cluster resource to add the name space to the ncpcon mount command for the volume. Otherwise, the cluster assumes the default name space for mounting the volume. You can do this by using the /opt=ns=<long|unix|dos|mac> switch in the ncpcon mount command.
For example, to specify the LONG name space, add the /opt=ns=long switch as follows:
ncpcon mount /opt=ns=long <VOLUMENAME>=<VOLUMEID>
For example, to specify the UNIX name space, add the /opt=ns=unix switch as follows:
ncpcon mount /opt=ns=unix <VOLUMENAME>=<VOLUMEID>
18.1.2 Encryption Support
Encryption provides password-protected activation of encrypted NSS volumes. Encryption can be activated at creation time only, and this choice persists for the life of the volume. Encrypted volume support is available on OES 1 SP1 Linux and later.
Encrypted volumes can be created only from NSSMU. Encrypted volumes require special handling on the first activation after startup, but all attributes are available for encrypted volumes and are managed the same as for unencrypted volumes. For information about creating and activating encrypted volumes, see Managing Encrypted NSS Volumes.
18.1.3 Enhanced Hard Link Support
Enhanced hard link support for an NSS volume allows users to create multiple names for a single, existing file object in the same directory or in multiple directories in the same NSS volume. NSS supports zero to 65,535 hard links per file on NSS volumes.
You must upgrade the media format before you can set the Hard Links attribute and create new hard links on a volume. For information about upgrading the media format, see Section 4.0, Upgrading the NSS Media Format.
After the media upgrade for enhanced hard links support, the Hard Links attribute must be enabled or disabled by using commands. The attribute cannot be enabled or disabled in NSSMU or in iManager. For information about enabling Hard Link support for a volume, see Section 24.3, Enabling or Disabling the Hard Links Attribute.
After the volume has been enabled for enhanced hard links, you can create hard links. For information about creating and managing hard links, see Section 24.0, Managing Hard Links.
Beginning in OES 2 SP1, Novell Storage Management Services supports the backup and restore of hard links on NSS volumes.
Hard links are lost when you use the Move Volume or Split Volume features of Distributed File Services.