10.18 Creating or Deleting Cluster SBD Partitions
If a single node (or group of nodes) somehow becomes isolated from other nodes, a condition called split brain results. Each side believes the other has failed, and forms its own cluster view that excludes the nodes it cannot see. Neither side is aware of the existence of the other. If the split brain is allowed to persist, each cluster will fail over the resources of the other. Since both clusters retain access to shared disks, corruption will occur when both clusters mount the same volumes.
Novell Cluster Services provides a split-brain detector (SBD) function to detect a split-brain condition and resolve it, thus preventing resources from being loaded concurrently on multiple nodes. The SBD partition contains information about the cluster, nodes, and resources that helps to resolve the split brain condition.
Novell Cluster Services requires an SBD partition for a cluster if its nodes use physically shared storage. Typically, you create the SBD when you configure the cluster on the first node. You can alternatively configure an SBD for the cluster after you configure the first node, but before you configure Novell Cluster Services on the second node of the cluster. You might also need to delete and re-create an SBD partition if the SBD becomes corrupted or its device fails.
An SBD must exist and the cluster must be enabled for shared disk access before you attempt to create shared storage objects in a cluster, such as pools and volumes. Novell Linux Volume Manager (NLVM) and other NSS management tools need the SBD to detect if a node is a member of the cluster and to get exclusive locks on physically shared storage.
This section describes how to use the Novell Cluster Services SBD Utility (sbdutil) to create and delete SBD partitions.
-
Section 10.18.1, Requirements and Guidelines for Creating an SBD Partition
-
Section 10.18.3, Creating a Non-Mirrored Cluster SBD Partition with SBDUTIL
-
Section 10.18.4, Mirroring an Existing SBD Partition with NSSMU
-
Section 10.18.5, Creating a Mirrored Cluster SBD Partition with SBDUTIL
-
Section 10.18.6, Removing a Segment from a Mirrored Cluster SBD Partition
-
Section 10.18.7, Deleting a Non-Mirrored Cluster SBD Partition
-
Section 10.18.9, Additional Information about SBD Partitions
10.18.3 Creating a Non-Mirrored Cluster SBD Partition with SBDUTIL
If you did not create a cluster SBD partition during the Novell Cluster Services installation on the first node of the cluster, you can create it later by using the SBDUTIL utility (/opt/novell/ncs/bin/sbdutil). You might also need to delete and re-create an SBD partition if the SBD becomes corrupted or its device fails. See the man page for sbdutil for more information on how to use it.
If a cluster partition does not exist, create one by using the SBDUTIL:
-
Ensure that nobody else is changing any storage on any nodes at this time.
Until the SBD exists and the cluster is set up for shared disk access, you are responsible for ensuring that you have exclusive access to the shared storage.
-
Take the cluster down:
-
Log in to any node in the cluster as the root user, then open a terminal console.
-
At the command prompt, enter
cluster down
-
-
On each cluster node, stop Novell Cluster Services:
-
Log in to the cluster node as the root user, then open a terminal console.
-
At the command prompt, enter
rcnovell-ncs stop
-
After you have stopped Novell Cluster Services on all nodes, continue with the next step.
-
-
Prepare a SAN device to use for the SBD partition:
-
Use the SAN storage array software to carve a device to use exclusively for the SBD partition.
-
Attach the device to all nodes in the cluster.
-
On each node, log in as the root user and rescan for devices:
nlvm -s rescan
Use the -s NLVM option to override the shared locking requirement and force the command to execute.
-
-
Log in to any node in the cluster as the root user, then open a terminal console.
-
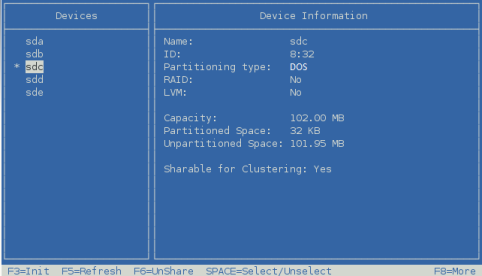
View a list of the devices and identify the leaf node name (such as sdc) of the SAN device that you want to use for the SBD partition. At the command prompt, enter
nlvm -s list devices
Use the -s NLVM option to override the shared locking requirement and force the command to execute.
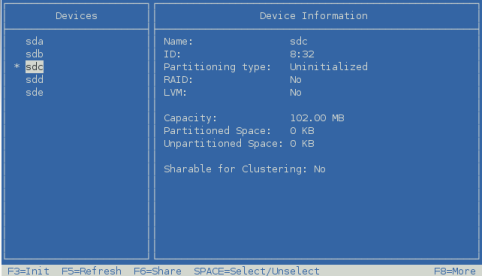
The device information shows the leaf node name, the size, the amount of free available space, the partitioning format (such as MSDOS or GPT), the shared state (whether it is marked as Shareable for Clustering), and the RAID state (whether the device is an NSS software RAID device). Do not use an NSS software RAID for the device.
For example, an uninitialized device reports a format of None and a shared state of No:
sdc size=102.00MB free=0KB format=None shared=No RAID=No
-
Initialize and share the device. At the command prompt, enter
nlvm -s init <device_name> format=msdos sharedWARNING:Initializing a device destroys all data on the device.
Replace device_name with the leaf node name (such as sdc) of the SAN device you want to use as the SBD partition.
Specify a partitioning format of msdos.
Specify the shared option to mark the device as Shareable for Clustering.
Use the -s NLVM option to override the shared locking requirement and force the command to execute.
You can list the devices to visually verify that the device is formatted and shared:
nlvm -s list devices
For example, the formatted device sdc reports a format of MSDOS and a shared state of Yes:
sdc size=102.00MB free=101.98MB format=MSDOS shared=Yes RAID=No
-
As the root user, enter the following at the command prompt:
sbdutil -c -n <cluster_name> -d <device_name> -s <size>
For the -n option, replace with the name of the cluster, such as cluster1. This name must match the name of an existing cluster that has a Cluster object in eDirectory. The name is case sensitive.
For the -d option, replace device_name with the leaf node name of the device where you want to create the cluster partition, such as sdc.
For the -s option, use one of the following methods for specifying the size of the SBD partition. For information about size requirements, see Preparing a SAN Device for the SBD.
-
Specify a value: Replace size with the size (in MB) to use for the SBD partition.
For example, the following command creates the /dev/nss/mycluster1.sbd partition with a size of 200 MB:
sbdutil -c -n mycluster1 -d sdc -s 200
-
Specify -1: You can specify the size as -1 to use all free space on the device. This option allows Novell Cluster Services to use a whole disk/LUN (or LUNs) that you set aside for SBD.
For example, the following command creates the /dev/nss/cl1.sbd partition on the CX4-LUN000 device, and uses the entire device:
sbdutil -c -n cl1 -d CX4-LUN000 -s -1
-
Use default size: If the -s option is not used, the default size is 8 MB.
For example, the following command creates the /dev/nss/cl2.sbd partition on the sdd device with the default size of 8 MB:
sbdutil -c -n cl2 -d sdd
-
-
On each node, log in as the root user and rescan for devices:
nlvm -s rescan
Use the -s NLVM option to override the shared locking requirement and force the command to execute.
-
(Optional) You can use the sbdutil -f -s command to view the path of the SBD partition.
-
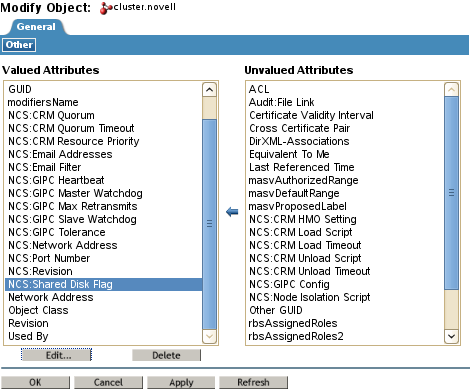
Modify the Cluster object in eDirectory to enable its NCS: Shared Disk Flag attribute.
This step is required only if the cluster has never had an SBD partition. However, it does no harm to verify that the attribute is enabled.
-
In a web browser, open iManager, then log in to the eDirectory tree that contains the cluster you want to manage.
IMPORTANT:Log in as an administrator user who has sufficient rights in eDirectory to delete and modify eDirectory objects.
-
Select , then select .
-
Browse to locate and select the Cluster object of the cluster you want to manage, then click .
-
Under , select the NCS: Shared Disk Flag, then click .
-
Select (enable) the check box, then click .

-
Click to save changes.
-
-
On each cluster node, start Novell Cluster Services:
-
Log in to the cluster node as the root user, then open a terminal console.
-
At the command prompt, enter
rcnovell-ncs start
-
After you have restarted Novell Cluster Services on all nodes, continue with the next step.
-
-
On each cluster node, join the cluster. At the command prompt, enter
cluster join
-
(Optional) Continue with Section 10.18.4, Mirroring an Existing SBD Partition with NSSMU.
10.18.4 Mirroring an Existing SBD Partition with NSSMU
You can mirror an existing Novell Cluster Services SBD partition to provide device fault tolerance. It is not necessary to take the cluster down or stop the cluster software.
This section describes how to use NSSMU to mirror the SBD partition. For information about using Novell Linux Volume Manager (NLVM) commands to mirror an SBD, see Mirroring an Existing SBD Partition with NLVM
in the OES 2015 SP1: NLVM Reference.
-
Prepare a SAN device to use as the mirror segment for the SBD partition:
-
Use the SAN storage array software to carve a device that is at least the size of the existing SBD partition’s device.
-
Attach the device to all nodes in the cluster.
-
On each node, log in as the root user and rescan for devices:
nlvm rescan
-
-
Initialize and mark the device as :
-
Log in to any node of the cluster as the root user, then open a terminal console.
-
Launch NSSMU:
nssmu
-
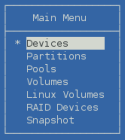
In the NSSMU Main Menu, select and press Enter.
-
In the list, select the device that you want to use for the SBD mirror, press F3 to initialize the device, then press y (Yes) to confirm and continue.
WARNING:Initializing a device destroys all of the data on it.
-
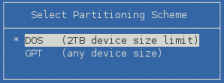
Select the DOS partitioning scheme for the device, then press Enter.
DOS supports devices up to 2 TB in size. GPT supports devices of any size.
Wait for the page to refresh before continuing.
-
Press F6 to mark the device as shareable for clustering.
The value changes from to .
-
Press Esc to return to the NSSMU Main Menu.
-
-
In NSSMU, mirror the SBD partition:
-
Select from the NSSMU Main Menu.
-
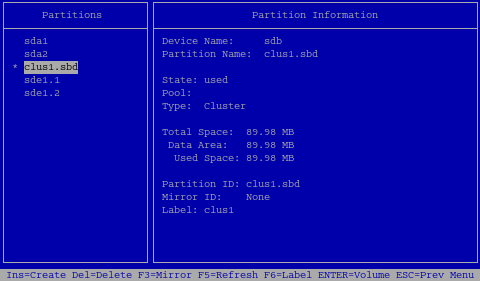
From the list of partitions, select the SBD partition that you want to mirror. The partition is named the same as the cluster with an .sbd extension, such as clus1.sbd.
-
Press F3 to open the dialog to create the RAID1 mirror.
-
Type the cluster name (such as clus1) for the RAID, then press Enter.
This is the same name as the SBD partition but without the .sbd extension.

-
From the list of available devices, select a device to use as the second segment of the mirror, then press the space bar to choose it.

When the device is selected, the asterisk next to the device stays there even if you move the cursor up and down in the list.
-
Press F3 again to accept your selection and create the mirror.
-
In the confirmation message, press y (Yes) to approve the RAID1 creation.
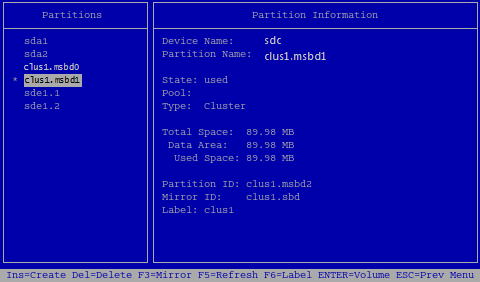
The SBD partitions are renamed with the partition name, and now have the extension of .msbd0 (mirrored SBD partition 0) and .msbd2 (mirrored SBD partition 1).
For example, for a cluster named clus1, the mirrored SBD partitions are clus1.msbd0 and clus1.msbd1.
-
Press Esc to return to the NSSMU Main Menu.
-
-
In NSSMU, verify that the RAID1 device was created for the SBD:
-
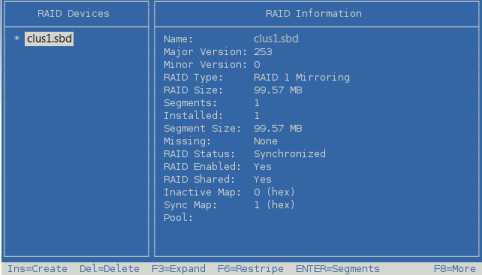
Select from the NSSMU Main Menu.
-
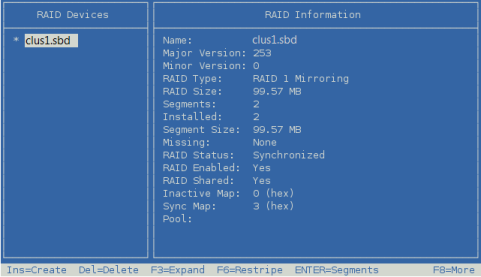
Select the RAID1 device that you created to view details about the mirrored SBD device (such as clus1.sbd).
-
View the RAID Status to ensure that synchronization has begun.
Synchronization is complete when the status is .
-
-
Press Esc twice to exit NSSMU.
10.18.5 Creating a Mirrored Cluster SBD Partition with SBDUTIL
You can create a mirrored Novell Cluster Services SBD partition to provide device fault tolerance for the SBD. You must take the cluster down and stop the cluster software.
Use the procedure in this section to create a new mirrored SBD partition by using the sbdutil utility. For information about using Novell Linux Volume Manager (NLVM) commands to create a new mirrored SBD partition, see Creating a Mirrored SBD Partition with NLVM
in the OES 2015 SP1: NLVM Reference.
-
Ensure that nobody else is changing any storage on any nodes at this time.
Until the SBD exists and the cluster is set up for shared disk access, you are responsible for ensuring that you have exclusive access to the shared storage.
-
Take the cluster down:
-
Log in to any node in the cluster as the root user, then open a terminal console.
-
At the command prompt, enter
cluster down
-
-
On each cluster node, stop Novell Cluster Services:
-
Log in to the cluster node as the root user, then open a terminal console.
-
At the command prompt, enter
rcnovell-ncs stop
-
After you have stopped Novell Cluster Services on all nodes, continue with the next step.
-
-
Prepare two SAN devices to use for the SBD partition:
-
Use the SAN storage array software to carve two devices of equal size to use exclusively for the mirrored SBD partition.
-
Attach the devices to all nodes in the cluster.
-
On each node, log in as the root user and rescan for devices:
nlvm -s rescan
Use the -s NLVM option to override the shared locking requirement and force the command to execute.
-
-
Log in to any node in the cluster as the root user, then open a terminal console.
-
View a list of the devices and identify the leaf node name (such as sdc) of the two SAN devices that you want to use for the mirrored SBD partition. At the command prompt, enter
nlvm -s list devices
Use the -s NLVM option to override the shared locking requirement and force the command to execute.
The device information shows the leaf node name, the size, the amount of free available space, the partitioning format (such as MSDOS or GPT), the shared state (whether it is marked as Shareable for Clustering), and the RAID state (whether the device is an NSS software RAID device). Do not use an NSS software RAID for the device.
For example, uninitialized devices report a format of None and a shared state of No:
sdc size=102.00MB free=0KB format=None shared=No RAID=No
sdd size=102.00MB free=0KB format=None shared=No RAID=No
-
Initialize and share the two devices. At the command prompt, enter
nlvm -s init <device_name1>,<device_name2> format=msdos shared
WARNING:Initializing a device destroys all data on the device.
Replace device_name1 and device_name2 with the leaf node names (such as sdc and sdd) of the two SAN devices you want to use for the mirrored SBD partition.
Specify a partitioning format of msdos.
Specify the shared option to mark the devices as Shareable for Clustering.
Use the -s NLVM option to override the shared locking requirement and force the command to execute.
For example, to initialize devices sdc and sdd, enter
nlvm -s init sdc,sdd format=msdos shared
You can list the devices to visually verify that the device is formatted and shared:
nlvm -s list devices
For example, the formatted devices sdc and sdd report a format of MSDOS and a shared state of Yes:
sdc size=102.00MB free=101.98MB format=MSDOS shared=Yes RAID=No
sdd size=102.00MB free=101.98MB format=MSDOS shared=Yes RAID=No
-
Create a mirrored SBD partition. At the command prompt, enter
sbdutil -c -n <cluster_name> -d <device_name1> -d <device_name2> -s <size>
Replace with the name of the cluster, such as cluster1. This name must match the name of an existing cluster that has a Cluster object in eDirectory. The name is case sensitive.
Replace device_name1 and device_name2 with the leaf node names (such as sdc and sdd) of the two SAN devices you want to use for the mirrored SBD partition. The cluster1.msbd0 mirrored SBD partition is created on the first device option instance in the command. The cluster1.msbd1 mirrored SBD partition is created on the second device option instance in the command.
For the -s option, replace size with the size (in MB) to use for each of the SBD RAID1 segments. Specify the size only once. Both devices should be the same size, but if they are not, the size of the RAID segments is determined by the size of the smaller device. Use one of the following methods for specifying the size of the SBD partition. For information about size requirements, see Preparing a SAN Device for the SBD.
-
Specify a value: Replace size with the size (in MB) to use for the SBD partition.
For example, the following command creates the cl1.sbd mirrored RAID device and the cl1.msbd0 and cl1.msbd1 partitions. Each segments is up to 1020 MB in size, depending on where the last cylinder boundary lies.
sbdutil -c -n cl1 -d CX4-LUN000 -d CX4-LUN001 -s 1020
-
Specify -1: You can specify the size as -1 to use all free space on the device. This option allows Novell Cluster Services to use a whole disk/LUN (or LUNs) that you set aside for SBD.
For example, the following command uses devices sdc and sdd to create the cluster1.sbd mirrored RAID device and the SBD mirrored partitions cluster1.msbd0 and cluster1.msbd1. It uses all available free space on the smaller device as the segment size.
sbdutil -c -n cluster1 -d sdc -d sdd -s -1
-
Use default size: If the -s option is not used, the default size is 8 MB.
-
-
On each node, log in as the root user and rescan for devices:
nlvm -s rescan
Use the -s NLVM option to override the shared locking requirement and force the command to execute.
-
(Optional) You can use the sbdutil -f -s command to verify the path and name of the SBD RAID device.
You can also use NSSMU, the Storage plug-in to iManager, or the nlvm -s list partitions command to view the partitions used by the RAID device.
-
Modify the Cluster object in eDirectory to enable its NCS: Shared Disk Flag attribute.
This step is required only if the cluster has never had an SBD partition. However, it does no harm to verify that the attribute is enabled.
-
In a web browser, open iManager, then log in to the eDirectory tree that contains the cluster you want to manage.
IMPORTANT:Log in as an administrator user who has sufficient rights in eDirectory to delete and modify eDirectory objects.
-
Select , then select .
-
Browse to locate and select the Cluster object of the cluster you want to manage, then click .
-
Under , select the NCS: Shared Disk Flag, then click .
-
Select (enable) the check box, then click .
-
Click to save changes.
-
-
On each cluster node, start Novell Cluster Services:
-
Log in to the cluster node as the root user, then open a terminal console.
-
At the command prompt, enter
rcnovell-ncs start
-
After you have restarted Novell Cluster Services on all nodes, continue with the next step.
-
-
On each cluster node, join the cluster. At the command prompt, enter
cluster join
10.18.6 Removing a Segment from a Mirrored Cluster SBD Partition
You can remove a segment from a mirrored cluster SBD partition and keep the remaining SBD partition. The software RAID definition remains, so if you delete the remaining partition later, you must delete the software RAID instead of simply deleting the partition as with a stand-alone SBD partition.
IMPORTANT:You can use NLVM commands to completely unmirror the SBD RAID1 device, and keep the SBD partition. See Unmirroring a Mirrored SBD Partition with NLVM
in the OES 2015 SP1: NLVM Reference.
You can specify which segment to keep when you use NSSMU to remove a segment from a software RAID 1 (mirror) device.
-
Log in to any node as the root user, then launch a terminal console.
-
At the command prompt, enter
cluster maintenance on
This causes all cluster servers to enter maintenance mode.
-
Remove a segment from the SBD RAID1 device.
-
Launch NSSMU:
nssmu
-
In the NSSMU Main Menu, select .
-
Select the software RAID1 device for the cluster SBD that you want to manage.
-
Press Enter to show its member segments.
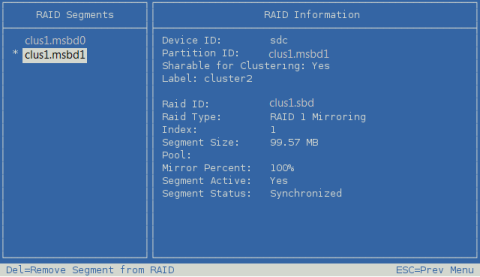
-
Select the member segment you want to delete, press Delete to remove the RAID segment, then press y (Yes) to confirm the removal.
-
Press Esc to return to the Software RAIDs page.
The RAID definition remains for the remaining segment of the mirrored SBD partition. The SBD RAID1 reports that it has one segment.
-
Press Esc twice to exit NSSMU.
-
-
At the terminal console of one cluster server, enter
cluster maintenance off
This causes all cluster servers to return to normal mode.