14.4 Configuring an LVM Cluster Resource with LVM Commands and the Generic File System Template
This section describes how to use Linux Logical Volume Manager (LVM) commands to create a shared LVM volume group. You use the Generic File System template (Generic_FS_Template) to create a volume group cluster resource that cluster-enables the exiting LVM volume group.
After you create the resource, you can add lines to its load script, unload script, and monitor script to customize the resource for other uses. Compare the Generic_FS_Template to the resource template for your product to determine which lines need to be added or modified.
14.4.2 Creating a Generic File System Cluster Resource for an LVM Volume Group
You can use the Novell Cluster Services Generic File System template (Generic_FS_Template) to create a cluster resource for the LVM volume group.
-
Ensure that the SAN device is attached to all of the nodes in the cluster.
-
Ensure that the existing LVM volume you want to cluster-enable is deactive on all nodes in the cluster.
See Step 13 in Section 14.4.1, Creating a Shared LVM Volume with LVM Commands.
-
In iManager, select >
-
Select the cluster you want to manage, then click .
-
Click the link.
-
Click the radio button, then click .

-
Specify information to define your new cluster resource:
-
Specify the name of the resource you want to create, such as clustervg01.
Do not use periods in cluster resource names. Novell clients interpret periods as delimiters. If you use a space in a cluster resource name, that space is converted to an underscore.
-
In the field, browse to select the .
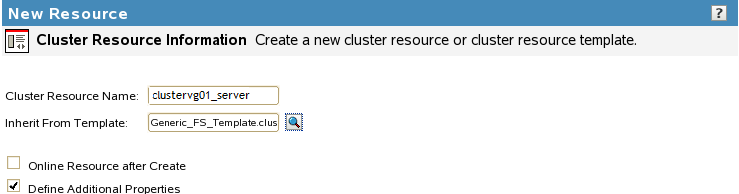
-
Deselect or select .
This option is deselected by default. Deselect this option to allow an opportunity to verify the scripts and resource policies before you bring the resource online for the first time.
Select this option to automatically online the resource on its most preferred node as soon as it is created and configured. The most preferred node is the first server in the assigned nodes list for the resource. You should also select the check box to configure the resource now.
-
Select the check box.
When this option is enabled, a wizard walks you through the load, unload, and monitor scripts, then allows you to set up the policies and preferred nodes for the cluster resource.
-
Click .
If you selected , continue with the setup. Otherwise, select the resource in the Cluster Objects list to open its properties page, and configure the resource.
-
-
Configure the load script for the resource by replacing the variables with your own values, specify the value, then click .
The following is the default Generic_FS template load script. The variable values must be specified before you can successfully bring the resource online. Be mindful that Linux path names are case sensitive. The mount path must already exist. You can add a mkdir command in the script for the mount point, or create the directory manually on each node before you allow the resource to fail over to other nodes. A sample script is available in Sample Generic LVM Resource Load Script.
#!/bin/bash
. /opt/novell/ncs/lib/ncsfuncs

# define the IP address
RESOURCE_IP=a.b.c.d
# define the file system type
MOUNT_FS=ext3
#define the volume group name
VOLGROUP_NAME=name
# define the device
MOUNT_DEV=/dev/$VOLGROUP_NAME/volume_name
# define the mount point
MOUNT_POINT=/mnt/mount_point

#activate the volume group
exit_on_error vgchange -a ey $VOLGROUP_NAME

# create the mount point on the node if it does not exist
ignore_error mkdir -p $MOUNT_POINT

# mount the file system
exit_on_error mount_fs $MOUNT_DEV $MOUNT_POINT $MOUNT_FS

# add the IP address
exit_on_error add_secondary_ipaddress $RESOURCE_IP

exit 0
-
Configure the unload script for the resource by replacing the variables with your own values, specify the value, then click .
The following is the default Generic_FS template unload script. The variable values must be specified before you bring the resource online. Be mindful that Linux path names are case sensitive. A sample script is available in Sample Generic LVM Resource Unload Script.
#!/bin/bash
. /opt/novell/ncs/lib/ncsfuncs

# define the IP address
RESOURCE_IP=a.b.c.d
# define the file system type
MOUNT_FS=ext3
#define the volume group name
VOLGROUP_NAME=name
# define the device
MOUNT_DEV=/dev/$VOLGROUP_NAME/volume_name
# define the mount point
MOUNT_POINT=/mnt/mount_point

# del the IP address
ignore_error del_secondary_ipaddress $RESOURCE_IP

# unmount the volume
sleep 10 # if not using SMS for backup, please comment out this line
exit_on_error umount_fs $MOUNT_DEV $MOUNT_POINT $MOUNT_FS

#deactivate the volume group
exit_on_error vgchange -a n $VOLGROUP_NAME

# return status

exit 0
-
Configure the monitor script for the resource by replacing the variables with your own values, specify the value, then click .
The following is the default Generic_FS template monitor script. Be mindful that Linux path names are case sensitive. The variable values must be specified before you bring the resource online. A sample script is available in Sample Generic LVM Resource Monitor Script.
#!/bin/bash
. /opt/novell/ncs/lib/ncsfuncs

# define the IP address
RESOURCE_IP=a.b.c.d
# define the file system type
MOUNT_FS=ext3
#define the volume group name
VOLGROUP_NAME=name
# define the device
MOUNT_DEV=/dev/$VOLGROUP_NAME/volume_name
# define the mount point
MOUNT_POINT=/mnt/mount_point

#check the logical volume
exit_on_error status_lv $MOUNT_DEV

# test the file system
exit_on_error status_fs $MOUNT_DEV $MOUNT_POINT $MOUNT_FS

# status the IP address
exit_on_error status_secondary_ipaddress $RESOURCE_IP

exit 0
-
On the Resource Policies page, view and modify the resource’s Policy settings:
-
(Optional) Select the check box if you want to ensure that the resource runs only on the master node in the cluster.
If the master node in the cluster fails, the resource fails over to the node that becomes the master.
-
(Optional) Select the check box if you don’t want the cluster-wide timeout period and node number limit enforced.
The quorum default values were set when you installed Novell Cluster Services. You can change the quorum default values by accessing the properties page for the Cluster object.
Selecting this box ensures that the resource is launched immediately on any server in the Preferred Nodes list as soon as any server in the list is brought online.
-
(Optional) By default, the Generic File System resource template sets the Start mode and Failover mode to and the Failback Mode to . You can change the default settings as needed.
-
Start Mode: If the Start mode is set to , the resource automatically loads on a designated server when the cluster is first brought up. If the Start mode is set to , you can manually start the resource on a specific server when you want, instead of having it automatically start when servers in the cluster are brought up.
-
Failover Mode: If the Failover mode is set to , the resource automatically moves to the next server in the Preferred Nodes list if there is a hardware or software failure. If the Failover mode is set to , you can intervene after a failure occurs and before the resource is started on another node.
-
Failback Mode: If the Failback mode is set to , the resource continues running on the node it has failed to. If the Failback mode is set to , the resource automatically moves back to its preferred node when the preferred node is brought back online. Set the Failback mode to to prevent the resource from moving back to its preferred node when that node is brought back online, until you are ready to allow it to happen.
-
-
Click .
-
-
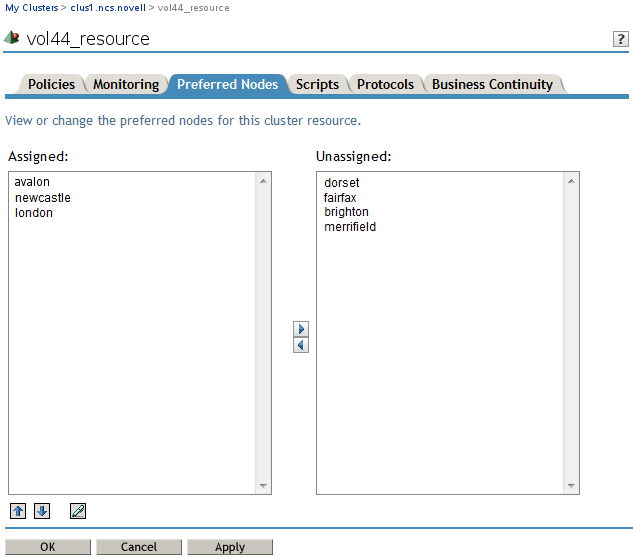
On the Preferred Nodes page, assign preferred nodes for the resource by moving them from the list to the list.
When you bring a resource online, it is automatically loaded on the most preferred node in the list. If the node is not available, the other nodes are tried in the order that they appear in the list. You can modify the order of the nodes by clicking the Edit (pen) icon to open the list a text editor. In the editor, click to close the editor.
-
Click .
Typically, the resource creation takes less than 10 seconds. However, if you have a large tree or if the server does not hold an eDirectory replica, the create time can take up to 3 minutes.
-
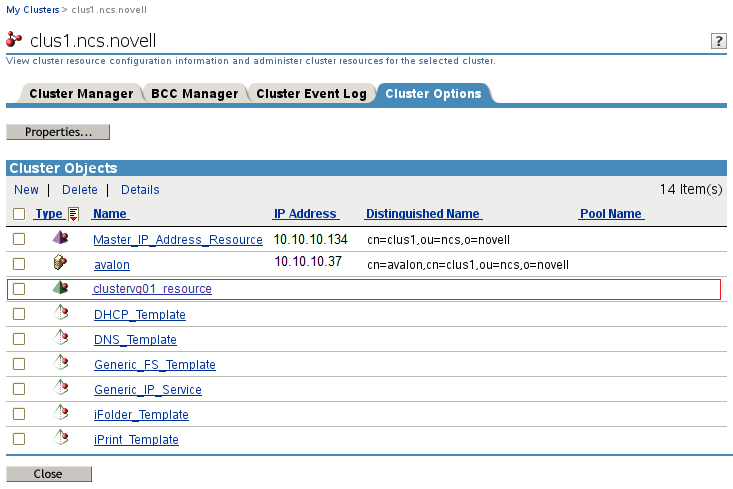
Verify that the resource was created by viewing its entry in the list on the Cluster Options page.
-
(Optional) Enable and configure resource monitoring:
Resource monitoring is disabled by default. Enable the monitoring function and modify the settings for the resource. For detailed information, see Section 11.7, Enabling Monitoring and Configuring the Monitor Script.
-
In iManager on the Cluster Manager page or Cluster Options page, select the resource name link to open its Properties dialog box, then select the tab.
-
Select the check box to enable resource monitoring for the selected resource.
-
Specify the to control how often you want the resource monitor script for this resource to run.
You can specify the value in minutes or seconds. See Polling Interval.
-
Specify the number of failures () for the specified amount of time ().
See Failure Rate.
-
Specify the by indicating whether you want the resource to be set to a comatose state, to migrate to another server, or to reboot the hosting node (without synchronizing or unmounting the disks) if a failure action initiates. The reboot option is normally used only for a mission-critical cluster resource that must remain available.
See Failure Action.
-
-
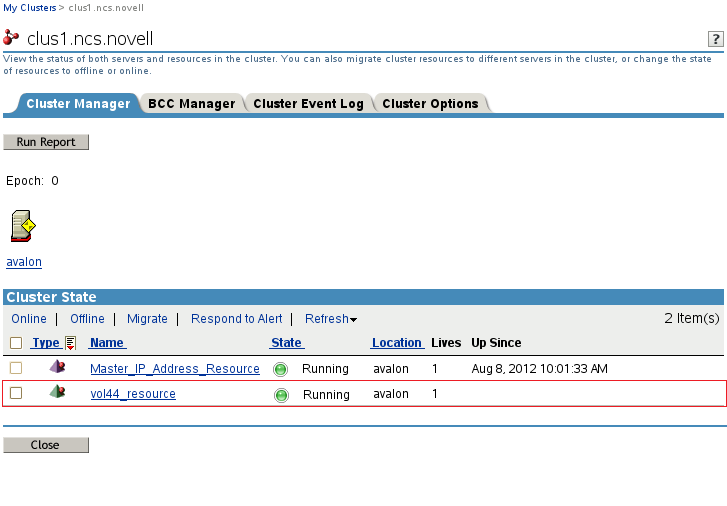
Bring the resource online:
-
Select > .
-
On the Cluster Manager page, select the check box next to the new CSM cluster resource, then click .
Ensure that the resource successfully enters the state. If the resource goes comatose instead, it is probably because you made an error when typing values in the script definitions. Typical issues are that the target LVM volume is still active locally on a node, the path names were not entered as case sensitive, the IP address is not unique in the network, or the mount path does not exist.
Take the resource offline, go to the resource’s > page to review and modify its scripts as needed to correct errors, then try again to online the resource.
-