6.2 Using Apache HTTP Server on OES Servers

When you set up OES services on the server, Novell-ready versions of Apache 2 HTTP Server software (Prefork, 64-bit) and Tomcat 6 are automatically installed. Apache and the OES Welcome website are automatically configured for non-secure port 80 and secure port 443. The Apache HTTP Server daemon (httpd2) starts automatically on server restart.

To set up personalized websites, you must manually create a virtual host configuration file for each website. Templates for secure SSL virtual host and non-secure virtual host configuration files are available in the /etc/apache2/vhosts.d/ directory. Use a text editor to create or modify the configuration files, then gracefully restart the Apache HTTP Server daemon (rcapache2 graceful) to apply the changes.

WARNING:Do not use the HTTP Server option in YaST to configure Apache or virtual host settings on an OES server. It overwrites essential OES settings for Apache and breaks the existing setup. For recovery information, see Section 6.4.1, Apache Server Errors after Using the HTTP Server Option in YaST.

6.2.1 Understanding the Default OES Setup of Apache HTTP Server

When you install services from the OES Add-On disk, the following Apache setup is configured:

Apache and Tomcat Installation

Novell-ready versions of Apache 2 HTTP Server software (Prefork, 64-bit) and Tomcat 6 are automatically installed when you set up OES services on a server.

Apache HTTP Server Configuration

OES configures Apache settings in the /etc/sysconfig/apache2 global configuration file and the /etc/apache2/conf.d/oes_httpd.conf configuration file.

The /etc/sysconfig/apache2 configuration file controls some global settings of Apache, such as modules to load, additional configuration files to include, server flags to apply when the Apache HTTP Server daemon (httpd2) is started, and flags that should be added to the command line.

Apache User wwwrun and Group www

Apache uses the user wwwrun identity to serve files to clients of your website. OES and Apache configure the following during the OES installation:

  • The Apache installation creates a local group www and user wwwrun on the server.

    You configure the user wwwrun as the file owner of the website’s main directory and files.

  • OES creates the group www and the user wwwrun in eDirectory when you install an OES server in an eDirectory tree for the first time. The user wwwrun is added as a member of the group www. The user novlxsrvd is also created and added to the group www.

  • OES enables the group www and its member users (wwwrun and novlxsrvd) for Linux with Linux User Management (LUM).

    If your website is hosted on an NSS volume or an NCP-enabled Linux volume, you must assign the eDirectory user wwwrun as a file system trustee of the website’s main directory, and give the trustee Read and File Scan rights.

For information about changing the file owner or configuring a file system trustee, see Section 6.2.7, Configuring Permissions for the Website DocumentRoot Directory.

Virtual Host for the OES Welcome Website

OES automatically configures the OES Welcome website in the /etc/opt/novell/httpd/conf.d/welcome-apache.conf file. Listening is set up on port 80 in the /etc/apache2/listen.conf file. Port 80 is opened in the firewall. The Apache HTTP Server daemon (httpd2) starts automatically on server restart.

Apache serves the Welcome page for the OES server at

http://<server_dns_or_ip_address>

Secure SSL Virtual Host for the Default Website

OES automatically configures a default secure virtual host (_default_:443) in the /etc/apache2/vhost.d/vhost-ssl.conf file. It sets up listening on port 443 in the /etc/apache2/listen.conf file. It opens port 443 in the firewall. The default virtual host configuration is automatically loaded first. It is also used when a domain name does not match a virtual host configuration. The default virtual host defines a custom log /var/log/apache2/ssl_request_log to capture events for SSL requests. An Include directive in the /etc/apache2/vhost.d/vhost-ssl.conf file automatically loads the virtual hosts that are defined in the /etc/opt/novell/httpd/sslconf.d/*.conf files.

Secure SSL Virtual Host for the Novell iManager Website

If you install Novell iManager on an OES server, the iManager installation automatically configures a secure virtual host for iManager and Novell Portal Services (NPS) in the /etc/opt/novell/iManager/nps-Apache.conf file. A symbolic link in the /etc/opt/novell/httpd/sslconf.d/ directory points to the nps-Apache.conf file. This allows the virtual host to be automatically included along with the default secure virtual host when Apache is restarted.

Aliases are defined in the nps-Apache.conf file to hit the website with any of the following URLs:

https://<server_dns_or_ip_address>/nps/iManager.html

https://<server_dns_or_ip_address>/nps

https://<server_dns_or_ip_address>/iManager.html

6.2.2 Manually Configuring Apache

On OES servers and Novell Open Workgroup Suite (NOWS) Small Business Edition (SBE) servers, you must manually configure Apache settings, OES virtual hosts, and virtual hosts for your personalized websites. Use a text editor to create or modify the configuration files, then gracefully restart the Apache HTTP Server daemon (rcapache2 graceful) to apply the changes.

WARNING:Do not use the HTTP Server option in YaST to manage Apache or the virtual host settings on an OES server. It overwrites essential OES settings for Apache and breaks the existing setup. For recovery information, see Section 6.4.1, Apache Server Errors after Using the HTTP Server Option in YaST.

For information about using the configuration files to manage your Apache HTTP Server and virtual hosts, see Configuring Apache Manually in the SLES 11 Administration Guide.

6.2.3 Creating and Configuring a Virtual Host for Each Website

On Linux, the Apache HTTP server can serve multiple universal resource identifiers (URIs) from a single instance of Apache running on the server. That is, multiple websites, such as www.example.com and www.example.net, can be run from a single web server. Each website is referred to as a virtual host. Virtual hosts can be name based, IP based, or port based.

You can set up personalized websites by manually creating a virtual host configuration file for each website. Templates for secure SSL virtual host and non-secure virtual host configuration files are available in the /etc/apache2/vhosts.d/ directory.

When you cluster-enable the web content by using Novell Cluster Services, use the IP address of the cluster resource for the virtual host. This ensures that the website traffic is directed to the cluster node where the web content cluster resource is currently active. Do not use the server node’s IP address or the master IP address of the cluster. Specify the Linux file path to the web content.

On OES servers, you create and configure a separate virtual host configuration file for each website that you want to host in the cluster. The following procedure provides basic information about setting up the file. Refer to other sections in this document to learn about the key settings that are available. For detailed information, see the Apache Virtual Host documentation website.

  1. Choose an OES node in the cluster, then log in as the root user.

  2. Create a copy of the virtual host template file in the /etc/apache2/vhosts.d/ directory.

    The /etc/apache2/vhosts.d/ directory contains a basic template (vhost.template) for a non-secure virtual host and an SSL template (vhost-ssl.template) for a secure virtual host.

  3. Rename the file with a name for your virtual host, and add the .conf file extension, such as mysite-Apache.conf.

  4. Open the virtual host file in a text editor and configure the virtual host settings for your personalized website:

    1. If the web content is clustered with Novell Cluster Services, set the VirtualHost directive to the IP address or DNS host name assigned to the cluster resource:

      <VirtualHost hostname>
      

      For example, if the DNS name is mysite.example.com, specify mysite as the VirtualHost.

      <VirtualHost mysite>
      
    2. Set the value of the DocumentRoot directive to the Linux path of the directory where you placed your web content, and specify the directory options for this location.

      The target directory must contain an index.html file, which is the root document for the virtual host. Specify the Linux path to the directory. For example, if you place your web content in an NSS volume path APACHEVOL:\www\mysite, the Linux path is /media/nss/APACHEVOL/www/mysite.

      DocumentRoot "/media/nss/APACHEVOL/www/mysite"
      
      <Directory  "/media/nss/APACHEVOL/www/mysite">
         # Possible options are "None", "All" or any combination of:
         # Indexes Includes FollowSymLinkx SymLinksifOwnerMatch ExecCGI MultiViews
      
         Options Indexes MultiViews
         AllowOverride None
         Order allow,deny
         Allow from all
      </Directory>
      
    3. Configure the host settings as desired for other directives in the file.

      The minimum settings for a non-secure website are shown in the following example:

      <VirtualHost mysite>
      
      DocumentRoot "/media/nss/APACHEVOL/www/mysite"
      
      ServerAdmin  mysite-admin@example.com
      ServerName   mysite.example.com
      
      ErrorLog     /var/log/apache2/error_log
      TransferLog  /var/log/apache2/access_log
      #CustomLog   /var/log/apache2/mysite.example.com-access_log combined
      
      
      HostnameLookups On
      
      UseCanonicalName On
      
      ServerSignature Off
      
      <Directory  "/media/nss/APACHEVOL/www/mysite">
         # Possible options are "None", "All" or any combination of:
         # Indexes Includes FollowSymLinkx SymLinksifOwnerMatch ExecCGI MultiViews
      
         Options Indexes MultiViews
         AllowOverride None
         Order allow,deny
         Allow from all
      </Directory>
      
      </VirtualHost>
      
      
    4. (Optional) Specify alias paths in the virtual host configuration file.

      For example, specify an alias for a Support web location that has a support directory at the same level as mysite. Include the Alias and Directory directives before the </VirtualHost> close tag.

      Alias /support "/media/nss/APACHEVOL/www/support"
      <Directory "media/nss/APACHVOL/www/support">
         Options Indexes MultiViews
         AllowOverride None
         Order deny,allow
         Allow from all
      </Directory>
      

      For information about alias paths that require LDAP authentication, see Section 6.2.8, Configuring a Web Location that Requires LDAP Authentication.

    5. Save the virtual host configuration file.

  5. (Optional) In the /etc/apache2/listen.conf file, add a Listen directive that specifies the IP address that you assigned to your cluster-enabled pool, and specify the port to use.

    OES configures Apache to listen on non-secure port 80 by default. It listens for all traffic.

  6. Make the websites visible on your network or to the world:

    1. Add the site name and IP address resolution to your DNS server to make them visible.

    2. If you use a non-standard port, open the port in the node’s firewall.

    3. If the traffic is from outside the firewall, open the port in the network firewall.

  7. Gracefully restart the Apache HTTP Server daemon to apply the virtual host configuration:

    rcapache2 graceful
    

    Each .conf file is automatically included in the Apache configuration when you restart Apache.

  8. Set up the virtual host for each of the remaining nodes:

    1. Log in to the next node as the root user.

    2. Copy the virtual host configuration file (such as /etc/apache2/vhosts.d/mysite-apache.conf) to the next node.

    3. Create a local Linux path to the website that you specified in the DocumentRoot directive and to any paths you specified in Alias directives, then make the user wwwrun the owner of the directory and its contents.

      When Apache is started or restarted, it looks for the paths specified in your website’s virtual host configuration file. If a path does not exist, Apache reports an error but it loads the virtual host. Users access the site via the IP address or DNS name of the cluster resource, so web content is served only on the node where the resource is active.

      When a cluster resource is not active on a node, the volume subdirectory (such as APACHEVOL) in the /media/nss directory is normally removed, and the path to the website does not exist. Creating the local path allows Apache to find the path even when the resource is not active on the node, and no error is reported when Apache loads. When the resource is taken offline, NSS does not remove the volume directory because it is now non-empty (it contains the local paths you create). The local path should not contain files. To add or remove web content files, access the NSS volume via the IP address of the cluster resource.

      Enter the following commands for the website path and alias paths. The chown command changes the group to the Apache www group unless the group is the root user.

      mkdir -p /media/nss/<volume_name>/<path>
      
      chown wwwrun:www /media/nss/<volume_name>/<path>
      

      For example, enter

      mkdir -p /media/nss/APACHEVOL/www/mysite
      
      chown wwwrun:www /media/nss/APACHEVOL/www/mysite
      
      mkdir -p /media/nss/APACHEVOL/www/support
      
      chown wwwrun:www /media/nss/APACHEVOL/www/support
      
      
    4. Open a terminal console as the root user, then gracefully restart Apache:

      rcapache2 graceful
      
    5. Repeat these steps on each of the remaining nodes in turn.

IMPORTANT:Any time that you make changes to the virtual host configuration file, you must copy the modified file to every node in the cluster, and gracefully restart Apache on each node.

6.2.4 Requiring Strong Ciphers

We recommend that you secure your web solution by requiring strong ciphers when the client is negotiating the connection in the SSL handshake.

In OES 11 SP1 and later servers, the weak SSL ciphers are disabled by default in the /etc/apache2/vhosts.d/vhost-ssl.conf file:

# SSL Cipher Suite:
SSLCipherSuite ALL:!aNULL:!eNULL:!SSLv2:!LOW:!EXP:!MD5:@STRENGTH

On OES 11 and earlier servers, we recommend that you enable only the strongest ciphers: RSA, HIGH, and SSLv2.

To enable strong ciphers and disable weak ciphers in OES 11 and earlier:

  1. In a text editor, modify the /etc/apache2/vhosts.d/vhost-ssl.conf file to require strong ciphers. Modify the default settings by placing a plus sign (+) before RSA, HIGH, and SSLv2, and placing an exclamation mark (!) before the weaker ciphers:

    # SSL Cipher Suite:
    SSLCipherSuite ALL:!ADH:!EXPORT56:RC4+RSA:+HIGH:!MEDIUM:!LOW:+SSLv2:!EXP:!eNULL
    
  2. Gracefully restart Apache on the server:

    rcapache2 graceful
    
  3. Repeat this process on every Linux node in the cluster.

    You can alternatively copy the Apache SSL configuration file (/etc/apache2/vhosts.d/vhost-ssl.conf) to every Linux node in the cluster, and then restart Apache.

6.2.5 Configuring an SSL Certificate for the Server

OES automatically configures secure SSL communications for a default virtual host (_default_:443). SSL is enabled in the Apache global configuration file (/etc/sysconfig/apache2) with the following directive:

APACHE_SERVER_FLAGS="SSL"

The default SSL configuration is defined in the /etc/apache2/vhosts.d/vhost-ssl.conf file. It uses an INCLUDE directive for the /etc/opt/novell/httpd/sslconf.d/*.conf files. This target directory contains the configuration files (or symbolic links to them) for OES virtual hosts that require SSL, such as the nps-Apache.conf file that is used for the Novell iManager tool.

By default, OES sets up an SSL certificate file and key file for the server by using certificates generated with the eDirectory Server Certificates service in NetIQ Certificate Server. Table 6-1 identifies the location of the SSL certificate and key files that are referenced by the SSLCertificateFile and SSLCertificateKeyFile directives in the /etc/apache2/vhosts.d/vhost-ssl.conf file.

Table 6-1 Default OES Server Certificates

OES Server Certificate File

Location

SSL Certificate File

/etc/ssl/servercerts/servercert.pem

SSL Certificate Key File

/etc/ssl/servercerts/serverkey.pem

IMPORTANT:If you use SSL, set up a server certificate for each virtual host unless you use a wildcard certificate.

If you modify the content or location of the certificate and key files, gracefully restart the Apache HTTP Server daemon (rcapache2 graceful) to apply the new values.

6.2.6 Configuring Apache to Listen on Multiple Ports

The Listen directive in the /etc/apache2/listen.conf file tells the Apache HTTP Server to accept incoming requests on the specified port or an address-and-port combination. If the directive specifies only a port, the server listens to the given port on all interfaces. If the directive specifies an IP address and port combination, the server listens on the given port and network interface.

By default, OES configures Apache to listen on non-secure port 80 and secure port 443 in the /etc/apache2/listen.conf file. If a firewall is used on the server, port 80 and port 443 are automatically opened in the firewall. The ports are not bound to a particular IP address, so Apache responds to requests on all IP interfaces on the server.

Listen 80


<IfDefine SSL>
    <IfDefine !NOSSL>
  <IfModule mod_ssl.c>

      Listen 443

  </IfModule>
    </IfDefine>
</IfDefine>

You can configure multiple Listen directives to specify multiple IP addresses and ports. The server responds to requests from any of the listed addresses and ports. For information about formats and options for the Listen directive, see the Listen Directive in the Apache MPM Common Directives collection.

If you configure non-standard ports for your personalized websites, you must add a Listen directive in the /etc/apache2/listen.conf file, then gracefully restart the Apache HTTP Server daemon (rcapache2 graceful) to apply the changes. Ensure that you open the port in the firewall.

6.2.7 Configuring Permissions for the Website DocumentRoot Directory

Apache uses the user wwwrun identity to serve files to clients of your website. You must configure permissions for the website content that allow Apache to serve the files to client users.

Setting the User wwwrun as the Owner of the Website’s Directory and Files

The user wwwrun must be the file owner of the website’s main directory and files.

  1. Log in as the root user, and open a terminal console.

  2. Change directory to go to the directory that contains the main directory of your website. This is the directory you specify as the DocumentRoot in the virtual host configuration file.

    For example, if the DocumentRoot is /media/nss/APACHEVOL/www/mysite, enter

    cd /media/nss/APACHEVOL/www
    
  3. Change the owner of the website’s directory and files to user wwwrun. Enter:

    chown -R wwwrun:www mysite
    

    This recursively modifies the owner to user wwwrun for the directory and the subdirectories and files it contains. It changes the group to www unless the group is set to the root user.

  4. In a file browser, view the directory’s properties to verify that the owner was changed.

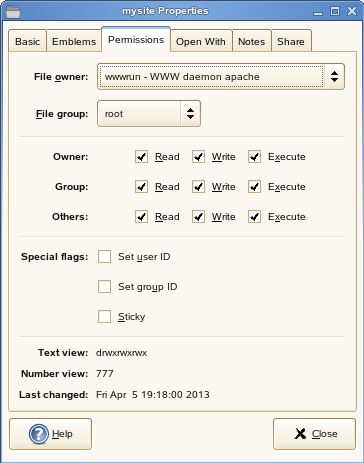
    You can also use the ls -al <path> command to list the directory and view the owner, group, and permissions.

Setting User wwwrun as a File System Trustee of the Website’s Directory

OES automatically creates the user wwwrun and group www in eDirectory. Both are LUM-enabled. You can verify their configuration by using the Directory Administration option and Linux User Management option in Novell iManager.

If your website is hosted on an NSS volume or an NCP-enabled Linux volume, you must assign the eDirectory user wwwrun as a file system trustee of the website’s main directory, and give the trustee Read and File Scan rights. You can also set the www group as a trustee with Read and File Scan rights.

  1. Log in to Novell iManager as an administrator user.

  2. In the iManager toolbar, click the View Objects icon.

  3. In the Tree view, select the volume, then browse the file system to locate the directory that contains your website’s content.

  4. Select the check box next to the directory, then select
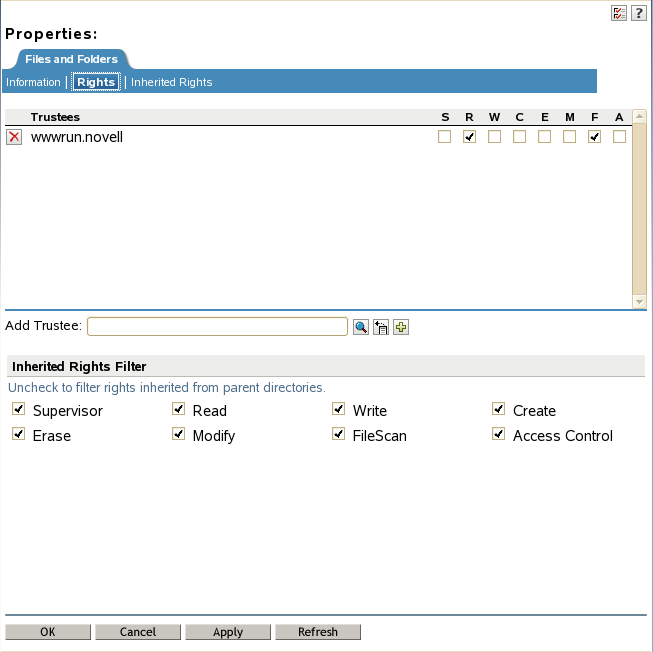
 Actions > Properties.

  5. On the Properties page, select Rights.

  6. Click the Add Trustee browse icon to open the Object Selector.

  7. Locate and select the user wwwrun, then click OK.

    The user wwwrun is added as a trustee with the default Read and File Scan rights.

  8. Click Apply or OK to save the changes.

6.2.8 Configuring a Web Location that Requires LDAP Authentication

If you have documents or a location that requires restricted web access, you can set up Apache to enforce eDirectory authentication and force the authentication to be done over https. This solution can be used on individual directories, URLs, or the entire Apache server.

The following example creates a single secure location so that any document that is referenced under the directory requires authentication. For example, the URL www.example.com can have public access, while the URL www.example.com/secure and documents it contains require authentication. Authentication should be done over a secure connection (https) rather than a non-secure connection (http). All http attempts are redirected to https for the given location.

  1. Ensure that the rewrite module is enabled in the /etc/sysconfig/apache2 global configuration file. OES enables this module by default.

    Open the /etc/sysconfig/apache2 file in a text editor, and verify that rewrite is listed in the modules defined in the APACHE_MODULES directive.

  2. Configure the permissions for the user wwwrun on the target directory:

    1. Change the owner to the Apache user wwwrun:

      chown -R wwwrun:www /media/nss/APACHEVOL/www/secure
      

      This changes the group to the Apache group www unless the group is the root user.

    2. For an NSS volume or an NCP-enabled Linux volume, configure the user wwwrun as a file system trustee of the /media/nss/APACHEVOL/www/secure directory, and give the trustee Read and File Scan rights.

      See Setting User wwwrun as a File System Trustee of the Website’s Directory.

  3. In a text editor, create a copy of the /etc/apache2/vhosts.d/vhosts-ssl.template file to create a secure.conf configuration file.

  4. Allow for all http requests for the /secure alias to be redirected to https. Add the following directives to the secure.conf file:

    RewriteEngine On
    
    RewriteRule ^/secure https://%{SERVER_NAME}/secure [L,R]
    
  5. If the location that contains secure information exists outside the DocumentRoot directory, create an alias to the directory. Add the following line to the secure.conf file:

    Alias /secure "/<path_to_directory>/secure"
    

    For a cluster resource, the secure directory ideally resides on the same clustered volume as the website, and at the same directory level as DocumentRoot for the website:

    Alias /secure "/media/nss/APACHEVOL/www/secure"
    
  6. Under the Alias directive, add the option for LDAP authentication under the Directory directive in the secure.conf file. Specify the IP address or DNS name of the website’s cluster resource.

    <Directory "media/nss/APACHVOL/www/secure">
      Options Indexes MultiViews
      AllowOverride None
      Order deny,allow
      Allow from all
      AuthType Basic
      AuthName "Protected"
      require valid-user
      AuthLDAPAuthoritative On
      AuthLDAPURL ldaps://<cluster_resource_ip_address_or_dns_name>/o=corp?uid?sub
    </directory>
    
  7. Save the /etc/apache/vhosts.d/secure.conf file.

  8. Open a terminal console as the root user, then gracefully restart the Apache daemon:

    rcapache2 graceful
    
  9. Verify that Apache is able to start.

    If there are errors, make corrections in the configuration file, then restart the Apache daemon.

  10. In a web browser, go to the website with http and verify that you are redirected to https, and that you can authenticate against the /secure alias.

6.2.9 Starting, Stopping, or Restarting the Apache Daemon

The Apache HTTP Server program runs as a daemon (httpd2) that executes continuously in the background to handle requests. OES configures the daemon to start automatically on system restart. You must restart Apache to apply any changes you make to the Apache or virtual host configuration files, or to add new virtual host configuration files. A graceful restart does not disrupt the service.

In a cluster, you manually copy the virtual host configuration files for clustered personalized websites to every node in the cluster. When Apache starts on each node, it reads the configuration file and is available to serve the site when the resource is active on the node. You do not add Apache commands in the resource’s load and unload scripts. All requests to a clustered website are sent to the DNS name or IP address of the cluster resource, and not to a specific node. The site’s requests are served by the Apache process that runs on the node where the cluster resource is currently active.

To start, stop, or restart the Apache daemon, use the /usr/sbin/rcapache2 commands in Table 6-2:

Table 6-2 /usr/sbin Commands

Command

Description

rcapache2 start

Starts the httpd2 parent process. The parent process reads its configuration files and opens log files, and then spawns the child processes to serve hits.

OES configures the Apache daemon to start automatically on server restart.

rcapache2 stop

Causes the parent process to immediately attempt to kill all of its child processes. This can take several seconds. The parent exits after all child processes have exited. Any requests in progress are terminated, and no further requests are served.

rcapache2 graceful-stop

Causes the parent process to advise its child processes to exit after their current request (or to exit immediately if they are not serving anything). The parent removes its PID file and ceases listening on all ports. The parent continues to run, and monitors child processes that are handling requests. The parent exits after the child processes complete the pending requests and exit, or when a timeout period has elapsed (as specified by the GracefulShutdownTimeout). If the timeout is reached, any remaining child processes are automatically sent the TERM signal to force them to exit, and any requests in progress are terminated.

rcapache2 restart

Causes the parent process to immediately kill its child processes like the stop option, but the parent does not exit. It re-reads its configuration files, and re-opens any log files. Then it spawns a new set of child processes and continues serving hits.

rcapache2 graceful

Causes the parent process to advise the child processes to exit after their current request (or to exit immediately if they are not serving anything). The parent re-reads its configuration files and re-opens its log files. As each child dies, the parent replaces it with a child from the new generation of the configuration, which begins serving new requests immediately.

6.2.10 Viewing the Apache Log Files

The following Apache log files are located in the /var/log/apache2/ directory:

  • access_log
  • error_log
  • rcapache2.out
  • rewrite_log
  • ssl_request_log

You can also specify custom logs by adding the CustomLog directive to your virtual host configuration file. For information about formatting the custom log, see Apache Module mod_log_config.